This tutorial uses PassportJS to authenticate the NodeJS App with MySQL Database Management Software (DBMS). The reason for this article is just simple. While i was studying web development i was faced with a challenge when i was working on my second project to integrate PassportJS Authentication into my app. At that time i was using MySQL for database management, SequelizeJS which is an Object Relation Mapper(ORM) for SQL-based databases, in this case MySQL, ExpressJS middleware, Body Parser and Express Session for server and session management. The difficulty was that i could only find tutorials that used Handlebars as the ORM and MongoDB as the DBMS which at that time, i was not that familiar with so if you find yourself at this crossroad this is for you. I will not waste your time but dive into it right away. I will be as literal as i can possibly be so even the least knowledged in web development can understand. We will need to make a few things ready for this setup. I am using a Windows Pc so please find a workaround if anything i say does not work for your OS especially my recommendations but the process is the same i believe.
First of all you will need to have a computer with your favorite text editor (I used VS Code), a web browser (I recommend Google Chrome), your favorite terminal (Git Bash recommended) and a SQL DBMS of your choice. I am using MySQL Workbench 6.3 CE. I will go through the steps in a list so it is easy to follow. When you have all the above, and properly set up, follow the instructions below. I am assuming you already have your database created, if not I will take you through.
- Create a folder on your computer in any location of your choice. I prefer to navigate to my preferred location using my terminal and then typing
mkdir nameOfProject. I will create the folder learningPassportJSon my desktop for this tutorial. Next is to type cd nameOfProject to navigate into the project folder.

- In the terminal we will have to initialize the folder to handle all our NodeJS framework. You can decide to do this later on but i recommend you doing this first if you are new to this process. Do this by typing
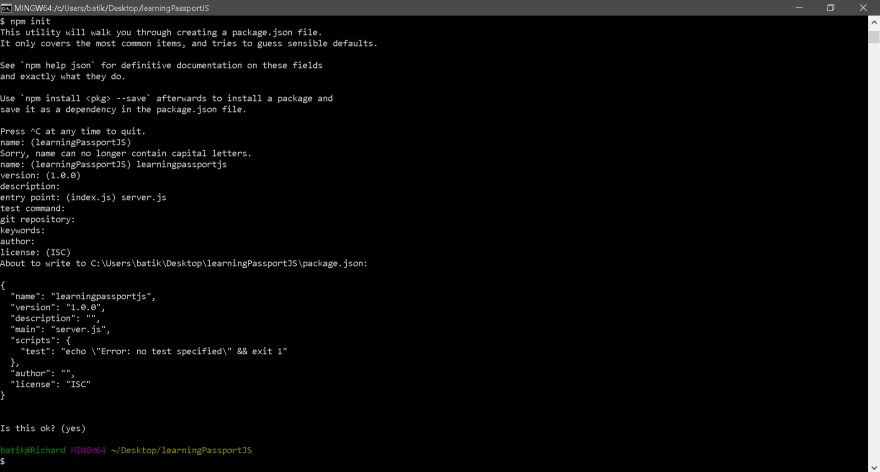
npm initand press enter. This sets up your project with a package.json file. This file will contain the information including all the expected dependencies and licenses as well as your name. For our purpose i will just keep pressing enter on my keyboard to load defaults but I will set the entry point as server.js. Feel free to change it to what pleases you. Please make sure you have lowercase letters in your texts or you will have to type them yourself.
- After we have initialized our project we will create our server.js file with
touch server.json the terminal. - Let us now install all the dependencies we will require. I will explain why we need each one later but i like to install all to get it out of the way. You can always install them later but you need them to run the app successfully. Install them in one line as
npm i --save sequelize passport passport-local mysql2 mysql express express-session body-parser bcrypt-nodejsor you can choose to install them individually as
npm i --save sequelize
npm i --save passport
npm i --save passport-local
npm i --save mysql2
npm i --save mysql
npm i --save express
npm i --save express-session
npm i --save body-parser
npm i --save bcryptjs
Adding --save makes sure your dependency is added and saved to your package.json file. This is important if you want to deploy this app. You will realize a new folder called node_modules. Do not touch this. This is what node uses to run the app locally on your computer. If you are using Git for your project do not forget to add node_modules to your .gitignore file in your project’s root folder.
Thanks to the contribution from Jordan White, I think it is worth to mention that you must have Sequelize CLI installed before you can use sequelize. Do this by running npm install -g sequelize-cli from your preferred terminal to install it globally or you can remove -g to have it installed locally.
Open the server.js file created in your favorite terminal and input a few lines of code in our server.js file. Don’t worry, I will have a horse-load of comments on all the codes so it is easy to understand why i wrote each line. You can copy the code below into your server file.
// Requiring necessary npm middleware packages
var express = require("express");
var bodyParser = require("body-parser");
var session = require("express-session");
// Setting up port
var PORT = process.env.PORT || 8080;
// Creating express app and configuring middleware
//needed to read through our public folder
var app = express();
app.use(bodyParser.urlencoded({ extended: false })); //For body parser
app.use(bodyParser.json());
app.use(express.static("public"));
//
//we are doing a GET to test if our server is working fine
app.get('/', function(req, res) {
       res.send('Welcome to Passport with Sequelize and without HandleBars');
});
//
//this will listen to and show all activities on our terminal to
//let us know what is happening in our app
app.listen(PORT, function() {
    console.log("App listening on PORT " + PORT);
  });
Save the server file. Let us run the server to make sure it is working properly. Do this by typing npm start or node server.js in your terminal. You remember the entry point when we run npm init? This is what is called when you run npm start.
If you followed the instruction well up to this point you should see the following

Open your browser and enter the location localhost:8080. This will display Welcome to Passport with Sequelize and without HandleBars. Great Job!! on getting this far. You are on your way to creating your app. If you don’t see that page look up the steps from the beginning. You can end the server and go back to your code.
- I assumed from the beginning you might have already created your database. If you have not and or do not know how to go about this do not worry. Just open your MySQL program of choice and from the query shell enter
CREATE DATABASE passport_demo;and run it. You should have a database created with name passport_demo. - Now that we have our server and database working it is time to add the other parts. We will configure and initialize our sequelize module. Do this by typing
sequelize init:models & sequelize init:configon your terminal and press enter. - After this code runs, you should see two folders models and config.
- Open the config folder and you should see a config.json file. Open it and edit the development object’s settings to match yours. If you have a password on your database enter it here in quotes. Example is below
{
  "development": {
    "username": "root",
    "password": "yourpassword",
    "database": "passport_demo",
    "host": "127.0.0.1",
    "dialect": "mysql"
  },
  "test": {
    "username": "root",
    "password": null,
    "database": "database_test",
    "host": "127.0.0.1",
    "dialect": "mysql"
  },
  "production": {
    "username": "root",
    "password": null,
    "database": "database_production",
    "host": "127.0.0.1",
    "dialect": "mysql"
  }
}
Navigate back and open the models folder. You should see an index.js file. This should be unchanged for our tutorial but if you have your config folder in a different location you can open it and edit Line 8 from Col 37 to route to your location because it will need the config.json file to work.Some Windows PCs will also throw an error that it couldn’t find the config module. change the backslashes on that to forward slashes to fix that error.
- In the models folder create a new file called user.js. This is going to insert our user information to the database using sequelize. You can have multiple model files depending on your needs. The models folder should contain the various table inserts that you make in the database.In this tutorial we want a user model. We will require the bcryptjs package to encrypt and decrypt the password that the user creates or logs in with. Your user.js file should look like this
// Requiring bcrypt for password hashing. Using the bcryptjs version as
//the regular bcrypt module sometimes causes errors on Windows machines
var bcrypt = require("bcryptjs");
//
// Creating our User model
//Set it as export because we will need it required on the server
module.exports = function(sequelize, DataTypes) {
  var User = sequelize.define("User", {
    // The email cannot be null, and must be a proper email before creation
    email: {
      type: DataTypes.STRING,
      allowNull: false,
      unique: true,
      validate: {
        isEmail: true
      }
    },
    // The password cannot be null
    password: {
      type: DataTypes.STRING,
      allowNull: false
    }
  });
  // Creating a custom method for our User model.
  //This will check if an unhashed password entered by the
  //user can be compared to the hashed password stored in our database
  User.prototype.validPassword = function(password) {
    return bcrypt.compareSync(password, this.password);
  };
  // Hooks are automatic methods that run during various phases of the User Model lifecycle
  // In this case, before a User is created, we will automatically hash their password

  User.hook("beforeCreate", function(user) {
    user.password = bcrypt.hashSync(user.password, bcrypt.genSaltSync(10), null);
  });
  return User;
};

//This is a fix by Samaila Philemon Bala in case you want to use ES6
//and the above is not working

//User.beforeCreate(user => {
  //  user.password = bcrypt.hashSync(
    //  user.password,
      //bcrypt.genSaltSync(10),
      //null
    //);
  //});
- Let us go back to our server.js file and add a few lines of code. We will need to require the server to read the models folder and we will also need it to sync our inserts and reads to the database. Your server.js should look like this
// Requiring necessary npm middleware packages
var express = require("express");
var bodyParser = require("body-parser");
var session = require("express-session");
// Setting up port
var PORT = process.env.PORT || 8080;
//Import the models folder
var db = require("./models");
//
// Creating express app and configuring middleware
//needed to read through our public folder
var app = express();
app.use(bodyParser.urlencoded({ extended: false })); //For body parser
app.use(bodyParser.json());
app.use(express.static("public"));
//
//we are doing a GET to test if our server is working fine
app.get('/', function(req, res) {
       res.send('Welcome to Passport with Sequelize and without HandleBars');
});
//
//this will listen to and show all activities on our terminal to
//let us know what is happening in our app
// Syncing our database and logging a message to the user upon success
db.sequelize.sync().then(function() {
  app.listen(PORT, function() {
    console.log("==> 🌎  Listening on port %s. Visit http://localhost:%s/ in your browser.", PORT, PORT);
  });
});
- Now let us navigate to the config folder and create another folder called middleware and inside that folder create a file called isAuthenticated.js. You should have
/config/middleware/isAuthenticated.js. Open and edit the isAuthenticated.js file to match this
// This is middleware for restricting routes a user is not allowed to visit if not logged in
module.exports = function(req, res, next) {
  // If the user is logged in, continue with the request to the restricted route
  if (req.user) {
    return next();
  }
  // If the user isn't' logged in, redirect them to the login page
  return res.redirect("/");
};
This will be exported also and we will need this to restrict access to pages meant for logged in users only.
- It is time to set up passport. In the config folder create a file called passport.js. Open the file and input the following in the file. The comments explain it all.
//we import passport packages required for authentication
var passport = require("passport");
var LocalStrategy = require("passport-local").Strategy;
//
//We will need the models folder to check passport agains
var db = require("../models");
//
// Telling passport we want to use a Local Strategy. In other words,
//we want login with a username/email and password
passport.use(new LocalStrategy(
  // Our user will sign in using an email, rather than a "username"
  {
    usernameField: "email"
  },
  function(email, password, done) {
    // When a user tries to sign in this code runs
    db.User.findOne({
      where: {
        email: email
      }
    }).then(function(dbUser) {
      // If there's no user with the given email
      if (!dbUser) {
        return done(null, false, {
          message: "Incorrect email."
        });
      }
      // If there is a user with the given email, but the password the user gives us is incorrect
      else if (!dbUser.validPassword(password)) {
        return done(null, false, {
          message: "Incorrect password."
        });
      }
      // If none of the above, return the user
      return done(null, dbUser);
    });
  }
));
//
// In order to help keep authentication state across HTTP requests,
// Sequelize needs to serialize and deserialize the user
// Just consider this part boilerplate needed to make it all work
passport.serializeUser(function(user, cb) {
  cb(null, user);
});
//
passport.deserializeUser(function(obj, cb) {
  cb(null, obj);
});
//
// Exporting our configured passport
module.exports = passport;
- For our app to work as expected we need to be able to GET and POST to our database. Example of this is the
app.getcode block we placed in the server.js file. Let us write a clean code. Create a folder in your root folder called routes and also create two files called api-routes.js and html-routes.js. The api-routes.js will be used to routeGETandPOSTfrom and to the database. open the api-routes.js and paste the following. The comments explain it all.
// Requiring our models and passport as we've configured it
var db = require("../models");
var passport = require("../config/passport");
//
module.exports = function(app) {
  // Using the passport.authenticate middleware with our local strategy.
  // If the user has valid login credentials, send them to the members page.
  // Otherwise the user will be sent an error
  app.post("/api/login", passport.authenticate("local"), function(req, res) {
    // Since we're doing a POST with javascript, we can't actually redirect that post into a GET request
    // So we're sending the user back the route to the members page because the redirect will happen on the front end
    // They won't get this or even be able to access this page if they aren't authed
    res.json("/members");
  });
//
  // Route for signing up a user. The user's password is automatically hashed and stored securely thanks to
  // how we configured our Sequelize User Model. If the user is created successfully, proceed to log the user in,
  // otherwise send back an error
  app.post("/api/signup", function(req, res) {
    console.log(req.body);
    db.User.create({
      email: req.body.email,
      password: req.body.password
    }).then(function() {
      res.redirect(307, "/api/login");
    }).catch(function(err) {
      console.log(err);
      res.json(err);
      // res.status(422).json(err.errors[0].message);
    });
  });
//
  // Route for logging user out
  app.get("/logout", function(req, res) {
    req.logout();
    res.redirect("/");
  });
//
  // Route for getting some data about our user to be used client side
  app.get("/api/user_data", function(req, res) {
    if (!req.user) {
      // The user is not logged in, send back an empty object
      res.json({});
    }
    else {
      // Otherwise send back the user's email and id
      // Sending back a password, even a hashed password, isn't a good idea
      res.json({
        email: req.user.email,
        id: req.user.id
      });
    }
  });
};
Let us leave the html-routes.js for now. We will come back to it. We will need it to handle login and serve our pages.
- On the server.js file we will need to import and initialize passport. Make sure your express is initialized before passport as passport requires express. The markup in the server is very important. I will also remove the
app.getcode block since we don’t need it. Your server file should look like the below
// Requiring necessary npm packages
var express = require("express");
var bodyParser = require("body-parser");
var session = require("express-session");
// Requiring passport as we've configured it
var passport = require("./config/passport");
//
// Setting up port and requiring models for syncing
var PORT = process.env.PORT || 8080;
var db = require("./models");
//
// Creating express app and configuring middleware needed for authentication
var app = express();
app.use(bodyParser.urlencoded({ extended: false }));
app.use(bodyParser.json());
app.use(express.static("public"));
// We need to use sessions to keep track of our user's login status
app.use(session({ secret: "keyboard cat", resave: true, saveUninitialized: true }));
app.use(passport.initialize());
app.use(passport.session());
//
// Requiring our routes
require("./routes/html-routes.js")(app);
require("./routes/api-routes.js")(app);
//
// Syncing our database and logging a message to the user upon success
db.sequelize.sync().then(function() {
  app.listen(PORT, function() {
    console.log("==> 🌎  Listening on port %s. Visit http://localhost:%s/ in your browser.", PORT, PORT);
  });
});
Note that we are requiring html-routes also. The Next step is to create our user interface (UI) to be able to capture the user’s information for signing in and or logging in. This will be the regular html files we usually create with its css and js files but this time it will be placed in a public folder. This is the folder express will use and parse from. If you are conversant with POSTMAN you can test the server using it at this point.
- I created a sample public folder with its files in it. which is what i will be using for this tutorial. Download it from Mediafire and unzip into the root folder.
- Take a look at the html files in the public folder. You will see that I captured the signup, login, and members page
GETs usingAPIs. This way we can pass it to the server with ease. - Now open the html-routes.js and paste the following code
// Requiring path to so we can use relative routes to our HTML files
var path = require("path");
//
// Requiring our custom middleware for checking if a user is logged in
var isAuthenticated = require("../config/middleware/isAuthenticated");
//
module.exports = function(app) {
//
  app.get("/", function(req, res) {
    // If the user already has an account send them to the members page
    if (req.user) {
      res.redirect("/members");
    }
    res.sendFile(path.join(__dirname, "../public/signup.html"));
  });
//
  app.get("/login", function(req, res) {
    // If the user already has an account send them to the members page
    if (req.user) {
      res.redirect("/members");
    }
    res.sendFile(path.join(__dirname, "../public/login.html"));
  });
//
  // Here we've add our isAuthenticated middleware to this route.
  // If a user who is not logged in tries to access this route they will be
  //redirected to the signup page
  app.get("/members", isAuthenticated, function(req, res) {
    res.sendFile(path.join(__dirname, "../public/members.html"));
  });
};
Save all files and then run the server with npm start or node server.js. If your server fails check the error on your terminal and go over everything from this tutorial. Take a look at */public/js/members.js* and you will be able to understand what you need in order to get the user information. Sequelize automatically creates an id for a user so you can use it to handle associations on other tables in the database.
If for example you are looking to authenticate on a classified website all you will have to make sure is to have a model such as posting to insert into database, api route to do the post, html route to GET page before and after Post to the database. Always make sure you pass isAuthenticated on any html route that you do not want the user to access without logging in. isAuthenticated will always check for access if used.
I hope my very literal explanation is able to help you figure out your authentication without the use of handlebars or MongoDB.
#node-js
