Mulesoft plugin to support SonarQube:
Follow the below steps:
1: SonarQube on-prem installation should be available.
2: If required, create organization and configure it into maven’s settings.xml file as below.
XML
1
<profile>
2
<id>sonar</id>
3
<activation>
4
<activeByDefault>true</activeByDefault>
5
</activation>
6
<properties>
7
<!-- Optional URL to server. Default value is http://localhost:9000 -->
8
<sonar.host.url>http://localhost:9000</sonar.host.url>
9
</properties>
10
<repositories>
11
<repository>
12
<id>MuleRepository</id>
13
<name>Exchange Repository</name>
14
<url>https://maven.anypoint.mulesoft.com/api/v2/<organizationkey>/maven</url>
15
<layout>default</layout>
16
</repository>
17
</repositories>
My sonar is available on “http://localhost:9000”. As I have not created any organization, none of the organization and its credentials are configured here.
3: Download the MuleSoft plugin binary from the below location.
4: Now execute the below command and create a jar file as a plugin to add in sonar
mvn clean package sonar-packaging:sonar-plugin -Dlanguage=mule
Once the plugin is created, copy the jar file in sonar’s plugin folder (sonar-home/extensions/plugins).
Restart the Sonar instance after the same.
5: Once the plugin is copied in the plugin folder, copy the rules files in the same plugin folder.
And restart sonar once again. (Safer side to reflect changes in UI.)
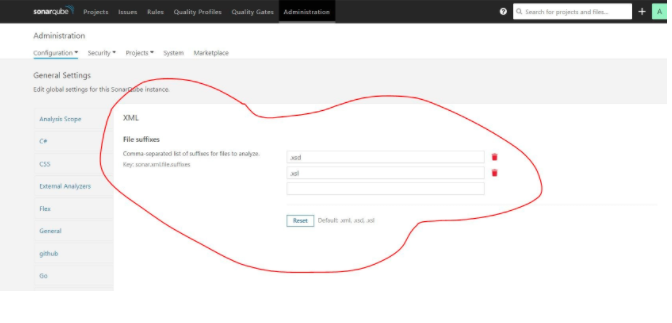
6: Once it is done, go to Default/Particular created organization in SonarQube->Administration -> Quality Profiles and delete the XML file extension from the rule.
7: Once it is done, refresh the page, and you will be able to see the Mule plugin in quality profiles. By default, it will set the MuleSoft 4 rule, and based on the project, it can be configured for MuleSoft 3 from the drop-down.
Now we’re ready to execute the command.
Let’s create a sample MuleSoft application:
Created one sample application: MuleSoft4 sample application
And now, execute the command to scan mu code with the defined rule in the MuleSoft plugin tool.
command: /root/apache-maven-3.6.3/bin/mvn sonar:sonar test -Dsonar.host.url=http://localhost:9000 -Dsonar.sources=src/
You can change commands based on your requirements.
Here is the resultant SonarQube’s dashboard:

#tutorial #integration #mulesoft #mule 4 #code coverage #munit #anypoint mulesoft #sonar qube
