This guide will be a detailed explanation to **Build a Multiplayer Turn-Based Game with Socket.io and React - THE RIGHT WAY. **This will cover both creating the server-side of your project using ExpressJS and client-side using ReactJS
Why another tutorial?
This is very important to clarify. There are tons of guides online focusing on “Getting started with socket.io” and it gets more frustrating when all of them are chat apps. But here we will focus on “Getting started with building a scalable project using Socket.io”, which is not a chat app :).
This guide will explain more about the Code Infrastructure rather than focusing on UI/UX. So bear with me if UI doesn’t look so appealing.
What is socket.io?
Socket.io is an abstraction built over the WebSockets protocol. Websockets is a protocol that allows a bilateral synchronous exchange between a client and a server. Or a bi-directional communication pipe in simple words
Note:_ Here websockets and socket.io will be used interchangeably (even though they are different in some aspects) unless stated otherwise._
Why WebSockets and not HTTP?
For real-time multiplayer games, we require the client to send information packets to the server and server sending/broadcasting data simultaneously. This can’t be achieved using HTTP as the client has to send a request to the server to actually receive something. This isn’t a viable scenario for multiplayer games.
What do you mean by the “Right way”?
The Right way — here means getting started with a Codebase which can be easily scaled further, and simultaneously not creating much hassle for smaller projects. It addresses common practices that can be followed for a much more modular project. This in no manner states it is the official way to build WebSockets projects. But is simply my opinion on it, you can easily swap out bits and parts of the project you don’t like :D
What is the project about? ⚡⚡
So coming to the core of the guide. This guide explains building a “multiplayer socket.io game” through a real-world project. This way it is much easier to see the project in action and we know the code/infrastructure works too! The project is…
Multiplayer Football Draft Simulator
What does this game do? ⚡
It is a turn-based multiplayer game. Where people enter and create a room. Other people hop into the room. Then the game begins where all players are shuffled and first-person gets the chance to pick the football-player he wants. He can search from the list of players (viewing their stats, position, ratings, and other details) and confirm his selection within the allocation time. Now, the turn is passed to another player. This repeats until every person has picked their whole football squad.
Pretty simple? Yes/no, it doesn’t matter. We will see the detailed breakdown of the code infrastructure behind this.
Server Architecture ⚡⚡⚡
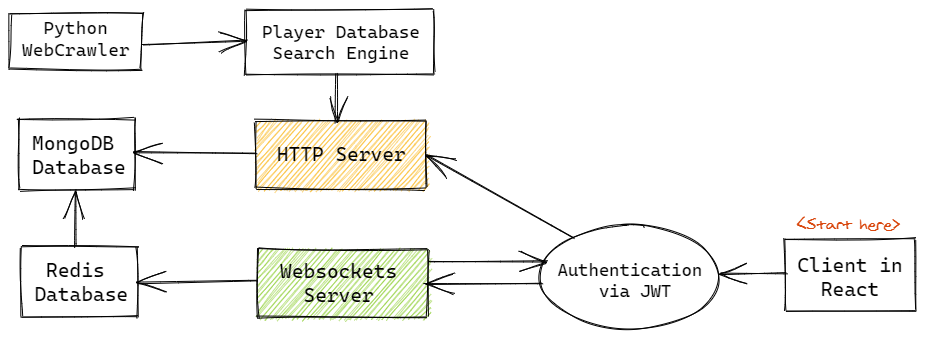
Game architecture
The above diagram explains how everything is connected from a birds-eye point of view.
Both the HTTP and Websockets server in this guide uses NodeJS. We are using Redis DB as socket.io supports its integration out of the box also the read/write operations are much faster as data is stored in-memory.MongoDB is used as a more permanent storage solution. The game results and the user teams for each room are stored in MongoDB after the end of each draft round. It also stores user credentials if they wish to register (this project has an optional registration/login step).
The WebCrawler is written in Python3, using the Scrapy library. The football players dataset has been crawled from https://sofifa.com. It consists of more than 20,000 players including their rating, statistics, worth, clubs, etc. It also has an optional data-analysis jupyter-notebook for playing with the scraped data, but its discussion is out of scope for this guide.
The Folder Structure (ExpressJS + MongoDB + socket.io)
NodeJS does not enforce code structure on you. This gives us a lot of flexibility to design them, but you can go horribly wrong which can lead to difficulty in maintaining and scaling the projects. This particular project structure can be used when working with sockets + NodeJS
Let’s dive in how the project codebase is structured
.{src}
├── controller
│   ├── authController.js      # Handles authentication requests
│   ├── searchController.js    # Handles search queries
│   ├── userController.js      # Handles user profile operations
│   └── ...
│
├── database
│   ├── db.js                  # Initialize DB connection
│   └── ...
│
├── middlewares
│   ├── authenticated.js       # Decode and verify JWT token
│   ├── error.js               # Common Error Handler
│   ├── logger.js              # Control logging levels
│   └── ...
│
├── models
│   ├── roomsModels.js         # DB model for rooms
│   ├── usersModel.js          # DB model for users
│   └── ...
│
├── schema
│   ├── rooms.js               # DB Schema for rooms
│   ├── users.js               # DB Schema for users
│   └── ...
│
├── socker
│   ├── roomManager.js         # Socket listeners/emitters handle
│   ├── sockerController.js    # Control socket connections
│   └── ...
│
├── app.js                     # Entry file for the project
├── env.js                     # Store environment variables
├── routes.js                  # All routes initializer
└── ...
The backend is divided into different directories according to the project requirement. If you want to skip or swap certain modules, it is as easy as adding another directory.
Most of the sub-directories are common to node projects, so I won’t explain them in detail here. The comments beside each directory should give an idea of what it is.
We will focus more on subdirectory socker/. This the place where your core socket.io code will reside.
#react #nodejs #javascript #technology #socketio #ios
