React Testing Library: Learn the basics
A few months ago I was hired to be the tester of a React website. The problem? I had little experience with React, and to follow the test documentation from React, from Enzyme and React Testing Library was quite complicated. So after I understood all of this, I decided to make this tutorial.
Another important thing to say, I tried to use Enzyme to do the tests, but that was not enough to easily do so. It wasn’t easier to read than React Testing Library, which is why I chose it in the end.
Introduction to the Basic Syntax
To make the Jest error report easily readable, we have three levels of descriptions in nameOfComponent.test.js — to refer to the component, the describe (to tag a group of tests by some context) and the it (which describes what that specific test and group of assertions (made with expect) refers to).
Then we have the render** **function, which is a method that puts that component in the Jest DOM, and puts it in renderResult. This is what we are going to use to make assertions. The render argument is a React element with its respective props. In this first code sample, I’ve entered the minimal props necessary to a valid DropDown using WAI-ARIA Design Patterns.
And lastly, we have the expects** **with two considerations:
- The pointer to an element in the DOM; a HTML element.
- The “toBe” assertion.
Here’s the example:
describe("DropDown basic props tests", () => {
	  it("Minimal props DropDown", () => {
	    const renderResult = render(
	      <DropDown
	        id="story1"
	        value={undefined}
	        label="lab1"
	        options={minimal_options}
	      />
	    );
	  expect(resultadoDoRender.getByText("lab1")).toBeInTheDocument();
	  });
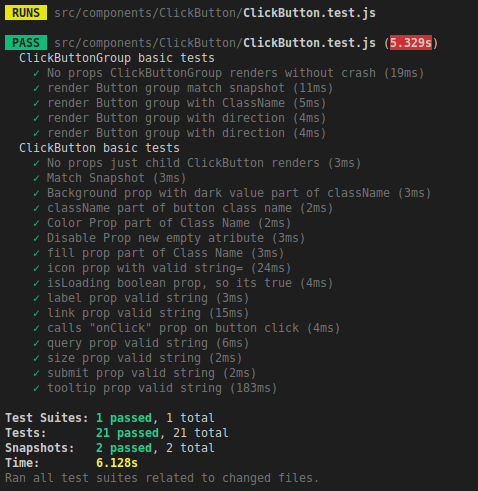
Example of report using "describe” and “it”
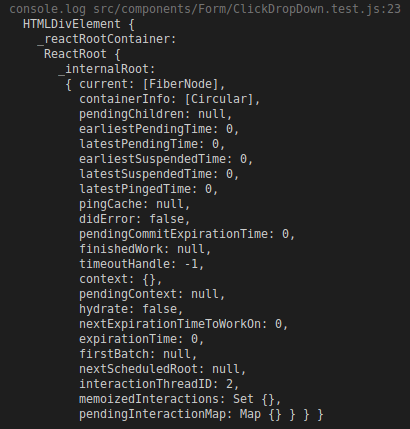
What is “renderResult”?
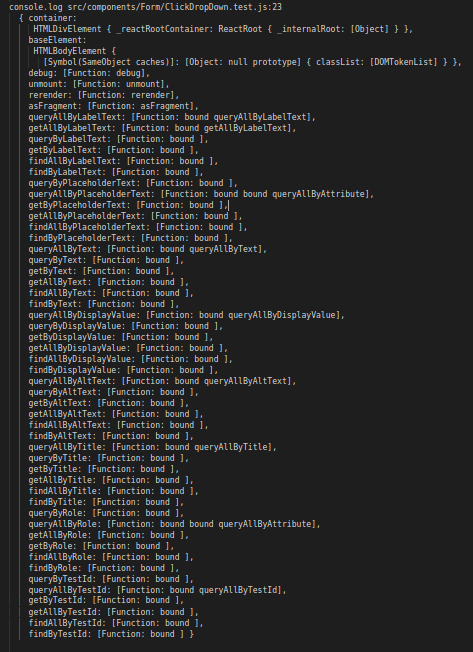
console.log (RenderResult)
TK (“ThingYouWant ToBeSure”) is this tech talk or rubbish? The best way to know what you are passing as an argument is to go to console.log(“ThingYouWant ToBeSure”), and check the output section of VSCode terminal, because the terminal section might omit some important things.
The console.log(renderResult) is an object with several methods. One of them is the container that returns the DIV and the HTMLBodyElement, which has our DropDown component inside.
renderResult provides methods that make it easier to search for the elements in the DOM. That’s why we need the “get methods”, a.k.a queries, described in the React Testing Library API.
Query API
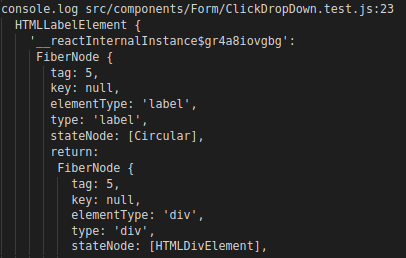
console.log(renderResult.getByText(“lab1))
Since the children of the label are a label element in this component, the string rotulo is in the document. We can see it in the container.innerHTML console.log.
So the expect(renderResult.getByText(“lab1)).toBeInTheDocument() will return true.
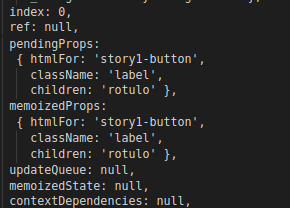
Pending props from label element
The getByText query is appropriated to make an assertion in a unique string that visually appears in the HTML document. Here’s some more examples:
console.log(renderResult.container)
The renderResult.container returns a pointer to a DOM Element, and we have access to the DOM API to search for the other related nodes, like these queries:
.getElementsByTagName(“span”)[0][“textContent”]
We’re getting the “children” text within the first span tag.
.getElementsByTagName(“div”)[0][“id”]
The id from the first div.
.getElementsByTagName(“button”)[0].getAttribute(“aria-label”)
The aria-label content from the first button.
.getElementsByClassName(“Extra”)[0]
First Element with a class named Extra.
.getElementsByTagName(“div”)[1][“classList”].contains(“checkable”)
If it’s in the second div it is ClassList which contains a “checkable” class.
Using only these examples, I could make all the assertions need for 12 WAI-ARIA pattern components — Checkbox, Date Input, DropDown, Radio, Button, ButtonGroup, Table, Tabs, Multiple Selection List, etc. However, this doesn’t apply to all kinds of props.
History, Router and Forms
Here’s a example of a link and search query test for a link:
import { render, fireEvent } from "react-testing-library";
	import { Router } from "react-router-dom";
	import { createMemoryHistory } from "history";
	/*And also the imports related to your component*/
	it("link prop validation", () => {
	  const history = createMemoryHistory({ initialEntries: ["/"] });
	  const renderResult = render(
	    <Router history={history}>
	      <Link to={{pathname: "/example"}}>Home</Link>
	    </Router>
	  );
	  fireEvent.click(RenderResult.getByText("Home"));
	  expect(history.location.pathname).toBe("/example");
	});
	it("query prop validation", () => {
	  const history = createMemoryHistory({ initialEntries: ["/"] });
	  const renderResult = render(
	    <Link history={history}>
	      <Button to={{search: "?author=Raissa"}}>Home</Button>
	    </Link>
	  );
	  fireEvent.click(RenderResult.getByText("Home"));
	  expect(history.location.search).toBe("?author=Raissa");
	  expect(history.location.pathname).toBe("/");
	});
In both cases we need to use a click event, to push this new state onto our memoryHistory and for the query to be put into location.search. To make the click happen we use getByText(“Home”) to make a reference to the span element.
It’s important to remember that the click event propagates to the link element (its parents). That’s why the click triggers the link and query methods, but the focus in the same context won’t. Now, let’s look at the “history”:
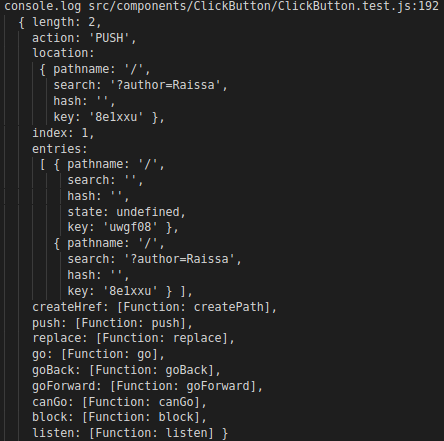
That’s why we deduce that a validation of a link component is:
fireEvent.click(RenderResult.getByText(“Home”));
expect(history.location.pathname).toBe(“/example”);
And to test search parameters changes:
fireEvent.click(RenderResult.getByText(“Home”)); expect(history.location.search).toBe(“?author=Raissa”);
expect(history.location.pathname).toBe(“/”);
If you don’t know and don’t use React Router, I suggest you start using it.
TK helpful to link to Portuguese article? Another thing I recommend, is that you use Formik for the Forms. Here’s an article on Formik (in Portuguese).
However, Formik also demands its own consideration in testing:
it("withFormik true Checkbox renders fine", () => {
	  const RenderResult = render(
	    <Formik>
	      <Form>
	        <Checkbox
	          id="12"
	          title="Check It!"
	          name="MyName"
	          label="Necessary"
	          withFormik
	        />
	      </Form>
	    </Formik>
	  );
	  expect(RenderResult.getByText("Necessary")).toBeInTheDocument();
	  expect(RenderResult.container.getElementsByTagName("form")[0]).toBeDefined();
	});
These are two simple validations that ensure the render doesn’t crash. However you can validate other values of attributes of the Form tag, like the examples we did before.
Firing Events and the Use of Storybook
Firing events demand two consideration. Which HTML element you must use to cause the event, and if the event has some parameters like an input.
The function props like onClick, onBlur, onKeyDown, etc should be well documented, so we know a which HTML element their listeners are. The tester is able to write a test code independently of the component’s implementation, because there are events, like focus, that don’t propagate to the parent.
To easily identify the HTML element, it’s basically the same as before — the use of console.log — to make the expects. To look for which events use and call the function prop, an idea is to use Storybook to document the component in isolation, its appearance and its behavior. This will make tests very real.
Firing Event Examples
It is always good to remember that it depends on your component! So here we will focus on the event, not the component.
Simple click on the span text, in a button.
const onClick = jest.fn();
fireEvent.click(RenderResult.getByText(“label”));
expect(onClick).toHaveBeenCalled();
Hover to show content, like in a tooltip.
fireEvent.focus(RenderResult.getByLabelText(“Label”));
expect(RenderResult.getByText(“TooltipContent”)).toBeInTheDocument()
Click on unselected option and a selected option in the multiple selection list.
fireEvent.click(RenderResult.getByText(“option 1”));
expect(SelectionFunc).toHaveBeenCalled();
fireEvent.click(RenderResult.getByText(“option 2”));
expect(UnselectionFunc).toHaveBeenCalled();
Click to select the option and then click to submit it.
fireEvent.click(RenderResult.getByText(“option 1”));
fireEvent.click(
  RenderResult.container.getElementsByTagName(“button”)[0]
);
expect(onChange).toHaveBeenCalled();
Inserting a date on a DateInput to call its onChange mock function.
fireEvent.change(RenderResult.getByLabelText(“label”), {
  target: { value: “2019–06–25” }
});
expect(onChange).toBeCalled();
to Be’s
I’ve used only the ones below, but there are many others.
toBeInTheDocument()— used to assert text that is in the DOM. Paragraphs, button labels, tooltips, span texts, empty content warnings, etc…toBe(“someString”)— to ascertain if a string exists in the HTML element that I’m referring to in thegetMethods. If something in the expect is ‘===’, another thing in thetoBewill be true.toBeDefined()— to ascertain if something is “!==” undefined. The most used case is when a class, that only exists because I passed a boolean prop like:dark,noStyle,big,small, is in the element class list.toBeCalled()— used to test the call of functions after firing Events.ToHaveBeenCalled(),ToHaveBeenCalledTimes(), andToHaveBeenCalledWith()are all important variations.toMatchSnapshot()— in some components that are more complex, I prefer to initialize with Snapshot testing and this is the assertion for this case specifically. For example:
it(“Match Snapshot Button”, () => {
  const RenderResult = render(<Button>Hello</Button>);
  expect(RenderResult.getByText(“Hello”)).toBeInTheDocument();
  expect(RenderResult).toMatchSnapshot();
});
More on snapshot testing.
And more Jest expects.
Dependencies and Test Setup
I’ve done all the tests with just this import, and we’ve already discussed them before:
import React from “react”;
import Component, { ComponentGroup } from “.”;
import { render, fireEvent } from “react-testing-library”;
import { Router } from “react-router-dom”;
import { createMemoryHistory } from “history”;
import { Form, Formik } from “formik”;
In the src/setupTests.js configuration file, what matters is:
import “react-testing-library/cleanup-after-each”;
To guarantee that each test won’t interfere with the next one (idempotents), because the React Trees mounted with render will be unmounted:
import “jest-dom/extend-expect”;
Necessary for some specific asserts:
import “mutationobserver-shim”;
Some tests need a MutationObserver. The modal is an example in our component.
Element.prototype.scrollIntoView = () => {};
In the Multiple Selection List it was necessary to add a scrollIntoView mock function in the DOM, which doesn’t exist by default.
const originalConsoleError = console.error;
  console.error = message => {
  if (/(Failed prop type)/.test(message)) {
    throw new Error(message);
  }
  originalConsoleError(message);
};
This makes the prop type warning appear as test failure.
devDependencies in /package.json:
“jest-dom”: “3.2.2”,
“jsdoc”: “3.5.5”,
“mutationobserver-shim”: “0.3.3”,
“react-testing-library”: “7.0.0”
#reactjs #javascript