Pointer Events in React Native
Learn about Pointer Events in React Native. Discuss the history of pointer events, and how to implement them using the new API. React Native’s Pointer Events API provides a powerful way to handle input events from different devices on both Android and iOS platforms.
Before smartphones, the main pointing input device was the mouse — and it still is on the desktop and in VR apps. With smartphones, touch became the preferred type of interaction.
Now there are pens and desktops and laptops that have touch screens for interaction. There are a lot of different types of events to consider when building an app you want to be cross-platform.
In this post, we’ll briefly discuss the history of pointer events, and how to implement them using the new API. You can find the full source code for this post in this GitHub repo.
Table of contents:
- Why pointer events?
- What is the React Native
pointerEventsprop?- Currently available React Native pointer events
- Implementing React Native Fabric for pointer events
- In Android
- In iOS
- Activating the pointer events feature flag
- In Android
- In iOS
- React Native pointer event use cases
- Detecting pointer type
- Drawing apps
- Drag-and-drop functionality
Why pointer events?
It’s a long story that began with the invention of the mouse. Pointer events were designed to be hardware-agnostic and target a specific set of coordinates on a screen. They make developing cross-platform apps much easier; instead of duplicating code to handle events from a handful of input devices, you can use pointer events to handle touch inputs, mouse inputs, multi-touch, and pen inputs.
The Pointer Events API in React Native is based on the W3C pointer events API. It may not seem necessary at first glance because mobile is all about touch — or is it? What about hover detection, which the Apple pencil now supports? What if you want (or need) left-click functionality in your app? What if you want to use a Bluetooth mouse?
For any of these use cases, you may have to write custom event handlers. But with pointer events, you only need one, and they will even tell you what type of device is generating the event, if you do need to do something custom. Additionally, the pointer events API is beneficial because it uses native code to handle the events, which can improve app performance.
What is the React Native pointerEvents prop?
Before we get to implementing actual pointer events, let’s discuss the pointerEvents prop because its name doesn’t tell you everything it does.
While it does activate and deactivate pointer events in a React Native View, it also does the same with touch events. It has four possible values:
auto: TheViewand its children can be the target of touch and pointer events. This is the same as not having the prop, but when you use it, you can dynamically activate and deactivate these events by switching its valuenone: Neither theViewnor its children can be the target of touch and pointer eventsbox-only: TheViewcan be the target of touch and pointer events, but not its childrenbox-none: TheView‘s children can be the target of touch and pointer events, but not the view itself
You can learn more about the pointerEvents prop in this LogRocket article.
Currently available React Native pointer events
The React Native Pointer Events API is a work in progress. Here is a list of the events that have been implemented so far:
onPointerOver: Fires when the user’s pointer enters the bounds of aViewonPointerEnter: Fires when the user’s pointer enters the bounds of aViewand moves inside those boundsonPointerDown: Fires when the user presses down on the screen with their pointeronPointerMove: Fires when the user moves their pointer while it is still pressed downonPointerUp: Fires when the user releases the pressure on the screen after having pressed down with their pointeronPointerOut: Fires when the user’s pointer exits the bounds of aViewonPointerLeave: Fires when the user’s pointer enters the bounds of aView, but then moves outside those bounds without interacting with theView
The onPointerCancel event is currently being worked on by the React Native team, and onClick, onContextMenu, onGotPointerCapture, onLostPointerCancel, and onPointerRawUpdate have yet to be implemented.
What I ran into, though, is that if you are using TypeScript, the types don’t match this list:
export interface PointerEvents {
  onPointerEnter?: ((event: PointerEvent) => void) | undefined;
  onPointerEnterCapture?: ((event: PointerEvent) => void) | undefined;
  onPointerLeave?: ((event: PointerEvent) => void) | undefined;
  onPointerLeaveCapture?: ((event: PointerEvent) => void) | undefined;
  onPointerMove?: ((event: PointerEvent) => void) | undefined;
  onPointerMoveCapture?: ((event: PointerEvent) => void) | undefined;
  onPointerCancel?: ((event: PointerEvent) => void) | undefined;
  onPointerCancelCapture?: ((event: PointerEvent) => void) | undefined;
  onPointerDown?: ((event: PointerEvent) => void) | undefined;
  onPointerDownCapture?: ((event: PointerEvent) => void) | undefined;
  onPointerUp?: ((event: PointerEvent) => void) | undefined;
  onPointerUpCapture?: ((event: PointerEvent) => void) | undefined;
}
However, onPointerOver exists, for example, but you have to use // @ts-ignore, and all the capture events and the cancel events do not work. So, the list is right and the types are wrong, at least currently.
The React Native team also plans to investigate other APIs related to pointer events. The following APIs may be enabled in the future:
- Pointer capture API:
setPointerCapture(),releasePointerCapture(), andhasPointerCapture() touch-actionstyle propertyclick,contextmenu, andauxclick
Implementing React Native Fabric for pointer events
The Pointer Events API in React Native is currently experimental and is only available in version ≥ 0.71 of React Native. It requires enabling Fabric, React Native’s new rendering engine, which is not super apparent in the React Native development blog post and at least for iOS on a Mac, was the most complicated and longest step. It also means that you can’t use Expo yet to experiment with pointer events. I tried. I also didn’t find any online React Native development platforms that I could do this with, either.
Fabric is a re-architecture of the React Native framework that aims to improve performance, stability, and reliability of mobile apps built using React Native. It is built on top of a new infrastructure called TurboModules, which provides a more efficient way of accessing native modules in React Native.
Fabric also uses a new threading model called the React Shadow Tree, which is a separate thread that runs in the background and handles the layout and rendering of components in React Native apps.
I am developing on macOS Monterey, so some of these steps will be slightly different on other operating systems.
In Android
In Android, you can enable Fabric in one of two ways.
Set newArchEnabled to true in android/gradle.properties:
# Use this property to enable support to the new architecture.
# This will allow you to use TurboModules and the Fabric render in
# your application. You should enable this flag either if you want
# to write custom TurboModules/Fabric components OR use libraries that
# are providing them.
newArchEnabled=true
Or, you can set an environment variable: ORG_GRADLE_PROJECT_newArchEnabled=true.
In iOS
The official docs say to navigate to the ios directory of your project and run the following command:
bundle install && RCT_NEW_ARCH_ENABLED=1 bundle exec pod installFor me, it was not so easy. I ran into this error when it tried to install ffi, again on macOS Monterey:
fatal error: 'ruby/config.h' file not foundAfter jumping from GitHub issues to Stack Overflow questions and back again, installing rbenv worked for me by running the following:
brew install rbenv ruby-build
echo 'eval "$(rbenv init -)' >> ~/.bash_profile
rbenv install 2.6.10
rbenv global 2.6.10
Then the bundle command worked.
The final step of implementing Fabric involves enabling feature flags in three places:
- The JavaScript code
- In iOS
- In Android
Activating the pointer events feature flag
First, in the JavaScript entry file, you’ll have to enable the shouldEmitW3CPointerEvents feature flag to use pointer events. If you want to use pointer events in Pressability, enable the shouldPressibilityUseW3CPointerEventsForHover feature flag. In the default React Native app template, this will be the index.js file at the root of your project:
import {AppRegistry} from 'react-native';
import App from './App';
import {name as appName} from './app.json';
// Step 1: Import React Native Feature Flags
import ReactNativeFeatureFlags from 'react-native/Libraries/ReactNative/ReactNativeFeatureFlags';

// Step 2: Enable pointer events in JavaScript
ReactNativeFeatureFlags.shouldEmitW3CPointerEvents = () => true;

// Step 3: Enable pointer event based hover events in Pressibility
ReactNativeFeatureFlags.shouldPressibilityUseW3CPointerEventsForHover = () =>
  true;

AppRegistry.registerComponent(appName, () => App);
In Android
You will also have to active the pointer events feature flag in Android, usually in the onCreate method in the root activity, which you will find at android/app/src/main/java/com/[app_name]/MainApplication.java:
// ...
// Step 1: Import ReactFeatureFlags
import com.facebook.react.config.ReactFeatureFlags;
// ...
  @Override
  public void onCreate() {
    super.onCreate();
    SoLoader.init(this, /* native exopackage */ false);
    if (!BuildConfig.DEBUG) {
      UpdatesController.initialize(this);
    }
    // Step 2: Activate the feature flag
    ReactFeatureFlags.dispatchPointerEvents = true;
    initializeFlipper(this, getReactNativeHost().getReactInstanceManager());
  }
In iOS
Finally, you have to activate the feature flag for iOS in its initialization code. In the default React Native template, this will be in ios/[app_name]/AppDelegate.mm in the didFinishLaunchingWithOptions method:
// ...
// Step 1: Import the RCTConstants header from React
#import <React/RCTConstants.h>
// ...
- (BOOL)application:(UIApplication *)application didFinishLaunchingWithOptions:(NSDictionary *)launchOptions
{
  // ...
  // Step 2: Activate the feature flag
  RCTSetDispatchW3CPointerEvents(YES);

  [super application:application didFinishLaunchingWithOptions:launchOptions];

  return YES;
}
React Native pointer event use cases
The use cases for pointer events are similar to those for mouse events, touch events, and the events from other pointing devices — except that pointer events can handle them all.
Detecting pointer type
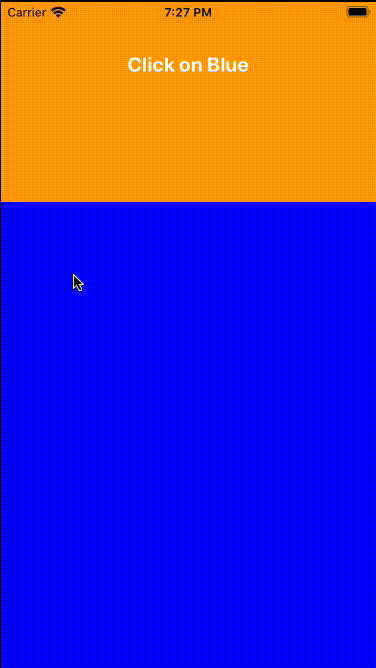
For a simple example, let’s determine the type of pointer device we are dealing with and find the x and y offset of the event in the View. Here is the code:
import React, {FC, useState} from 'react';
import {
  StyleSheet,
  View,
  Text,
  NativeSyntheticEvent,
  NativePointerEvent,
} from 'react-native';

const DetectScreen: FC = () => {
  const [type, setType] = useState('Click on Blue');

  const onDown = (event: NativeSyntheticEvent<NativePointerEvent>): void => {
    const {
      nativeEvent: {offsetX, offsetY, pointerType},
    } = event;
    const message = `${pointerType} event at offset x:${offsetX} and y:${offsetY}`;
    setType(message);
  };

  return (
    <View style={styles.container}>
      <View style={styles.top}>
        <Text style={styles.label}>{type}</Text>
      </View>
      <View style={styles.bottom} onPointerDown={onDown} />
    </View>
  );
};

const styles = StyleSheet.create({
  container: {
    flex: 1,
  },
  top: {
    height: 200,
    backgroundColor: 'orange',
  },
  bottom: {
    flexGrow: 1,
    backgroundColor: 'blue',
  },
  label: {
    margin: 50,
    textAlign: 'center',
    color: '#fff',
    fontSize: 20,
    fontWeight: 'bold',
  },
});

export default DetectScreen;
In this example, there are two views: one at the top to print a message and one at the bottom to capture pointer events. The bottom view is listening for the onPointerDown event. When any type of pointer is used in the view, it will execute the onDown function, which creates a message out of the pointerType, offsetX, and offsetY values from the event.nativeEvent property and updates the type state value, which is printed in the top view.
The properties you expect to see from a pointer event will be in the event.nativeEvent property. Here are some of the other properties you will find there:
{
    "altKey": false,
    "button": 0,
    "buttons": 0,
    "clientX": 47.5,
    "clientY": 415.5,
    "ctrlKey": false,
    "detail": 0,
    "height": 40,
    "isPrimary": true,
    "metaKey": false,
    "offsetX": 47.5,
    "offsetY": 15.5,
    "pageX": 47.5,
    "pageY": 415.5,
    "pointerId": 0,
    "pointerType": "touch",
    "pressure": 0.165,
    "screenX": 47.5,
    "screenY": 415.5,
    "shiftKey": false,
    "tangentialPressure": 0,
    "target": 14,
    "tiltX": 0,
    "tiltY": 0,
    "twist": 0,
    "width": 40,
    "x": 47.5,
    "y": 415.5
  }
And here it is in action:
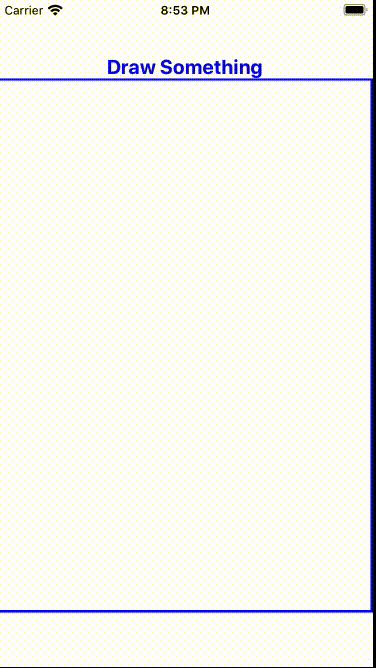
Drawing apps
Currently, enough of the pointer APIs is active in React Native to create a drawing app. To create this very basic drawing app example, I used the React Native SVG package.
We’ll use pointer events to create a path in an SVG image. A path defines the series of connected lines, curves, and other shapes in the SVG and is stored as d in the SVG. We will generate it using the onPointerMove event.
Here is the code:
import React, {FC, useState} from 'react';
import {
  StyleSheet,
  View,
  Text,
  NativeSyntheticEvent,
  NativePointerEvent,
  Dimensions,
} from 'react-native';
import {Path, Svg} from 'react-native-svg';

const {height, width} = Dimensions.get('window');

const DrawScreen: FC = () => {
  const [path, setPath] = useState<string[]>([]);

  const onMove = (event: NativeSyntheticEvent<NativePointerEvent>): void => {
    const {
      nativeEvent: {offsetX, offsetY},
    } = event;
    const newPath = [...path];

    // Create a new point
    const newPoint = `${newPath.length === 0 ? 'M' : ''}${offsetX.toFixed(
      0,
    )},${offsetY.toFixed(0)} `;

    // Add new point to existing points
    newPath.push(newPoint);
    setPath(newPath);
  };

  return (
    <View style={styles.container}>
      <Text style={styles.label}>Draw Something</Text>
      <View style={styles.wrapper} onPointerMove={onMove}>
        <Svg height={height * 0.8} width={width}>
          <Path
            d={path.join('')}
            stroke={'blue'}
            fill={'transparent'}
            strokeWidth={2}
            strokeLinejoin={'round'}
            strokeLinecap={'round'}
          />
        </Svg>
      </View>
    </View>
  );
};

const styles = StyleSheet.create({
  container: {
    flex: 1,
    justifyContent: 'center',
    alignItems: 'center',
  },
  wrapper: {
    borderColor: 'blue',
    borderWidth: 2,
    height: height * 0.8,
    width,
  },
  label: {
    color: 'blue',
    fontSize: 20,
    fontWeight: 'bold',
  },
});

export default DrawScreen;
When we press down on the screen with the mouse in the simulator, on a device with a finger or pen, or using some other pointing device, and then move it across the screen, it triggers the onPointerMove event, which in turn executes the onMove function.
This function gets the x and y offsets of the pointer location and adds it as another point in the path array. This array is then joined into a single string to the path data for the d attribute of the SVG.
Here is this example in action:
Drag-and-drop functionality
While trying to come up with an example for drag-and-drop, I ran into an issue. Without pointer capture, it is pretty hard to get drag-and-drop to work. Here is a definition of pointer capture from Mozilla:
Pointer capture allows events for a particular pointer event
PointerEventto be re-targeted to a particular element instead of the normal (or hit test) target at a pointer’s location. This can be used to ensure that an element continues to receive pointer events even if the pointer device’s contact moves off the element (such as by scrolling or panning).
Without pointer capture, I can only drag elements so far before they drop on their own; normally, you would call setPointerCapture after the onPointerDown event so you have a handle on the element. For now, I would suggest using PanResponder for drag-and-drop use cases.
Conclusion
React Native’s Pointer Events API provides a powerful way to handle input events from different devices on both Android and iOS platforms. It allows developers to write cross-platform applications that handle touch inputs, mouse inputs, multi-touch, and pen inputs.
While the API is currently experimental and requires enabling Fabric, it will eventually provide a much simpler way to handle pointer events. Pointer events are hardware agnostic, use a single event model to handle all type of pointing devices, and provide a good experience for users regardless of their hardware. A single event model also makes developing React Native apps simpler and more flexible. And, finally, because the Pointer Events API uses native code to handle events, they can improve app performance.
However, as we saw, enabling Fabric can be a complicated process, and there are some extra steps that need to be taken to activate the feature flags. The API is still a work in progress, and we can expect to see more improvements and features added in the future. You can find the full source code used in this article in this GitHub repo, including my failure with drag-and-drop.
Source: https://blog.logrocket.com
#reactnative