A lot has happened in the last five years of software development. What it means to build, deploy, and orchestrate software has changed drastically. There’s been a move from hosting software on-premise to public cloud and shift from virtual machines (VMs) to containers. Containers are cheaper to run than VMs because they require fewer resources and run as single processes. Moving to containers has reduced costs, but created the problem of how to run containers at scale.
Kubernetes was first open-sourced on June 6th, 2014. Google had been using containers for years and used a tool called Borg to manage containers at scale. Kubernetes is the open source version of Borg and has become the de facto standard in the last four years.
Its journey to becoming a standard was largely facilitated by all the big players jumping on board. Red Hat, IBM, Amazon, Microsoft, Oracle, and Pivotal – every major public cloud provider has Kubernetes support.
This is great for developers because it provides a single way to package applications (in a Docker container) and deploy it on any Kubernetes cluster.
High-Performance Development with CI/CD, Kubernetes, and Jenkins X
High performing teams are almost always a requirement for success in technology, and continuous integration, continuous deployment (CI/CD), small iterations, plus fast feedback are the building blocks. CI/CD can be difficult to set up for your cloud native app. By automating everything, developers can spend their precious time delivering actual business value.
How do you become a high performing team using containers, continuous delivery, and Kubernetes? This is where Jenkins X comes in.
“The idea of Jenkins X is to give all developers their own naval seafaring butler that can help you sail the seas of continuous delivery.” — James Strachan

Jenkins X helps you automate your CI/CD in Kubernetes – and you don’t even have to learn Docker or Kubernetes!
What Does Jenkins X Do?
Jenkins X automates the installation, configuration, and upgrading of Jenkins and other apps (Helm, Skaffold, Nexus, among others) on Kubernetes. It automates CI/CD of your applications using Docker images, Helm charts, and pipelines. It uses GitOps to manage promotion between environments and provides lots of feedback by commenting on pull requests as they hit staging and production.
Get Started with Jenkins X
To get installed with Jenkins X, you first need to install the jx binary on your machine, or cloud provider. You can get $300 in credits for Google Cloud, so I decided to start there.
Install Jenkins X on Google Cloud and Create a Cluster
Navigate to cloud.google.com and log in. If you don’t have an account, sign up for a free trial. Go to the console (there’s a link in the top right corner) and activate Google Cloud shell. Copy and paste the following commands into the shell.
curl -L https://github.com/jenkins-x/jx/releases/download/v1.3.79/jx-linux-amd64.tar.gz | tar xzv
sudo mv jx /usr/local/bin
NOTE: Google Cloud Shell terminates any changes made outside your home directory after an hour, so you might have to rerun the commands. The good news is they’ll be in your history, so you only need to hit the up arrow and enter. You can also eliminate the sudo mv command above and add the following to your .bashrc instead.
export PATH=$PATH:.
Create a cluster on GKE (Google Kubernetes Engine) using the following command. You may have to enable GKE for your account.
jx create cluster gke --skip-login
Confirm you want to install helm if you’re prompted to download it. You will be prompted to select a Google Cloud Zone. I’d suggest picking one close to your location. I chose us-west1-a since I live near Denver, Colorado. For Google Cloud Machine Type, I selected n1-standard-2, and used the defaults for the min (3) and max (5) number of nodes.
For the GitHub name, type your own (e.g., mraible) and an email you have registered with GitHub (e.g., matt.raible@okta.com). I tried to use oktadeveloper (a GitHub organization), and I was unable to make it work.
NOTE: GitHub integration will fail if you have two-factor authentication enabled on your account. You’ll need to disable it on GitHub if you want the process to complete successfully. :-/
When prompted to install an ingress controller, hit Enter for Yes. Hit Enter again to select the default domain.
You’ll be prompted to create a GitHub API Token. Click on the provided URL and name it “Jenkins X”. Copy and paste the token’s value back into your console.
Grab a coffee, an adult beverage, or do some pushups while your install finishes. It can take several minutes.
The next step will be to copy the API token from Jenkins to your console. Follow the provided instructions in your console.
When you’re finished with that, run jx console and click on the link to log in to your Jenkins instance. Click on Administration and upgrade Jenkins, as well as all its plugins (Plugin Manager > scroll to the bottom and select all). If you fail to perform this step, you won’t be able to navigate from your GitHub pull request to your Jenkins X CI process for it.
Create a Spring Boot App
When I first started using Jenkins X, I tried to import an existing project. Even though my app used Spring Boot, it didn’t have a pom.xml in the root directory, so Jenkins X thought it was a Node.js app. For this reason, I suggest creating a blank Spring Boot app first to confirm Jenkins X is set up correctly.
Create a bare-bones Spring Boot app from Cloud Shell:
jx create spring -d web -d actuator
This command uses Spring Initializr, so you’ll be prompted with a few choices. Below are the answers I used:
Question Answer Language java Group com.okta.developer Artifact okta-spring-jx-example TIP: Picking a short name for your artifact name will save you pain. Jenkins X has a 53 character limit for release names and oktadeveloper/okta-spring-boot-jenkinsx-example will cause it to be exceeded by two characters.
Select all the defaults for the git user name, initializing git, and the commit message. You can select an organization to use if you don’t want to use your personal account. Run the following command to watch the CI/CD pipeline of your app.
jx get activity -f okta-spring-jx-example -w
Run jx console, click the resulting link, and navigate to your project if you’d like a more visually rich view.
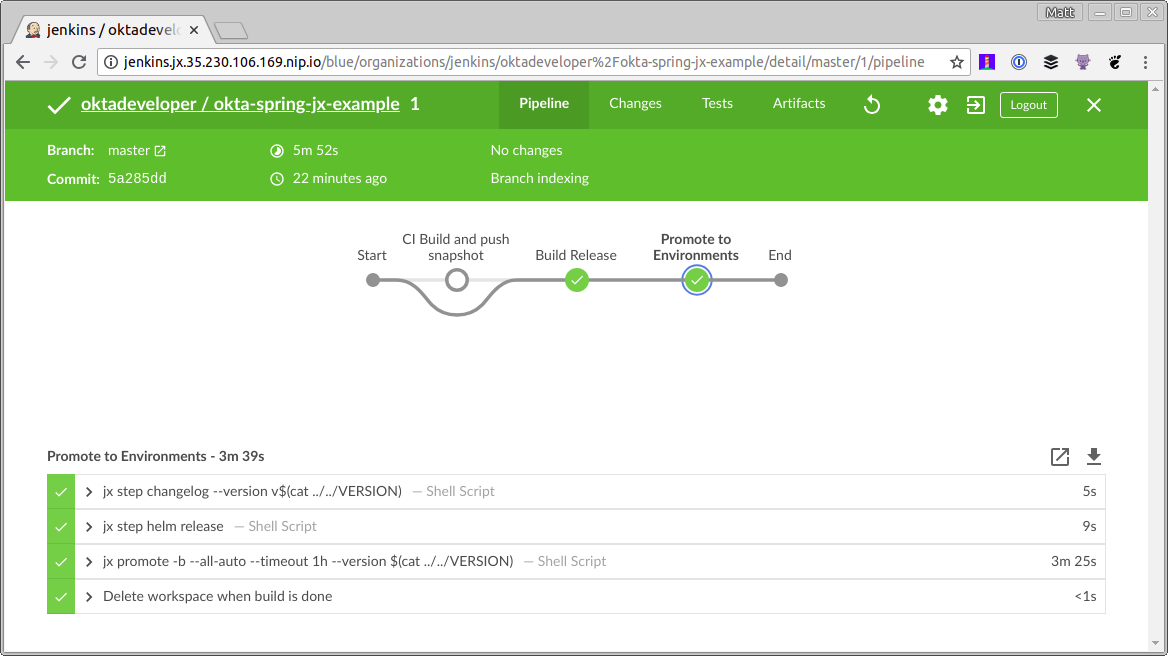
This process will perform a few tasks:
- Create a release for your project.
- Create a pull request for your staging environment project.
- Auto-deploy it to staging environment so you can see it in action.
Merge status checks all passed so the promotion worked!
Application is available at: http://okta-spring-jx-example.jx-staging.35.230.106.169.nip.io
NOTE: Since Spring Boot doesn’t provide a welcome page by default, you will get a 404 when you open the URL above.
Deploy Your Spring Boot App to Production with Jenkins X
By default, Jenkins X will only auto-deploy to staging. You can manually promote from staging to production using:
jx promote okta-spring-jx-example --version 0.0.1 --env production
You can change your production environment to use auto-deploy using [jx edit environment](https://jenkins-x.io/commands/jx_edit_environment/ "jx edit environment").
Now that you know how to use Jenkins X with a bare-bones Spring Boot app let’s see how to make it work with a more real-world example.
Secure Your Spring Boot App and Add an Angular PWA
Over the last several months, I’ve written a series of blog posts about building a PWA (progressive web app) with Ionic/Angular and Spring Boot.
- Create a release for your project.
- Create a pull request for your staging environment project.
- Auto-deploy it to staging environment so you can see it in action.
This is the final blog post in the series. I believe this is an excellent example of a real-world app because it has numerous unit and integration tests, including end-to-end tests with Protractor. Let’s see how to automate its path to production with Jenkins X and Kubernetes!
Clone the Spring Boot project you just created from GitHub (make sure to change {yourUsername} in the URL):
git clone https://github.com/{yourUsername}/okta-spring-jx-example.git okta-jenkinsx
In an adjacent directory, clone the project created that has Spring Boot + Angular as a single artifact:
git clone https://github.com/oktadeveloper/okta-spring-boot-angular-auth-code-flow-example.git spring-boot-angular
In a terminal, navigate to okta-jenkinsx and remove the files that are no longer necessary:
cd okta-jenkinsx
rm -rf .mvn src mvnw* pom.xml
The result should be a directory structure with the following files:
$ tree .
.
├── charts
│   ├── okta-spring-jx-example
│   │   ├── Chart.yaml
│   │   ├── Makefile
│   │   ├── README.md
│   │   ├── templates
│   │   │   ├── deployment.yaml
│   │   │   ├── _helpers.tpl
│   │   │   ├── NOTES.txt
│   │   │   └── service.yaml
│   │   └── values.yaml
│   └── preview
│       ├── Chart.yaml
│       ├── Makefile
│       ├── requirements.yaml
│       └── values.yaml
├── Dockerfile
├── Jenkinsfile
└── skaffold.yaml

4 directories, 15 files
Copy all the files from spring-boot-angular into okta-jenkinsx.
cp -r ../spring-boot-angular/* .
When using Travis CI to test this app, I ran npm install as part of the process. With Jenkins X, it’s easier to everything with one container (e.g. maven or nodejs), so add an execution to the frontend-maven-plugin (in holdings-api/pom.xml) to run npm install (hint: you need to add the execution with id==’npm install’ to the existing pom.xml).
Now is a great time to open the okta-jenkinsx directory as a project in an IDE like IntelliJ IDEA, Eclipse, Netbeans, or VS Code! :)
<plugin>
   <groupId>com.github.eirslett</groupId>
   <artifactId>frontend-maven-plugin</artifactId>
   <version>${frontend-maven-plugin.version}</version>
   <configuration>
       <workingDirectory>../crypto-pwa</workingDirectory>
   </configuration>
   <executions>
       <execution>
           <id>install node and npm</id>
           <goals>
               <goal>install-node-and-npm</goal>
           </goals>
           <configuration>
               <nodeVersion>${node.version}</nodeVersion>
           </configuration>
       </execution>
       <execution>
           <id>npm install</id>
           <goals>
               <goal>npm</goal>
           </goals>
           <phase>generate-resources</phase>
           <configuration>
               <arguments>install --unsafe-perm</arguments>
           </configuration>
       </execution>
       ...
   </executions>
</plugin>
NOTE: The --unsafe-perm flag is necessary because Jenkins X runs the build as a root user. I figured out this workaround from node-sass’s troubleshooting instructions.
Add Actuator and Turn Off HTTPS
Jenkins X relies on Spring Boot’s Actuator for health checks. This means if you don’t include it in your project (or have /actuator/health protected), Jenkins X will report your app has failed to startup.
Add the Actuator starter as a dependency to holdings-api/pom.xml:
<dependency>
   <groupId>org.springframework.boot</groupId>
   <artifactId>spring-boot-starter-actuator</artifactId>
</dependency>
You’ll also need to allow access to its health check endpoint. Jenkins X will deploy your app behind a Nginx server, so you’ll want to turn off forcing HTTPS as well, or you won’t be able to reach your app. Modify holdings-api/src/main/java/.../SecurityConfiguration.java to allow /actuator/health and to remove requiresSecure().
public class SecurityConfiguration extends WebSecurityConfigurerAdapter {

   @Override
   public void configure(WebSecurity web) throws Exception {
       web.ignoring().antMatchers("/**/*.{js,html,css}");
   }

   @Override
   protected void configure(HttpSecurity http) throws Exception {
       http
               .csrf().csrfTokenRepository(CookieCsrfTokenRepository.withHttpOnlyFalse())
           .and()
               .authorizeRequests()
               .antMatchers("/", "/home", "/api/user", "/actuator/health").permitAll()
               .anyRequest().authenticated();
   }
}
Adjust Paths in Dockerfile and Jenkinsfile
Since this project builds in a sub-directory rather than the root directory, update ./Dockerfile to look in holdings-api for files.
FROM openjdk:8-jdk-slim
ENV PORT 8080
ENV CLASSPATH /opt/lib
EXPOSE 8080

# copy pom.xml and wildcards to avoid this command failing if there's no target/lib directory
COPY holdings-api/pom.xml holdings-api/target/lib* /opt/lib/

# NOTE we assume there's only 1 jar in the target dir
# but at least this means we don't have to guess the name
# we could do with a better way to know the name - or to always create an app.jar or something
COPY holdings-api/target/*.jar /opt/app.jar
WORKDIR /opt
CMD ["java", "-jar", "app.jar"]
You’ll also need to update Jenkinsfile so it runs any mvn commands in the holdings-api directory. Add the -Pprod profile too. For example:
// in the 'CI Build and push snapshot' stage
steps {
 container('maven') {
   dir ('./holdings-api') {
     sh "mvn versions:set -DnewVersion=$PREVIEW_VERSION"
     sh "mvn install -Pprod"
   }
 }
 ...
}
// in the 'Build Release' stage
dir ('./holdings-api') {
  sh "mvn versions:set -DnewVersion=\$(cat ../VERSION)"
}
...
dir ('./holdings-api') {
  sh "mvn clean deploy -Pprod"
}
This should be enough to make this app work with Jenkins X. However, you won’t be able to log into it unless you have an Okta account and configure it accordingly.
Why Okta?
In short, we make identity management a lot easier, more secure, and more scalable than what you’re probably used to. Okta is a cloud service that allows developers to create, edit, and securely store user accounts and user account data, and connect them with one or multiple applications. Our API enables you to:
- Authenticate and authorize your users
- Store data about your users
- Perform password-based and social login
- Secure your application with multi-factor authentication
- And much more! Check out our product documentation
Are you sold? Register for a forever-free developer account, and when you’ve finished, come on back so we can learn more about CI/CD with Spring Boot and Jenkins X!
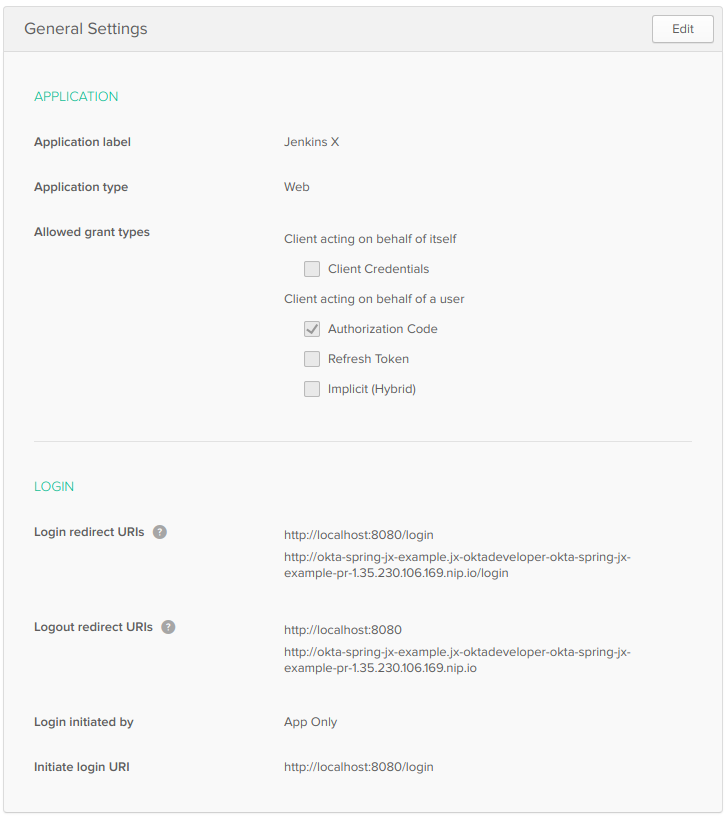
Create a Web Application in Okta for Your Spring Boot App
After you’ve completed the setup process, log in to your account and navigate to Applications > Add Application. Click Web and Next. On the next page, enter the following values and click Done (you will have to click Done, then Edit to modify Logout redirect URIs).
- Authenticate and authorize your users
- Store data about your users
- Perform password-based and social login
- Secure your application with multi-factor authentication
- And much more! Check out our product documentation
Open holdings-api/src/main/resources/application.yml and paste the values from your org/app into it.
okta:
 client:
   orgUrl: https://{yourOktaDomain}
   token: XXX
security:
   oauth2:
     client:
       access-token-uri: https://{yourOktaDomain}/oauth2/default/v1/token
       user-authorization-uri: https://{yourOktaDomain}/oauth2/default/v1/authorize
       client-id: {clientId}
       client-secret: {clientSecret}
     resource:
       user-info-uri: https://{yourOktaDomain}/oauth2/default/v1/userinfo
You’ll notice the token value is XXX. This is because I prefer to read it from an environment variable rather than being checked into source control. You’ll likely want to do this for your client secret as well, but I’m only doing one property for brevity. To create an API token:
- Create a release for your project.
- Create a pull request for your staging environment project.
- Auto-deploy it to staging environment so you can see it in action.
You’ll need to add a holdings attribute to your organization’s user profiles to store your cryptocurrency holdings in Okta. Navigate to Users > Profile Editor. Click on Profile for the first profile in the table. You can identify it by its Okta logo. Click Add Attribute and use the following values:
- Authenticate and authorize your users
- Store data about your users
- Perform password-based and social login
- Secure your application with multi-factor authentication
- And much more! Check out our product documentation
After performing these steps, you should be able to navigate to [http://localhost:8080](http://localhost:8080 "http://localhost:8080") and log in after running the following commands:
cd holdings-api
./mvnw -Pprod package
java -jar target/*.jar
Storing Secrets in Jenkins X
Storing environment variables locally is pretty straightforward. But how do you do it in Jenkins X? Look no further than its credentials feature. Here’s how to use it:
- Create a release for your project.
- Create a pull request for your staging environment project.
- Auto-deploy it to staging environment so you can see it in action.
While you’re in there, add a few more secrets: OKTA_APP_ID, E2E_USERNAME, and E2E_PASSWORD. The first is the ID of the Jenkins X OIDC app you created. You can get its value from navigating to your app on Okta and copying the value from the URL. The E2E-* secrets should be credentials you want to use to run end-to-end (Protractor) tests. You might want to create a new user for this.
You can access these values in your Jenkinsfile by adding them to the environment section near the top.
environment {
  ORG               = 'mraible'
  APP_NAME          = 'okta-spring-jx-example'
  CHARTMUSEUM_CREDS = credentials('jenkins-x-chartmuseum')
  OKTA_CLIENT_TOKEN = credentials('OKTA_CLIENT_TOKEN')
  OKTA_APP_ID       = credentials('OKTA_APP_ID')
  E2E_USERNAME      = credentials('E2E_USERNAME')
  E2E_PASSWORD      = credentials('E2E_PASSWORD')
}
Transferring Environment Variables to Docker Containers
To transfer the OKTA_CLIENT_TOKEN environment variable to the Docker container, look for:
sh "make preview"
And change it to:
sh "make OKTA_CLIENT_TOKEN=\$OKTA_CLIENT_TOKEN preview"
At this point, you can create a branch, commit your changes, and verify everything works in Jenkins X.
cd ..
git checkout -b add-secure-app
git add .
git commit -m "Add Bootiful PWA"
git push origin add-secure-app
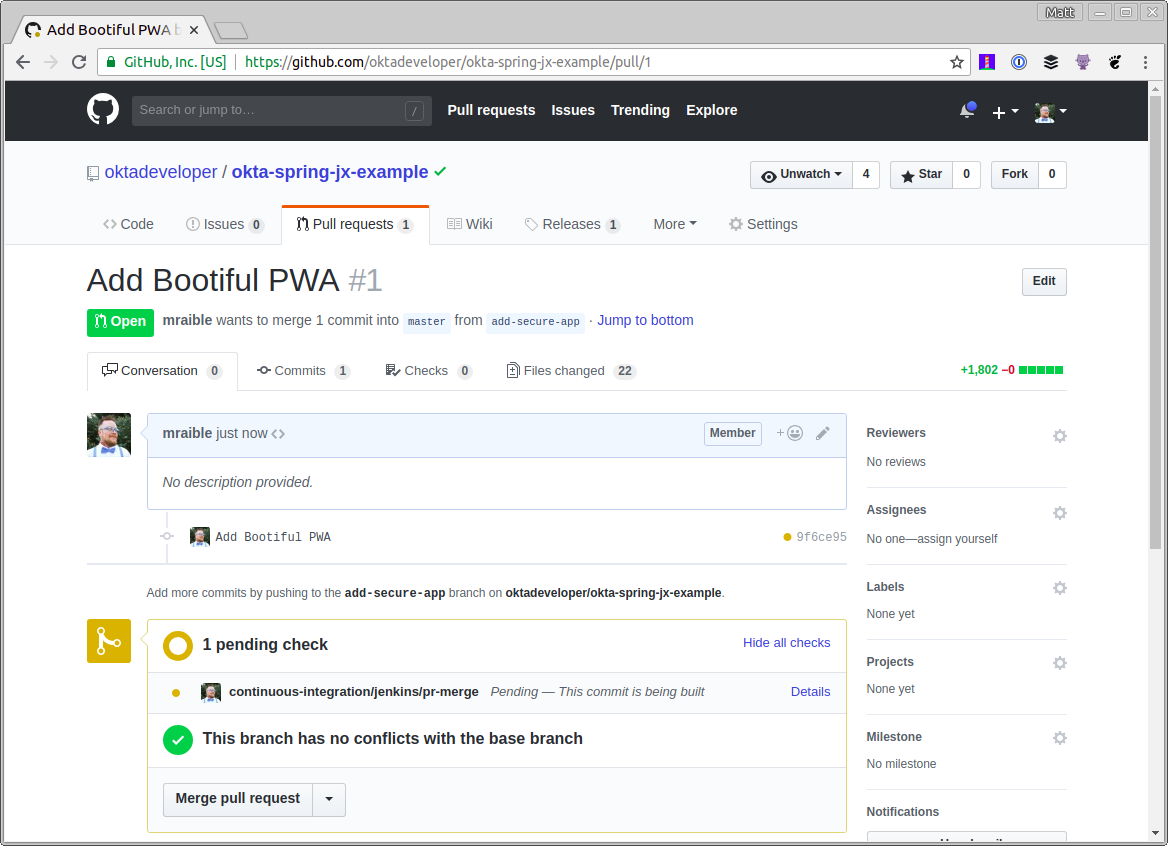
Open your browser and navigate to your repository on GitHub and create a pull request. It should look like the following after creating it.
If the tests pass for your pull request, you should see some greenery and a comment from Jenkins X that your app is available in a preview environment.
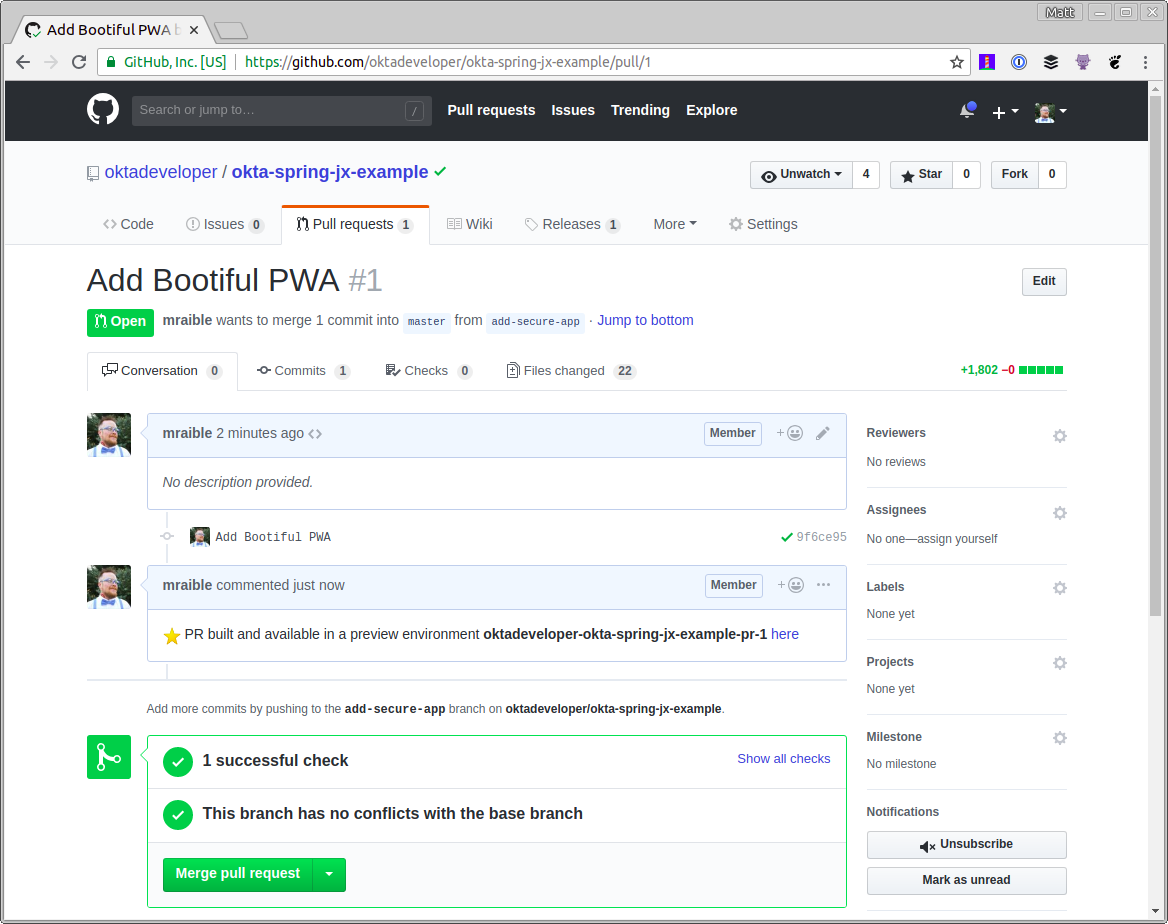
If you click on the here link and try to log in, you’ll likely get an error from Okta that the redirect URI hasn’t been whitelisted.
Automate Adding Redirect URIs in Okta
When you create apps in Okta and run them locally, it’s easy to know what the redirect URIs for your app will be. For this particular app, they’ll be [http://localhost:8080/login](http://localhost:8080/login "http://localhost:8080/login") for login, and [http://localhost:8080](http://localhost:8080 "http://localhost:8080") for logout. When you go to production, the URLs are generally well-known as well. However, with Jenkins X, the URLs are dynamic and created on-the-fly based on your pull request number.
To make this work with Okta, you can create a Java class that talks to the Okta API and dynamically adds URIs. Create holdings-api/src/test/java/.../cli/AppRedirectUriManager.java and populate it with the following code.
package com.okta.developer.cli;

import com.okta.sdk.client.Client;
import com.okta.sdk.lang.Collections;
import com.okta.sdk.resource.application.OpenIdConnectApplication;
import org.slf4j.Logger;
import org.slf4j.LoggerFactory;
import org.springframework.beans.factory.annotation.Value;
import org.springframework.boot.ApplicationArguments;
import org.springframework.boot.ApplicationRunner;
import org.springframework.boot.SpringApplication;
import org.springframework.boot.autoconfigure.SpringBootApplication;

import java.util.LinkedHashSet;
import java.util.List;
import java.util.Set;

@SpringBootApplication
public class AppRedirectUriManager implements ApplicationRunner {
   private static final Logger log = LoggerFactory.getLogger(AppRedirectUriManager.class);

   private final Client client;

   @Value("${appId}")
   private String appId;

   @Value("${redirectUri}")
   private String redirectUri;

   @Value("${operation:add}")
   private String operation;

   public AppRedirectUriManager(Client client) {
       this.client = client;
   }

   public static void main(String[] args) {
       SpringApplication.run(AppRedirectUriManager.class, args);
   }

   @Override
   public void run(ApplicationArguments args) {
       log.info("Adjusting Okta settings: {appId: {}, redirectUri: {}, operation: {}}", appId, redirectUri, operation);
       OpenIdConnectApplication app = (OpenIdConnectApplication) client.getApplication(appId);

       String loginRedirectUri = redirectUri + "/login";

       // update redirect URIs
       List<String> redirectUris = app.getSettings().getOAuthClient().getRedirectUris();
       // use a set so values are unique
       Set<String> updatedRedirectUris = new LinkedHashSet<>(redirectUris);
       if (operation.equalsIgnoreCase("add")) {
           updatedRedirectUris.add(loginRedirectUri);
       } else if (operation.equalsIgnoreCase("remove")) {
           updatedRedirectUris.remove(loginRedirectUri);
       }

       // todo: update logout redirect URIs with redirectUri (not currently available in Java SDK)
       app.getSettings().getOAuthClient().setRedirectUris(Collections.toList(updatedRedirectUris));
       app.update();
       System.exit(0);
   }
}
This class uses Spring Boot’s CLI (command-line interface) support, which makes it possible to invoke it using the Exec Maven Plugin. To add support for running it from Maven, make the following modifications in holdings-api/pom.xml.
<properties>
    ...
   <exec-maven-plugin.version>1.6.0</exec-maven-plugin.version>
   <appId>default</appId>
   <redirectUri>override-me</redirectUri>
</properties>

<!-- dependencies -->

<build>
   <defaultGoal>spring-boot:run</defaultGoal>
   <finalName>holdings-app-${project.version}</finalName>
   <plugins>
       <!-- existing plugins -->
       <plugin>
           <groupId>org.codehaus.mojo</groupId>
           <artifactId>exec-maven-plugin</artifactId>
           <version>${exec-maven-plugin.version}</version>
           <executions>
               <execution>
                   <id>add-redirect</id>
                   <goals>
                       <goal>java</goal>
                   </goals>
               </execution>
           </executions>
           <configuration>
               <mainClass>com.okta.developer.cli.AppRedirectUriManager</mainClass>
               <classpathScope>test</classpathScope>
               <arguments>
                   <argument>appId ${appId} redirectUri ${redirectUri}</argument>
               </arguments>
           </configuration>
       </plugin>
   </plugins>
</build>
Then update Jenkinsfile to add a block that runs mvn exec:java after it builds the image.
dir ('./charts/preview') {
  container('maven') {
    sh "make preview"
    sh "make OKTA_CLIENT_TOKEN=\$OKTA_CLIENT_TOKEN preview"
    sh "jx preview --app $APP_NAME --dir ../.."
  }
}

// Add redirect URI in Okta
dir ('./holdings-api') {
  container('maven') {
    sh '''
      yum install -y jq
      previewURL=$(jx get preview -o json|jq  -r ".items[].spec | select (.previewGitInfo.name==\\"$CHANGE_ID\\") | .previewGitInfo.applicationURL")
      mvn exec:java@add-redirect -DappId=$OKTA_APP_ID -DredirectUri=$previewURL
    '''
  }
}
Commit and push your changes, and your app should be updated with a redirect URI for [http://{yourPreviewURL}/login](http://{yourPreviewURL}/login "http://{yourPreviewURL}/login"). You’ll need to manually add a logout redirect URI for [http://{yourPreviewURL}](http://{yourPreviewURL} "http://{yourPreviewURL}") since this is not currently supported by Okta’s Java SDK.
To promote your passing pull request to a staging environment, merge it, and the master branch will be pushed to staging. Unfortunately, you won’t be able to log in. That’s because no process registers the staging site’s redirect URIs with your Okta app. If you add the URIs manually, everything should work.
Running Protractor Tests in Jenkins X
Figuring how to run end-to-end tests in Jenkins X was the hardest thing for me to figure out. I started by adding a new Maven profile that would allow me to run the tests with Maven, rather than npm.
NOTE: For this profile to work, you will need to add [http://localhost:8000/login](http://localhost:8000/login "http://localhost:8000/login") as a login redirect URI to your app, and [http://localhost:8000](http://localhost:8000 "http://localhost:8000") as a logout redirect URI.
<profile>
   <id>e2e</id>
   <properties>
       <!-- Hard-code port instead of using build-helper-maven-plugin. -->
       <!-- This way, you don't need to add a redirectUri to Okta app. -->
       <http.port>8000</http.port>
   </properties>
   <build>
       <plugins>
           <plugin>
               <groupId>org.springframework.boot</groupId>
               <artifactId>spring-boot-maven-plugin</artifactId>
               <executions>
                   <execution>
                       <id>pre-integration-test</id>
                       <goals>
                           <goal>start</goal>
                       </goals>
                       <configuration>
                           <arguments>
                               <argument>--server.port=${http.port}</argument>
                           </arguments>
                       </configuration>
                   </execution>
                   <execution>
                       <id>post-integration-test</id>
                       <goals>
                           <goal>stop</goal>
                       </goals>
                   </execution>
               </executions>
           </plugin>
           <plugin>
               <groupId>com.github.eirslett</groupId>
               <artifactId>frontend-maven-plugin</artifactId>
               <version>${frontend-maven-plugin.version}</version>
               <configuration>
                   <workingDirectory>../crypto-pwa</workingDirectory>
               </configuration>
               <executions>
                   <execution>
                       <id>webdriver update</id>
                       <goals>
                           <goal>npm</goal>
                       </goals>
                       <phase>pre-integration-test</phase>
                       <configuration>
                           <arguments>run e2e-update</arguments>
                       </configuration>
                   </execution>
                   <execution>
                       <id>ionic e2e</id>
                       <goals>
                           <goal>npm</goal>
                       </goals>
                       <phase>integration-test</phase>
                       <configuration>
                           <environmentVariables>
                               <PORT>${http.port}</PORT>
                               <CI>true</CI>
                           </environmentVariables>
                           <arguments>run e2e-test</arguments>
                       </configuration>
                   </execution>
               </executions>
           </plugin>
       </plugins>
   </build>
</profile>
TIP: You might notice that I had to specify two different executions for e2e-update and e2e-test. I found that running npm e2e doesn’t work with the frontend-maven-plugin because it just calls other npm run commands. It seems you need to invoke a binary directly when using the frontend-maven-plugin.
Instead of using a TRAVIS environment variable, you’ll notice I’m using a CI one here. This change requires updating crypto-pwa/test/protractor.conf.js to match.
baseUrl: (process.env.CI) ? 'http://localhost:' + process.env.PORT : 'http://localhost:8100',
Make these changes, and you should be able to run ./mvnw verify -Pprod,e2e to run your end-to-end tests locally. Note that you’ll need to have E2E_USERNAME and E2E_PASSWORD defined as environment variables.
When I first tried this in Jenkins X, I discovered that the jenkins-maven agent didn’t have Chrome installed. I found it difficult to install and discovered that [jenkins-nodejs](https://github.com/jenkins-x/builder-nodejs/blob/master/Dockerfile#L4 "jenkins-nodejs") has Chrome and Xvfb pre-installed. When I first tried it, I encountered the following error:
[21:51:08] E/launcher - unknown error: DevToolsActivePort file doesn't exist
This error is caused by a Chrome on Linux issue. I figured out the workaround is to specify --disable-dev-shm-usage in chromeOptions for Protractor. I also added some additional flags that seem to be recommended. I particularly like --headless when running locally, so a browser doesn’t pop up and get in my way. If I want to see the process happening in real-time, I can quickly remove the option.
If you’d like to see your project’s Protractor tests running on Jenkins X, you’ll need to modify crypto-pwa/test/protractor.conf.js to specify the following chromeOptions:
capabilities: {
  'browserName': 'chrome',
  'chromeOptions': {
    'args': ['--headless', ''--disable-gpu', '--no-sandbox', '--disable-extensions', '--disable-dev-shm-usage']
  }
},
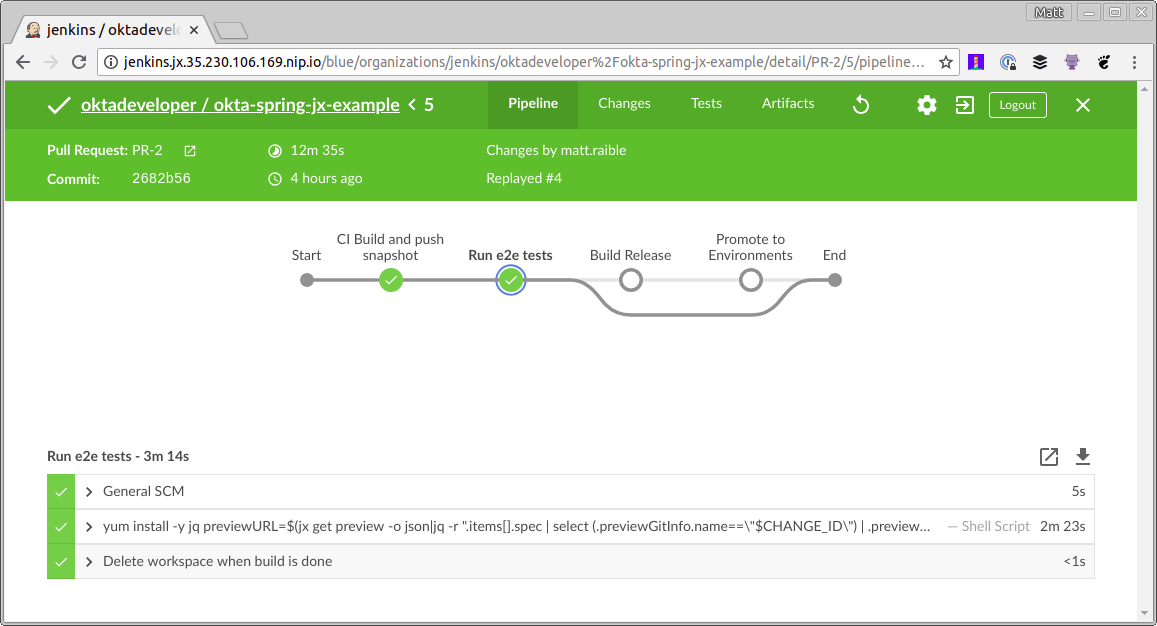
Then add a new Run e2e tests stage to Jenkinsfile that sits between the “CI Build” and “Build Release” stages. If it helps, you can see the final Jenkinsfile.
stage('Run e2e tests') {
 agent {
   label "jenkins-nodejs"
 }
 steps {
   container('nodejs') {
     sh '''
       yum install -y jq
       previewURL=$(jx get preview -o json|jq  -r ".items[].spec | select (.previewGitInfo.name==\\"$CHANGE_ID\\") | .previewGitInfo.applicationURL")
       cd crypto-pwa && npm install --unsafe-perm && npm run e2e-update
       Xvfb :99 &
       sleep 60s
       DISPLAY=:99 npm run e2e-test -- --baseUrl=$previewURL
     '''
   }
 }
}
After making all these changes, create a new branch, check in your changes, and create a pull request on GitHub.
git checkout -b enable-e2e-tests
git add .
git commit -m "Add stage for end-to-end tests"
git push origin enable-e2e-tests
I did have to make a few additional adjustments to get all the Protractor tests to pass:
- Create a release for your project.
- Create a pull request for your staging environment project.
- Auto-deploy it to staging environment so you can see it in action.
The tests will likely fail on the first run because the logout redirect URI is not configured for the new preview environment. Update your Okta app’s logout redirect URIs to match your PR’s preview environment URI, replay the pull request tests, and everything should pass!
You can find the source code for the completed application in this example on GitHub.
Thanks for reading ❤
#spring-boot #jenkins #kubernetes