How to Build a Movie Tracking System with Java and React
Java has been on the scene for a while. It’s adapted and grown over time, and the Java community still puts out exciting and interesting projects. One of those projects is Vert.x, a toolkit for building reactive applications on the JVM. Having worked on enterprise Java systems for longer than I care to admit, I’ve found Vert.x to be a fun way to develop all sorts of applications.
Then there’s JavaScript, which has been around for nearly as long as Java. It too has grown over time.
As a Java engineer who fell out of love with JavaScript some time ago, I’ve recently come to enjoy building web-based UIs using one of the newer additions to the Java family, React.js.
So when I decided to put together a website to track movies that I wanted to watch, I decided to use both frameworks: React.js on the front end and Vert.x on the back end. The result was a project that was both easy and delightful to put together. I’ll show you how I did it.
A plot summary of the project
First, a bit about the project. My family and I enjoy watching movies together, but come movie night, we often have trouble thinking of one we can all agree on. It’s not that there is a shortage of such movies — it’s just that we always think of them at other times and don’t jot them down. So, the purpose of this project is to keep track of interesting movies we haven’t seen.
I’ll keep it simple for this article, of course. I’ll omit many of the attributes that might make up a movie, limiting it to name and genre. I’ll also leave out the backing data store — the example here will just store movies in memory.
There are also various shortcuts that can be taken when creating React apps. I’ll intentionally bypass those shortcuts, lest they detract from a beginner’s understanding of React.
Also, while I deal with microservice architectures by day, this project won’t be that. Instead, it will be a simple, self-contained web application. If you’re a microservice-oriented programmer yourself, you can think of this project as representing a top-level service, which in turn could talk to a lower-level data service.
Below is a representation of the application. We’ll have a React app displaying our UI. That app talks to the Vert.x app, which in turn will validate and persist our data. Both apps are bundled into a single executable (technically, a Java ARchive, or JAR file).
Meet the actors
Most readers will likely be familiar with either Java or Node.js, along with their ecosystems. Still, we’ll briefly summarize them here.
- Node.js is a Javascript runtime environment, built on Chrome’s V8 Javascript engine. It’s commonly used to power serverside JavaScript webapps, but that’s not all it does. We can also run non-web-related software on Node.js. In this tutorial, we’ll use Node.js solely to help us package up and test our Web UI.
- npm (which ostensibly stands for Node Package Manager) is the main package manager used with Node. npm is a tool is installed alongside Node.js that communicates with the npm package repository.
- Java, in this context, is two things. It’s a programming language, but it’s also a platform, made up primarily of a compiler and a runtime environment (the Java Virtual Machine, or JVM). These days, there are two main distributions of Java: Oracle Java and OpenJDK. Owing to potential licensing issues with Oracle’s distro, most developers opt these days for OpenJDK.
- Maven is the most common package manager and build system used in the Java ecosystem. Maven can be used via a command-line tool called mvn. It also integrates well with most common Java IDEs. Maven Central is the central repository where Maven packages are stored.
Likewise, much has been written about React.js and Vert.x, but we’ll briefly summarize them here:
- React.js is a library for building rich, interactive user interfaces. It is often described as the “V” in MVC (Model/View/Controller) applications.
- Vert.x is a toolkit for building reactive applications on the JVM (Java Virtual Machine). As with Node.js, it’s event-loop-based and, therefore, offers tools that make it easy to write non-blocking code. It provides additional benefits such as its actor model and event bus, as well as a polyglot development environment.
The table below compares the components of each ecosystem:

Assembling the Cast
Node.js and npm
The first thing we’ll need installed is Node.js and npm. Most Javascript developers will already have these installed and can skip to the next section. Otherwise, to validate whether you have Node.js and npm installed, head to a command line and type node -v.
If that doesn’t work, let’s install them. Simply go to the Node.js installation page, find the latest installer for your platform, and run it. Again, try node -v and npm -v.
This time, each should print out its version. (The version numbers might be different, which is fine).
Note: A third binary, npx, is also installed. npx’s purpose is to make it easier to run command-line tools that are hosted on the npm repo.
Java and Maven
We’ll also need Java and Maven installed. Let’s first validate that Java is installed. Head to your command line and type java -version. If that works, congratulations. If not, you’ll need to install it.
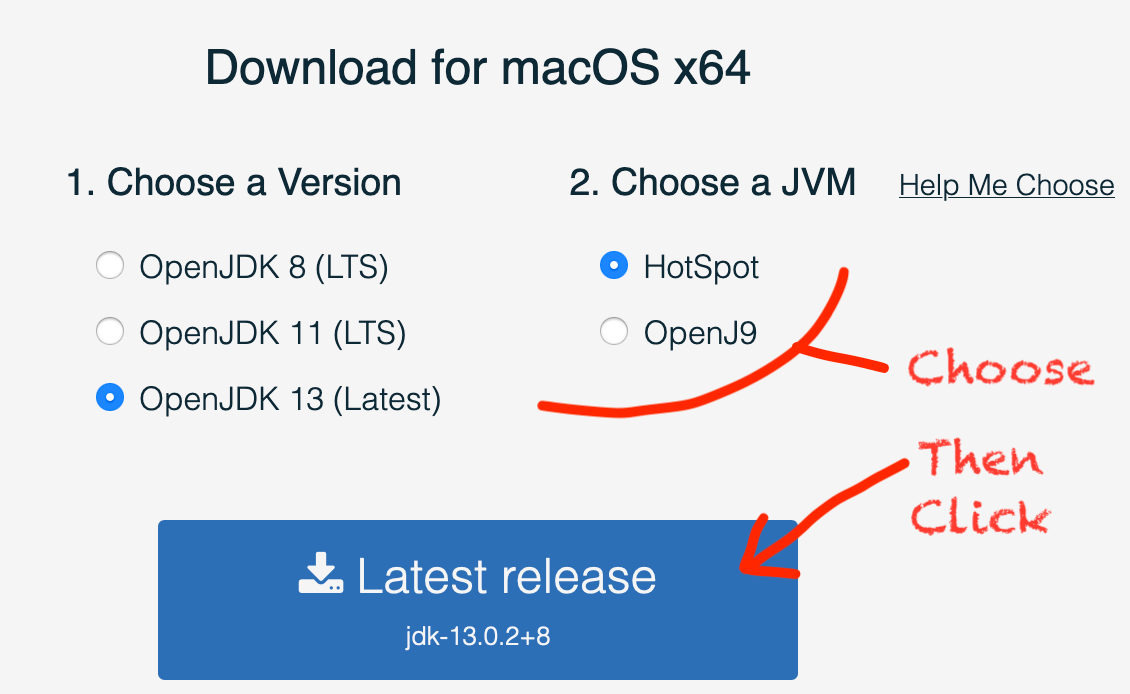
As mentioned, these days OpenJDK is favored over Oracle’s Java distribution. The easiest way to install OpenJDK is by heading to AdoptOpenJDK. Choose the version of Java you want (generally, the latest version) and the JVM flavor (HotSpot is fine). Then click the big blue download button to download the installer. Launch the installer and follow the instructions.
Next, let’s check for a Maven installation: mvn -v
If that command doesn’t work, you’ll need to install Maven. Go to the Maven download site and download either the .tar.gz or the .zip binaries (note: there aren’t different packages for different operating systems). Then follow the installation instructions on the Maven installation page.

When you’re done,mvn -v should print the version number.
Creating our React Project
Let’s get on to the fun stuff. First, we need a place to put our React app. Our directory structure will look like this:
movies/
      react-app/
      vertx/
So starting in a suitable location (such as your home or documents directory), create a movies/ directory, and then cd into it. For example, on OS X:
$ cd ~/Documents
$ mkdir movies
$ cd movies
create-react-app
Now to create our React app. For this we use a tool aptly called Create React App. This tool was created by Facebook, and is hosted on npm. We’ll execute it using the npx library I mentioned earlier:
npx create-react-app react-app
After a minute or so, you should have a new react-app/ subdirectory, containing a skeletal React app:
$ cd react-app
$ ls
README.md   node_modules   package.json   public   src   yarn.lock
The most interesting items are the public/ directory, which contains static assets such as HTML pages and icons, and the src/ directory, which contains the app’s JavaScript and CSS. We’ll examine the contents shortly. For now, let’s launch the app that was created for us.
Within the react-app/ directory, run $ npm start. npm will run our code under its default port, 3000, and open a browser for us. In a few seconds, we should see something like this:
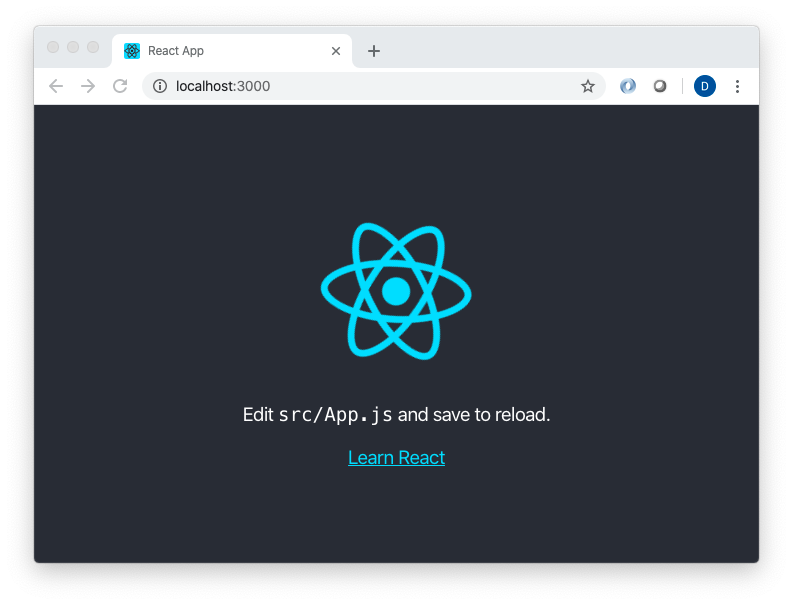
Before we move on, let’s make a quick edit to the src/App.js file (as suggested by the rendered app itself). For example, modify the `` content to something like this:
<p>
 I have edited <code>src/App.js</code> and will save to reload.
</p>
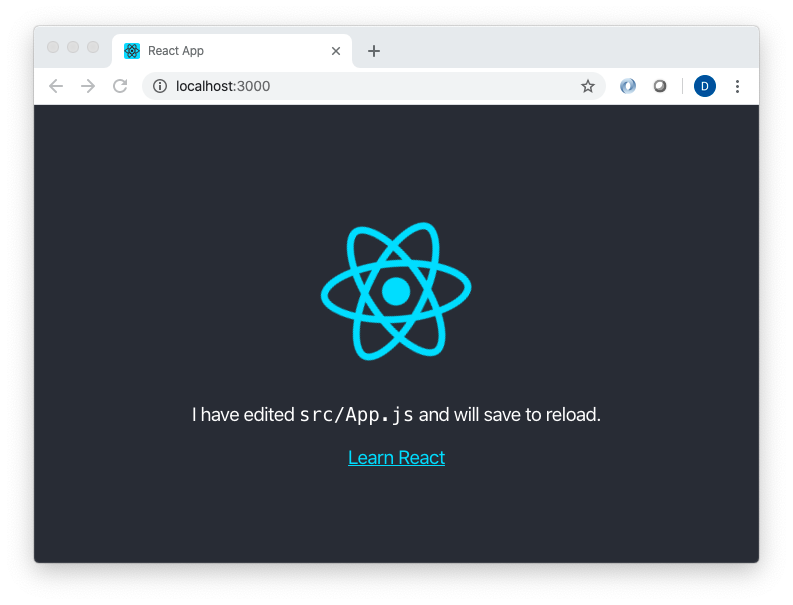
Save the file, and then — without doing anything else — go back to your browser. You should see your changes reflected automatically:
You can stop your npm process by using control-C.
Creating our basic files
Rather than going through the provided boilerplate files, we’ll create our own. The first thing we must do in those directories is delete most of the files. This is a common pattern you’ll follow as you use create-react-app: first, create your app; next, delete most of the resultant boilerplate.
Let’s start in the src/ directory. There, delete all but the index.css and index.js files. Next, cd into the public/ directory, and delete everything except the index.html file.
Now we’ll open the remaining public/index.html file. Replace its contents with the following:
<!DOCTYPE html>
<html lang="en">
  <head>
    <meta charset="utf-8" />
    <title>Movies</title>
  </head>
  <body>
    <div id="root"></div>
  </body>
</html>
Next, we’ll focus on the src/ directory. From there, open the index.js file and replace its contents with
import React from 'react';
import ReactDOM from 'react-dom';
import './index.css';
import App from './App';
ReactDOM.render(<App />, document.getElementById('root'));
Let’s pause to see what’s happening here. When npm compiles and runs an app like ours that was via create-react-app, it will look for two files: index.html and index.js— everything starts from there. Our index.html file is very basic — the most interesting part is the line that identifies where the meat of our React app will be placed:
<div id="root"></div>
In turn, index.js is the file that effectively bootstraps the app. That happens in this line:
ReactDOM.render(<App />, document.getElementById('root'));
There, we make a call to ReactDOM.render(), telling it first what to render, then where to render it. The what is an instance of an App Component, which we will review next. The where is the HTML element identified by the provided selector (document.getElementById('root'), which we’d defined in index.html).
You’ll also notice that there are a few imports on top of index.js. Using imports is how the remaining components (or modules) of our app will effectively be sucked in. The first two, React and ReactDOM, obviously import modules from the framework itself. index.css is the next import, so let’s open that file and populate it with the following:
body {
 margin: 0;
 font-family: 'Helvetica Neue', sans-serif;
 -webkit-font-smoothing: antialiased;
 -moz-osx-font-smoothing: grayscale;
}
Finally, there’s this line:
import App from './App'’';
This tells us to import a module called App, from a file called App.js in the same directory (the .js file extension is implied). Remember — our index.js file has specified that an App Component instance is rendered in place of the document.getElementById(‘root’) element in our HTML file.
Components are the primary building block of any React app. You can think of a component as a UI element, which can display itself on a screen, react to changes to an underlying model, and cause changes to that model. Components also have lifecycle hooks that can be tapped into. As you would expect, components can be embedded within other components.
Let’s define our App component by opening the App.js file and populating it with the following:
import React, { Component } from "react";
import './App.css';
class App extends Component {
  render() {
    return (
      <div className="App">
          <h1>
            Movies
          </h1>
      </div>
      )
    }
  }
export default App;
A few things to note. First, this file imports an App.css module (which contains Cascading Style Sheet, or CSS, styles). Component logic and style are typically paired in this manner with React apps. So any Foo component will have its behavior defined in a Foo.js file and its style defined in a Foo.css file.
Let’s create a simple style for our App component within App.css:
.App {
  text-align: center;
  background-color: #fff;
  min-height: 100vh;
  display: flex;
  flex-direction: column;
  align-items: center;
  justify-content: center;
  font-size: calc(10px + 2vmin);
}
h1 {
  color: #666666;
}
.App-link {
  color: #61dafb;
}
Beyond the imports, most of App.js is involved with declaring an App object that extends react.Component. By extending this class, we are provided with a number of functions that we can override. Perhaps the most important of these is the render() function. Here, we return the markup that defines how our component should be rendered to the screen. Our App component returns the following markup:
<div className="App">
  <h1>
    Movies
  </h1>
</div>
Readers with front end experience may think they recognize that markup as HTML. They would be wrong. While it looks like HTML, it’s actually another language called JSX. JSX allows us to easily mix markup with our JavaScript to create UI elements.
While JSX looks like HTML for the most part, there are subtle differences. In fact, there’s one clue in the snippet above that we’re not working with traditional HTML — the className tag in our div. If this was pure HTML, we’d declare App as a class, but since class is a Javascript keyword, we use the className tag instead.
Let’s launch our app again and see where we are:
$ npm start
We should be greeted with a simple screen:
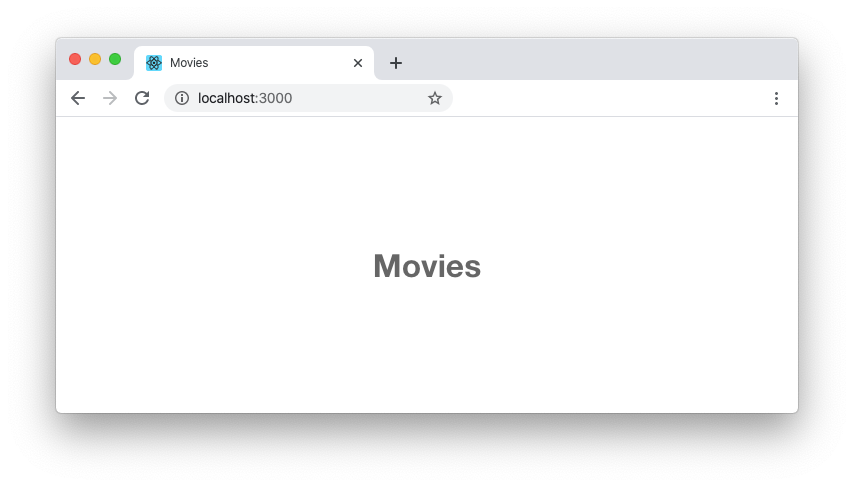
Looks good. Now let’s display some movies!
Displaying Movies
First, let’s outline the components that we’re going to build. We’ll have three, each depicted in their own color below:
The blue component represents the App component that we’ve already built. Within App, we’ll add two more components:
MovieForm: Represented in orange, this component will allow us to enter new movies to our list.MovieList: Represented in green, this component will display the movies on our list.
Adding the movie list display
Let’s start by creating two files in the src/ directory: MovieList.js and MovieList.css. The latter should contain the following:
.movie-list {
  border-collapse: collapse;
  margin-top: 20px;
  width: 100%;
}

table, th, td {
  border: 1px solid black;
}

th, td {
  padding: 8px;
}
MovieList.js should contain this:
import React, { Component } from "react";
import './MovieList.css'

class MovieList extends Component {

    constructor(props) {
        super(props);
        this.toMovie = this.toMovie.bind(this);
        this.genreLabel = this.genreLabel.bind(this);
    }

    genreLabel(g) {
        return "?";
    }

    toMovie(m) {
        var g = "?";
        for (var i = 0; i < this.props.genres.length; i++) {
            if (this.props.genres[i].value == m.genre) {
                g = this.props.genres[i].label;
                break;
            }
        }
	return (<tbody key={m.guid}><tr><td>{m.title}</td><td>{g}</td></tr></tbody>)
    }

    render() {
        return (
            <table className="movie-list" >
	    <tbody>
            <tr>
                <th>Name</th>
                <th>Genre</th>
            </tr>
            </tbody>
            {this.props.movies.map(this.toMovie)}
            </table>
        )
    }

}

export default MovieList;
Constructors
The first interesting thing you’ll notice is that MovieList overrides the default constructor for Component. A parameter called props is passed to the constructor. We’ll examine that parameter in a moment, but note that it’s passed to the superclass’ constructor. This sets the value of a props class-level variable.
You’ll also see a function bound to the current App instance — e.g.
this.toMovie = this.toMovie.bind(this);. This allows the toMovie function to be called from any context (such as from UI events). You’ll bind() your functions this way a lot as you develop React apps.
Rendering the UI
As with most components, the render() function is where the interesting stuff happens. Any time React determines that any components need to be re-displayed in the UI, each component’s render() function is called.
In MovieDisplay’s render() function, we create a table. Remember, although it looks like we’re using HTML, we’re actually writing JSX. This means there are a few differences to be aware of (e.g. the className tag mentioned earlier). It also means that we can easily mix JavaScript in. Let’s look at one example:
{this.props.movies.map(this.toMovie)}
We’ve created a table, but how do we populate it with rows of data? For this, we can use JavaScript.
Earlier, we mentioned the props object that was passed to this component’s constructor. As we’ll soon see, as part of that props object, we are providing an array of movies. So we iterate over that array using map(), to which we pass toMovie as the mapping function. (Here and here are some resources to explain mapping functions, if you need them). In turn, toMovie takes a movie object and returns the JSX markup required to display a table row:
toMovie(m) {
  var g = "?";
  for (var i = 0; i < this.props.genres.length; i++) {
      if (this.props.genres[i].value == m.genre) {
          g = this.props.genres[i].label;
          break;
      }
  }
  return (<tbody key={m.guid}><tr><td>{m.title}</td><td>{g}</td></tr></tbody>)
 }
Note: That _key_ tag is a React requirement. Each unique UI item in a list must have its own key to uniquely identify it. We’ll be assigning GUIDs to our movies, so we’ll use those as unique keys.
Let’s add this component to the App component and see what we’ve got. Within App.js, we first import MovieList:
import MovieList from "./MovieList"
Just below the import statements, we’ll create an array of movie genres:
const genres = [
  {value: 'action', label: 'Action'},
  {value: 'comedy', label: 'Comedy'},
  {value: 'drama', label: 'Drama'},
  {value: 'thriller', label: 'Thriller'},
  {value: 'musical', label: 'Musical'}
]
Then an array of sample movies to display:
const movies = [
  {genre: 'action', title: 'Captain Marvel', guid: '6530b64b-0753-4629-a1bb-6716109b964b'},
  {genre: 'comedy', title: 'Groundhog Day', guid: 'ba5b9881-7128-485f-84d5-afc50f199b23'},
  {genre: 'action', title: 'Midway', guid: '2e93da48-d451-4df0-b77c-41dddde428ad'},
  {genre: 'drama', title: 'Dances With Wolves', guid: 'f207c1a0-3bef-48f1-a596-29b84887e94d'},
  {genre: 'thriller', title: 'Scream', guid: '3733f942-6a44-4eb9-af54-586d9d15eb67'}
]
Finally, within the render() function, below the “Movies” header, we’ll add an instance of MovieList, passing the genres and the movies to the props argument to MovieList’s constructor:
<h1>
  Movies
</h1>
<div>
  <MovieList movies={movies} genres={genres} />
</div>
Then let’s return to our browser and see what we’ve got:
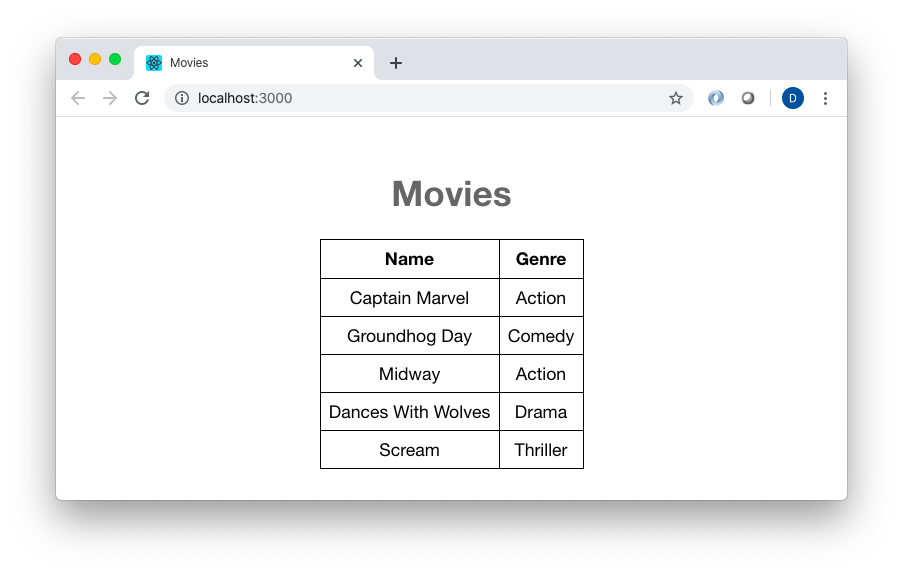
Adding the Movie Entry Form
Now let’s add the ability to create movies. We’ll start by creating two files in the src/ directory: MovieForm.js and MovieForm.css. The latter should contain the following:
.movie-form {
	border: 1px solid #666;
	padding: 8px;
	background-color: #aaa;
}

.movie-form-element {
	border: 1px solid #666;
	padding: 5px;
	background-color: #fff;
	margin-left: 3px;
	margin-right: 3px;
	margin-top: 2px;
	margin-bottom: 2px;
	padding: 8px;
}

.movie-form-element label {
	color: black;
	font-size: 14px;
}

.movie-form-element input {
	color: black;
	font-size: 12pt;
	margin: 2px;
}

.movie-form-element select {
	color: black;
	font-size: 12pt;
	margin: 2px;
}
MovieForm.js should contain this:
import React, { Component } from "react";
import './MovieForm.css'
class MovieForm extends Component {
constructor(props) {
super(props);
this.handleChangeTitle = this.handleChangeTitle.bind(this);
this.handleChangeGenre = this.handleChangeGenre.bind(this);
this.changeState = this.changeState.bind(this);
this.toGenreOption = this.toGenreOption.bind(this);
this.state = { title: '', genre: 'comedy' };
}
handleChangeTitle(event) {
this.changeState( { title: event.target.value } )
}
handleChangeGenre(event) {
this.changeState( { genre: event.target.value } )
}
changeState(keyVal) {
  this.setState( Object.assign({}, this.state, keyVal) )
}
toGenreOption(g) {
return (<option key={g.value} value={g.value}>{g.label}</option>)
}
render() {
return (
<>
<form className="movie-form" onSubmit={this.tryCreateMovie}>
<span className="movie-form-element">
<label>Title
<input type="text" value={this.state.title} onChange={this.handleChangeTitle} />
</label>
</span>
<span className="movie-form-element">
<label>Genre
<select value={this.state.genre} onChange={this.handleChangeGenre}>
  {this.props.genres.map(this.toGenreOption)}
</select>
</label>
</span>
<span className="movie-form-element">
<input type="submit" value="Submit" />
</span>
</form>
</>
)
}
}
export default MovieForm;
Maintaining state
Just like MovieList, MovieForm overrides the default constructor and accepts a props parameter. It also binds a number of functions to the current MovieForm instance — e.g.
this.handleChangeTitle = this.handleChangeTitle.bind(this);
But, unlike MovieList, in MovieForm’s constructor we create a state object for the component. Here, state simply represents the movie that we’re currently creating — when this component first loads, its state will be an object representing a movie with a blank title and a blank genre.
In any component, state is a special sort of variable. It’s there not only to maintain state for the component, but also, when reassigned, to invoke re-rendering of the component in the UI.
Keep in mind that objects assigned to the state variable are intended to be immutable. That is, while we technically could call it
this.state.title = 'Dances With Wolves' we’re strongly discouraged from doing so. Doing this would mean the UI does not update to reflect the new state.
Instead, we should call it something like this:
this.setState({ title: 'Dances With Wolves', genre: this.state.genre })
Because we invoked setState, the UI would re-render the component to reflect the new title.
You might think that re-creating the state object in this manner could get tedious. You’d be right — especially for larger objects. That’s why we created the changeState() function:
changeState(keyVal) {
this.setState( Object.assign({}, this.state, keyVal) )
}
This method leverages the Object.assign() function, which essentially merges all of the parameters passed to it (an empty object, the component’s current state, and the changes to the state that we want to make) and returns a new object representing the new state. For example, if our current state looks like this:
{ title: 'Dances With Wolves', genre: 'Action' }
and we call changeState({ genre: 'Drama' }), then our new state will look like this:
{ title: 'Dances With Wolves', genre: 'Drama' }
We have two event handlers that leverage the changeState() function: handleChangeGenre() and handleChangeTitle().
Wiring state to the UI
Now let’s look at the render() function. As we discussed earlier, the use of JSX makes it easy to mix JavaScript into your layout. Let’s look at one example:
<input type="text" value={this.state.title} onChange={this.handleChangeTitle} />
Here, we’re creating a simple text field. But we can easily wire in the MovieForm component’s state to provide the text field’s value. We can just as easily attach an event handler (the aforementioned handleChangeTitle) to the text field. In other words, every time this text field renders, its value will match state.title. And any time the value is changed (e.g. the user types a character in the text field), the handleChangeTitle event handler is called, and the state is updated.
We also use JavaScript to create a select widget from which to choose genres, in this chunk:
<select value={this.state.genre} onChange={this.handleChangeGenre}>
{this.props.genres.map(this.toGenreOption)}
</select>
Here, we create a standard HTML select widget, and use Javascript to provide the options. As we did with MovieList, we’ll provide an Array of genres to the props object that was passed to this Component’s constructor. So we iterate over that Array using map(), and then pass the toGenreOption function as the mapping function. In turn, toGenreOption takes a genre object and returns the JSX markup required to display a select item:
return (<option key={g.value} value={g.value}>{g.label}</option>)
Let’s add this component to the App component and see what we’ve got. Within App.js, we first import MovieForm:
import MovieForm from "./MovieForm"
Then, within the render() function, below the “Movies” header, we’ll add an instance of MovieForm, passing the genres to the props argument to MovieForm’s constructor:
<h1>
  Movies
</h1>
<div>
  <MovieForm genres={genres} />
</div>
Let’s return to our browser and see what we’ve got:
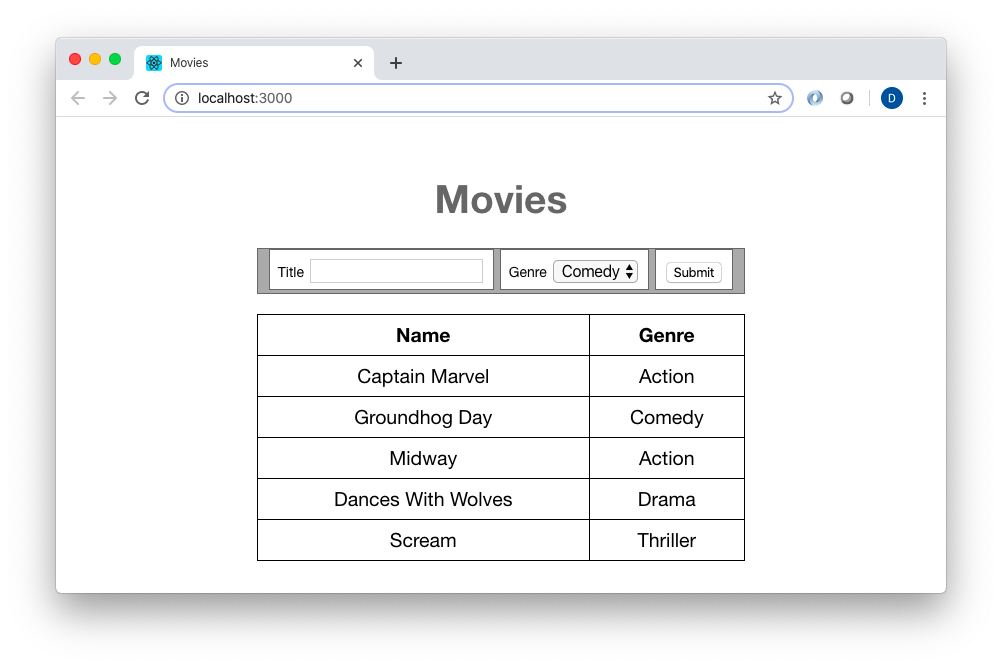
Creating our Backend Movie Service
As of now, our movie form doesn’t really serve any purpose. That will change, but first, let’s create our Vert.x movie service.
Vert.x structure
Time to set up our Vert.x application. If you work with an IDE like IntelliJ or Eclipse, you could use it to automatically generate a Maven project. Here, we’ll just do it by hand. In our top-level directory, we’ll create a vertx directory, right alongside our react-app directory. Inside that, we’ll create the following structure:
├── pom.xml
├── src/
│   ├── main/
│   │   └── java/
│   │   └── resources/
This is the default directory structure for a minimal Maven project. src/main/java contains, as you’d guess, the Java source for the project. src/main/resources contains resources (config files, images, etc) that are to be packaged into the Java application. Generally, we’d also have src/test/java and src/test/resources directories, but for the sake of brevity (and not a dislike of tests!) we’re omitting those here.
pom.xml is the file that tells Maven how the project is structured. The bulk of ours file will serve to configure Vert.x . Copy the contents of the file below into your pom.xml:
<?xml version="1.0" encoding="UTF-8"?>
<project xmlns="http://maven.apache.org/POM/4.0.0"
	xmlns:xsi="http://www.w3.org/2001/XMLSchema-instance"
	xsi:schemaLocation="http://maven.apache.org/POM/4.0.0 http://maven.apache.org/xsd/maven-4.0.0.xsd">
	<modelVersion>4.0.0</modelVersion>

	<groupId>com.me</groupId>
	<artifactId>movies-app</artifactId>
	<version>1.0.0-SNAPSHOT</version>

	<properties>
		<project.build.sourceEncoding>UTF-8</project.build.sourceEncoding>

		<maven.compiler.source>1.8</maven.compiler.source>
		<maven.compiler.target>1.8</maven.compiler.target>

		<maven-compiler-plugin.version>3.8.0</maven-compiler-plugin.version>
		<maven-shade-plugin.version>2.4.3</maven-shade-plugin.version>
		<maven-surefire-plugin.version>2.22.1</maven-surefire-plugin.version>
		<exec-maven-plugin.version>1.5.0</exec-maven-plugin.version>

		<vertx.version>3.8.1</vertx.version>
		<junit-jupiter.version>5.4.0</junit-jupiter.version>

		<main.verticle>com.me.Main</main.verticle>
	</properties>

	<dependencyManagement>
		<dependencies>
			<dependency>
				<groupId>io.vertx</groupId>
				<artifactId>vertx-stack-depchain</artifactId>
				<version>${vertx.version}</version>
				<type>pom</type>
				<scope>import</scope>
			</dependency>
		</dependencies>
	</dependencyManagement>

	<dependencies>
		<dependency>
			<groupId>io.vertx</groupId>
			<artifactId>vertx-core</artifactId>
		</dependency>
		<dependency>
			<groupId>io.vertx</groupId>
			<artifactId>vertx-web</artifactId>
		</dependency>
		<dependency>
			<groupId>org.apache.commons</groupId>
			<artifactId>commons-lang3</artifactId>
			<version>3.9</version>
		</dependency>
	</dependencies>

	<build>
		<plugins>
			<plugin>
				<artifactId>maven-compiler-plugin</artifactId>
				<version>${maven-compiler-plugin.version}</version>
			</plugin>
			<plugin>
				<artifactId>maven-shade-plugin</artifactId>
				<version>${maven-shade-plugin.version}</version>
				<executions>
					<execution>
						<phase>package</phase>
						<goals>
							<goal>shade</goal>
						</goals>
						<configuration>
							<transformers>
								<transformer
									implementation="org.apache.maven.plugins.shade.resource.ManifestResourceTransformer">
									<manifestEntries>
										<Main-Class>io.vertx.core.Launcher</Main-Class>
										<Main-Verticle>${main.verticle}</Main-Verticle>
									</manifestEntries>
								</transformer>
								<transformer
									implementation="org.apache.maven.plugins.shade.resource.AppendingTransformer">
									<resource>META-INF/services/io.vertx.core.spi.VerticleFactory</resource>
								</transformer>
							</transformers>
							<artifactSet>
							</artifactSet>
							<outputFile>${project.build.directory}/${project.artifactId}-${project.version}-fat.jar
							</outputFile>
						</configuration>
					</execution>
				</executions>
			</plugin>
			<plugin>
				<artifactId>maven-surefire-plugin</artifactId>
				<version>${maven-surefire-plugin.version}</version>
			</plugin>
			<plugin>
				<groupId>org.codehaus.mojo</groupId>
				<artifactId>exec-maven-plugin</artifactId>
				<version>${exec-maven-plugin.version}</version>
				<configuration>
					<mainClass>io.vertx.core.Launcher</mainClass>
					<arguments>
						<argument>run</argument>
						<argument>${main.verticle}</argument>
					</arguments>
				</configuration>
			</plugin>
		</plugins>
	</build>


</project>
You can change the groupId (for example, to your own reverse domain name), artifactId, and/or version if you’d like. The rest should pretty much stay the same.
Vert.x verticles and controllers
Now let’s write some code. Vert.x provides a sort of actor model, made up of independent components called verticles. It’s a powerful tool that we can choose to leverage as little or as much as we want to. Here, we will create a verticle as the launching point of our application.
In the src/main/java directory, we’ll create a package called com.me (or, if you’d like, you can use your own reverse domain name). This means simply that we will create the subfolders com/me.
Let’s pause to check our overall directory structure, which should look something like this:
├── react-app
│   (stuff)
├── vertx
│   ├── pom.xml
│   ├── src/
│   │   ├── main/
│   │   │   ├── java/
│   │   │   │   ├── com/
│   │   │   │   │   └── me/
│   │   │   └── resources/
In that new me/ directory, we’ll add a Main.java file with the following contents:
package com.me;
import io.vertx.core.AbstractVerticle;

public class Main extends AbstractVerticle {

  @Override
  public void start() throws Exception {
    System.out.println("Movie app starting...");
    new AppServer().run(vertx);
  }

}
In the same directory, we’ll create an AppServer.java file with these contents:
package com.me;

import io.vertx.core.Vertx;
import io.vertx.core.http.HttpServer;
import io.vertx.core.http.HttpServerResponse;
import io.vertx.core.logging.Logger;
import io.vertx.core.logging.LoggerFactory;
import io.vertx.ext.web.Router;
import io.vertx.ext.web.handler.StaticHandler;

public class AppServer {

    private final Logger LOGGER = LoggerFactory.getLogger( AppServer.class );

    public void run(Vertx vertx) {
        HttpServer server = vertx.createHttpServer();

        Router router = Router.router(vertx);

        router.get("/movies").handler(ctx -> {
            HttpServerResponse resp = ctx.response();
            resp.end("No movies!");
        });

        router.post("/movies").handler(ctx -> {
            HttpServerResponse resp = ctx.response();
            resp.end("Unable to save movies");
        });

        server.requestHandler(router).listen(80, http -> {
            if (http.succeeded()) {
                LOGGER.info("MovieApp HTTP server started on port 80");
            } else {
                LOGGER.info("MovieApp HTTP server failed to start");
            }
        });

    }

}
What have we done? Vert.x expects a verticle instance as the application’s entry point, so we created one in the Main class. This class really only serves to implement io.vertx.core.AbstractVerticleand override that class’s start() lifecycle method. Within start(), we simply create an instance of our AppServer class and run it. Notice that we pass a vertx argument to the AppServer’s run() method. This is an instance of io.vertx.core.Vertx, defined in AbstractVerticle.
You might wonder how Vert.x will know to use Main as the program’s entry point. It’s simple — we earlier defined it in the pom.xml file as the properties : main.verticle value.
The AppServer class is essentially our webapp’s controller. Technically, it’s just a regular old class, extending straight from java.lang.Object. We’ve created a single method, run(), that does all the work.
In run(), we first create an instance of io.vertx.core.http.HttpServer (which, as mentioned earlier, leverages Jetty underneath). Next, we create an io.vertx.ext.web.Router instance, which will route HTTP requests to handlers. Handlers are literally instances of the io.vertx.coreHandler class (which defines a single void handle(RoutingContext ctx) method), but we leverage Java 8 lambdas to implement those handlers. For example, this chunk defines a handler for GET requests to the_/movies_ path:
router.get("/movies").handler(…)
Whereas router.post("/movies").handler(…) defines a handler for POST requests to the same path.
Handlers
The handlers themselves are simple. They simply return a plain text response to the caller. However, notice that we’re not literally returning that text from a method. Because Vert.x is a reactive framework that runs on an event loop, we need to explicitly say when we’re ready to send the response back to the caller.
So first, the handler() method is passed a RoutingContext instance, from which it can derive the HttpServerResponse to use. Then, we simply call the HttpServerResponse’s end() method to send the response back to the caller.
Next, we glue everything together, telling HttpServer to use Router as its request handler, then to start up and listen on port 80. We provide a lambda to be invoked after the server attempts to startup, to tell us whether startup was successful or not. We use this callback approach, because we don’t want to block Vert.x’s thread on anything — including waiting for the server to start up.
Let’s test out what we’ve got. From the command line in our project’s vertx/ directory, we’ll compile and build the app by running mvn clean install.
Once that’s done, run an ls within the directory to see what we’ve got. You should notice a new target/ subdirectory. Inside there are all of the build artifacts we just generated. The most important is movies-app-1.0.0-SNAPSHOT-fat.jar . This is the entire, self-contained serverside application, complete with an embedded Netty-based web server.
Let’s run it now. In the sample directory, run the following:
java -jar target/movies-app-1.0.0-SNAPSHOT-fat.jar
You should see something like this:
Movie app starting…
Feb 27, 2020 7:23:37 AM io.vertx.core.impl.launcher.commands.VertxIsolatedDeployer
INFO: Succeeded in deploying verticle
Feb 27, 2020 7:23:37 AM com.me.AppServer
INFO: MovieApp HTTP server started on port 80
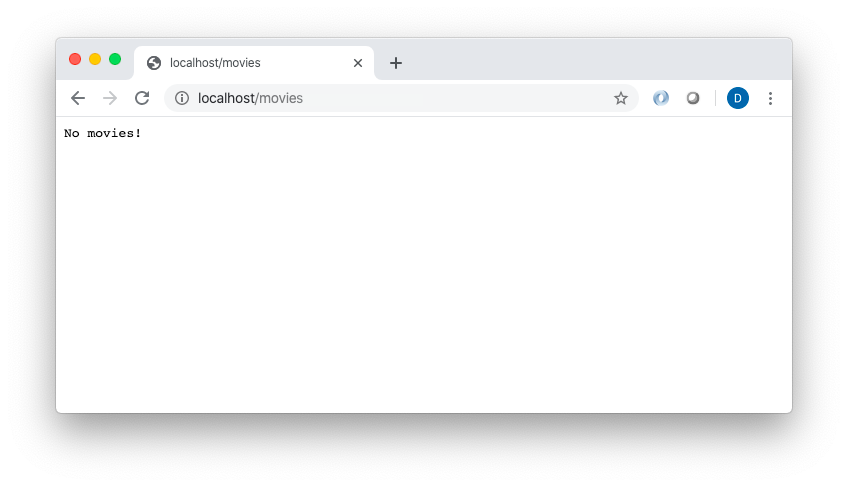
Head to a web browser, and enter http://localhost/movies (which will issue a GET request to port 80). You should see something like this:
Saving movie instances
In the name of brevity, we won’t actually save our movies to a database (after this tutorial, you can take that on as a homework project.) Instead, we’ll simply store movie instances in-memory. That means that the movies will disappear when the Vert.x server restarts, but that’s fine for our purposes.
We’ll want a model to represent our movies, so in that me/ directory, add a Movie.java file. Our model will consist of the following fields:
private String genre;
private String title;
private UUID guid;
So, with all of the ceremony, our class will look like this:
package com.me;

import java.util.UUID;

public class Movie {

    private String genre;
    private String title;
    private UUID guid;

    public Movie() {

    }

    public Movie(String genre, String title, UUID guid) {
        super();
        this.genre = genre;
        this.title = title;
        this.guid = guid;
    }

    public String getGenre() {
        return genre;
    }

    public void setGenre(String genre) {
        this.genre = genre;
    }

    public String getTitle() {
        return title;
    }

    public void setTitle(String title) {
        this.title = title;
    }

    public UUID getGuid() {
        return guid;
    }

    public void setGuid(UUID guid) {
        this.guid = guid;
    }

}
Now let’s flesh out our AppServer class to save movies. Add this method:
private void postMovie(RoutingContext ctx, Vertx vertx) {
  final Movie movie = Json.decodeValue(
      ctx.getBodyAsString(), Movie.class);
  if (StringUtils.isEmpty(movie.getGenre()) ||
      StringUtils.isEmpty(movie.getTitle())) {
   ctx.response()
   .setStatusCode(400)
   .putHeader("content-type", "application/json")
   .end("{ 'error': 'Title and Genre must by non-empty' }");
 }
 vertx.eventBus().request("service.movie-add", Json.encode(movie),
   res -> {
     if ( res.succeeded() ) {
       ctx.response()
       .putHeader("content-type", "application/json")
       .end( res.result().body().toString() );
     } else {
       ctx.fail( res.cause() );
     }
   });
}
This method retrieves the request body (ctx.getBodyAsString()) and JSON decodes it into a movie. It performs some basic input validation, returning an HTTP status of 400 with simple a JSON error message upon validation failure.
Assuming validation passes, we next introduce Vert.x’s event bus to our app. The event bus provides a way for Vert.x apps’ components to communicate with each other while remaining completely decoupled. They do this by publishing and consuming messages. Conceptually, you can almost think of the event bus as a message queue.
Event bus communication in our app will look like this:
AppServer will post messages to two event bus “channels”: the getMovie() method will publish to “service.movie-get”, and the postMovie() method will publish to “service.movie-add”. A verticle called MovieRepository — which we’ll create shortly — will consume those messages, process them, and then send messages back in response over the same channels.
We get a reference to the event bus through our Vertx instance. Then we publish a message on the service.movie-add channel, along with our new movie instance as a payload. Because we should expect a message in response from the MovieRepository message consumer, we provide a message response handler. Assuming all went well, we will return the message’s body as JSON back to the original HTTP caller. If a failure occurred, we’ll send a generic failure (500) response.
To use the postHandler() request handler method, we’ll modify our post request handler (in the run() method) like this:
router.post("/movies").handler(ctx -> postMovie(ctx, vertx));
In order to properly handle POST requests, we also need to add the following line to our run() method (just below the line in which we create our router instance):
router.route().handler(BodyHandler.create());
Now, we’ll create a second verticle to serve as our data repository. As mentioned earlier, we will just store movies in memory here. But think of this class as a typical Repository or DAO object that communicates with a database.
In the me/ directory, create a MovieRepository.java file with the following contents:
package com.me;

import java.util.ArrayList;
import java.util.List;
import java.util.UUID;

import io.vertx.core.AbstractVerticle;
import io.vertx.core.json.Json;

public class MovieRepository extends AbstractVerticle {

	private static final List<Movie> MOVIES = new ArrayList<>();

	@Override
	public void start() throws Exception {
		System.out.println("MovieRepository starting...");

		vertx.eventBus().consumer("service.movie-add", msg -> {
			Movie movie = Json.decodeValue((String)msg.body(), Movie.class);
			movie.setGuid(UUID.randomUUID());
			MOVIES.add(movie);
			msg.reply(Json.encode(movie));
		});

		vertx.eventBus().consumer("service.movie-get", msg -> {
			msg.reply(Json.encode(MOVIES));
		});
	}

}
Notice that, like our Main class, this class also extends AbstractVerticle and overrides the start() method. Here, start() uses the verticle’s Vertx instance to create two event bus consumers. The first listens to the service.movie-add channel, and provides a handler that decodes messages from that channel as Movie instances, assigns a UUID to the movies, and “persists” them into an in-memory List. It then publishes a message to the event bus in response, containing the movie (now with its new UUID) as the body.
As you can probably guess, this consumer will handle messages published by AppServer.postMovie().
The second consumer subscribes to the service.movie-get channel. Its handler immediately publishes a message in response, containing the entire list of persisted movies as the body.
Let’s return to our AppServer class to make use of that second consumer. Add this method:
private void getMovie(RoutingContext ctx, Vertx vertx) {
  vertx.eventBus().request("service.movie-get", "", res -> {
    if ( res.succeeded() ) {
      ctx.response()
      .putHeader("content-type", "application/json")
      .end( res.result().body().toString() );
    } else {
      ctx.fail( res.cause() );
    }
  });
}
This will serve as our HTTP request handler for GET requests. It immediately publishes a message to the event bus’s service.movie-get channel (the message body doesn’t matter, so we provide an empty string). It also provides a handler for the return message, which returns the message body as a JSON payload to the original HTTP caller (or a 500 error response if a failure occurred).
Of course, in MovieRepository, we’ve already added a service.movie-get channel consumer, which retrieves the list of previously-created movies.
To make use of the getMovie() handler, we’ll modify our get request handler (in the run() method) like this:
router.get("/movies").handler(ctx -> getMovie(ctx, vertx));
Our final form of AppServer.java should look like this:
package com.me;

import org.apache.commons.lang3.StringUtils;

import io.vertx.core.Vertx;
import io.vertx.core.http.HttpServer;
import io.vertx.core.json.Json;
import io.vertx.core.logging.Logger;
import io.vertx.core.logging.LoggerFactory;
import io.vertx.ext.web.Router;
import io.vertx.ext.web.RoutingContext;
import io.vertx.ext.web.handler.BodyHandler;
import io.vertx.ext.web.handler.StaticHandler;

public class AppServer {

    private final Logger LOGGER = LoggerFactory.getLogger( AppServer.class );

    public void run(Vertx vertx) {
        HttpServer server = vertx.createHttpServer();

        Router router = Router.router(vertx);
        router.route().handler(BodyHandler.create());

		router.get().handler(StaticHandler.create());

        router.get("/movies").handler(ctx -> getMovie(ctx, vertx));

        router.post("/movies").handler(ctx -> postMovie(ctx, vertx));

        server.requestHandler(router).listen(80, http -> {
            if (http.succeeded()) {
                LOGGER.info("MovieApp HTTP server started on port 80");
            } else {
                LOGGER.info("MovieApp HTTP server failed to start");
            }
        });
    }

    private void getMovie(RoutingContext ctx, Vertx vertx) {
    	vertx.eventBus().request("service.movie-get", "", res -> {
    		if ( res.succeeded() ) {
    			ctx.response()
    			.putHeader("content-type", "application/json")
    			.end( res.result().body().toString() );
    		} else {
    			ctx.fail( res.cause() );
    		}
    	});
    }

    private void postMovie(RoutingContext ctx, Vertx vertx) {
    	final Movie movie = Json.decodeValue(ctx.getBodyAsString(), Movie.class);
    	if (StringUtils.isEmpty(movie.getGenre()) || StringUtils.isEmpty(movie.getTitle())) {
    		ctx.response()
    		.setStatusCode(400)
			.putHeader("content-type", "application/json")
			.end("{ 'error': 'Title and Genre must by non-empty' }");
    	}
    	vertx.eventBus().request("service.movie-add", Json.encode(movie), res -> {
    		if ( res.succeeded() ) {
    			ctx.response()
    			.putHeader("content-type", "application/json")
    			.end( res.result().body().toString() );
    		} else {
    			ctx.fail( res.cause() );
    		}
    	});
    }

}
We’ll make one more addition to our Main class before we can take these changes for a spin. MovieRepository is a verticle, and you’ll notice that it’s not instantiated anywhere. This means that, as-is, its event bus subscribers will never be created, so movies will not be saved or retrieved. Vert.x verticles need to deployed, so we’ll do that in Main. First, add this method:
protected void deployVerticle(String className) {
  vertx.deployVerticle(className, res -> {
    if (res.succeeded()) {
      System.out.printf("Deployed %s verticle \n", className);
    } else {
      System.out.printf("Error deploying %s verticle:%s \n", className, res.cause());
    }
  });
}
We create this as a generic method to deploy any verticle. We use Main’s Vertx instance to deploy the verticle, and provide a callback handler which logs the result. A callback handler is required so that we don’t block the current thread while the verticle is being deployed.
Then, we simply add this line in the start() method:
deployVerticle(MovieRepository.class.getName());
Compile and launch the app again:
mvn clean install
java -jar target/movies-app-1.0.0-SNAPSHOT-fat.jar
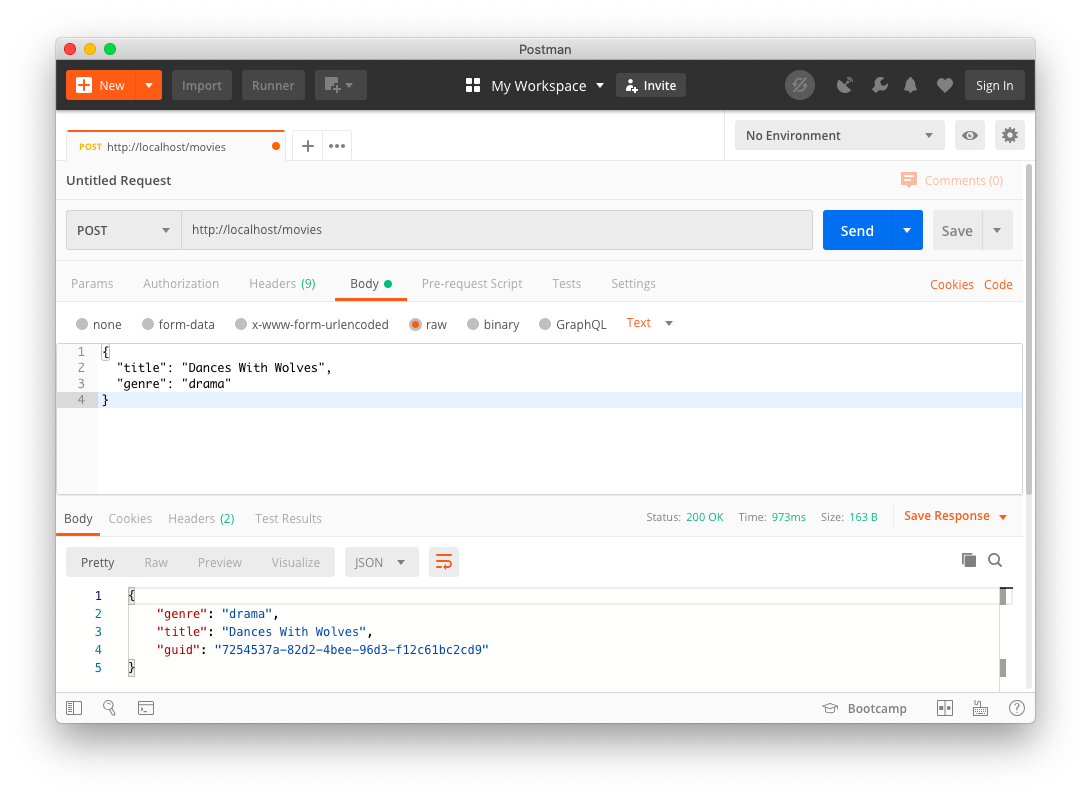
Hitting localhost/movies from a web browser should still return an empty list, since we haven’t added movies. You’ll need to use a tool like Postman to make a POST request to localhost/movies and provide a request body like this:
{
  "title": "Dances With Wolves",
  "genre": "drama"
}
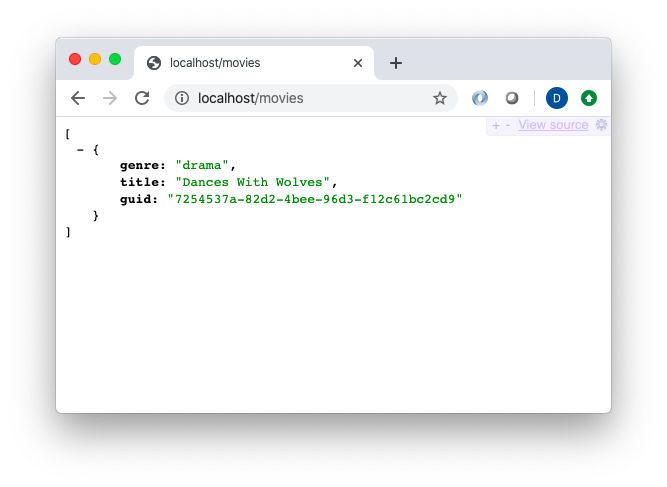
If all goes well, you should get a response back containing the newly saved movie, along with its new guid value:
{
  "genre": "drama",
  "title": "Dances With Wolves",
  "guid": "7254537a-82d2-4bee-96d3-f12c61bc2cd9"
}
Now, head back to your web browser (or continue using Postman) and make another GET request:
Wiring the Front End and Back End
Now for the last step — connecting the React and Vert.x applications.
Fetching and displaying movies
Let’s head back to our React code and modify MovieList.js. We need to:
- Move the list of movies to display from the const in
App.jsto MovieList’sstate. - Notify
MovieListwhen a new movie is created. - Allow
MovieListto query the Vert.x application for the list of movies to display.
We’ll start by adding this to the top of the file, just below the imports:
var xhr;
Then we’ll add the following to MovieList’s constructor:
this.state = {
 movies: []
}
this.sendRequest = this.sendRequest.bind(this);
this.processRequest = this.processRequest.bind(this);
this.props.eventDispatcher.subscribe(“addMovie”, this.sendRequest);
Here, we create a state object, consisting of an empty array called movies. After binding two new functions (which we’ll create next), we subscribe to an event dispatcher (which we’ll also code up shortly). This will allow MovieList to be notified any time a new movie is created.
Let’s add that sendRequest function:
sendRequest() {
  xhr = new XMLHttpRequest();
  xhr.open("GET", "http://localhost/movies")
  xhr.send();
  xhr.addEventListener("readystatechange", this.processRequest, false);
 }
This function will assign a new XMLHttpRequest instance to our xhr variable and tell it to make a GET request to localhost/movies (we’re hard-coding URLs that for clarity here, but we wouldn’t do that in a production-ready system). We also identify the processRequest function as a callback for successful requests.
Let’s create that processRequest function next:
processRequest() {
  if (xhr.readyState === 4 && xhr.status === 200) {
    var response = JSON.parse(xhr.responseText);
    this.setState({
      movies: response
    })
  }
}
This method simply parses the body content of successful responses to our GET requests. Recall that our Vert.x GET endpoint will return a list of movie objects. So we then simply set MovieList’s state to the content. If you remember from earlier, doing so will cause the MovieList component to re-render in the UI.
We’ll want to be sure to retrieve the list of movies when the UI first loads (e.g. if the user refreshes their browser). For this, we use the componentDidMount() lifecycle hook. This is a method defined in the React Component object, which we can override. As you might guess, it’s invoked when the component has fully loaded.
componentDidMount() {
  this.sendRequest()
}
Lastly, we make a minor change within the render() method. The displayed movies now need to come from MovieList’s state, so we now create the table rows via:
{this.state.movies.map(this.toMovie)}
Persisting movies
Now we’ll enhance MovieForm.js to actually persist new movies to the Vert.x application.
As with MovieList.js, we’ll add the following at the top:
var xhr;
Next, we’ll bind two new functions in the constructor:
 this.tryCreateMovie = this.tryCreateMovie.bind(this);
 this.processRequest = this.processRequest.bind(this);
Let’s create the first of those functions, like this:
tryCreateMovie() {
  xhr = new XMLHttpRequest();
  xhr.open("POST", "http://localhost/movies")
  xhr.send(JSON.stringify({ “title”: this.state.title, "genre": this.state.genre }));
  xhr.addEventListener("readystatechange", this.processRequest, false);
 }
This function assigns a new XMLHttpRequest object to the xhr variable, and then posts a JSONified form of the movie we’re creating to http://localhost/movies. On successful responses, it invokes the processRequest callback function, which will look like this:
processRequest() {
  if (xhr.readyState === 4 && xhr.status === 200) {
    this.props.eventDispatcher.dispatch("addMovie", "")
    this.changeState( { title: ""} )
  }
}
This function publishes an addMovie message to the event dispatcher (which we will create shortly). It also changes MovieForm’s state to a movie with an empty title, in order to clear out the Title text field.
OK, it’s time to code up our event dispatcher. We’ll do that in the App.js file. First, let’s get rid of the movies array — we won’t need it anymore. In its place, we’ll create a simple object that looks like this:
const eventDispatcher = {
  listeners: {},
  dispatch: function(event, data) {
    if (this.listeners[event]) {
      this.listeners[event].forEach(function(l) {
        l(data);
      });
    }
  },
  subscribe: function(event, f) {
    if (!this.listeners[event]) this.listeners[event] = [];
    this.listeners[event].push(f)
  }
}
The listeners field is, of course, declared as an empty object. Ultimately, it will serve as a sort of map of lists. The keys will be strings and it will represent event types (for example, addMovie from above) whereas the values will be an array of callback functions to be invoked whenever the event is published.
The subscribe function takes an event name and a callback function. It simply adds the callback function to the listener object, under the key that matches the event name. The dispatch function takes an event name (a string) and data (which is any arbitrary object). It then checks the listeners object for a key matching the event name. If it finds that key, then it loops though the callback functions stored in the associated array and invokes them, passing the data.
This event dispatcher might seem like overkill for our little application, but it would make handling state changes across the app simple if we were to expand this app. Furthermore, it’s completely generic, so it can be copied into other React apps. For handling state in much more complex applications, there’s also Redux. We won’t cover Redux in this article, but you can try retrofitting it into this app later as a homework assignment.
Finally, we’ll modify the creation of the MovieForm and MovieList components within the App() function. We’ve removed the movies array, so we won’t pass that to the MovieList anymore. But both MovieForm and MovieList will need a reference to the event dispatcher. So we’ll change the component declarations to:
 <MovieForm genres={genres} eventDispatcher={eventDispatcher} />
 <MovieList genres={genres} eventDispatcher={eventDispatcher} />
It’s a wrap
Now, we’ll create a little shell script to package the entire application — both the React part and the Java/Vert.x part — into a single executable. In the react-app/ directory, create a deploy.sh script with the following contents:
npm run build
if [ -d "../vertx/src/main/resources/webroot/" ]; then rm -Rf ../vertx/src/main/resources/webroot/; fi
mkdir ../vertx/src/main/resources/webroot/
cp -R build/* ../vertx/src/main/resources/webroot/
In this script, we use npm to build the application, optimized for a production deployment. We then ensure that an empty src/main/resources/webroot subdirectory exists in the vertx directory (deleting any previous such directory first). Finally, we copy the built React app into that src/main/resources/webroot directory, where it will be served up as static content from the Vert.x app.
Ensure that the script is executable (chmod 777 deploy.sh) and then run it (./deploy.sh). Then go to the vertx directory (cd ../vertx), and build and launch the app:
mvn clean install
java -jar target/movies-app-1.0.0-SNAPSHOT-fat.jar
Let’s hit http://localhost with a web browser to see what we’ve got:
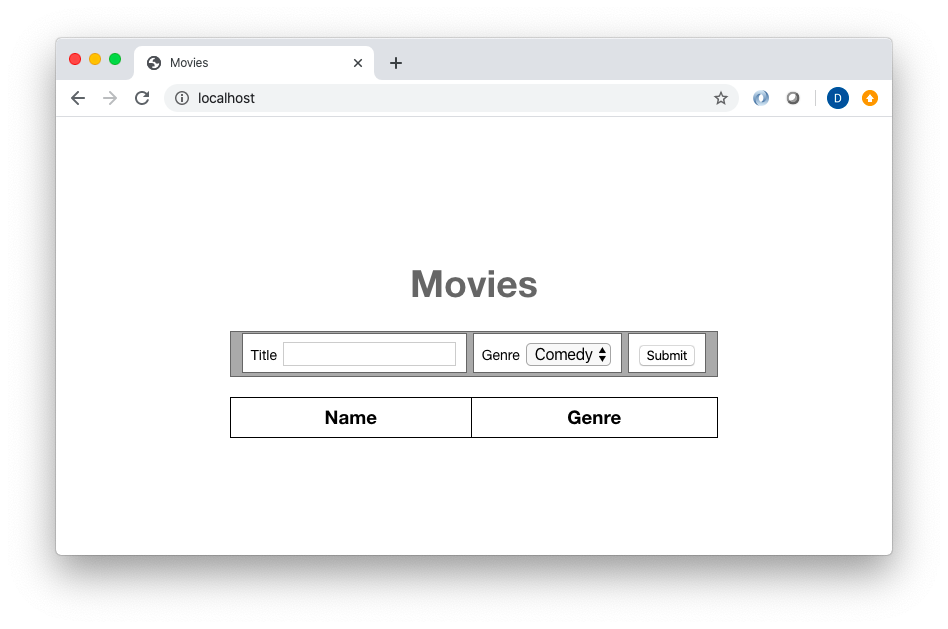
The result should look familiar. Now, let’s add a few movies:
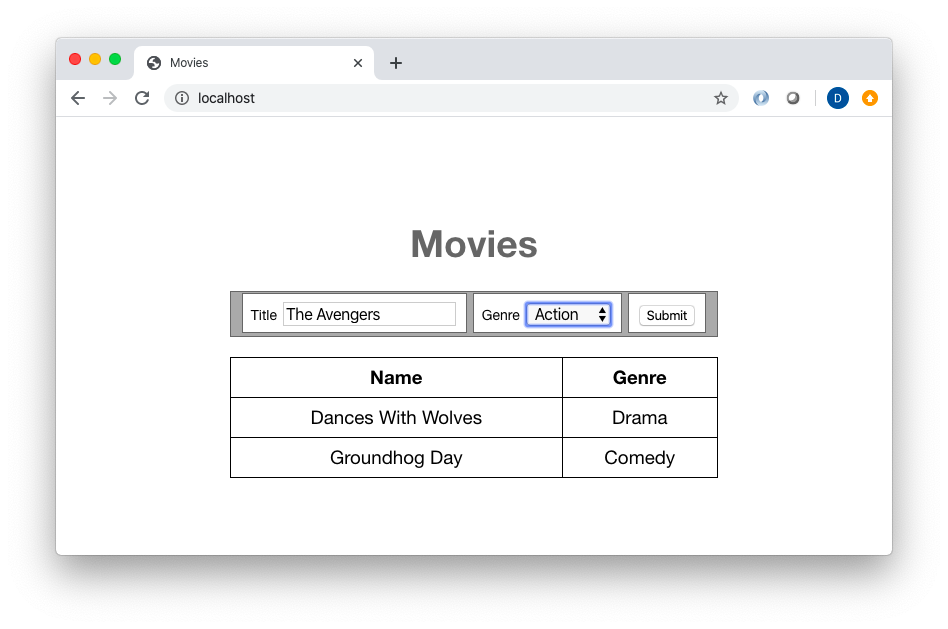
Refresh the browser, and your movies will re-fetched and re-rendered.
Thank you for reading!
#react #java #javascript #programming
