For the bulk of my web career, I’ve worked exclusively on the client-side of things. Designing responsive layouts, creating visualisations from large amounts of data, building application dashboards etc. But I never really had to deal with routing or HTTP requests directly. Until recently.
Note: if you’re an experienced Node.js developer, you’re probably going to think what’s in here is blindingly obvious/simple. ¯_(ツ)_/¯.
Some networking basics
When I was starting out in the web industry a couple years back, I stumbled upon a Computer Networks course by Professor David Wetherall on Coursera. Unfortunately, it is no longer available but the lectures are still available on the Pearson website.
I really liked this course because it explained what was happening under the hood in a digestible manner, so if you can get your hands on the textbook, Computer Networks, give it a read for all the in-depth details of the wonders of networking.
Over here though, I’m only going to cover a brief overview of things for context. HTTP (Hypertext Transfer Protocol) is a communications protocol used in computer networks. The internet has plenty of them, like SMTP (Simple Mail Transfer Protocol), FTP (File Transfer Protocol), POP3 (Post Office Protocol 3) and so on.
These protocols allow devices with vastly different hardware/software to communicate with each other because they provide well-defined message formats, rules, syntax and semantics etc. This means as long as the device supports a particular protocol, it can communicate with any other device on the network.

From [TCP/IP vs. OSI: What’s the
Difference Between the
Two Models?](https://community.fs.com/blog/tcpip-vs-osi-whats-the-difference-between-the-two-models.html) “https://community.fs.com/blog/tcpip-vs-osi-whats-the-difference-between-the-two-models.html)”)
Operating systems usually come with support for networking protocols, like HTTP, out-of-the-box, which explains why we don’t have to explicitly install any additional software to access the web. Most networking protocols maintain an open connection between 2 devices, allowing them to transmit data back and forth.
HTTP, which is what the web runs on, is different. It is known as a connectionless protocol, because it is based on a request/response mode of operation. Web browsers make requests to the server for images, fonts, content etc. but once the request is fulfilled, the connection between the browser and server is severed.
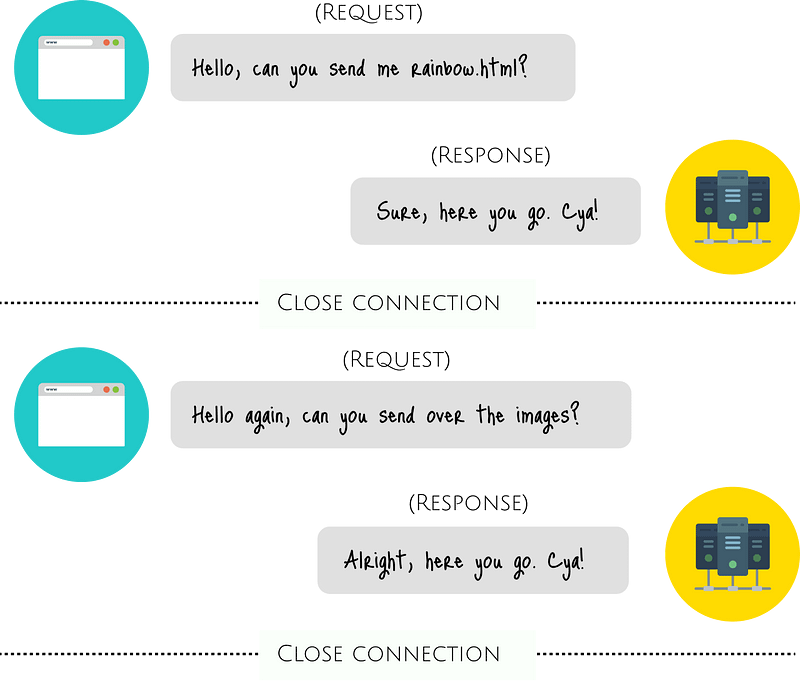
Simplification of request/response
Servers and Clients
The term server may be slightly confusing to people new to the industry because it can refer to both the hardware (physical computers that house all the files and software required by websites) or the software (program that allows users to access those files on the web).
Today, we’ll be talking about the software side of things. But first, some definitions. URL stands for Universal Resource Locator, and consists of 3 parts: the protocol, the server and the requested file.

Anatomy of a URL
The HTTP protocol defines several methods that the browser can use to ask the server to perform a bunch of different actions, the most common being GET and POST. When a user clicks a link or enters a URL in the address bar, the browser sends a GET request to the server to retrieve the resource defined in the URL.
The server needs to know how to process this HTTP request in order to retrieve the correct file then send it back to the browser who asked for it. The most popular web server software that handles this are Apache and NGINX.

Web servers handle incoming requests and respond to them accordingly
Both are full suite open-source software packages that include features like authentication schemes, URL rewriting, logging and proxying, just to name a few. Both Apache and NGINX are written in C. Technically, you could write a web server in any language. Python, Go, Ruby, this list can go on for quite a bit. It’s just that some languages are better at doing certain things than others.
Creating an HTTP server with Node.js
Node.js is a Javascript run-time environment built on Chrome’s V8 Javascript engine. It comes with a http module that provides a set of functions and classes for building a HTTP server.
For this basic HTTP server, we will also be using file system, path and url, all of which are native Node.js modules.
Start off by importing the required modules.
const http = require('http') // To use the HTTP interfaces in Node.js
const fs = require('fs') // For interacting with the file system
const path = require('path') // For working with file and directory paths
const url = require('url') // For URL resolution and parsing
We will also create a dictionary of MIME types so we can assign the appropriate MIME type to the requested resource based on its extension. A full list of MIME types can be found at the Internet Assigned Numbers Authority.
const mimeTypes = {
  '.html': 'text/html',
  '.js': 'text/javascript',
  '.css': 'text/css',
  '.ico': 'image/x-icon',
  '.png': 'image/png',
  '.jpg': 'image/jpeg',
  '.gif': 'image/gif',
  '.svg': 'image/svg+xml',
  '.json': 'application/json',
  '.woff': 'font/woff',
  '.woff2': 'font/woff2'
}
Now we can create the HTTP server with http.createServer() function, which will return a new instance of http.Server.
const server = http.createServer()
We will pass a request handler function into createServer() with the request and response objects. This function gets called once every time an HTTP request is made against the server.
server.on('request', (req, res) => {
  // more stuff needs to be done here
})
The server is started by calling the listen method on the server object, with the port number we want the server to listen on, for example, 5000.
server.listen(5000)
The request object is an instance of IncomingMessage, and allows us to access all sorts of information about the request, like response status, headers and data.
The response object is an instance of ServerResponse, which is a writable stream, and provides numerous methods for sending data back to the client.
Within the request handler, we want to do the following things:
- Parse the incoming request and handle those without extensions
const parsedUrl = new URL(req.url, 'https://node-http.glitch.me/')
let pathName = parsedUrl.pathname
let ext = path.extname(pathName)

// To handle URLs with trailing '/' by removing aforementioned '/'
// then redirecting the user to that URL using the 'Location' header
if (pathName !== '/' && pathName[pathName.length - 1] === '/') {
  res.writeHead(302, {'Location': pathName.slice(0, -1)})
  res.end()
  return
}

// If the request is for the root directory, return index.html
// Otherwise, append '.html' to any other request without an extension
if (pathName === '/') {
  ext = '.html'
  pathName = '/index.html'
} else if (!ext) {
  ext = '.html'
  pathName += ext
}
- Parse the incoming request and handle those without extensions
// Construct a valid file path so the relevant assets can be accessed
const filePath = path.join(process.cwd(), '/public', pathName)
// Check if the requested asset exists on the server
fs.exists(filePath, function (exists, err) {
  // If the asset does not exist, respond with a 404 Not Found
  if (!exists || !mimeTypes[ext]) {
    console.log('File does not exist: ' + pathName)
    res.writeHead(404, {'Content-Type': 'text/plain'})
    res.write('404 Not Found')
    res.end()
    return
  }
  // Otherwise, respond with a 200 OK status,
  // and add the correct content-type header
  res.writeHead(200, {'Content-Type': mimeTypes[ext]})
  // Read file from the computer and stream it to the response
  const fileStream = fs.createReadStream(filePath)
  fileStream.pipe(res)
})
All the code is hosted on Glitch and you are free to remix the project if you wish.
https://glitch.com/edit/#!/node-http
Creating a HTTP server with Node.js frameworks
Node.js frameworks like Express, Koa.js and Hapi.js come with various useful middleware functions, in addition to a host of other handy features that save developers the trouble of writing themselves.
Personally, I feel that it’s good to learn the basics without frameworks first, just for understanding what goes on under the hood, then after that, go nuts with whatever framework you like.
Express has its own in-built middleware for serving static files, so the code required for doing the same thing as in native Node.js is much shorter.
const express = require('express')
const app = express()

// Serve static files out of the 'public' folder
app.use(express.static('public'))

// Serve the index.html when users access the
// root directory using res.sendFile()
app.get('/', (req, res) => {
  res.sendFile(__dirname + '/public/index.html')
})

app.listen(5000)
Koa.js does not bundle any middleware within its core, so any middleware required has to be installed separately. The latest version of Koa.js leverages async functions in favour of callbacks. To serve static files, you can use the koa-static middleware.
const serve = require('koa-static')
const koa = require('koa')
const app = new koa()

// Serve static files out of the 'public' folder
// By default, koa-static will serve the index.html file on the root directory
app.use(serve(__dirname + '/public'))

app.listen(5000)
Hapi.js favours configuration, and revolves around configuring the server object. It utilises plugins for extending capabilities like routing, authentication and so on. To serve static files, we will need a plugin called inert.
const path = require('path')
const hapi = require('hapi')
const inert = require('inert')

// Routes can be configured on the server object
const server = new hapi.Server({
  port: 5000,
  routes: {
    files: {
      relativeTo: path.join(__dirname, 'public')
    }
  }
})

const init = async () => {
  // server.register() command adds the plugin to the application
  await server.register(inert)

  // inert adds a directory handler to
  // specify a route for serving multiple files
  server.route({
    method: 'GET',
    path: '/{param*}',
    handler: {
      directory: {
        path: '.',
        redirectToSlash: true,
        index: true
      }
    }
  })

  await server.start()
}

init()
Each of these frameworks have their own pros and cons, and these will be more evident for larger applications rather than simply serving a single HTML page. The choice of framework will depend heavily on the actual requirements of the project you’re working on.
Wrapping up
If the network side of things has always been a black box to you, hopefully this article can serve as a helpful introduction to the protocol that powers the web. I also highly recommend reading the Node.js API documentation, which is very well-written and is a great help for anyone new to Node.js in general.
- Parse the incoming request and handle those without extensions
Thanks for reading ❤
If you liked this post, share it with all of your programming buddies!
#node-js #javascript #web-development