How to build a Chat App with React Native
The following features:
- Public and private chat rooms
- Roles and permissions
- Typing indicators
- Read receipt
- File uploads
- Show online and offline users
Prerequisites
Knowledge of **React **and React Native is required to follow this tutorial.
The following package versions are used. If you encounter any issues in compiling the app, try to use the following:
- Node 11.2
- Yarn 1.13
- React Native 0.59
You’ll also need a Chatkit app instance. I assume you already know how to set it up. If not, then check out the official docs.
Lastly, you’ll need an ngrok account for exposing the server to the internet.
Chat App overview
As mentioned earlier, we will be building a chat app. The first screen that the user will see when they open the app is the Login screen. This is where they enter their username so they can log in. We will be creating the users in the **Chatkit **console later:

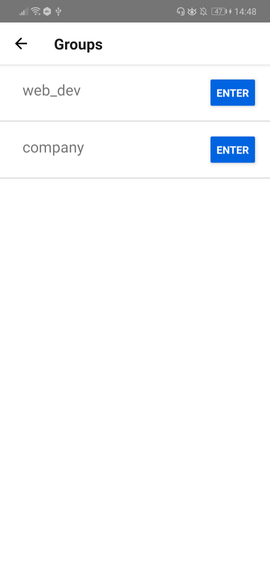
Once logged in, the app will show the list of rooms they can enter:
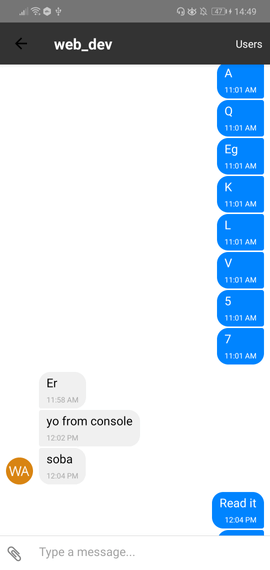
Once they’ve selected a room to enter, they’ll be greeted by the Chat app screen:
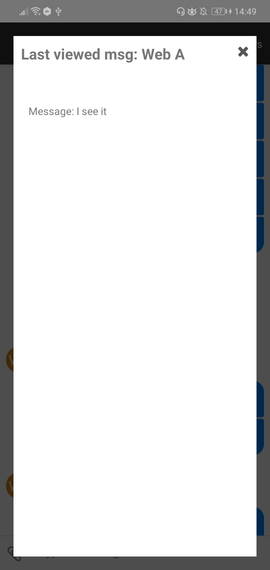
From the Chat screen, when a user clicks on the avatar of another member of a room, they can see the last message they have seen:
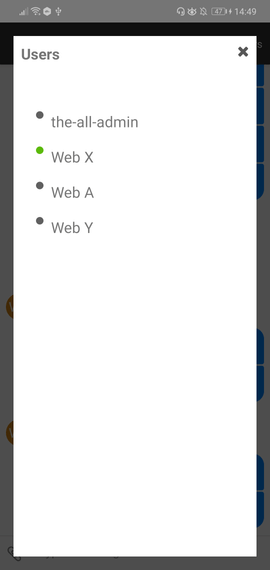
The list of members can be viewed when they click on the Users button in the header. The circle right beside the username indicates their online status:
Aside from those, the app will also have a file attachment and typing indicator feature. Image, audio, and video files can also be previewed.
You can find the code in this GitHub repo.
Setting up roles and permissions
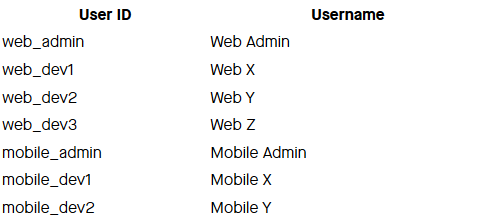
Before we proceed, we first have to set up the roles and permissions for each user in the Chatkit console. We will set up seven users:
Three rooms will also be needed:
- company
- web_dev
- mobile_dev

Everyone will be able to have chat in the company room. While the web and mobile users can only chat within their respective rooms. This can be implemented by means of roles and permissions:

For this app, we only have two roles. These will only be scoped in a specific room:
room-admin- check all the permissions.room-member- check all the permissions exceptroom:delete,room:update,room:join,room:leave,room:members:add,room:members:remove.

The only difference between the two is that the room-admin can add or remove users from the room. Though we won’t really be implementing it in the app.
Once you’ve created the roles, the next step is to assign the roles to each of the users. Web Admin and Mobile Admin will have the role of room-admin, while the rest of the users will have the role of room-member. Be sure to apply them to the room where they’re supposed to go:

Don’t forget to assign all of the users as a member of the company room. This time, the room admins will have the same role as the members.
Bootstrapping the app
For us to get into the crucial parts of the app quickly, I prepared a GitHub repo which contains some of the boilerplate code (custom components, navigation setup, styling). Clone it and switch to the starter branch:
    git clone https://github.com/anchetaWern/RNChatkitDemo
    git checkout starter
Whenever I mention “starter branch“, it means that I’m referring to existing code.
Next, install all the dependencies and link the relevant packages:
    yarn
    react-native eject
    react-native link react-native-gesture-handler
    react-native link react-native-permissions
    react-native link react-native-document-picker
    react-native link react-native-fs
    react-native link react-native-config
    react-native link react-native-vector-icons
    react-native link rn-fetch-blob
One of the dependencies (React Native Audio Toolkit) doesn’t play nice with automatic linking. Be sure to check out their docs for information on how to set it up.
Next, we need to update the Android manifest file to allow the app to read from the external storage. This allows us to pick files from the device’s external storage:
    // android/app/src/main/AndroidManifest.xml
    <manifest xmlns:android="http://schemas.android.com/apk/res/android"
      package="com.rnchatkitdemo">
      <uses-permission android:name="android.permission.INTERNET" />
      <uses-permission android:name="android.permission.READ_EXTERNAL_STORAGE" />
      ...
    </manifest>
Lastly, update the android/app/build.gradle file and include the gradle file for React Native Config:
    apply from: "../../node_modules/react-native/react.gradle"
    apply from: project(':react-native-config').projectDir.getPath() + "/dotenv.gradle" // add this
Adding the server code
Now we’re ready to start coding. Let’s kick things off with the server. Some of the code for initializing Chatkit and running the server itself has already been added to the starter branch. All we have to do now is install the dependencies, update the .env file, and add the routes that the app will be consuming.
Start by install the dependencies:
    cd server
    yarn
Next, update the .env file with the Chatkit credentials:
    CHATKIT_INSTANCE_LOCATOR_ID="YOUR CHATKIT INSTANCE LOCATOR ID (v1:us1:)"
    CHATKIT_SECRET_KEY="YOUR CHATKIT SECRET KEY"
Now we can proceed with the code. The /users route allows us to fill the users array with users data that will be used when someone logs in. Later on, be sure to access <a href="http://localhost:5000/users" target="_blank">http://localhost:5000/users</a> on your browser before you try logging in a user. This is because the login code uses the data in the users array to get specific user data:
    // server/index.js
    let users = [];
    app.get("/users", async (req, res) => {
      try {
        users = await chatkit.getUsers();
        res.send({ users });
      } catch (get_users_err) {
        console.log("error getting users: ", get_users_err);
      }
    });
Note: We only have the above route to simplify things. You don’t really want to be exposing user data in a production app.
When a user logs in, the app makes a request to the/userroute. This will return the user’s info based on their username:
    app.post("/user", async (req, res) => {
      const { username } = req.body;
      try {
        const user = users.find((usr) => usr.name == username);
        res.send({ user });
      } catch (get_user_err) {
        console.log("error getting user: ", get_user_err);
      }
    });
Next, add the route which returns the rooms that the user (the one supplied in the request body) is a member of. This is the reason why we went through the trouble of assigning each of the users to their rooms:
    app.post("/rooms", async (req, res) => {
      const { user_id } = req.body;
      try {
        const rooms = await chatkit.getUserRooms({
          userId: user_id
        });
        res.send({ rooms });
      } catch (get_rooms_err) {
        console.log("error getting rooms: ", get_rooms_err);
      }
    });
The getUserRooms is preferable to the getJoinable rooms method because the rooms we created (except for the company room) are private. This means they won’t show up when you call getJoinableRooms. Another reason is that the room wouldn’t even be returned if the user is already a member of that room.
Lastly, add the route for returning the user permissions. This will be called when a user enters a specific room so that the app knows what the user can or cannot do in that specific room:
    app.post("/user/permissions", async(req, res) => {
      const { room_id, user_id } = req.body;
      try {
        const roles = await chatkit.getUserRoles({ userId: user_id });
        const role = roles.find(role => role.room_id == room_id);
        const permissions = (role) ? role.permissions : [];
        res.send({ permissions });
      } catch (user_permissions_err) {
        console.log("error getting user permissions: ", user_permissions_err);
      }
    });
The response data in the API call above is an array containing the individual permissions. Here’s an example: ['room:join', 'room:leave'].
Group screen
The Group screen is where the user will be redirected to when they have logged in to the app. We won’t go through the login code as it has already been pre-coded. All you need to know is that the Login screen sends a request to the /user route of the server. As you’ve seen earlier, this returns the user data. From this data, the only thing we want to pass to the Group screen is the user_id:
    // src/screens/Group.js
    state = {
      rooms: []
    };

    constructor(props) {
      super(props);
      const { navigation } = this.props;
      this.user_id = navigation.getParam("id");
    }
When the component is mounted, we send a request to the /rooms route. This returns the list of rooms that the user is a member of:
    async componentDidMount() {
      try {
        const response = await axios.post(`${CHAT_SERVER}/rooms`, { user_id: this.user_id });
        const { rooms } = response.data;
        this.setState({
          rooms
        });
      } catch (get_rooms_err) {
        console.log("error getting rooms: ", get_rooms_err);
      }
    }
Next, render the list of rooms:
    render() {
      const { rooms } = this.state;
      return (
        <View style={styles.container}>
          {
            rooms &&
            <FlatList
              keyExtractor={(item) => item.id.toString()}
              data={rooms}
              renderItem={this.renderRoom}
            />
          }
        </View>
      );
    }
Here’s the code for rendering each list item. It has a button which when clicked by the user redirects them to the room they selected:
    renderRoom = ({ item }) => {
      return (
        <View style={styles.list_item}>
          <Text style={styles.list_item_text}>{item.name}</Text>
          <Button title="Enter" color="#0064e1" onPress={() => {
            this.enterChat(item);
          }} />
        </View>
      );
    }
Here’s the code for entering a chat room. This sends a request to the /user/permissions route which then returns the permissions for that specific room. From there, we determine if the user is a room admin if they have the room:members:add permission. This means that they can add new users to the room:
    enterChat = async (room) => {
      try {
        const response = await axios.post(`${CHAT_SERVER}/user/permissions`, { room_id: room.id, user_id: this.user_id });
        const { permissions } = response.data;
        const is_room_admin = (permissions.indexOf('room:members:add') !== -1);

        this.props.navigation.navigate("Chat", {
          user_id: this.user_id,
          room_id: room.id,
          room_name: room.name,
          is_room_admin
        });

      } catch (get_permissions_err) {
        console.log("error getting permissions: ", get_permissions_err);
      }
    };
We won’t really be implementing the adding of users in this tutorial. This is just to show how permissions can be used to limit what the user can do within the app.##
Chat screen
We can now proceed to the main meat of the app. As we have lots of things to implement, I’ve divided it into multiple sections, each discussing a specific feature of the chat app.
Importing the dependencies
First, we import the dependencies:
    // src/screens/Chat.js
    import React, { Component } from "react";
    import { View, Text, ActivityIndicator, FlatList, TouchableOpacity, Alert } from "react-native";
    import { GiftedChat, Send, Message } from "react-native-gifted-chat"; // for the chat UI
    import { ChatManager, TokenProvider } from "@pusher/chatkit-client"; // for implementing chat functionality
    import axios from "axios"; // for making requests to the server
    import Config from "react-native-config"; // for reading .env file
    import Icon from "react-native-vector-icons/FontAwesome"; // for showing icons
    import { DocumentPicker, DocumentPickerUtil } from "react-native-document-picker"; // for picking files
    import * as mime from "react-native-mime-types"; // for determining the mime type of the picked file
    import Modal from "react-native-modal";
    import RNFetchBlob from "rn-fetch-blob"; // for converting the attached file to a blob
    import RNFS from "react-native-fs"; // for getting the base64 string representation of a file
Chatkit expects the file attachments to be a Blob. React Native doesn’t really have support for this format by default. So we use rn-fetch-blob as a polyfill to implement it. Later on, you’ll see this in action in the Attaching files section:
    const Blob = RNFetchBlob.polyfill.Blob;
    const fs = RNFetchBlob.fs;
    window.XMLHttpRequest = RNFetchBlob.polyfill.XMLHttpRequest;
    window.Blob = Blob;
Next, we have a few pre-coded components which are used to render either an audio or video player depending on the format of the attached file. Note that these components only support mp3 files for audio, and mp4 files for video:
    import ChatBubble from "../components/ChatBubble";
    import AudioPlayer from "../components/AudioPlayer";
    import VideoPlayer from "../components/VideoPlayer";
You can read my previous tutorial on playing audio and video file attachments in a Chatkit React Native app if you want to learn more about how those components are implemented
Lastly, update the.envfile with your Chatkit config.
Initializing the chat code
In the Chat screen’s header, we add a button for opening the modal for viewing all the members of the room (whether they’re offline or online):
    class Chat extends Component {

      static navigationOptions = ({ navigation }) => {
        const { params } = navigation.state;
        return {
          headerTitle: params.room_name,
          headerRight: (
            <View style={styles.header_right}>
              <TouchableOpacity style={styles.header_button_container} onPress={params.showUsersModal}>
                <View style={styles.header_button}>
                  <Text style={styles.header_button_text}>Users</Text>
                </View>
              </TouchableOpacity>
            </View>

          ),
          headerStyle: {
            backgroundColor: "#333"
          },
          headerTitleStyle: {
            color: "#FFF"
          }
        };
      };

      // next: initialize state

    }
Next, initialize the state:
    state = {
      company_users: null,
      room_users: null,
      messages: [],
      is_initialized: false, // if Chatkit is initialized or not
      is_picking_file: false, // to show/hide the loading animation when picking files
      // to show/hide the various modal windows:
      is_video_modal_visible: false,
      is_last_viewed_message_modal_visible: false,
      is_users_modal_visible: false,
      is_typing: false, // if there's someone in the room who is currently typing
      typing_user: null, // the username of the user who is typing
      show_load_earlier: false,
      viewed_user: null, // username of user whose read receipt is currently being viewed
      viewed_message: null // the text message being viewed
    };

    // next: add constructor
Next, get the navigation params that were passed from the Group screen earlier:
    constructor(props) {
      super(props);
      const { navigation } = this.props;

      this.user_id = navigation.getParam("user_id");
      this.room_id = navigation.getParam("room_id");
      this.is_room_admin = navigation.getParam("is_room_admin");

      this.modal_types = {
        video: 'is_video_modal_visible',
        last_viewed_message: 'is_last_viewed_message_modal_visible',
        users: 'is_users_modal_visible'
      }
    }

    // next: add componentDidMount
Once the component is mounted, initialize Chatkit:
    async componentDidMount() {
      this.props.navigation.setParams({
        showUsersModal: this.showUsersModal
      });

      try {
        const chatManager = new ChatManager({
          instanceLocator: CHATKIT_INSTANCE_LOCATOR_ID,
          userId: this.user_id,
          tokenProvider: new TokenProvider({ url: CHATKIT_TOKEN_PROVIDER_ENDPOINT })
        });

        let currentUser = await chatManager.connect();
        this.currentUser = currentUser;

        // next: subscribe to room

      } catch (chat_mgr_err) {
        console.log("error with chat manager: ", chat_mgr_err);
      }
    }
We then subscribe to the room. We only need to subscribe to the hooks for receiving messages, and showing/hiding typing indicators:
    await this.currentUser.subscribeToRoomMultipart({
      roomId: this.room_id,
      hooks: {
        onMessage: this.onReceive,
        onUserStartedTyping: this.startTyping,
        onUserStoppedTyping: this.stopTyping
      }
    });
We don’t need to subscribe to the
onPresenceChangedhook because the presence data fromthis.currentUser.usersis live data. This means that when the users either offline or online, their presence state also changes, so the UI is automatically updated.
Lastly, we update the state with the room members data:
    await this.setState({
      is_initialized: true,
      room_users: this.currentUser.users
    });
Chat UI
We can now proceed to the UI. Start by extracting the data that we need from the state:
    render() {
      const {
        is_initialized,
        room_users,
        messages,
        video_uri,
        is_video_modal_visible,
        is_last_viewed_message_modal_visible,
        viewed_user,
        viewed_message,
        is_users_modal_visible,
        show_load_earlier,
        typing_user
      } = this.state;

      // next: render the Chat UI
    }
Next, render the chat UI. All the heavy lifting is already done for us by React Native Gifted Chat, so all we have to do is supply all the props that it needs:
    return (
      <View style={styles.container}>
        {(!is_initialized) && (
          <ActivityIndicator
            size="small"
            color="#0064e1"
            style={styles.loader}
          />
        )}

        {is_initialized && (
          <GiftedChat
            messages={messages}
            onSend={messages => this.onSend(messages)} // function to execute when send button is clicked
            user={{
              _id: this.user_id
            }}
            renderActions={this.renderCustomActions} // for rendering button for attaching files
            renderSend={this.renderSend} // custom send button UI
            renderMessage={this.renderMessage} // custom chat bubble UI
            onInputTextChanged={this.onTyping} // function to execute while the user is typing
            renderFooter={this.renderFooter} // for rendering the typing indicator
            extraData={{ typing_user }} // so that the footer will be re-rendered when the typing user is updated
            onPressAvatar={this.viewLastReadMessage} // function to execute when user avatar is clicked

            loadEarlier={show_load_earlier} // for loading earlier messages
            onLoadEarlier={this.loadEarlierMessages}
          />
        )}

        // next: add modals

      </View>
    );
Next, render the modal for showing the fullscreen version of the attached video files:
    <Modal isVisible={is_video_modal_visible}>
      <View style={styles.modal}>
        <TouchableOpacity onPress={this.hideModal.bind(this, 'video')}>
          <Icon name={"close"} size={20} color={"#565656"} style={styles.close} />
        </TouchableOpacity>
        <VideoPlayer uri={video_uri} />
      </View>
    </Modal>
Next, render the modal for showing the last message viewed by a specific member of the room:
    {
      viewed_user && viewed_message &&
      <Modal isVisible={is_last_viewed_message_modal_visible}>
        <View style={styles.modal}>
          <View style={styles.modal_header}>
            <Text style={styles.modal_header_text}>Last viewed msg: {viewed_user}</Text>
            <TouchableOpacity onPress={this.hideModal.bind(this, 'last_viewed_message')}>
              <Icon name={"close"} size={20} color={"#565656"} style={styles.close} />
            </TouchableOpacity>
          </View>

          <View style={styles.modal_body}>
            <Text>Message: {viewed_message}</Text>
          </View>
        </View>
      </Modal>
    }
Next, render the modal for showing the list of members of the room:
    {
      room_users &&
      <Modal isVisible={is_users_modal_visible}>
        <View style={styles.modal}>
          <View style={styles.modal_header}>
            <Text style={styles.modal_header_text}>Users</Text>
            <TouchableOpacity onPress={this.hideModal.bind(this, 'users')}>
              <Icon name={"close"} size={20} color={"#565656"} style={styles.close} />
            </TouchableOpacity>
          </View>

          <View style={styles.modal_body}>
            <FlatList
              keyExtractor={item => item.id.toString()}
              data={room_users}
              renderItem={this.renderUser}
            />
          </View>
        </View>
      </Modal>
    }
Here’s the function for rendering each individual user. This will show a green circle next to the user’s name if they are online, and a gray circle if they’re offline:
    renderUser = ({ item }) => {
      const online_status = item.presenceStore[item.id];

      return (
        <View style={styles.list_item_body}>
          <View style={styles.list_item}>
            <View style={[styles.status_indicator, styles[online_status]]}></View>
            <Text style={styles.list_item_text}>{item.name}</Text>
          </View>
        </View>
      );
    }
Here’s the code for showing the users modal:
    showUsersModal = () => {
      this.setState({
        is_users_modal_visible: true
      });
    }
Lastly, here’s the code for hiding a specific modal:
    hideModal = (type) => {
      const modal = this.modal_types[type];
      this.setState({
        [modal]: false
      });
    }
Attaching files
The code for rendering the custom button for attaching files is already in the starter branch, so all we have to do is add the code for actually attaching a file. To implement this, we use the React Native Document Picker package. We call the DocumentPicker.show function to show the default file picker of the device’s operating system. We use the DocumentPickerUtil.allFiles function to specify that all file types can be selected by the user. You can also supply a specific file type if you want. From their source code, you can see that those methods simply return a mime-type wild card. Though we will only have previews for png, jpg, mp3, and mp4 files:
    openFilePicker = async () => {
      await this.setState({
        is_picking_file: true // show the loader instead of the button for picking files to prevent the user from clicking it again
      });

      DocumentPicker.show({
        filetype: [DocumentPickerUtil.allFiles()],
      }, async (err, file) => {
        if (!err) { // if there's no error in picking the file

          // next: convert the file to a blob
        }

        this.setState({
          is_picking_file: false
        });
      });
    }
Next, we determine the mime type of the file and convert it to its base64 string representation using the react-native-fs package. From there, we convert it to a Blob using the rn-fetch-blob package. As you learned earlier, this acts as a polyfill for implementing Blobs in the React Native environment. Lastly, we temporarily store the name, type, and the Blob representation of the file so that we can easily get it later when we send a message:
    try {
      const file_type = mime.contentType(file.fileName);
      const base64 = await RNFS.readFile(file.uri, "base64");

      const file_blob = await Blob.build(base64, { type: `${file_type};BASE64` });

      this.attachment = {
        file_blob: file_blob,
        file_name: file.fileName,
        file_type: file_type
      };

      Alert.alert("Success", "File attached!");

    } catch (attach_err) {
      console.log("error attaching file: ", attach_err);
    }
Sending messages
The code for sending messages is already included in the starter branch. But we need to update it so that it sends multi-part messages (text with attachment). Replace the existing onSend method with the following. The main difference here is that the text message is included in the message_parts array. This allows us to supply different kinds of content to an individual message. In this case, the other type is an attachment. If the user has selected an attachment, we push it into the message_parts array:
    onSend = async ([message]) => {
      let message_parts = [
        { type: "text/plain", content: message.text }
      ];

      if (this.attachment) {
        const { file_blob, file_name, file_type } = this.attachment;
        message_parts.push({
          file: file_blob, // the file Blob
          name: file_name, // the file name
          type: file_type // the file type
        });
      }

      this.setState({
        is_sending: true // show the loading animation for sending a message
      });

      // next: send message
    }
Next, we send the message. The main difference here is that we’re now using the sendMultipartMessage method instead of the sendSimpleMessage method. Another important thing to note is that when a user sends a message, we also assume that they’ve already read the last message they received. So we set a read cursor using the ID of the last message they received:
    try {
      if (this.last_message_id) {
        const set_cursor_response = await this.currentUser.setReadCursor({
          roomId: this.room_id,
          position: this.last_message_id // the ID of the last message they received
        });
      }
      // send the message
      await this.currentUser.sendMultipartMessage({
        roomId: this.room_id,
        parts: message_parts
      });

      this.attachment = null;
      await this.setState({
        is_sending: false // hide the loading animation
      });
    } catch (send_msg_err) {
      console.log("error sending message: ", send_msg_err);
    }
Receiving messages
The code for receiving messages has already been included in the starter branch, but we need to update it so it sets the last_message_id that we used in the code for sending a message earlier:
    onReceive = async (data) => {
      this.last_message_id = data.id; // add this
      // ...
    }
Next, replace the existing getMessage function with the following:
    getMessage = async ({ id, sender, parts, createdAt }) => {

      const text = parts.find(part => part.partType === 'inline').payload.content;
      const attachment = parts.find(part => part.partType === 'attachment');

      const attachment_url = (attachment) ? await attachment.payload.url() : null;
      const attachment_type = (attachment) ? attachment.payload.type : null;

      const msg_data = {
        _id: id,
        text: text,
        createdAt: new Date(createdAt),
        user: {
          _id: sender.id,
          name: sender.name,
          avatar: `https://ui-avatars.com/api/?background=d88413&color=FFF&name=${sender.name}`
        }
      };

      if (attachment) {
        Object.assign(msg_data, { attachment: { url: attachment_url, type: attachment_type } });
      }

      if (attachment && attachment_type.indexOf('video') !== -1) {
        Object.assign(msg_data, { video: attachment_url });
      }

      if (attachment && attachment_type.indexOf('image') !== -1) {
        Object.assign(msg_data, { image: attachment_url });
      }

      return {
        message: msg_data
      };
    }
We’re using the UI Avatars API to automatically generate an image which matches the user’s initials.
In the code above, the most important distinction is the way we’re getting the text. In this case, the message is already considered a multipart message instead of a simple plain-text message. The first part you specify should always be the text. While the parts that follow can be a file attachment or a URL. The type of a specific part can either beinline,url, orattachment. In this case, we’re handling bothinlineandattachmenttypes. If you specify,text/plainas thetypefor a message part, it’s automatically considered asinline. And if you specify afileto a message part, it’s automatically considered as anattachment.
To get to the actual text of an inline message part, we simply extract payload.content:
const text = parts.find(part => part.partType === 'inline').payload.content;
But for an attachment message part, you have to call the payload’s url() method in order to get the direct URL to the file. This is what we use for previewing the files:
    const attachment = parts.find(part => part.partType === 'attachment');
    const attachment_url = (attachment) ? await attachment.payload.url() : null;
Next, add the renderMessage function. We don’t have this on the starter branch because we’re only rendering plain text previously. This time though, we need to cater for audio (mp3), and video (mp4) files as well. We only render a custom chat bubble if it’s an audio file because Gifted Chat already has a feature for rendering previews for image and video files. If it’s a video though, we supply the onLongPress prop to Gifted Chat’s <Message> component. This allows us to listen for the event when a chat bubble is long-pressed. It’s what we use to render the fullscreen video:
    renderMessage = (msg) => {
      const { attachment } = msg.currentMessage;
      const renderBubble = (attachment && attachment.type.indexOf('audio') !== -1) ? this.renderPreview.bind(this, attachment.url) : null;
      const onLongPress = (attachment  && attachment.type.indexOf('video') !== -1) ? this.onLongPressMessageBubble.bind(this, attachment.url) : null;

      const modified_msg = {
        ...msg,
        renderBubble,
        onLongPress,
        videoProps: {
          paused: true // don't autoplay the video because it's just a preview
        }
      }
      return <Message {...modified_msg} />
    }
When a chat bubble that has a custom onLongPress method is long pressed, the app opens the modal for viewing the fullscreen video:
    onLongPressMessageBubble = (link) => {
      this.setState({
        is_video_modal_visible: true,
        video_uri: link // the direct link to the video
      });
    }
Next, here’s the code for rendering a custom chat bubble. This makes use of the <AudioPlayer> component which has already been pre-coded:
    renderPreview = (uri, bubbleProps) => {
      const text_color = (bubbleProps.position == 'right') ? '#FFF' : '#000';
      const modified_bubbleProps = {
        ...bubbleProps
      };
      return (
        <ChatBubble {...modified_bubbleProps}>
          <AudioPlayer url={uri} />
        </ChatBubble>
      );
    }
Typing indicators
To implement the typing indicators, we use Chatkit’s isTypingIn method to set the room where the current user is currently typing in. This will trigger the onUserStartedTyping hook on the other members of the room who are currently online:
    onTyping = async () => {
      try {
        await this.currentUser.isTypingIn({ roomId: this.room_id });
      } catch (typing_err) {
        console.log("error setting is typing: ", typing_err);
      }
    }
When the onUserStartedTyping hook is triggered, the following function is executed. This shows the chat UI’s footer text which displays the typing indicator:
    startTyping = (user) => {
      this.setState({
        is_typing: true,
        typing_user: user.name
      });
    }
If the user stops typing, the onUserStoppedTyping hook is automatically triggered so the following function is executed as well. This hides the chat UI’s footer text:
    stopTyping = (user) => {
      this.setState({
        is_typing: false,
        typing_user: null
      });
    }
Here’s the code for rendering the custom footer. All it does is show the name of the user who is currently typing in the chat room:
    renderFooter = () => {
      const { is_typing, typing_user } = this.state;
      if (is_typing) {
        return (
          <View style={styles.footerContainer}>
            <Text style={styles.footerText}>
              {typing_user} is typing...
            </Text>
          </View>
        );
      }
      return null;
    }
Read receipt
The last feature that we’re going to implement is the read receipt. This allows the current user to view the last message that another member of the room has read (or get all of the user’s read cursors). This makes use of Chatkit’s readCursor method to fetch the ID of the latest message that a specific user has marked as read (via the setReadCursor method):
    viewLastReadMessage = async (data) => {
      try {
        const cursor = await this.currentUser.readCursor({
          userId: data.userId,
          roomId: this.room_id
        });

        const viewed_message = this.state.messages.find(msg => msg._id == cursor.position);

        await this.setState({
          viewed_user: data.name,
          is_last_viewed_message_modal_visible: true,
          viewed_message: viewed_message.text
        });
      } catch (view_last_msg_err) {
        console.log("error viewing last message: ", view_last_msg_err);
      }
    }
Users can only view the message if it has already been loaded in their chat screen. If the message doesn’t show up then it means that the member they selected hasn’t read any of the recent messages that the current user is able to view.## Running the Chat app
At this point, you can now run the app. Start by running the server and exposing it to the internet using ngrok:
    cd server
    yarn start
    ~/Downloads/ngrok http 5000
Update the login and chat screen with your ngrok URL:
    // src/screens/Login.js, src/screens/Group.js, src/screens/Chat.js
    const CHAT_SERVER = "YOUR NGROK HTTPS URL";
Next, delete the node_modules/react-native-gifted-chat/node_modules/react-native-video folder. This is because we also have React Native Video as a dependency for the app. It’s conflicting with Gifted Chat’s copy, so we need to delete it.
Finally, run the app:
    react-native run-android
    react-native run-ios
Before you log a user in, be sure to visit <a href="http://localhost:5000/users" target="_blank">http://localhost:5000/users</a> on your browser to populate the users array in the server.
Conclusion
In this tutorial, you learned how to use various **Chatkit **features within a React Native app. Specifically, you learned how to implement roles and permissions, read receipts, file uploads, and typing indicators.
You can find the code in this GitHub repo.
#ios #javascript #node-js #react-native #reactjs