Originally published by Luis Aviles at medium.com
Some time ago I implemented a simple chat application using TypeScript language only. The main goal was to write a demo to explain how you can use this programming language on the client side and on the server. The client app is using latest Angular features.
In this post I will show you how I implemented the app from scratch.

Demo: TypeScript Chat Application
What is a Real Time Application?
According this Wikipedia definition, a real-time application allows information to be received as soon as it is published, rather than requiring a source to be checked periodically for updates. Therefore, this kind of app should give a feeling to users that events and actions happen immediately.
WebSockets
WebSockets is a protocol that provides a bi-directional communication channel. This means that a browser and web server can maintain real-time comms, sending messages back and forth while the connection is open.
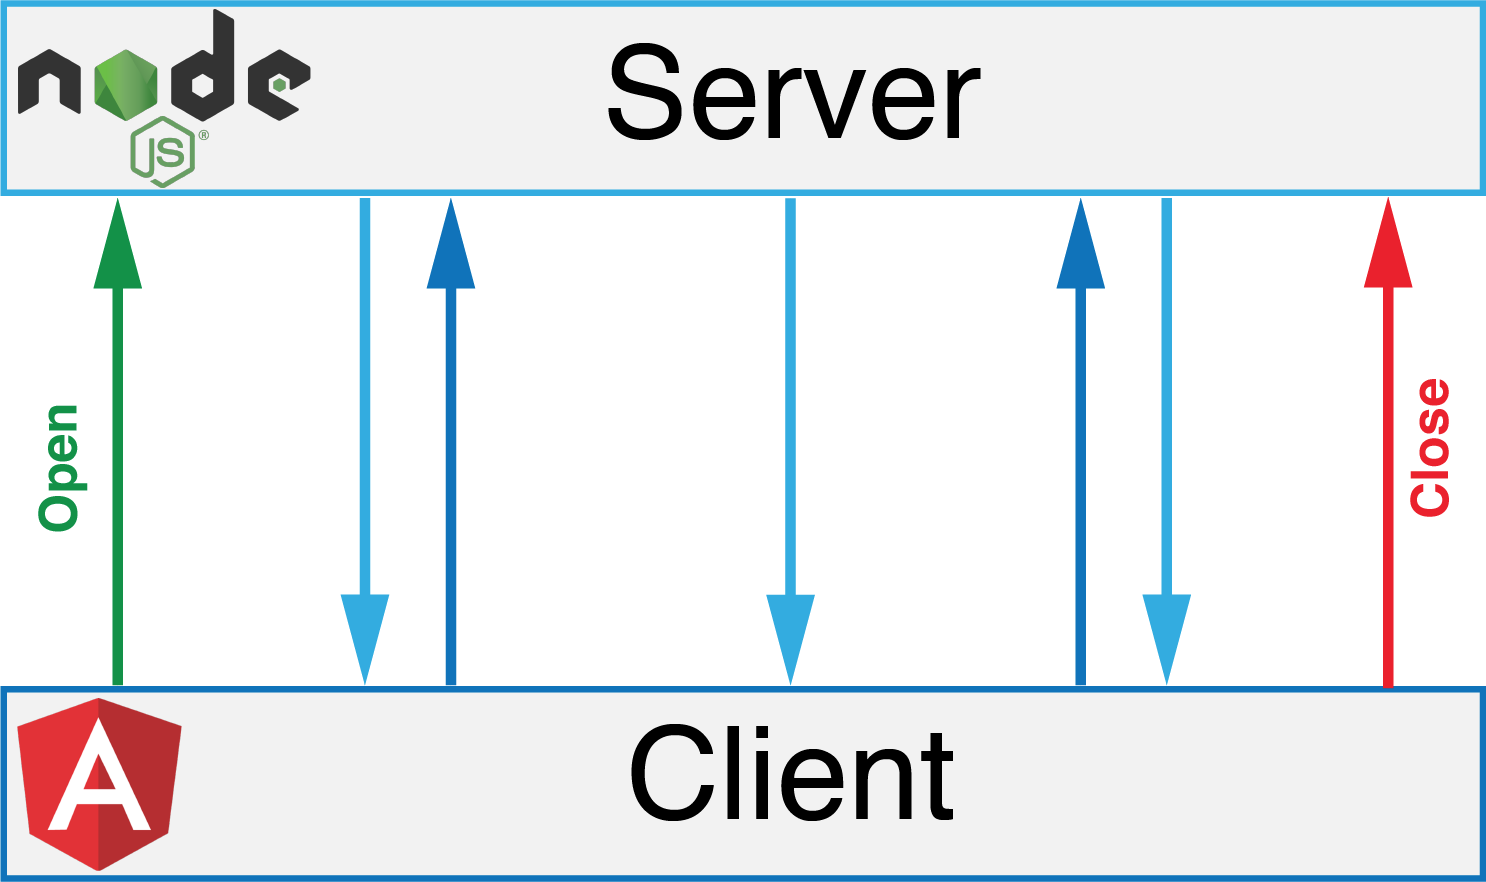
Websockets communication
Application Structure
We will separate server related code and client code. I will go into details when most important files will are explained. For now, this is the expected structure of our application:
server/ |- src/ |- package.json |- tsconfig.json |- gulpfile.jsclient/
|- src/
|- package.json
|- tsconfig.json
|- .angular-cli.json
Server Code
Since WebSockets is a specification, we can find several implementationsabout it. We can choose J̶a̶v̶a̶S̶c̶r̶i̶p̶t̶ TypeScript or any other programming language.
In this case we’ll use Socket.IO, which is one of the fastest and most reliable real-time engines.
Why use TypeScript on server side code?
TypeScript comes with really cool features and it is updated very often. It can prevent about 15% of bugs. Do you need more reasons? 😄
Initializing server application
Create a package.json file and then install the following dependencies:
npm install --save express socket.io @types/express @types/socket.io
We’ll need to install some devDependencies to allow integrate gulp and typescript so that we can define build tasks easily with these tools later:
npm install --save-dev typescript gulp gulp-typescript
TypeScript Compiler Configuration
Create a tsconfig.json file with the following content:
{

“files”: [

“src/.ts",

"src/model/.ts”

],

“compilerOptions”: {

“target”: “es5”

}

}
Data Model definition
Taking advantage of static typing, let’s define a small data model as follows:
export class User {

constructor(private name: string) {}

}
export class Message {

constructor(private from: User, private content: string) {}

}
export class ChatMessage extends Message{

constructor(from: User, content: string) {

super(from, content);

}

}
…let’s see further details into our server/src directory:
server/

|- src/

|- model/

|- message.model.ts

|- user.model.ts

|- index.ts

|- server.ts

|- package.json

|- tsconfig.json

|- gulpfile.js
Chat Server Implementation
The main files in server directory are index.ts and chat-server.ts. The first one allows us to create and export our ChatServer app, while the last one contains express and socket.IO configurations:
import { ChatServer } from ‘./chat-server’;
let app = new ChatServer().getApp();

export { app };
import { createServer, Server } from ‘http’;

import * as express from ‘express’;

import * as socketIo from ‘socket.io’;
import { Message } from ‘./model’;
export class ChatServer {

public static readonly PORT:number = 8080;

private app: express.Application;

private server: Server;

private io: SocketIO.Server;

private port: string | number;
constructor() {
    this.createApp();
    this.config();
    this.createServer();
    this.sockets();
    this.listen();
}

private createApp(): void {
    this.app = express();
}

private createServer(): void {
    this.server = createServer(this.app);
}

private config(): void {
    this.port = process.env.PORT || ChatServer.PORT;
}

private sockets(): void {
    this.io = socketIo(this.server);
}

private listen(): void {
    this.server.listen(this.port, () => {
        console.log('Running server on port %s', this.port);
    });

    this.io.on('connect', (socket: any) => {
        console.log('Connected client on port %s.', this.port);
        socket.on('message', (m: Message) => {
            console.log('[server](message): %s', JSON.stringify(m));
            this.io.emit('message', m);
        });

        socket.on('disconnect', () => {
            console.log('Client disconnected');
        });
    });
}

public getApp(): express.Application {
    return this.app;
}

}
Server Classes
The previous code will give a result of the following classes and relationships:

Build and Run the Server
In order to have JavaScript files needed by the V8 engine of Node.js, we can add a build task into our gulpfile.js file:
var gulp = require(“gulp”);
var ts = require(“gulp-typescript”);
var tsProject = ts.createProject(“tsconfig.json”);gulp.task(“build”, function () {
return tsProject.src()
.pipe(tsProject())
.js.pipe(gulp.dest(“./dist”));
});
As you can see, the output of build process(JavaScript files) will be located indist directory. To perform this action, you’ll need to run:
gulp build
Now we can run node dist/index.js command to have the server running.
Client Code
Let’s generate our client directory using the latest Angular CLI version:
ng new typescript-chat-client --routing --prefix tcc --skip-install
Then install your dependencies running npm install(I prefer to use Yarn for this step):
cd typescript-chat-client

yarn install
Adding Angular Material
Find and follow the latest guide to install Angular Material inside your Angular CLI project.
As part of using best practices in our project structure, we can create sharedand materialmodules:
client/

|- src/

|- app/

|- chat/

|- shared/

|- material/

|- material.module.ts

|- shared.module.ts

|-app.module.ts
We can do that from the command line interface:
ng generate module shared --module app

ng generate module shared/material --module shared
Check the changes inside app.module.ts and shared.module.ts to see the relationships created between these modules.
Adding express and socket.IO
We’ll need to add express and socket.io modules into our client App:
npm install express socket.io --save
Chat Modules and Components
Let’s create a new module before starting to create components for our chat application:
ng generate module chat --module app
Now add a component into newest module:
ng generate component chat --module chat
In order to use web-sockets and custom models, let’s create another sharedfolder. This time inside chat directory:
ng generate service chat/shared/services/socket --module chat

ng generate class chat/shared/model/user

ng generate class chat/shared/model/message
We’ll be ending with a structure similar to:
client/

|- src/

|- app/

|- chat/

|- shared/

|- model/

|- user.ts

|- message.ts

|- services/

|- socket.service.ts

|- shared/

|-app.module.ts
Observables and Web Sockets
Since our Angular app comes with RxJS, we can use Observables to catch Socket.IO events:
import { Injectable } from ‘@angular/core’;

import { Observable } from ‘rxjs/Observable’;

import { Observer } from ‘rxjs/Observer’;

import { Message } from ‘…/model/message’;

import { Event } from ‘…/model/event’;
import * as socketIo from ‘socket.io-client’;
const SERVER_URL = ‘http://localhost:8080’;
@Injectable()

export class SocketService {

private socket;
public initSocket(): void {
    this.socket = socketIo(SERVER_URL);
}

public send(message: Message): void {
    this.socket.emit('message', message);
}

public onMessage(): Observable<Message> {
    return new Observable<Message>(observer => {
        this.socket.on('message', (data: Message) => observer.next(data));
    });
}

public onEvent(event: Event): Observable<any> {
    return new Observable<Event>(observer => {
        this.socket.on(event, () => observer.next());
    });
}

}
We’ll need to define some enums to manage Actions and Events in the App:
// Actions you can take on the App
export enum Action {
JOINED,
LEFT,
RENAME
}// Socket.io events
export enum Event {
CONNECT = ‘connect’,
DISCONNECT = ‘disconnect’
}
Now we’re ready to listen to messages from the server:
import { Component, OnInit } from ‘@angular/core’;
import { Action } from ‘./shared/model/action’;

import { Event } from ‘./shared/model/event’;

import { Message } from ‘./shared/model/message’;

import { User } from ‘./shared/model/user’;

import { SocketService } from ‘./shared/services/socket.service’;
@Component({

selector: ‘tcc-chat’,

templateUrl: ‘./chat.component.html’,

styleUrls: [‘./chat.component.css’]

})

export class ChatComponent implements OnInit {

action = Action;

user: User;

messages: Message[] = [];

messageContent: string;

ioConnection: any;
constructor(private socketService: SocketService) { }
ngOnInit(): void {

this.initIoConnection();

}
private initIoConnection(): void {

this.socketService.initSocket();
this.ioConnection = this.socketService.onMessage()
  .subscribe((message: Message) => {
    this.messages.push(message);
  });

this.socketService.onEvent(Event.CONNECT)
  .subscribe(() => {
    console.log('connected');
  });

this.socketService.onEvent(Event.DISCONNECT)
  .subscribe(() => {
    console.log('disconnected');
  });

}
public sendMessage(message: string): void {

if (!message) {

return;

}
this.socketService.send({
  from: this.user,
  content: message
});
this.messageContent = null;

}
public sendNotification(params: any, action: Action): void {

let message: Message;
if (action === Action.JOINED) {
  message = {
    from: this.user,
    action: action
  }
} else if (action === Action.RENAME) {
  message = {
    action: action,
    content: {
      username: this.user.name,
      previousUsername: params.previousUsername
    }
  };
}

this.socketService.send(message);

}

}
Material Code & UI events have been omitted in this file
Once ChatComponent gets initialized, the component is going to subscribe to SocketService observables in order to start to receive connection events or incoming messages.
The sendMessage and sendNotification functions are going to send the respective content through the same service. Notifications sent at this time are Rename User and User Joined.
Source Code
Find the complete project in this GitHub repository:
github.com/luixaviles/socket-io-typescript-chat
Live Demo
Go through to typescript-chat.firebaseapp.com and open two or more tabs in your favorite browser and start a conversation.
Originally published by Luis Aviles at medium.com
====================================================
Thanks for reading :heart: If you liked this post, share it with all of your programming buddies! Follow me on Facebook | Twitter
Learn More
☞ TypeScript, Angular, Firebase & Angular Material Masterclass
☞ Typescript: The Complete Developer’s Guide
☞ Typescript Masterclass & FREE E-Book
☞ Angular 8 (formerly Angular 2) - The Complete Guide
☞ Complete Angular 8 from Zero to Hero | Get Hired
☞ Learn and Understand AngularJS
☞ The Complete Angular Course: Beginner to Advanced
☞ Angular Crash Course for Busy Developers
☞ Angular Essentials (Angular 2+ with TypeScript)
☞ Angular Tutorial: Create a CRUD App with Angular CLI and TypeScript
☞ How to master advanced TypeScript patterns
#angular #typescript #node-js #web-development