Let’s Develop a Mobile App in Flutter
Flutter is a mobile framework for the development of multiplatform native apps, so from one code we will get an app that can run on Android as well as on iOS. It is a similar experiment to Xamarin from Microsoft a few years ago.
Let’s Develop a Mobile App in Flutter (1/3)
Flutter developers released a second beta version of the Flutter framework at the beginning of April. It is the second beta version released in just the last month and a half. It seems that after a long development period, there will be a stable version of the framework released quite soon.
Flutter developers released a second beta version of the Flutter framework at the beginning of April. It is the second beta version released in just the last month and a half. It seems that after a long development period, there will be a stable version of the framework released quite soon. In this article we will present the basic interface setting for using Flutter and describe its project structure. We will also use a simple project from the Flutter developers to show how to create an app for Android and iOS that has a UI corresponding to the given platform.
If you are a Flutter guru already (or if you know your way around it), you will not find much new information in this article. But we believe that you will discover some interesting tips and tricks in this series nonetheless.
Let’s get started
The Dart programming language is used for creating Flutter applications. Dart is an object oriented programming language and its syntax is very similar to Kotlin’s, even though it might be a bit more wordy. You can check its specifications and syntax on the official website. We will not discuss Dart much in this article but we will still present a few basic language constructs.
SDKs
We need to have the Flutter and Dart SDKs installed in order to be able to start using Flutter. The installation of the SDK packages is partially dependent on your operating system. We will show only the main commands here, other details and differences can be found on the official Flutter webpage. Because Flutter is in beta, the SDK installation is performed by cloning the official repository, therefore you need to have a git client installed.
git clone -b beta https://github.com/flutter/flutter.git
Then you need to add the path to Flutter to the interface variable PATH. After a correct setup we can call Flutter relatively, thanks to which we ensure the correct function of all other available Flutter tools. Next, we will need the SDK and the relevant development tools for our intended platform. The only development restriction for iOS (or let’s say of the final app assembly) is the necessity of having a device with macOS. Finally, we need to install all the dependent components using the following command. The same command can also be used for the overall configuration check of our interface.
flutter doctor
As Flutter is constantly being developed, the stable SDK version changes on a daily basis. That is why we recommend running the following command every time before you start or continue the development of your Flutter app. It will perform the update of all necessary SDK packages.
flutter upgrade
Editor
We recommend using Android Studio for the development. Flutter developers offer a plugin that will make the creation of your new project a piece of cake. All the following examples will be presented in Android Studio. You can find all the necessary details for the installation of Android Studio and the plugin on the official Flutter website.
Project creation
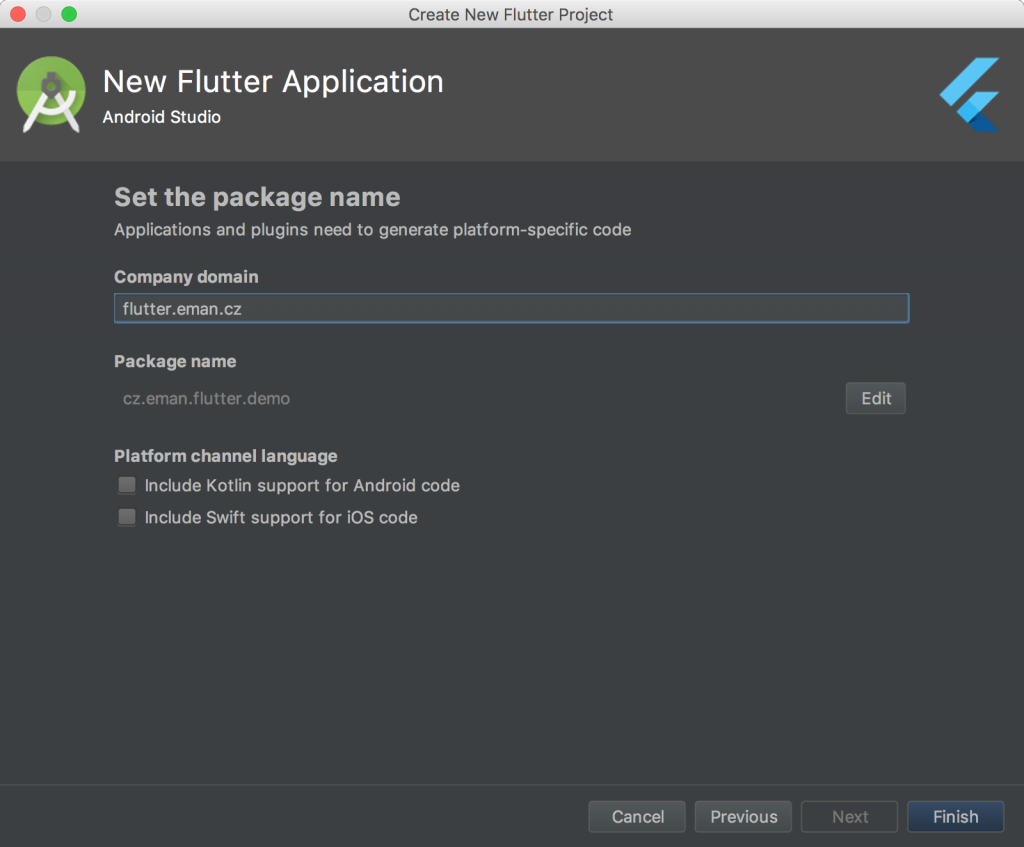
If you have the Android Studio and the plugin installed, the creation of a new project is a cakewalk. Select the Create New Flutter Project option and go through a simple wizard that will help you set up the basic project configuration.
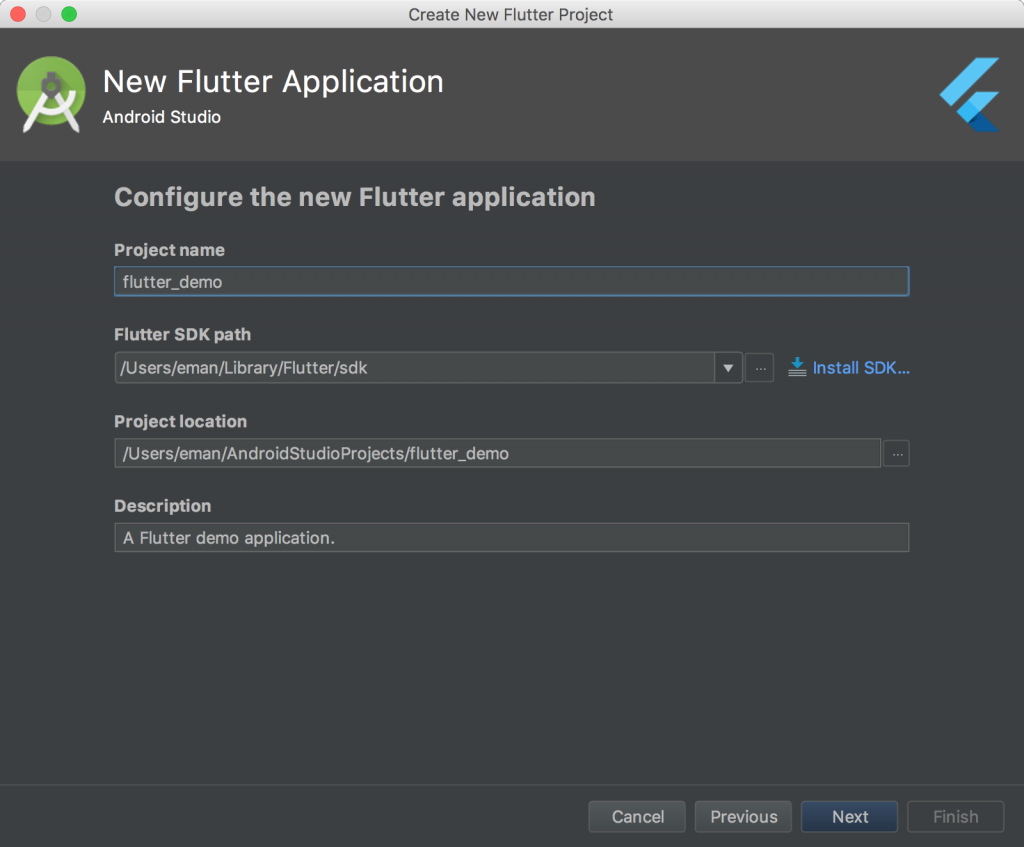
After the creation, the project contains all the necessary parts for a correct setup and run of the final app as well as a demo project prepared by Flutter developers. In the next part we will use this demo project to show how to create apps for both platforms with ease. In the end, the apps will look as if they are created by a native development process.
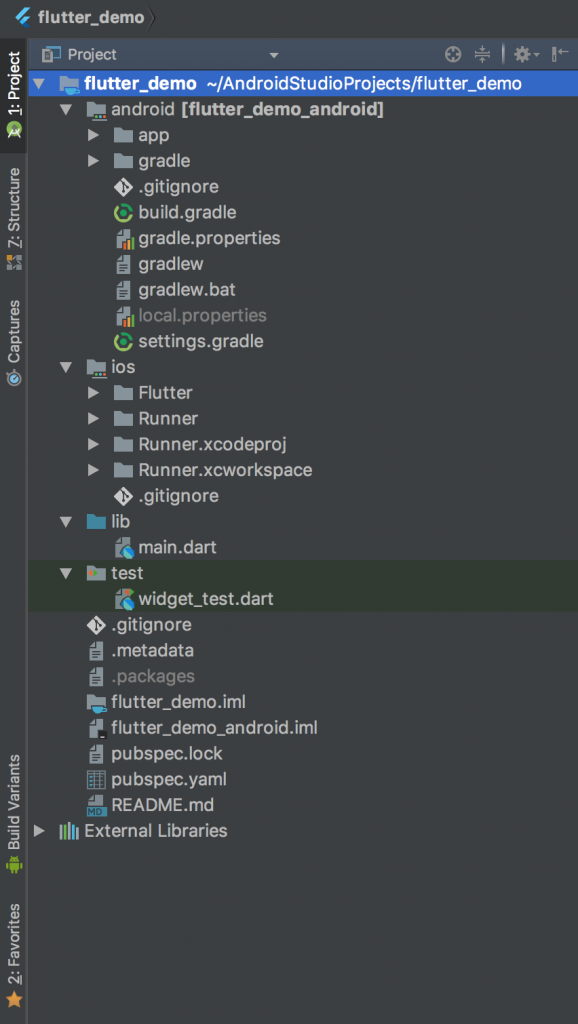
Project’s structure
The structure of every Flutter project looks more or less like this:
- The
androiddirectory – here we will find the classic Android project. In theappmodule we can find the actual Android app that already contains a few generated files. These are for connecting the Flutter app to the classic Android app. All Android specific configurations, the applicationId definition for example, supported SDKs, or signing certificates will be modified here. - The
iosdirectory – here we will find the typical iOS project. It already contains a few generated files used for connecting the Flutter app to the classic iOS app. All iOS specific configuration is to be done in this directory - The
libdirectory – the most important directory where the Flutter app files are stored. The main file here ismain.dartcontaining thevoid main()function which is the input function for the Flutter app. - File
pubspec.yaml– this file is for the Flutter app configuration. We also define the dependencies on external Flutter modules and Dart libraries in this file. For example, to add a library for detecting information about the device on which the app runs, we only need to add the following dependency.
dependencies:
  ...
  device_info: "^0.2.0"
Flutter application
Assembly of the app
To assemble the final app, we only need to enter one of the following commands, depending on the selected platform. The assembly can be parameterized to a certain degree. The currently supported parameters can be displayed by the last two commands.
flutter build apk          # Build an Android APK file from your app.
flutter build ios          # Build an iOS application bundle (Mac OS X host only).
flutter build apk --help   # Print build parameters
flutter build ios --help   # Print build parameters
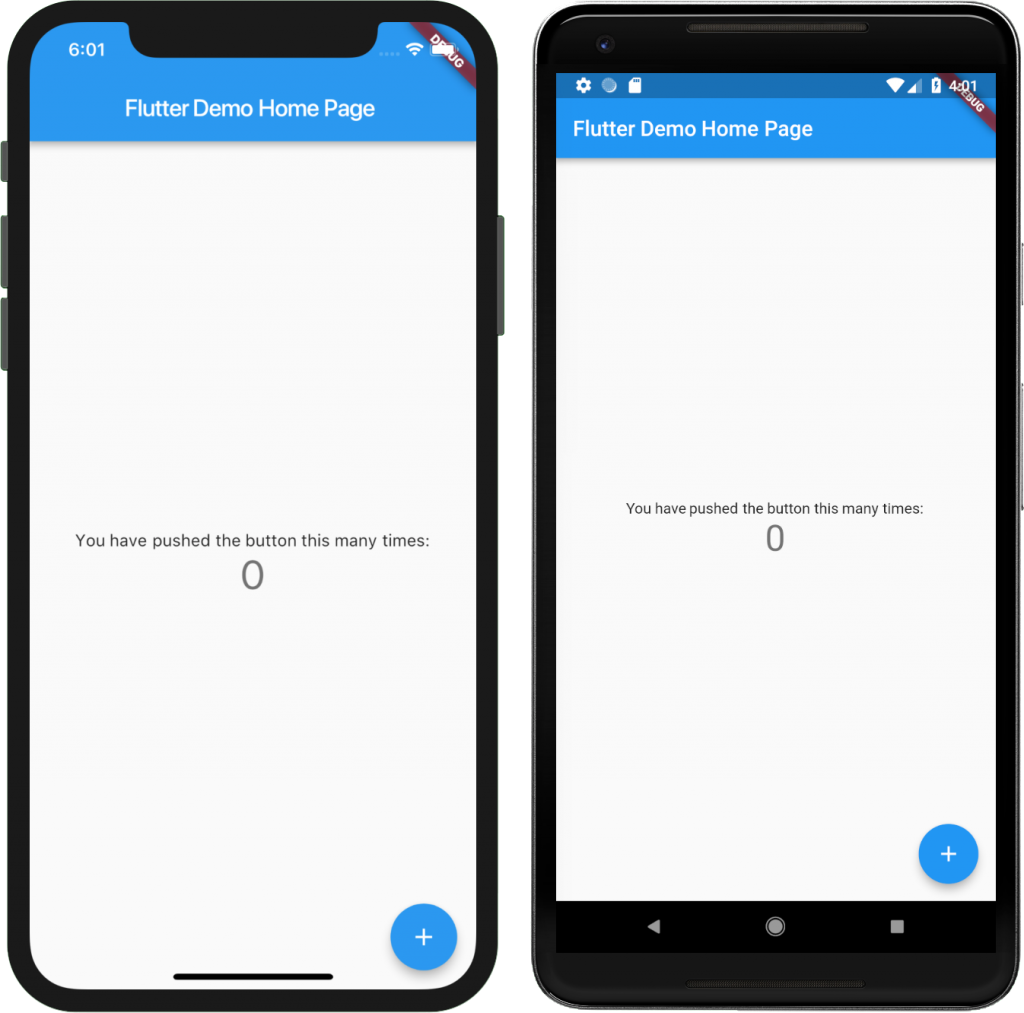
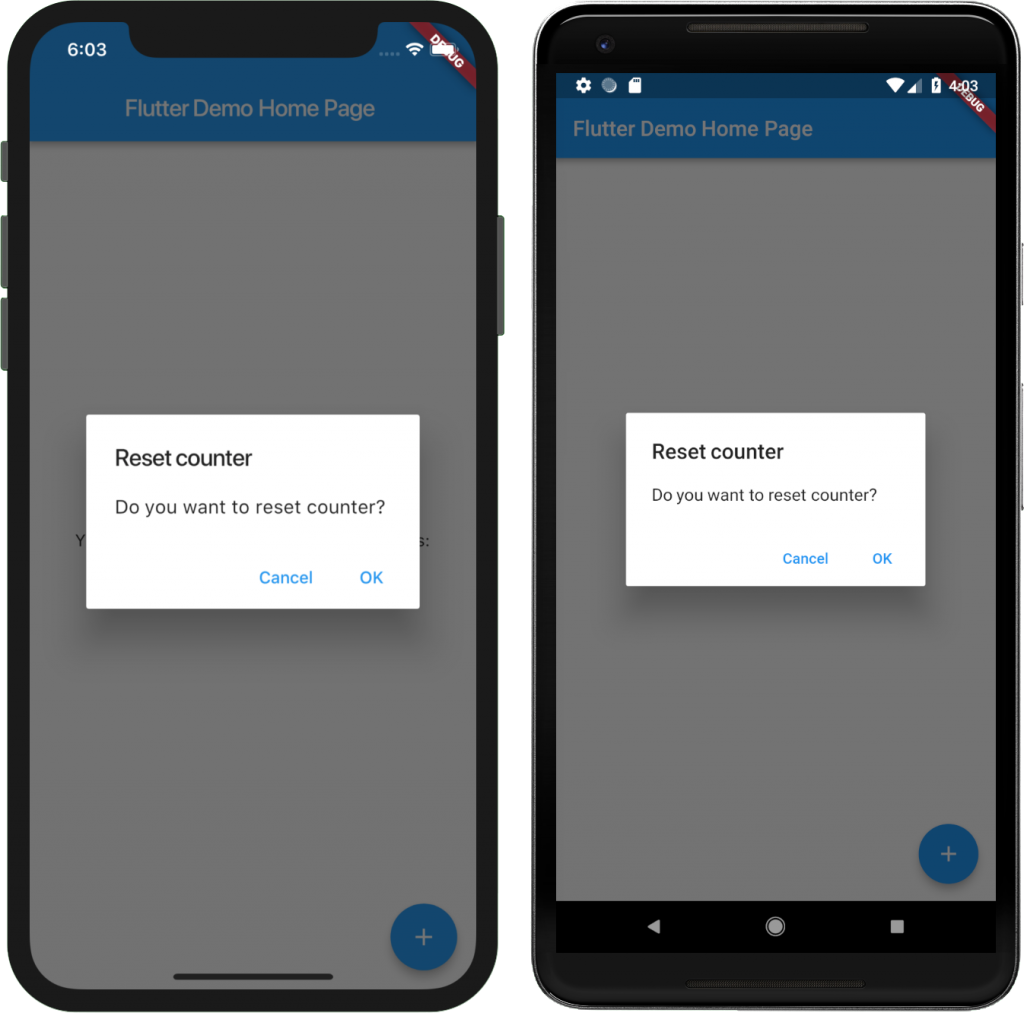
As you can see, the final apps created from one code for iOS and Android look alike. After installing the demo app on a specific end device (iPhone X, Pixel 2 XL), it looks like this:
Expanding the demo app
Let’s add more simple logic to the app. After every fifth click on the + button, the app will show a simple dialogue with a query if the user wishes to reset the counter or continue. The user will then, using the dialogue buttons, choose one option. When the OK button is pressed, the counter will reset and the dialogue ends. When pressing the Cancel button, the dialogue will end. At the end of the _incrementCounter method from the _MyHomePageState class, we will add the following code:
if (_counter % 5 == 0) {
  showDialog(
      context: context,
      barrierDismissible: false,
      builder: (BuildContext context) {
        return /*TODO create dialog*/
      });
}
Every time the variable _counter is divisible by five, the dialogue will be shown, so everything is set up as we wanted. Now we need to create a function that will create a dialogue with the requested functionality.
Material design dialogue
Let’s add a new method that will create a new alert dialogue in material design to the _MyHomePageState class. The basis is the AlertDialog class, which awaits in the constructor for the configuration of the dialogue being created. An important parameter is the actions field where the individual dialogue buttons are defined. The method for creating the dialogue is as follows:
AlertDialog _createMaterialAlertDialog() => new AlertDialog(
    title: new Text('Reset counter'),
    content: new Text('Do you want to reset counter?'),
    actions: <Widget>[
      new MaterialButton(
        onPressed: () {
          Navigator.pop(context);
        },
        child: new Text('Cancel'),
      ),
      new MaterialButton(
          onPressed: () {
            setState(() {
              _counter = 0;
            });
            Navigator.pop(context);
          },
          child: new Text('OK')),
    ],
  );
iOS design dialogue
The dialogue creation is the same as the preceding one, but instead of the material design component we will use components from the cupertino package. The method for creating the dialogue is as follows:
CupertinoAlertDialog _createCupertinoAlertDialog() => new CupertinoAlertDialog(
    title: new Text('Reset counter'),
    content: new Text('Do you want to reset counter?'),
    actions: <Widget>[
      new CupertinoButton(
        onPressed: () {
          Navigator.pop(context);
        },
        child: new Text('Cancel'),
      ),
      new CupertinoButton(
          onPressed: () {
            setState(() {
              _counter = 0;
            });
            Navigator.pop(context);
          },
          child: new Text('OK')),
    ],
  );
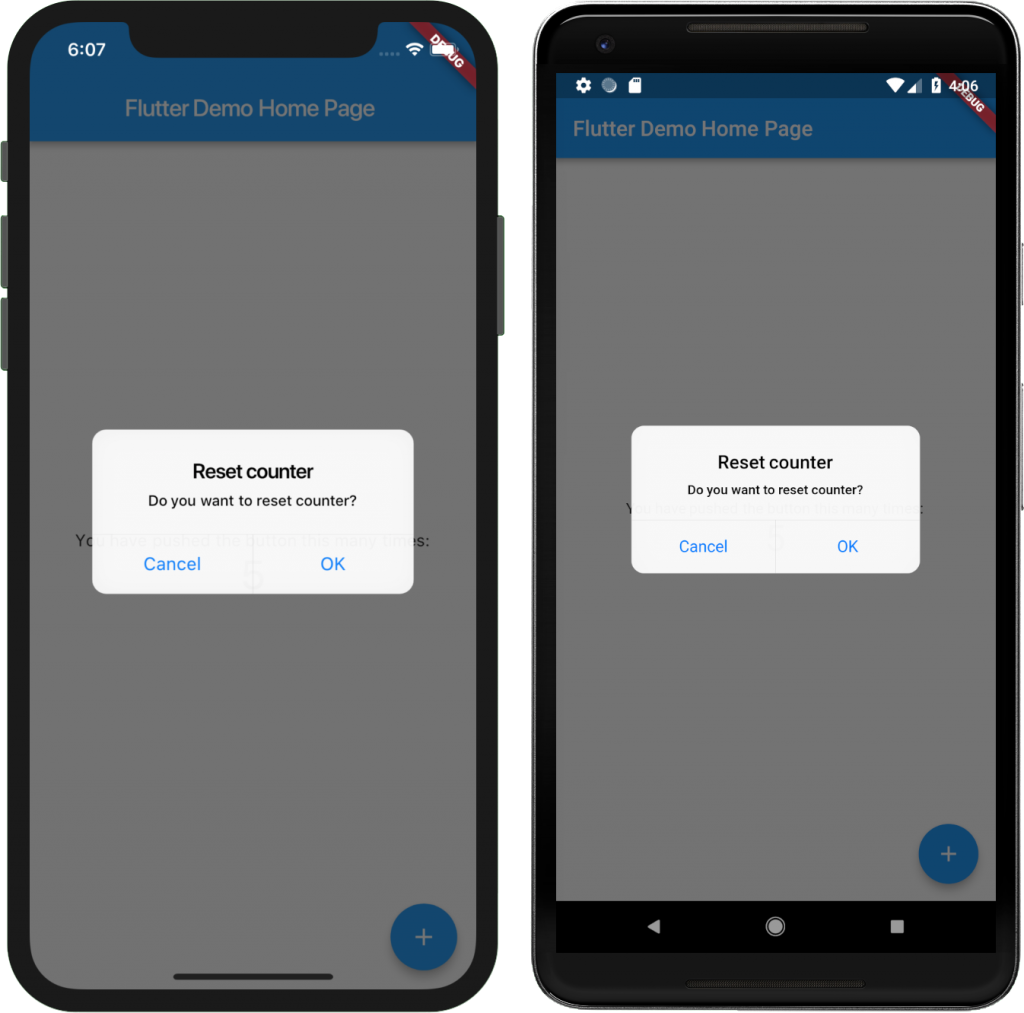
Dialogue based on the target platform
Let’s now combine both concepts together and add a logic that will ensure that the correct dialogue is displayed based on the platform on which the app is running. It is quite simple; we only need to ask what the used platform is.
if (_counter % 5 == 0) {
  showDialog(
      context: context,
      barrierDismissible: false,
      builder: (BuildContext context) {
        return Platform.isIOS
            ? _createCupertinoAlertDialog()
            : _createMaterialAlertDialog();
      });
}

As you have probably noticed, the app now contains a lot of redundant code – the source code for both methods for the creation of corresponding dialogues is virtually the same. It differs only in places where we are calling the appropriate class for displaying a specific element. In one of the following articles we will show how to, at least partially, get rid of these redundancies.
Conclusion
In today’s article we did an overview of Flutter, showed the initial steps needed before starting the creation of a Flutter app and described the parts of the Flutter project. We also extended the prepared demo project with the platform dependent dialogue displaying functionality. You can find the whole project at our GitHub.
We will present the basic constructions of the Dart programming language next. We will also show how Flutter actually works from the inside and start creating an app for displaying events, event registrations, and notifications about any event changes.
Let’s Develop a Mobile App in Flutter (2/3)
Language Dart you need to know if you want a Flutter flow. That’s why we’ll have a look at how to write and design in Flutter. We’ll answer the basic question: Why does it work cross-platform? And we’ll also call a native service for the given platform.
The last article presented the Flutter framework: We’ve set up the environment in order to be able to start developing the Flutter application and described the structure of the Flutter app project. We also presented how to create the platform-dependent dialogue.
Today, we’ll introduce Flutter in more technical details. We’ll go over the Dart language in order to understand how to actually write in Flutter. We’ll talk about Flutter from a design perspective and explain why it works cross-platform. And we’ll show how to call a native service for the given platform. Let’s get started.
Language class
Dart is an object-oriented programming language with syntax very similar to today’s modern languages such as Kotlin, C# or Java.
Variables
Dart is a strongly typed language. That means that every variable has its own data type that is determined when the variable is created and it cannot be changed when the program is running. You don’t have to explicitly state the data type when creating a new variable. You can use the keyword var to deduce its type. Even though it’s a strongly typed language, you can create a variable “without any data type” by using the keyword dynamic.
// explicit data type
String firstName = 'Eman';

// data type deduction
var surname = 'Novák';

// variable data type
dynamic company = 'eMan.cz';

//firstName = 10; // compile error
//surname = 10; // compile error
company = 10;
Classes and objects
Everything is an object in Dart. Every object is an instance of a class and all classes inherit from the Object class. The classes consist of class variables and methods (static methods); objects consist of instance variables and methods.
One of the concepts of object-oriented programming is the encapsulation of classes. In Java, for example, you can define several visibility levels, usually by using keywords such as private, protected, or public. Only the private and public visibility, that which is not defined by special keywords, exist in Dart. But while declaring a class, variable etc. for private visibility, it’s sufficient to use the _ prefix in the name of the element. The visibility does not apply to the classes’ level but to the level of the individual app parts – libraries (library).
class _MyPrivateClass {
  String _myPrivateVariable = '...' // private variable in private class
  String myPublicVariable = '...' // public variable in private class
}

class MyPublicClass {
  String _myPrivateVariable = '...' // private variable in public class
  String myPublicVariable = '...' // public variable in public class
}
Note: Each individual Dart file is a library by default. That means that the individual private components are not visible among the files.
An interesting concept of this language is the Named constructors. It’s a classic object constructor but you can define its name. If the constructor is named appropriately, you can deduce how the object is created from its name. In Java, for example, a similar construct could be created using a static method that would create and initialize the actual object.
class Person {
  String firstName;
  String surname;

  Person.fromJson(Map data) {
    firstName = data['first_name'];
    surname = data['surname'];
  }
}

main() {
  var person = new Person.fromJson({'first_name': 'Eman', 'surname': 'von Prag'});
  print(person.firstName); // Eman
  print(person.surname);   // von Prag
}
Functions
Dart also supports classical functions and because everything is an object, so are the functions. The main function is the main() function that is the app’s entry function, therefore every app will start with this function. You can nest the definitions of the individual functions and create, so called, Nested functions. Every nested function gains the context of the function in which it’s nested, it can see its local variables.
bool topLevel = true;

void main() {
  var insideMain = true;

  void nestedFunction() {
    var insideNestedFunction = true;

    void nestednestedFunction() {
      var insideNestedNestedFunction = true;

      assert(topLevel);
      assert(insideMain);
      assert(insideNestedFunction);
      assert(insideNestedNestedFunction);
    }

    //assert(insideNestedNestedFunction) translation error - unknown variable
  }
}
Null-aware operators
Similarly to Kotlin, Dart offers several operators that make notation of the Null Pointer safety code easier.
- The
androiddirectory – here we will find the classic Android project. In theappmodule we can find the actual Android app that already contains a few generated files. These are for connecting the Flutter app to the classic Android app. All Android specific configurations, the applicationId definition for example, supported SDKs, or signing certificates will be modified here. - The
iosdirectory – here we will find the typical iOS project. It already contains a few generated files used for connecting the Flutter app to the classic iOS app. All iOS specific configuration is to be done in this directory - The
libdirectory – the most important directory where the Flutter app files are stored. The main file here ismain.dartcontaining thevoid main()function which is the input function for the Flutter app. - File
pubspec.yaml– this file is for the Flutter app configuration. We also define the dependencies on external Flutter modules and Dart libraries in this file. For example, to add a library for detecting information about the device on which the app runs, we only need to add the following dependency.
Cascade
The cascade is for calling multiple methods on a single object. In Kotlin, a similar result is obtained by using the apply.
class Person {
  String firstName;
  String surname;
  String company;
}

main() {
  var person = new Person()
    ..firstName = 'Bob'
    ..surname = 'Clever'
    ..company = 'eMan.cz';
}
Everything is a widget
You’ve probably heard that “everything is a widget” if you’ve read any article about Flutter. And yes, everything is actually a widget. Everything, even the app itself, is a widget. Thanks to this, every UI element can be addressed uniformly. There are two kinds of widgets:
- The
androiddirectory – here we will find the classic Android project. In theappmodule we can find the actual Android app that already contains a few generated files. These are for connecting the Flutter app to the classic Android app. All Android specific configurations, the applicationId definition for example, supported SDKs, or signing certificates will be modified here. - The
iosdirectory – here we will find the typical iOS project. It already contains a few generated files used for connecting the Flutter app to the classic iOS app. All iOS specific configuration is to be done in this directory - The
libdirectory – the most important directory where the Flutter app files are stored. The main file here ismain.dartcontaining thevoid main()function which is the input function for the Flutter app. - File
pubspec.yaml– this file is for the Flutter app configuration. We also define the dependencies on external Flutter modules and Dart libraries in this file. For example, to add a library for detecting information about the device on which the app runs, we only need to add the following dependency.
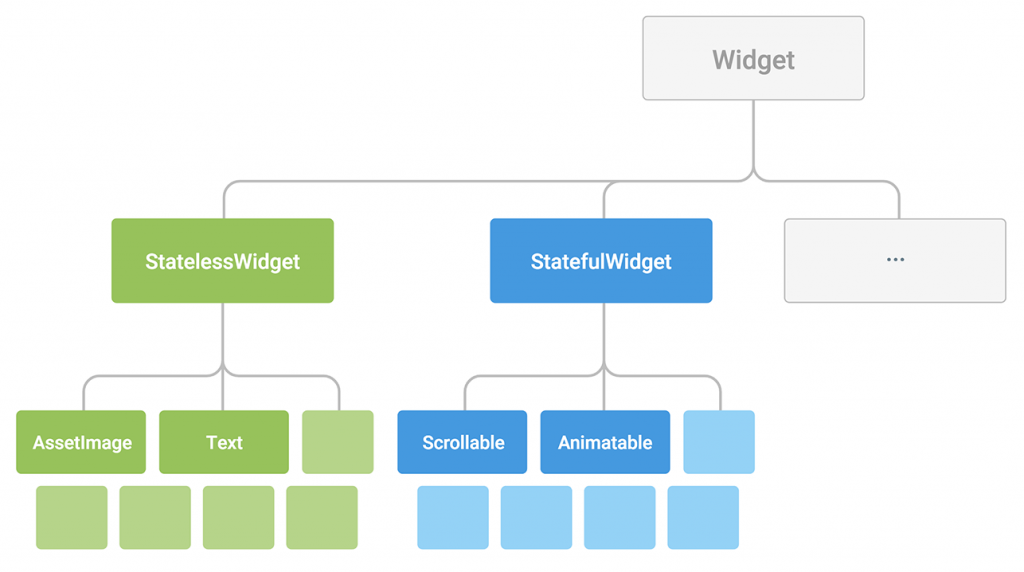
Source: https://flutter.io/technical-overview/
Every widget is very small because it manages only the activity it was created for and not any other. For example, the Text widget that displays text manages only the actual display of the text and doesn’t consider its position in connection to the other widgets nor has the ability to gather events (e.g. clicks). If you want it to have any other function, you simply add another widget that supports the function you need. In the end, developing a Flutter app results in putting the individual widgets together in order to get the desired functionality, which reminds us of building with Legos. And everyone loves Legos, right?! 😉
Flutter technology
Flutter does not use any native elements of the target platform. All elements were developed anew by Flutter developers in order to be suitable to the conventions of the target platform. Most of the app’s source code is translated directly into machine code of the target processor (via Android NDK on Android and via LLVM on iOS). That’s why you only need one source code for both platforms. And thanks to this the resulting app performance should be way faster, at least on Android.
You can see the individual framework layers on the diagram below. The dependency of the individual layers is from the top down; each layer depends on the layers below. The green part shows the main components of the Flutter framework. As you can see, Material (Android) and Cupertino (iOS) components are on the same level, making the platform-dependent development quite complicated as we saw in the last article. When looking over the Flutter documentation on its website, you can find a diagram showing the Material component to be dependent on Cupertino. That would solve the above mentioned issue. Unfortunately, when looking into the current source code of Flutter, it seems that the two components are at the same level.
The blue part shows components present in the Flutter core that are responsible for the actual operation of the app. The Skia component is responsible for the rendering of 2D graphics, Dart for compilation of the AOT parts of the code that couldn’t be compiled into the machine code directly, and the Text component manages the rendering of the text.
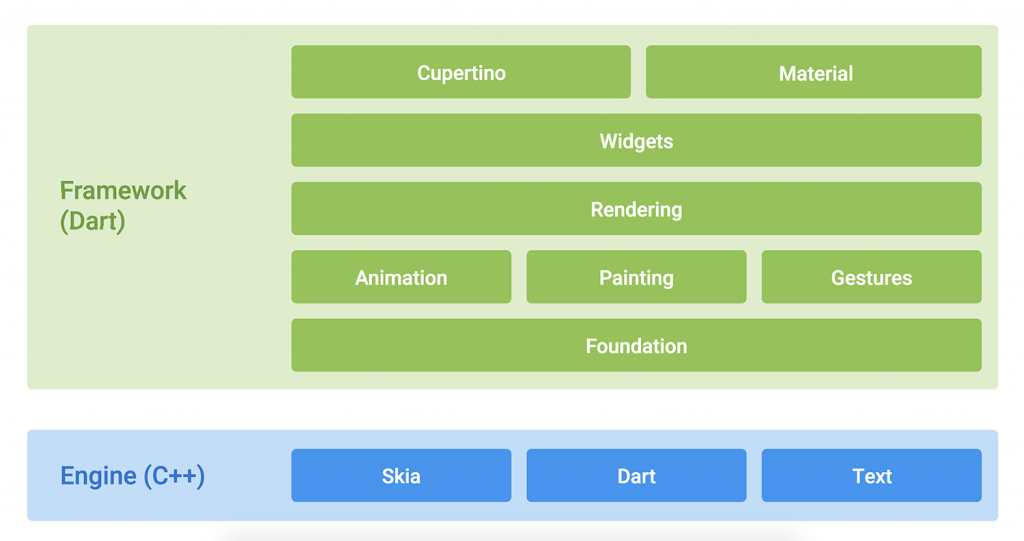
Edited from source: https://flutter.io/technical-overview/
Native interface
Flutter allows for calling a specific method of the native interface of the given platform using the, so called, Method channel. The Flutter app (client) sends a message with the request to the native part of the app (host). If the host knows the message, it manages the request and returns an answer. For this to be correctly served, both the client and the host have to implement the same message protocol.
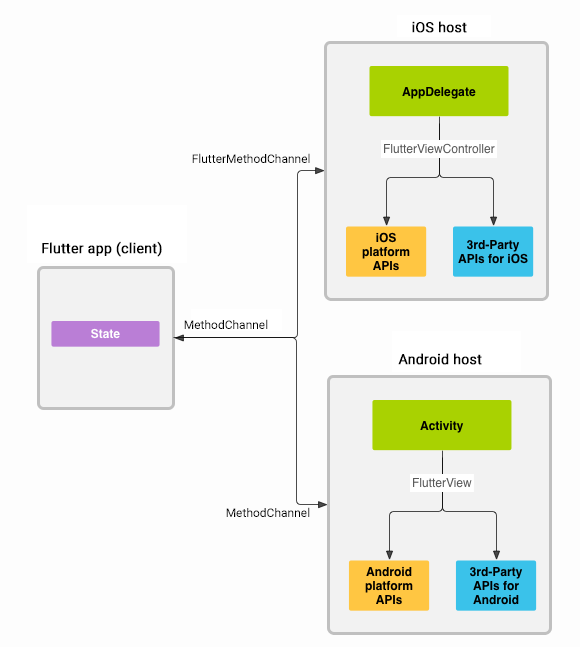
Source: https://flutter.io/platform-channels/
As you can see from the diagram, using Method channel you can call any service of the native platform or a service that is offered by third party libraries. It’s also one of the ways to implement a service using the platform-specific services that Flutter doesn’t support. This is useful when, for example, you don’t have a library with the requested service available for Flutter but it exists as a library for Android and iOS.
Let’s see this in action using an example scenario when you want to find out the battery status of your device. As Flutter supports the creation of the platform-specific parts of the source code even in Kotlin for Android parts, and in Swift for iOS parts, we used these languages for our examples.
Client
The client sends a request about the battery status and displays the formatted result in the middle of the screen upon its reception. The message processing is asynchronous so the state of the battery can be displayed only after the result is received. In the example you can see one of the possible methods of processing such asynchronous calls.
An important part is the construction of the MethodChannel object that awaits in the parameter of the constructor for the name of the channel that is being created. On the host side, you can connect the host and the client using the this name. In order for the client and host to communicate, they need to use the same channel as well as send and expect to receive messages of the same type. The invokeMethod() method is used for defining the message type (in the parameter of the method).
The main.dart file in the lib directory should then look like this:
const platform = const MethodChannel('battery');

void main() {
  platform
      .invokeMethod('getBatteryLevel') // sends message with request 'getBatteryLevel'
      .then((result) => 'Battery level at $result %.')
      .catchError((error) => "Failed to get battery level: '${error.message}'.")
      .then((msg) => runApp(new Center(
            child: new Text(
              msg,
              textDirection: TextDirection.ltr,
            ),
          )));
}
Host
It is important that the host registers the handler on the same channel that was defined on the client’s side. After receiving a specific message type, that can be determined by call.method, you can perform the requested operation and save the result in the result object.
The MainActivy.kt file in the android/app/src/main/kotlin/package_name directory should then look like this:
class MainActivity : FlutterActivity() {
    private val CHANNEL = "battery"

    override fun onCreate(savedInstanceState: Bundle?) {
        super.onCreate(savedInstanceState)
        GeneratedPluginRegistrant.registerWith(this)

        MethodChannel(flutterView, CHANNEL).setMethodCallHandler { call, result ->
            if (call.method == "getBatteryLevel") {
                val batteryLevel = getBatteryLevel()

                if (batteryLevel != -1) {
                    result.success(batteryLevel)
                } else {
                    result.error("UNAVAILABLE", "Battery level not available.", null)
                }
            } else {
                result.notImplemented()
            }
        }
    }

    private fun getBatteryLevel(): Int {
        return if (Build.VERSION.SDK_INT >= Build.VERSION_CODES.LOLLIPOP) {
            val batteryManager = getSystemService(Context.BATTERY_SERVICE) as BatteryManager
            batteryManager.getIntProperty(BatteryManager.BATTERY_PROPERTY_CAPACITY)
        } else {
            val intent = ContextWrapper(applicationContext).registerReceiver(null, IntentFilter(Intent.ACTION_BATTERY_CHANGED))
            intent!!.getIntExtra(BatteryManager.EXTRA_LEVEL, -1) * 100 / intent.getIntExtra(BatteryManager.EXTRA_SCALE, -1)
        }
    }
}
The AppDelegate.swift file in the ios/Runner directory should then look like this:
@UIApplicationMain
@objc class AppDelegate: FlutterAppDelegate {
    override func application(_ application: UIApplication, didFinishLaunchingWithOptions launchOptions: [UIApplicationLaunchOptionsKey: Any]?) -> Bool {
        GeneratedPluginRegistrant.register(with: self);

        let controller : FlutterViewController = window?.rootViewController as! FlutterViewController;
        let batteryChannel = FlutterMethodChannel.init(name: "battery", binaryMessenger: controller);
        batteryChannel.setMethodCallHandler({(call: FlutterMethodCall, result: FlutterResult) -> Void in
            if (call.method == "getBatteryLevel") {
                let batteryLevel : Int = self.getBatteryLevel();
                if(batteryLevel != -1) {
                    result(batteryLevel);
                } else {
                    result(FlutterError.init(code: "UNAVAILABLE", message: "Battery info unavailable", details: nil));
                }
            } else {
                result(FlutterMethodNotImplemented);
            }
        });

        return super.application(application, didFinishLaunchingWithOptions: launchOptions);
    }

    private func getBatteryLevel() -> Int {
        let device = UIDevice.current;
        device.isBatteryMonitoringEnabled = true;
        if (device.batteryState == UIDeviceBatteryState.unknown) {
            return -1;
        } else {
            return Int(device.batteryLevel * 100);
        }
    }
}
Conclusion
Today we discussed what to use and how to write when designing apps in Flutter. We presented the individual parts of the app and the individual parts of the Flutter framework. And we also tackled the communication with the native platform interface when calling platform-specific services. You can find the whole project at eMan’s GitHub.
Let’s Develop a Mobile App in Flutter (3/3)
We already know how to create dialogues and use Dart. In the last article of this series, we will finally get to the creation of a more complex app. We’ll also discuss how to tackle the support of a platform dependent app. Let’s do this!
In the previous article we had a look into the Flutter framework, introduced Dart, and showed how to call the native interface of the given platform. This article will present possible localization options of the app and we’ll also have a brief look at the creation of a screen layout. Then we’ll incorporate all gained knowledge into our app and, as the final step, we’ll connect it to Firebase. That’ll give us a skeleton of what’s today probably the most used software architecture in mobile development – a mobile app that, in the client’s role, gathers data from a server database.
We make widgets (Abstract Factory pattern)
The first article tackled the creation of a platform dependent dialogue. The presented solution used the corresponding graphic component based on the identification of the target platform. This solution is not ideal as it calls a code with a large number of if-then-else constructions for the identification of the platform and subsequent usage of the specific component. This issue can be fixed, for example, by using the Abstract Factory design pattern.
Abstract Factory in general
The Abstract Factory design pattern is a part of a creational design pattern group. Abstract Factory is used for the creation of similar products and eliminates the usage of new. A group of objects created by a factory is then clearly determined by the relevant factory.
- The
androiddirectory – here we will find the classic Android project. In theappmodule we can find the actual Android app that already contains a few generated files. These are for connecting the Flutter app to the classic Android app. All Android specific configurations, the applicationId definition for example, supported SDKs, or signing certificates will be modified here. - The
iosdirectory – here we will find the typical iOS project. It already contains a few generated files used for connecting the Flutter app to the classic iOS app. All iOS specific configuration is to be done in this directory - The
libdirectory – the most important directory where the Flutter app files are stored. The main file here ismain.dartcontaining thevoid main()function which is the input function for the Flutter app. - File
pubspec.yaml– this file is for the Flutter app configuration. We also define the dependencies on external Flutter modules and Dart libraries in this file. For example, to add a library for detecting information about the device on which the app runs, we only need to add the following dependency.
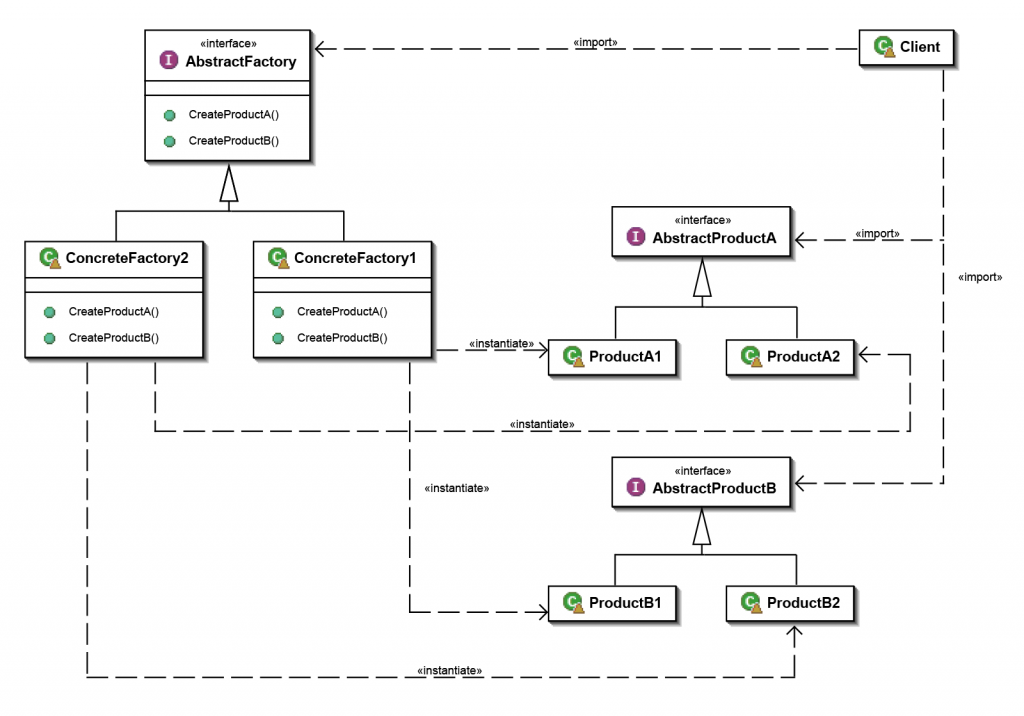
(Source: https://en.wikipedia.org/wiki/Abstract_factory_pattern)
To better understand it, picture this example: You’re building a house and want the windows and doors to be from a specific material. You can select from wood, plastic and aluminium, and the only restriction is that you can’t combine various materials.
- The
androiddirectory – here we will find the classic Android project. In theappmodule we can find the actual Android app that already contains a few generated files. These are for connecting the Flutter app to the classic Android app. All Android specific configurations, the applicationId definition for example, supported SDKs, or signing certificates will be modified here. - The
iosdirectory – here we will find the typical iOS project. It already contains a few generated files used for connecting the Flutter app to the classic iOS app. All iOS specific configuration is to be done in this directory - The
libdirectory – the most important directory where the Flutter app files are stored. The main file here ismain.dartcontaining thevoid main()function which is the input function for the Flutter app. - File
pubspec.yaml– this file is for the Flutter app configuration. We also define the dependencies on external Flutter modules and Dart libraries in this file. For example, to add a library for detecting information about the device on which the app runs, we only need to add the following dependency.
You make your order in a given factory and you know that the supplied products will be from the same material. This way you get rid of asking over and over again: “What material should the door/window be made of?” Instead, you just submit another order to the factory you selected at the beginning.
Abstract Factory in more detail
Our abstract factory will offer an interface for the creation of various graphics and other elements. The creation of the elements itself will be taken care of by two factories, one for Android and another for iOS style. But how do you determine what elements to create in the factory and what elements to create in a different way? We can approach this question from several angles:
- creating all graphic components
- creating all components that are in the
materialorcupertinopackage - creating only the components that exist in both graphic versions
We decided to choose the second option as it’s a nice compromise between the other possibilities. Moreover, if an alternative component is implemented in the other package in the future, adding the component will be way easier. Then the source files should not contain any package:flutter/cupertino.dart or ipackage:flutter/material.dart import in other files than the ones containing the implementation of relevant factories.
When declaring the individual interface methods, it’s recommended to use the “Optional named parameters“ thanks to which the interface change (in a sense of adding a new parameter) influences only the specific factories implementing the given interface and leaves the places where the interface methods are called untouched.
Here is the creation of Scaffold and AppBar components as an example. You can find the whole interface in the widget_factory.dart file.
abstract class WidgetFactory {
  Widget createScaffold({PreferredSizeWidget appBar, Widget body});

  PreferredSizeWidget createAppBar({Widget title});
  ...
}
The implementation of the given factories that ensures the creation of the relevant component based on the requested style:
class _AndroidWidgetFactory implements WidgetFactory {
  @override
  Widget createScaffold({PreferredSizeWidget appBar, Widget body}) {
    return Scaffold(appBar: appBar, body: body);
  }

  @override
  PreferredSizeWidget createAppBar({Widget title}) {
    return AppBar(title: title);
  }
  ...
}

class _IOSWidgetFactory implements WidgetFactory {
  @override
  Widget createScaffold({PreferredSizeWidget appBar, Widget body}) {
    return CupertinoPageScaffold(navigationBar: appBar, child: body);
  }

  @override
  PreferredSizeWidget createAppBar({Widget title}) {
    return CupertinoNavigationBar(middle: title, backgroundColor: Colors.white);
  }
  ...
}
All the necessary classes are ready. We only need to add the logic for the initialization of the factory that will create the elements while the app is running. We used a Singleton design pattern that will make sure that the whole running app will use only one instance of the specific factory. Dart offers the “Factory constructor“ for the creation and a clean usage of Singletons. As we can see from the example, the logic for determining on what system the app is running is only in one place.
abstract class WidgetFactory {
  static WidgetFactory _instance;

  factory WidgetFactory() {
    if (_instance == null) {
      if (Platform.isAndroid) {
        _instance = _AndroidWidgetFactory();
      } else if (Platform.isIOS) {
        _instance = _IOSWidgetFactory();
      } else {
        throw UnsupportedError('Unsupported target platform.');
      }
    }
    return _instance;
  }
  ...
}

// using
WidgetFactory().createScaffold(...);
Note: We could use a static method getInstance() for the creation of the Factory construction for returning the class instance in Java.
Pros and cons
- The
androiddirectory – here we will find the classic Android project. In theappmodule we can find the actual Android app that already contains a few generated files. These are for connecting the Flutter app to the classic Android app. All Android specific configurations, the applicationId definition for example, supported SDKs, or signing certificates will be modified here. - The
iosdirectory – here we will find the typical iOS project. It already contains a few generated files used for connecting the Flutter app to the classic iOS app. All iOS specific configuration is to be done in this directory - The
libdirectory – the most important directory where the Flutter app files are stored. The main file here ismain.dartcontaining thevoid main()function which is the input function for the Flutter app. - File
pubspec.yaml– this file is for the Flutter app configuration. We also define the dependencies on external Flutter modules and Dart libraries in this file. For example, to add a library for detecting information about the device on which the app runs, we only need to add the following dependency.
Localization of the app
Today’s standard is that apps are offered in various language mutations in order to attract as wide a spectrum of users as possible. And Flutter is one of them, offering several options on how to get the required properties. Using the intl package for the support of localization is one of the possible options. The package adds the support for localization to any project written in Dart. It establishes a special construction for getting the string’s definitions in the project that ensures the usage of a correct language mutation. Based on this construction and using a special tool, files with corresponding strings are generated for each language mutation that supplement the translation. These are then added to the final app. The second option we’ll present is defining the translation directly in the source code.
We’ll add a new dependency to the pubspec.yaml file that will provide the support for localization.
dependencies:
  flutter_localizations:
    sdk: flutter
  ...
In order to add support for any language to our app, we need to add two classes, as shown in the example below. The _EventsLocalizationsDelegate class is for the loading and storing of the EventsLocalizations object with the relevant, supported localization. Both classes are quite usual and they’ll be similar in every project. The only thing that changes is the values defined in the _localizedValues attribute. It’s a master map where the keys of the first map are marks according to the IANA register.
enum StringId {
  appTitle,
  homeScreenTitle,
  ...
}

class EventsLocalizations {
  static const LocalizationsDelegate<EventsLocalizations> delegate = const _EventsLocalizationsDelegate();

  static const Map<String, Map<StringId, String>> _localizedValues = {
    'en': {
      StringId.appTitle: 'Eman\'s events',
      StringId.homeScreenTitle: 'Events',
      ...
    },
    'cs': {
      StringId.appTitle: 'Eman\'s events',
      StringId.homeScreenTitle: 'Akce',
      ...
    },
    ...
  };

  static final Iterable<Locale> supportedLocales = _localizedValues.keys.map((languageCode) => Locale(languageCode));

  static EventsLocalizations of(BuildContext context) => Localizations.of<EventsLocalizations>(context, EventsLocalizations);

  final Locale _locale;

  EventsLocalizations(this._locale);

  String get appTitle => _localizedValues[_locale.languageCode][StringId.appTitle];
  String get homeScreenTitle => _localizedValues[_locale.languageCode][StringId.homeScreenTitle];
  // or
  String getString(StringId stringId) => _localizedValues[_locale.languageCode][stringId];
}

class _EventsLocalizationsDelegate extends LocalizationsDelegate<EventsLocalizations> {
  const _EventsLocalizationsDelegate();

  @override
  bool isSupported(Locale locale) => EventsLocalizations._localizedValues.containsKey(locale.languageCode);

  @override
  Future<EventsLocalizations> load(Locale locale) => SynchronousFuture<EventsLocalizations>(EventsLocalizations(locale));

  @override
  bool shouldReload(LocalizationsDelegate<EventsLocalizations> old) => false;
}
The last thing to do is to specify which language mutations are supported by the app (the supportedLocales parameter of the app’s widget) and register the delegates for all components that’ll be responsible for the correct localization (the localizationsDelegates field of the app’s widget).
class EventsApp extends StatelessWidget {
  @override
  Widget build(BuildContext context) {
    return MaterialApp(
      localizationsDelegates: [
        EventsLocalizations.delegate,
        GlobalMaterialLocalizations.delegate,
        GlobalWidgetsLocalizations.delegate,
      ],
      supportedLocales: EventsLocalizations.supportedLocales,
      ...
    );
  }
}
Then to get a localized string we’ll use one of the following methods based on what localization class interface we selected.
EventsLocalizations.of(context).appTitle;
// or
EventsLocalizations.of(context).getString(StringId.appTitle);
Note: The current Material Components version does not support Czech, it introduces an error while rendering widgets.
Creating layouts
As previously stated, the layout creation is simply a puzzle. You just put together simple widgets, thus creating a widget that looks and does what was expected of it from the beginning. The following example shows the creation of ListView and its elements and we’ll also take a look at the usage of a few basic layouts. If you’d like to create more complex layouts, take a look at the Flutter webpage for some ideas to get you started.
class EventListState extends State<EventList> {
  final _events = List<Event>();

  @override
  void initState() {
    super.initState();
    _events.addAll(generateWordPairs().take(10).map((pair) => Event(
          pair.asPascalCase,
          DateTime.now(),
          lorem.createParagraph(),
        )));
  }

  @override
  Widget build(BuildContext context) {
    return ListView.builder(
        padding: const EdgeInsets.all(20.0),
        itemCount: _events.length * 2,
        itemBuilder: (context, index) {
          if (index.isOdd) {
            return WidgetFactory().createDivider();
          } else {
            return _buildItem(_events[index ~/ 2]);
          }
        });
  }

  Widget _buildItem(Event event) {
    return GestureDetector(
      child: Container(
        decoration: BoxDecoration(color: Colors.transparent),
        child: Column(
          crossAxisAlignment: CrossAxisAlignment.start,
          children: [
            Container(
              padding: const EdgeInsets.only(bottom: 8.0),
              child: Text(
                event.name,
                style: TextStyle(fontSize: 20.0, color: Colors.black),
              ),
            ),
            Text(
              format.format(event.dateTime),
              style: TextStyle(
                fontSize: 16.0,
                color: Colors.grey[500],
              ),
            ),
          ],
        ),
      ),
      onTap: () => _itemClicked(event),
    );
  }
  ...
}
We’ll focus only on the _buildItem method that creates the layout of a single item of the list.
- The
androiddirectory – here we will find the classic Android project. In theappmodule we can find the actual Android app that already contains a few generated files. These are for connecting the Flutter app to the classic Android app. All Android specific configurations, the applicationId definition for example, supported SDKs, or signing certificates will be modified here. - The
iosdirectory – here we will find the typical iOS project. It already contains a few generated files used for connecting the Flutter app to the classic iOS app. All iOS specific configuration is to be done in this directory - The
libdirectory – the most important directory where the Flutter app files are stored. The main file here ismain.dartcontaining thevoid main()function which is the input function for the Flutter app. - File
pubspec.yaml– this file is for the Flutter app configuration. We also define the dependencies on external Flutter modules and Dart libraries in this file. For example, to add a library for detecting information about the device on which the app runs, we only need to add the following dependency.
You can picture the layout as a tree where every parent nod determines the behaviour or manner of the rendering of its children.
Cloud Firestore database
Cloud Firestore is a Document Store database; it’s the successor to the original Firebase real-time database. We’ll create a Firestore database for our example, with a collection named events containing several documents with the following structure:
name: "...",
date_time: "...",
description: "...",
We won’t go into details of the actual Cloud Firestore database creation and its addition to the project. For more details on this process, please have a look at this guide from Google. After the actual configuration, adding it to the project is a piece of cake. In the previous example, the initState method created a list of events containing random dates that we will now switch for dates from the database. We’ll get the events collection from an instance of the database and all documents that it contains will be mapped by the Event model class. In the following example we regard the events collection as a data stream and, using the listen method, we react to any change of the data. Feel free to try for yourself how the app reacts to you changing the data in the database.
class EventListState extends State<EventList> {
  ...
  @override
  void initState() {
    Firestore.instance
        .collection('events')
        .orderBy('date_time')
        .snapshots()
        .listen((event) => setState(() {
              _events.clear();
              _events.addAll(event.documents.map((snapshot) => Event(
                    snapshot.data['name'],
                    DateTime.parse('${snapshot.data['date_time']}z'),
                    snapshot.data['description'],
                  )));
            }));
  ...
}
Conclusion
In this article we presented how to tackle the issue of keeping the style for a given platform, and we created a support for a multi-language app. Then we created a simple layout and connected the app to the Firestore database. You can find the whole project that we have been very secretly creating here, one part at a time, at our GitHub, where you can also see that the project’s history follows this article.
#mobile-apps #flutter #ios #android