How to Build Progressive Web Apps (PWA) using Angular 9
In this tutorial, we will use the most recent version of Angular 9 to build a Progressive Web Application (PWA) that works on mobile or any platform that uses a standard-compliant browser.
What is PWA?
A progressive web app offers the high level of user experience because it has the same features as native apps have. Nowadays, PWA has become the big deal, and more companies are switching towards the Progressive web applications (PWA).
PWA does not require to be deployed via app stores; instead, we take a slightly different approach and deploy it through the web servers through URLs. To make the same PWA as the native apps, we have to fulfill the following requirements.
Responsive
Runs on almost every device desktop, mobile, or tablet.
Auto-Updated
Service worker keeps it always updated.
Secure
Content is considered to be safe due to serving through HTTPS.
Reliably Connected
Service workers support to make it work offline and on sparse networks.
Progressive
Web app that employs modern web capabilities to produce an app-like experience for every user.
Searchable
Very much searchable via search engines due to web app manifest.
Shareable
It does not require to be downloaded can easily be shared via a simple link or URL.
User Experience
Similar user experience by engaging the same interaction methodology as a native app has.
Installable
Fully installable on users’ mobile home screen, and the good thing is we do not have to visit the app store.
Regularly Communicate
Keeps you up to date via push notifications and offers you the latest updates, promotion offers, etc.
Table of Contents:
- Configuring & Installing Angular Application
- Adding Angular Material Library
- Build & Consume REST API using HttpClient
- Adding PWA in Angular 8/9
- Service Workers in Angular
- Configure Production Build with http-server
- Audit PWA App with Lighthouse
- Conclusion
Configuring & Installing Angular Application
In this step, we will configure the Angular project for giving you the demo of Angular PWA.
First, you make sure that you have the latest version of Node.js and NPM configured on your system.
node -v

# v10.16.0
Follow this URL to download and install Node & NPM.
Now, we are going to begin with installing the latest version of Angular CLI on your system.
npm install -g @angular/cli@latest
Run the following command to install an Angular app:
ng new angular-pwa
Get inside the project directory:
cd angular-pwa
Adding Angular Material Design UI Library
Adding a Material design library in Angular is very easy, It can be done by using just a single command. Run the following command from your terminal.
ng add @angular/material
Add the material theme in src/styles.css file.
@import "~@angular/material/prebuilt-themes/indigo-pink.css";
Ordinarily, we import the angular material components in the AppModule. But there is a slight twist. We are going to create a separate module file for material components and import the components here and then import the material component file inside the main AppModule file.
This is the process I highly recommend for managing the material components in an organized way. We will show the users data into the angular material table, Create app/material.module.ts file add the following code inside of it.
import { NgModule } from '@angular/core';
import { MatTableModule } from '@angular/material/table';
import { MatPaginatorModule, MatToolbarModule } from '@angular/material';

@NgModule({
    imports: [
        MatTableModule,
        MatPaginatorModule,
        MatToolbarModule
    ],
    exports: [
        MatTableModule,
        MatPaginatorModule,
        MatToolbarModule
    ]
})

export class MaterialModule { }
Next, import MaterialModule module in the main app.module.ts file as given below.
import { BrowserModule } from '@angular/platform-browser';
import { AppComponent } from './app.component';

/* angular material */
import { BrowserAnimationsModule } from '@angular/platform-browser/animations';
import { MaterialModule } from './material.module';
import { NgModule, CUSTOM_ELEMENTS_SCHEMA } from '@angular/core';

@NgModule({
  declarations: [
    AppComponent
  ],
  imports: [
    BrowserModule,
    BrowserAnimationsModule,
    MaterialModule
  ],
  providers: [],
  bootstrap: [AppComponent],
  schemas: [CUSTOM_ELEMENTS_SCHEMA]
})

export class AppModule { }
Build & Consume REST API using HttpClient
In this step, create angular service to fetch the data from the remote server using an open-source REST API.
To make the HTTP requests we need to import and register HttpClientModule service in app.module.ts file.
import { HttpClientModule } from '@angular/common/http';

@NgModule({
  imports: [
    HttpClientModule
   ]
})
Let’s generate a service. In here, we will write the logic to fetch the users’ data with the help of JSONPlaceholder API, run the following command.
ng g service rest-api
Next, open the app/rest-api.service.ts file and add the following code in it:
import { Injectable } from '@angular/core';
import { Observable } from 'rxjs';
import { HttpClient } from '@angular/common/http';

export interface User {
  id: string;
  name: string;
  email: string;
  website: string;
}

@Injectable({
  providedIn: 'root'
})

export class RestApiService {
  api: string = "https://jsonplaceholder.typicode.com/users";

  constructor(private http: HttpClient) { }

  getUsers(): Observable<User[]> {
    return this.http.get<User[]>(this.api)
  }
}
We are fetching the User data using the HttpClient service as an Observable via getUsers() method.
Next, open the app/app.component.ts file and add the given below code:
import { Component, ViewChild } from '@angular/core';
import { RestApiService } from './rest-api.service';
import { MatPaginator, MatTableDataSource } from '@angular/material';

export interface TableElement {
  id: string;
  name: string;
  email: string;
  website: string;
}

@Component({
  selector: 'app-root',
  templateUrl: './app.component.html',
  styleUrls: ['./app.component.css']
})

export class AppComponent {
  Data: TableElement[];
  col: string[] = ['id', 'name', 'email', 'website'];
  dataSource = new MatTableDataSource<TableElement>(this.Data);
  @ViewChild(MatPaginator, { static: true }) paginator: MatPaginator;

  constructor(private restApiService: RestApiService) {
    this.restApiService.getUsers().subscribe((res) => {
      this.dataSource = new MatTableDataSource<TableElement>(res);
      setTimeout(() => {
        this.dataSource.paginator = this.paginator;
      }, 0);
    })
  }

}
We imported the RestApiService in AppComponent to fetch and display the user data. We are using Angular Material table UI component to display the data. We can manipulate the item’s size using the angular material pagination module.
Build the PWA app UI using the angular material table, go to the app.component.html file to create the layout. Our layout will have the material navbar and a data table with pagination.
<mat-toolbar color="accent" class="header">
  <span>Angular PWA Example</span>
</mat-toolbar>

<table mat-table [dataSource]="dataSource" matSort>
  <ng-container matColumnDef="id">
    <th mat-header-cell *matHeaderCellDef mat-sort-header> ID. </th>
    <td mat-cell *matCellDef="let element"> {{element.id}} </td>
  </ng-container>

  <ng-container matColumnDef="name">
    <th mat-header-cell *matHeaderCellDef mat-sort-header> Name </th>
    <td mat-cell *matCellDef="let element"> {{element.name}} </td>
  </ng-container>

  <ng-container matColumnDef="email">
    <th mat-header-cell *matHeaderCellDef mat-sort-header> Email </th>
    <td mat-cell *matCellDef="let element"> {{element.email}} </td>
  </ng-container>

  <ng-container matColumnDef="website">
    <th mat-header-cell *matHeaderCellDef mat-sort-header> Website </th>
    <td mat-cell *matCellDef="let element"> {{element.website}} </td>
  </ng-container>

  <tr mat-header-row *matHeaderRowDef="col"></tr>
  <tr mat-row *matRowDef="let row; columns: col;"></tr>
</table>

<mat-paginator [pageSizeOptions]="[7, 14, 28]" showFirstLastButtons></mat-paginator>

Adding PWA in Angular 8/9
It is undoubtedly very easy to convert an existing angular application into a Progressive Web App (PWA). The “ng add angular pwa” command can make your dreams come true.
ng add @angular/pwa
The above command automatically add PWA files and features inside an Angular app:
- The manifest.webmanifest file
- The ngsw-config.json service worker
- Varying sizes of icons inside the assets/icons directory
The “index.html” file has been updated and added the following meta tag and theme colour attribute.
  <link rel="manifest" href="manifest.webmanifest">
  <meta name="theme-color" content="#1976d2">
Please make sure and add few PWA compliant icon assets.
Service Workers in Angular
A Service Worker is a script that works in the background and gets along with almost every modern browsers.
Service Workers work with HTTPS and works in the same manner as Web Workers does but a bit adversely. Progressive Web Application considers service workers as the primary technology. It allows deep platform integration, such as offline support, background sync, rich caching, and push notifications.
The “ng add angular pwa” command generated the ngsw-config.json file, It is solely responsible for service workers. Service workers are also automatically added to app.module.ts file.
// app.module.ts

import { ServiceWorkerModule } from '@angular/service-worker';
import { environment } from '../environments/environment';

@NgModule({
  declarations: [...],
  imports: [
    ServiceWorkerModule.register('ngsw-worker.js', { enabled: environment.production })
  ],
  providers: [...],
  bootstrap: [...],
  schemas: [...]
})

export class AppModule { }
Have a look at the ngsw-config.json file.
// ngsw-config.json

{
  "$schema": "./node_modules/@angular/service-worker/config/schema.json",
  "index": "/index.html",
  "assetGroups": [
    {
      "name": "app",
      "installMode": "prefetch",
      "resources": {
        "files": [
          "/favicon.ico",
          "/index.html",
          "/manifest.webmanifest",
          "/*.css",
          "/*.js"
        ]
      }
    }, {
      "name": "assets",
      "installMode": "lazy",
      "updateMode": "prefetch",
      "resources": {
        "files": [
          "/assets/**",
          "/*.(eot|svg|cur|jpg|png|webp|gif|otf|ttf|woff|woff2|ani)"
        ]
      }
    }
  ]
}
The “ng add angular pwa” command also registered the service-worker inside the package.json file:
// package.json

{
  "dependencies": {
    ...
    "@angular/service-worker": "~8.2.14"
    ...
  }
}
The feature will only work with the app, which is being served with HTTPS.
Configure Production Build with http-server
Install the http-server package globally via NPM using the following command.
sudo npm install -g http-server
The http-server is a simple, zero-configuration command-line http server. It is powerful enough for production usage, but it’s simple and hackable enough to be used for testing, local development, and learning.
– http-server
Run ng build prod command to build the app for production environment.
ng build --prod
Now, we have the production build ready at the dist/angular-pwa folder. Next, we will serve the angular PWA using the http-server package.
Get inside the prod build folder.
cd dist/angular-pwa
Start the prod build
Next, run the following command in your terminal.
http-server -o
The above command will open the angular app on the following URL http://127.0.0.1:8080 and also give you the following URLs, you can check your app by entering one of the URL in the browser’s address bar.
Available on:
http://127.0.0.1:8080
http://192.168.0.102:8080
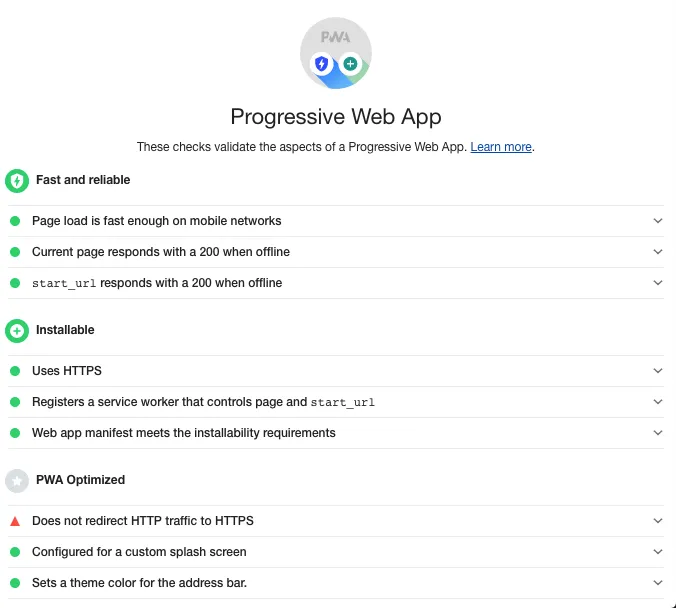
Audit PWA App with Lighthouse
Now, we will verify the PWA application using Lighthouse extension on the Google Chrome browser. Add the following URL on the browser’s address bar: http://127.0.0.1:8080
Install the lighthouse extension from chrome web store.
Next, open the browser console by using the Ctrl + Shift + I.
Conclusion
Finally, we have completed the Angular 9 PWA tutorial with an example. In this tutorial, we have got a chance to do the cover the following topics:
- How to convert the existing angular application to PWA?
- How to Add PWA features in an angular application?
- How to work with Service Workers?
- How to configure the add-to-home-screen feature using web manifest file?
- How to audit the PWA app with Google’s Lighthouse extension?
Download the full code of this tutorial from this GitHub repository, I hope you will like this tutorial. Happy Coding!
#Angular #PWA #WebDev #angular