This post was originally published at https://www.blog.duomly.com/angular-course-with-building-a-banking-application-with-tailwind-css-lesson-3-user-account-balance/
The previous week we’ve published the second lesson of our Angular Course with Tailwind CSS, where we are building a banking app step by step.
In the first lesson, we’ve created a project using Angular CLI, installed Tailwind CSS, and started building the first component UI, the login form. If you didn’t start with us in lesson one, feel free to go back and start from scratch or just get the code from our Github.
https://github.com/Duomly/angular9-tailwind-bank-frontend/tree/Angular9-TailwindCSS-Course-Lesson1
In the second lesson, we’ve built a login logic, started from creating a service and connecting with backend API, through creating auth guard, finishing on creating an empty dashboard component. You can jump to this lesson as well.
And today we are going to continue our project and get user data after login to be able to display it in our dashboard component.
Of course, we’ve got a Youtube version for you as always, so if you prefer watching jump to our YT channel.
Besides that, remember that you can follow our backend courses where you are able to write your own backend for this application in two different technologies: GoLang and Node.js.
Are you ready to start lesson 3?
1. Create a new component
Let's start our application and we will create a new component using Angular CLI. We will use the following command:ng generate component account-balanceWhen our component is ready, we would like to place it in the dashboard component. So, let's open
dashboard.component.html file and add there the following code:
<div id="dashboard-component" class="container mx-auto grid">
  <div class="flex mb-4 mt-24">
    <div class="mx-auto">
      <h3 class="text-gray-700 font-normal mx-auto">
        Hi User, here is your dashboard:
      </h3>
    </div>
  </div>
  <app-account-balance></app-account-balance>
</div>
Now, the component should be visible in our dashboard. So, we can start building the UI of the account-balance component. Let's start!
2. Account Balance Component UI
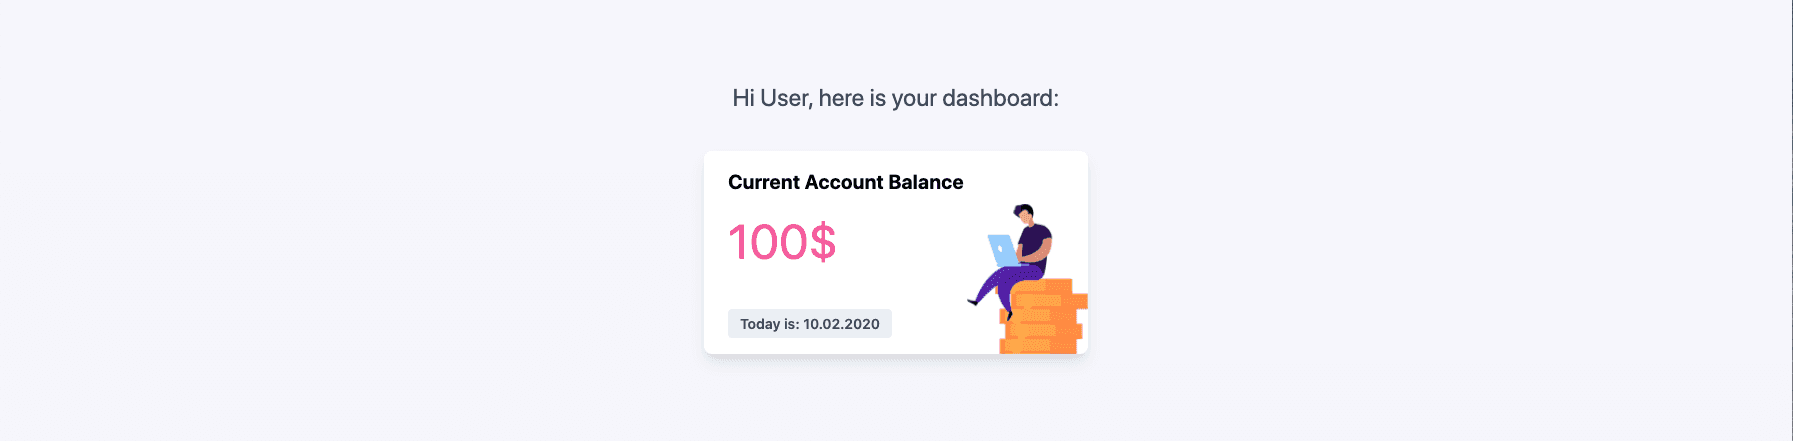
In this step, we will build a UI for the Account Balance Component. For this, we will use the Tailwind CSS card and we will add some additional classes.Also, in this step we won’t use data from API yet, we will hardcode the values like account balance or date.
So, let’s open account-balance.component.html file and place there the following code:
<div id="balance-card" class="relative mx-auto max-w-sm rounded-lg overflow-hidden shadow-lg bg-white mt-5">
  <div class="px-6 py-4">
    <div class="font-bold text-xl mb-2">Current Account Balance</div>
    <p class="text-pink-500 text-5xl">
      100$
    </p>
    <div><img class="absolute bottom-0 right-0" src="../../assets/balance-account-image.png" /></div>
  </div>
  <div class="px-6 py-4">
    <span class="inline-block bg-gray-200 rounded px-3 py-1 text-sm font-semibold text-gray-700">Today is: 10.02.2020</span>
  </div>
</div>
I used in this code an image, which you can find in Github sources of this lesson.
Now, let’s add some custom styles in the account-balance.component.scss file:
#balance-card {
  img {
    max-height: 150px;
  }
}
Great, our component looks pretty nice right now. If you managed to add an image you should see your application like in the image below.
3. Get user data
Let's start form getting the user's data in the login function. Openlogin.service.ts file and add the following code.
userSubject: any = new BehaviorSubject<any>(null); user: any = this.userSubject.asObservable();…
login(Username: string, Password: string): any {
this.http.post(this.url, { Username, Password }, httpOptions).toPromise().then((res: any) => {
if (res && res.jwt) {
sessionStorage.setItem(‘jwt’, res.jwt);
this.errorSubject.next(null);
if (res.data) {
this.userSubject.next(res.data);
}
this.router.navigateByUrl(‘dashboard’);
} else if (res.Message) {
this.errorSubject.next(res.Message);
}
});
}
We are passing
res.data to the user, which is observable.
When it’s ready let’s go to the dashboard.component.ts file and let’s define user value, then we will get the user data from LoginService in ngOnInit() method.
import { Component, OnInit } from '@angular/core';
import { LoginService } from '../services/login/login.service';

@Component({
  selector: 'app-dashboard',
  templateUrl: './dashboard.component.html',
  styleUrls: ['./dashboard.component.scss']
})
export class DashboardComponent implements OnInit {
  user: any = null;

  constructor(
    private loginService: LoginService,
  ) { }

  ngOnInit(): void {
    this.loginService
      .userSubject
      .subscribe(user => {
        this.user = user;
      });
  }
}
Great, when it’s ready, we can pass user data to the template!
4. Display user data
Let's opendashboard.component.html and we will use our user's name in the header, then we are going to pass the user's data to the <app-account-balance> component.
<div id="dashboard-component" class="container mx-auto grid">
  <div class="flex mb-4 mt-24">
    <div class="mx-auto">
      <h3 class="text-gray-700 font-normal mx-auto">
        Hi {{user ? user.Username : ''}}, here is your dashboard:
      </h3>
    </div>
  </div>
  <app-account-balance [user]="user"></app-account-balance>
</div>
Now, let's open the account-balance.component.ts file and we are going to use @Input to access user data. Besides that, we will set the day of the current date to display it on the card.
import { Component, OnInit, Input } from '@angular/core';
@Component({

selector: ‘app-account-balance’,

templateUrl: ‘./account-balance.component.html’,

styleUrls: [‘./account-balance.component.scss’]

})

export class AccountBalanceComponent implements OnInit {

@Input() user: any;

date = null;

day = null;

month = null;

year = null;
constructor() { }
ngOnInit(): void {

this.date = new Date();

this.day = this.date.getDate();

this.month = Number(this.date.getMonth()) + 1;

this.year = this.date.getFullYear();

}

}
We are almost there! The last step in today’s lesson is to put the user’s value and the data values in the
account-balance.component.html file.
<div *ngFor="let userAccount of user.Accounts">
  <div id="balance-card" class="relative mx-auto max-w-sm rounded-lg overflow-hidden shadow-lg bg-white mt-5">
    <div class="px-6 py-4">
      <div class="font-bold text-xl mb-2">Current {{userAccount ? userAccount.Name : 'Account'}} Balance</div>
      <p class="text-pink-500 text-5xl">
        {{userAccount ? userAccount.Balance : ''}}$
      </p>
      <div><img class="absolute bottom-0 right-0" src="../../assets/balance-account-image.png" /></div>
    </div>
    <div class="px-6 py-4">
      <span class="inline-block bg-gray-200 rounded px-3 py-1 text-sm font-semibold text-gray-700">Today is: {{day}}.{{month}}.{{year}}</span>
    </div>
  </div>
</div>
And voila! Our user’s data is visible on the dashboard. In the next lessons, we will learn how to ask for user’s data after refreshing the page with our jwt token.
Congratulations!
Conclusion
If you didn't manage to get the code you can check out the code for this lesson on Github.Angular Course - Lesson Three - Github Code
Remember to take a look at our backend courses, so you can create back-end for this application using Golang or Node.js.
In the next lesson, we will create a registration process and other super interesting features!
Stay tuned and let us know in the comments if you like the course!
Thank you for reading,
Anna from Duomly
#angular #web-development #typescript #javascript