The differences React vs. Redux when created the exact same app
Because learning Redux can be hard — at first.
It can be a great feeling once you’ve managed to learn how to use React and can confidently built a few apps. You’re able to manage state and everything seems to be working fine. However, it’s quite possible that a time may arrive where you have to learn Redux.
This may be because the app that you’ve been working on has gotten larger and larger and you’ve found yourself passing state all over the place and need a better way of managing your data. Or it may just be because you’ve noticed that a ton of job adverts require knowledge of Redux as well as React. Either way, knowing how to use Redux is a great piece of knowledge to have, and you should therefore, owe it to yourself to learn it.
However, one thing that can make it difficult to pick up is the amount of additional code you have to wrap your head around in order to understand how it works. I personally also feel that the documentation out there, including the official Redux docs, show so many different approaches to using Redux, that Redux no longer feels approachable.
In a way this is kind of a good thing, because it encourages you to use Redux in the way that you see fit, rather than saying “this is exactly how you should use it, and if you don’t then you are a bad developer”. However, this nicety doesn’t arrive until you know what you’re doing with Redux, which until then, just makes it really hard to pick up.
So how are we going to learn Redux?
By building an app with React, and then building the exact same app with Redux!
Oh and by the way, when I say “building an app with Redux”, we are still using React — we’re simply managing the flow of data with Redux. But from here on, apart from some tangents along the way, when I refer to the app being built with Redux, I really mean being built with React AND Redux.
Anyway, this intro is already longer than I’d anticipated. So let’s start by having a quick look at how the two apps look:

React vs Redux. Not a battle as such, but rather a variation of approach to your app.
Because these are both React apps that have been created with create-react-app, their file structure is mostly identical, with the exception of a redux folder inside of the Redux app. Let’s take a look at the file structure now:
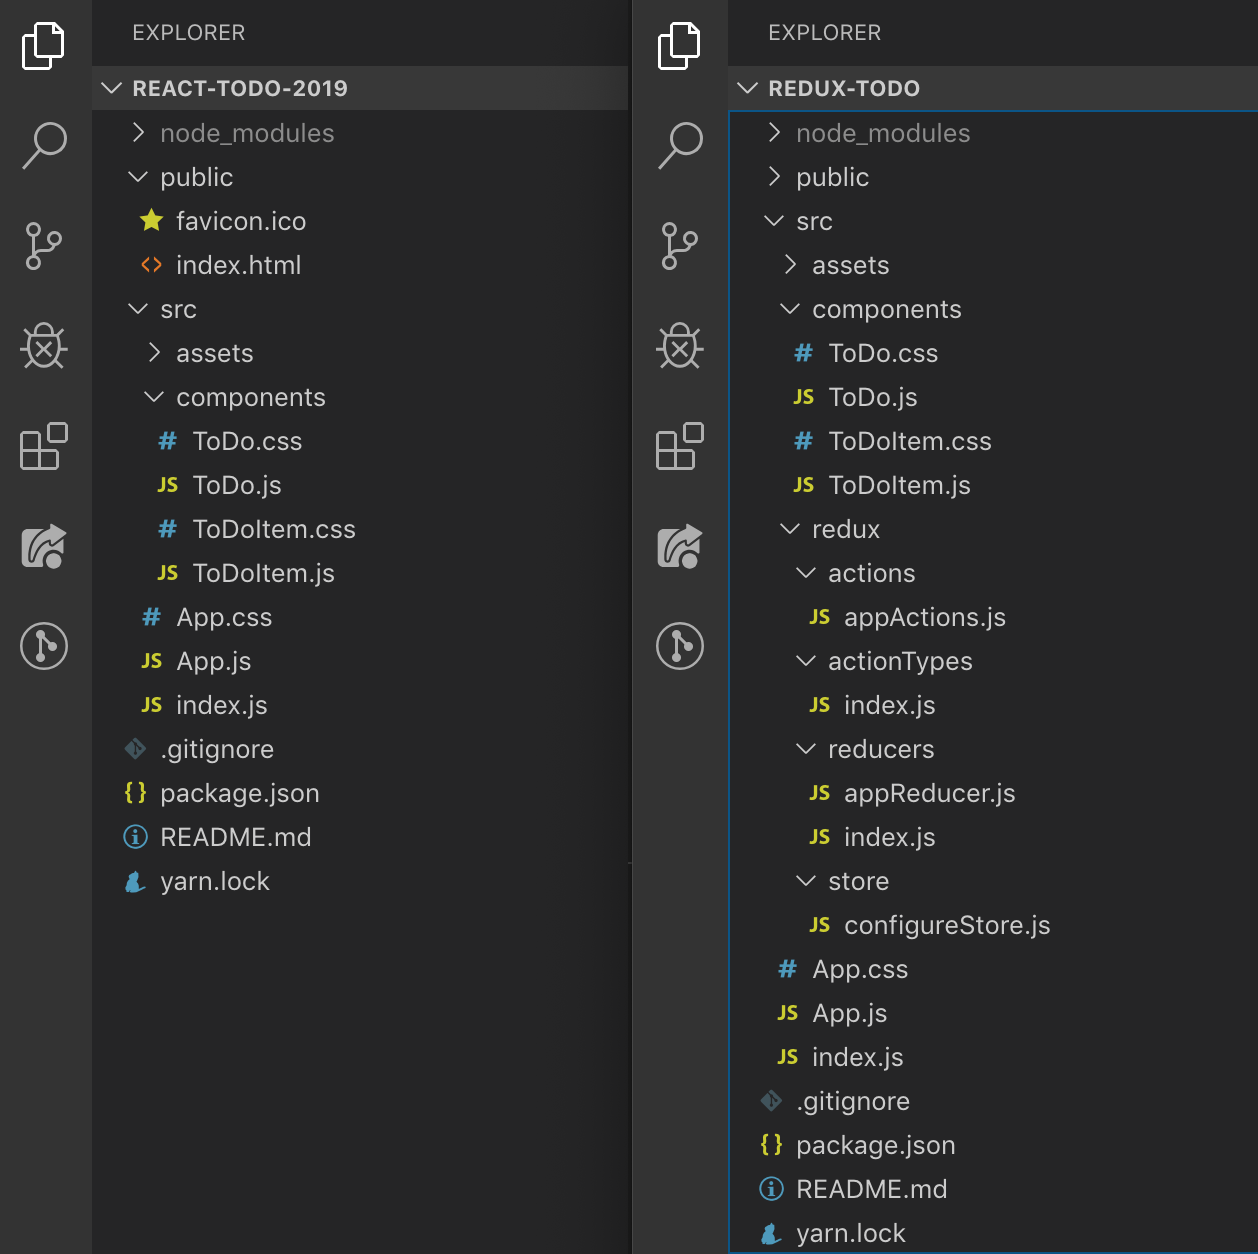
React on the left. Redux on the right.
Now given that these two apps achieve the exact same thing, you might be wondering why Redux requires so many additional files, and what purpose they serve.
The first thing you will notice is the large amount of initial boilerplate code needed in order to get Redux set up for your app. This is, in large part and the mental model it applies — Redux also has its roots in functional programming but let’s save this rabbit hole for another occasion. Anyway, this additional code can really pay off when building larger applications that have lots of data flowing in and out from various components, APIs etc. So it may seem like overkill for this simple To Do app at first, but just stick with us as we’re not trying to encourage you to use Redux for simple apps, but rather we’re using this on a simple app in order to make Redux a little easier to pick up and understand.
Before we deep dive into the code, let’s push ahead and explain Redux a little more first.
Redux handles the flow of data through three key principles:
1. Stores
Also known as a single source of truth, a store is basically just an object that you initialise with some state, then whenever we want to update it, we overwrite the store with a new version of it. You may already be using these same principles in your React applications anyway, as it is generally considered a best practice to recreate state rather than mutating it. To further clarify the difference here, if we had an array and we wanted to push a new item into it, we wouldn’t update our store by pushing a new item into the array, but rather we would overwrite the store with an updated version of it.
2. Reducers
So our store gets updated through something known as a reducer. These basically are the mechanisms by which we send our new versions of state. That may not make much sense just yet, so let’s elaborate a little. Let’s say we have our store object and it has an array that looks like this: list: [{‘id: 1, text: ‘clean the house’}]. If we had a function that adds new items into our array, our reducer will explain to our store how the new version of our store will look. So in the case of our list array, we would likely grab the contents of our list, spread it into a new list array through the ... syntax, along with the new item we want to add. Therefore, our reducer for adding new items may look something like this: list: [...list, newItem]. This is also what we mean here when we discussed how we create new copies of our state for the store, rather than pushing new items into existing parts of it.
3. Actions
Now in order for our reducers to know what new data to put into our state, they have access to a payload. This payload is sent to our reducer through something known as an action. An action is typically accessible within the components in our app — via props — just like any function we create. Because these actions are in our components, we can pass them parameters — these become the payloads.
So with that in mind,
We can think of Redux in the following way: Our app has access to actions. These actions carry data (or a payload as it generally tends to be called) from our app. Actions have a type that it shares with a Reducer. Whenever the action type gets triggered, it picks up the payload and tells our store how it should now look — by which we generally mean how should our data object look now that it has been updated.
There are other parts to this Redux mental model, such as action creators and action types, among others — but these additional elements are not required for our To Do app.
The Redux setup here may be a good starting point for you and you might decide to deviate from this as you begin to get more comfortable with Redux. With that in mind, although I initially stated that the Redux docs can be a bit overwhelming, reviewing all of the different approaches taken should be viewed as a source of inspiration when it comes to creating your own setup.
Adding Redux to a React app.
So we can create our React app in the same way that we would with Create React App. Afterwards, use yarn or npm to install the following two packages: redux and react-redux and then you are good to go! There is also a dev dependency called redux-devtools-extension which can be very helpful when it comes to ensuring that your Redux app is working in the way that you want it to. It is, however, optional, so don’t feel like you have to install it if you don’t want to.
We mentioned all of the boilerplate earlier. Let’s explain what it all does.
We will start this by looking at the root file of our app, which is main.js
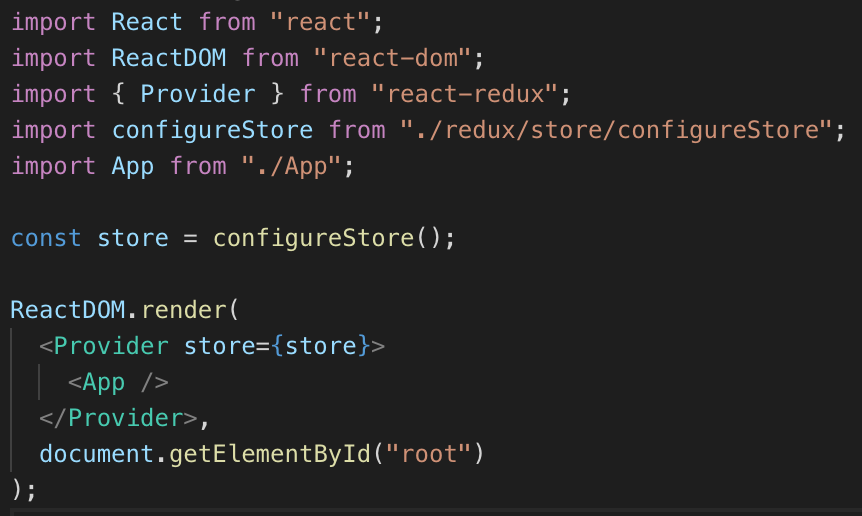
main.js
Here we have five imports. The first two are for React, so we won’t bother discussing them, and the fifth import is simply our App component. The third and fourth imports are what we will focus on. The third import, Provider is basically a gateway into our Redux store (the thing we spoke about earlier). There is actually a bit more to how this works, as we need to pick which components we want to have access to our store, but we’ll discuss how that works a little later.
As you will see, we wrap our component with a component. One thing you will also notice from the screenshot above is that our Provider takes a store prop, which we pass in our store variable. You will see that our fourth import, configureStore is actually a function that we have imported, and then returned the output of it to our store variable, as such: const store = configureStore();.
Now this configureStore basically, as you may have guessed, is our store configuration. This includes the initial state we want to pass in. This is a file that we actually create ourselves, and we will review this in more detail later. So in short, our main.js file imports our store and wraps our root App component with it, thus providing access to it.
Unfortunately there is more boilerplate required, so let’s move one step up and look at the additional code in our root App component:
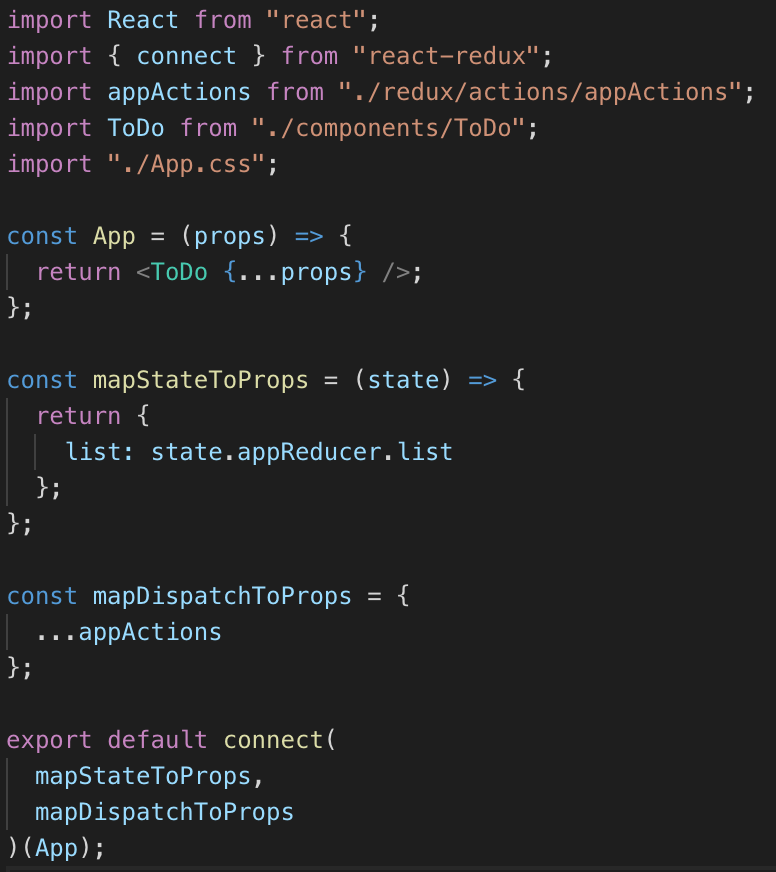
So we have another file with five imports. The first is React, the fourth is a React component and the fifth is a css file, so let’s not bother discussing those any further. Remember how I said that there was a bit more to how we provide our components with access to our store? Well this is where our second import, connect comes into play.
If you look at the bottom of the screenshot above, you will see that rather than exporting our App component, we export connect, which is basically a curried function. A curried function is basically a function that returns another function. What connect is doing here is basically taking the contents of mapStateToProps and mapDispatchToProps — both of which we will discuss shortly — then takes our App component and adds the contents of mapStateToProps and mapDispatchToProps to it, then finally returns our App component with the new functionality added. So that’s that, but what is the contents of those mapStateToProps and mapDispatchToProps things?
Well, mapStateToProps takes the state from our store and passes it down as a prop for our connectedApp component. In this case, we give it the key of list as it followed the naming convention we gave it inside of our store (more on that later). We didn’t need to follow this convention though and could have called it whatever we wanted to — either way, list is what we will be referring to in our app whenever we want to access that particular part of state. Now you will see that mapStateToProps is a function that takes state as a parameter. In this case, state is basically our store object (more on that later). But for your reference, if we were to put a console.log('store', store) inside of mapStateToProps like so:

This is what the output would be:
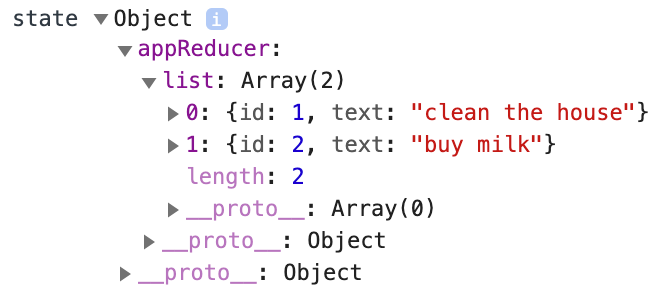
So with that in mind, we are basically just accessing certain parts of our store and we are attaching those parts to our App through props — in this case, we can see from the console that our state is an object called appReducer, which contains a list array inside of it. Therefore, we attach it to our App component by our mapStateToProps function returning an object with a key of list and a value of state.appReducer.list. This can all seem a bit foreign and verbose at first but hopefully that has helped to break down what is going on here.
So what about mapDispatchToProps? Well that takes us to the third import in our App.js file, which is appActions. This is another file that we create, which we will dive into later. For now, just know that mapDispatchToProps is a plain object that takes the actions we will create and passes them into our connected App component as props. In Redux terms, Dispatch refers to the dispatching of an action, which is basically a fancy way of saying that we are executing a function. So mapDispatchToProps is kind of like saying mapFunctionsToProps, or mapActionsToProps. However, the React docs refer to this as mapDispatchToProps, so we will stick to that naming convention here.
One thing I wanted to note here is that in a typical larger React application, our mapStateToProps function might have lots of different key/value pairs inside of the object that gets returned. This could also be coming from various different reducers for the store in your Redux app, as you can have access points for your store if required. The same also applies to mapDispatchToProps, in the sense that while our simple To Do app only has one file that looks after our actions — appActions — a larger app may have several files that look after actions specific to certain parts of your app. Your mapDispatchToProps file may pull in actions from various places and then pass them all down as props to your App component. Again, it’s really up to you how you choose to compose your application.
So we’ve looked at the main chunks of boilerplate that spill out from Redux into our root files, let’s now take a look at what is going on inside of our Redux folder, before finally taking a look at how we pull this all together inside of our React subcomponents (by this I mean anything that isn’t the root App.js component).
The Redux folder
There is a lot to unpack here. Before we start, let’s take another look at the file structure of our app:

We will tackle this in the same order as the files appear in the screenshot above:
Actions

actions/appActions.js
So if we remember from earlier, our appActions file is the file we imported into our App.js file. This contains the functions that carry the data (also known as payload) from our app. In the case of our To Do app, we need three pieces of functionality:
- Ability to hold input data
- Ability to add items
- Ability to delete items
Now the first functionality — ability to hold input data — is actually going to be handled locally inside of our ToDo component. We could have opted to handle this ‘the Redux way’, but I wanted to demonstrate that not everything has to be handled through Redux if — in your opinion — it doesn’t make sense to do so. In this case, I wanted to simply handle input data at the component level, whilst maintaining the actual To Do list with Redux at a central level. So let’s move onto the two other functionalities required: adding and deleting items.
These functions simply take a payload. For adding new To Do items, it is likely that the payload we need to pass is the new To Do item. Therefore, our function ends up looking like this:
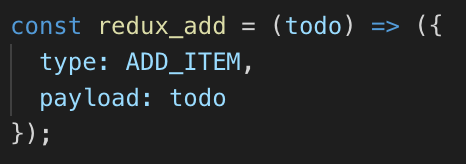
appActions.js
We see here that the function takes a parameter that I have opted to call todo and returns an object that has a type and a payload. We assign the value of the todo param to the payload key. Now as you may have noticed from the screenshot above, the types here are actually variables that have been imported from our actionTypes folder — but more on action types in a moment.
We also have our redux_delete function which takes an id as its payload, in order for our accompanying reducer to know which To Do item to remove. Finally, we have an appActions object which takes our redux_add and redux_delete functions as key and values. This could have also been written as:
const appActions = {
    redux_add: redux_add,
    redux_delete: redux_delete
};
If that would have made more sense to you. I’d also like to know that all of the naming used here, such as appActions and the prefixing of our functions with redux_ is not a requirement, it was simply my own naming convention.
Action Types

actionTypes/index.js
Now you may recall from earlier that I mentioned that there is a way that our reducers and actions know how to interact with one another — this is through the use of types. Our reducers will also access these same action types. As you can see, these are simply variables that have a name that matches the string it is being assigned to.
This part isn’t entirely necessary and you could avoid creating this file and pattern altogether if you wish. We do this, however, as a Redux best practice because it provides a central place for all of our action types which reduces the number of places we have to go to update these if we ever need to. And given that our reducers will also be using these, we can be confident that the names are always correct as we are always pulling them in from one place. Speaking of reducers…
Reducers
There’s two parts here: our appReducer, and our rootReducer. In larger apps, you may have lots of different reducers. These will all then get pulled into your rootReducer. In our case, we could have just handled this with one reducer, given the small size of our app. However, I’ve opted to keep two here as you’ll likely operate in this fashion. Oh, and the names here were my convention — you can call your reducers whatever you want.
Let’s take a look at our appReducer.
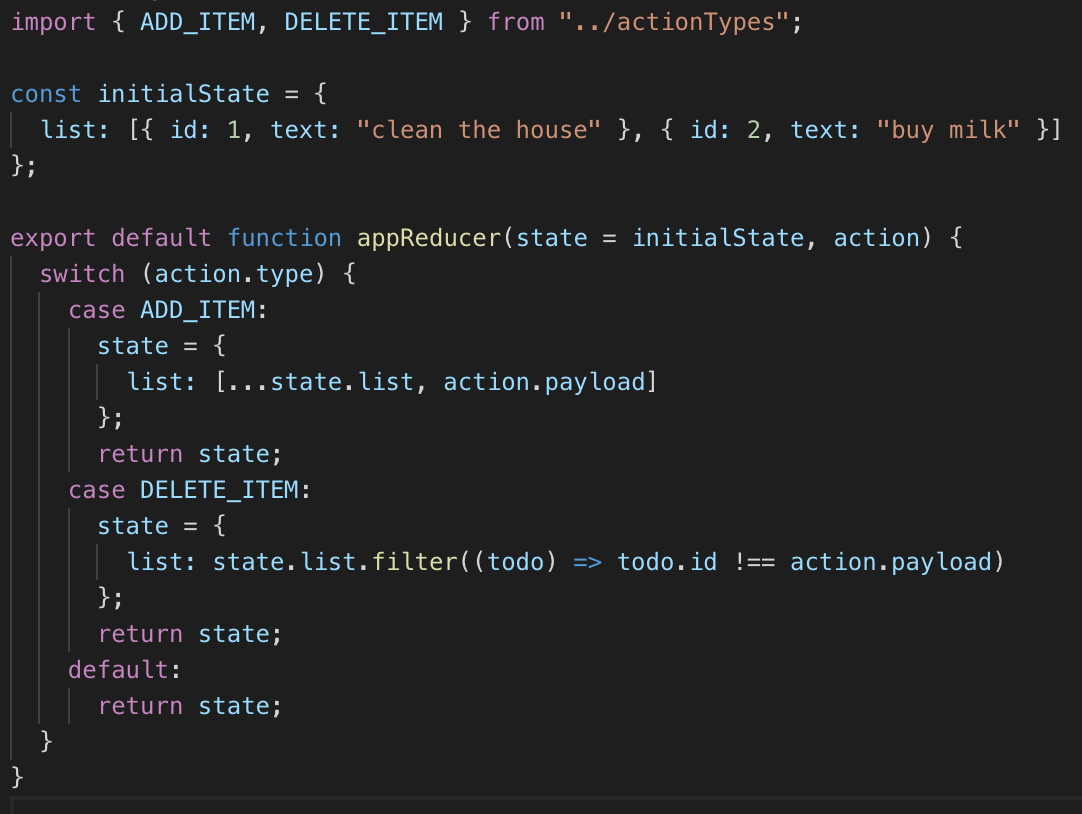
reducers/appReducer.js
The first thing we see is that we’re importing the same action types that we have been using for our actions. The next bit is our initialState variable which is our state. This is what we will be using to initialise our store with so that we have some initial state to begin with. You may choose in your own projects to have an empty object if you do not need any initial state to begin with — again, it’s down to whatever works for your project.
The next bit is our appReducer function that takes two parameters: the first is a state param which is the state we want to begin with. In our case, we use default parameters to default the first parameter to our initialState object. This stops us from having to pass anything in further down the line. The second param is our action. Now this appReducer function gets triggered every time one of the functions from our appActions.js file is triggered — we will later see how these are triggered, but for now just know that the functions ultimately end up inside of our ToDo.js file. Anyway, so each time one of these functions get triggered, our appReducer runs through a series of switch statements to find the one that matches the action.type that was passed in. To get an idea of what the data looks like that gets triggered, let’s console.log out our action, as such:
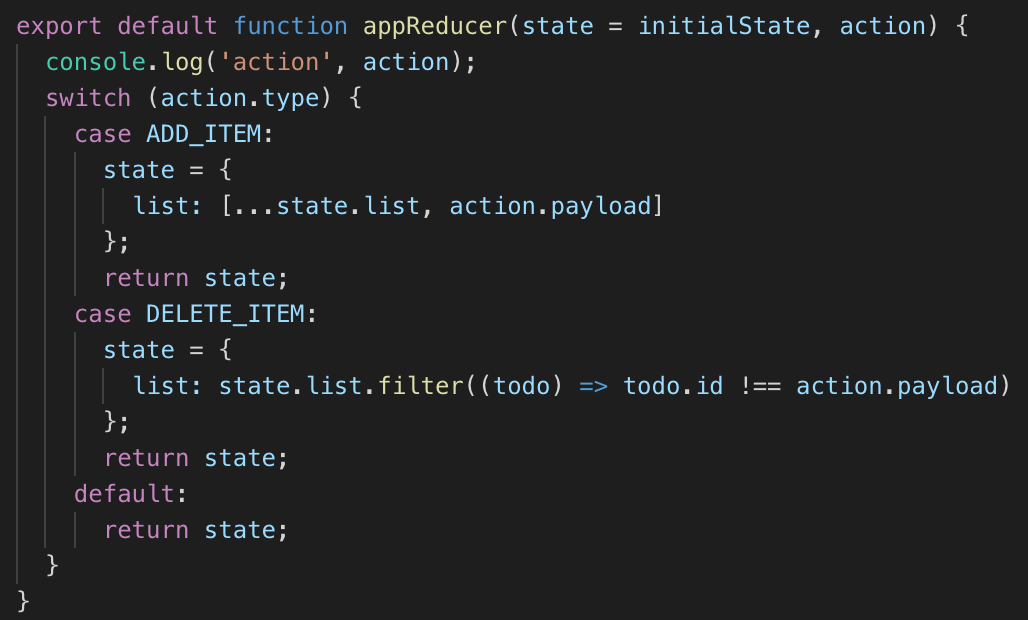
Now in our app, let’s say that we create a new To Do item by typing “take out the trash” in our input field and pressing the + button. When we do this, we see the following in the console:

Now besides the payload, we can see that our action has a type of "ADD_ITEM". This matches up with the ADD_ITEM variable that our switch statement has as one of its cases:

As there is a match, it executes this, which basically tells our store how its new state should be. In this case, we are telling our store that the state should now equal a list array which contains the previous contents of the list array, along with the new payload we passed in, which if we take another look at what was logged to the console:
Now remember, the action carries the payload — this part is handled by the actions we saw in appActions.js. Our reducers pick up actions and handle them based on whichever action.type matches.
Let’s now take a look at our rootReducer:

reducers/index.js
The first import we have is combineReducers. This is a Redux helper function which basically gathers all of your various reducers and turns them into an object which can then be passed to our createStore function in our store, which we will take a look at in a moment. The second import is our appReducer file that we created and discussed earlier.
As mentioned earlier, we didn’t really need this step as our app is fairly simple, but I’ve decided to keep this in for learning purposes.
Store
Let’s take a look as our configureStore.js file:

store/configureStore.js
The first import here is createStore which holds the complete state of your app. You can only have one store. You can have many reducers that have their own initialState though. It’s key to understand the difference here though which is basically that you can have many reducers that provide some form of state, but you can only have one store that pulls in all of the data from your reducers.
The second import here is our rootReducer, which we have covered earlier. You will see that create a simple function called configureStore that returns our createStore import as a function that takes in our rootReducer as its only parameter.
Again, this is something we could have skipped and simply created out store within our root index.js file. Instead, I have kept this here as there is a lot of configuration you may find yourself doing for your store. This can range from setting up middleware to enabling additional Redux dev tools. It’s quite typical for this to occur, but as it would have been overkill to go into all of this now, I’ve removed anything from configureStore that wasn’t required for this app.
Okay, so we now have everything set up in our Redux folder, and we’ve hooked up Redux to our index.js file and our root App.js component. Now what?
Triggering Redux functions in our app
We’re on the home stretch now. We’ve set everything up and our connected components have access to our store — via mapStateToProps and our actions via mapDispatchToProps— as props. We access these props just like we normally would in React, but for reference:

ToDo.js
These three props are the same ones we passed in: the list contains our state, while redux_add and redux_delete are our add and delete functions.
We then just use these where we need to. In our case, I have maintained the same functions that I used in our vanilla React app, with the exception of instead of updating state locally with some sort of setList() function from a useState hook, we call our redux_add or redux_delete functions with the required payloads. Let’s take a look:
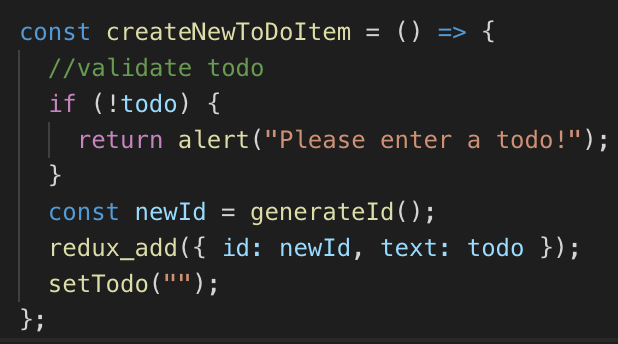
Adding items
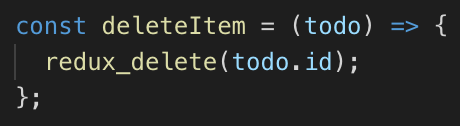
Deleting items
Let’s take our deleteItem function and step back through each step that leads to the update of state in our app.
redux_delete takes the ID from the To Do item that we want to remove.
If we take a look at our appActions.js file, we see that the ID we passed in becomes the value of our payload:
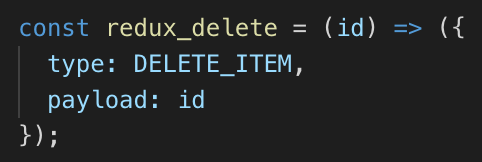
appActions.js
We then see in our appReducer.js file that whenever the DELETE_ITEM type is hit in our switch statement, it returns a new copy of our state that has the ID from the payload filtered out of it:

appReducer.js
As our new state is updated, the UI in our app updates.
And that’s Redux!
We’ve looked at how to add Redux to a React project, how to configure a store, how to create actions that carry data, and how to create reducers that update our store. We’ve also looked at our how to connect our app up to Redux in order to enable access to all of our components. I hope you have found this useful and have gained a better understanding of how an app might look with Redux. And if you have enjoyed reading this, be sure to show your love by leaving some claps — hint, you can leave up to 50!
But wait, where is the app that just used React? I thought this was a comparison piece?
The aim here was to create an app that functions in exactly the same way as an app built just with React. However, in writing this article, it became apparent that a lot of time needed to be spent explaining how Redux works, so it ended up becoming a bit of a beginner’s guide to Redux to demonstrate how you would go about adding Redux into an existing React app. The existing React app in question was already reviewed here: I created the exact same app created in React and Vue. Here are the differences. So please feel free to check it out so that you can review the differences yourself.
Github links to both apps:
React ToDo: here
Redux ToDo: here
If you’re interested in forking the styles used in this article and want to make your own equivalent piece, please feel free to do so!
Thank you so much !
#React #Redux #JavaScript #Web Development #Coding