This tutorial aims to walk through an example of creating the authentication or log in using Spring Boot, Spring Security, Spring Data, and MongoDB for Java web application with custom User Details Service. Using Spring Boot will make web development more compact and faster. Right here, we combined with Netbeans IDE for coding boost. Previously, we showed you how to use Spring Boot, MVC, and MongoDB also Spring Boot, MongoDB RESTful web service. Now, using the same way of tutorial walkthrough we’ll be added security to the web application using Spring Security.
A shortcut of the steps:
- Generate a New Spring Boot Gradle Project
- Create Java User and Role Domains or Models or Entities
- Create Java User and Role Repository
- Create a Custom Java User Details Service
- Create Controller for All Spring MVC Views
- Add a Configuration for Spring MVC and Security
- Create All Required Spring MVC Views with Bootstrap
- Run and Test The Spring Boot Security and MongoDB Java Web Application
Spring Security is one of the most used Security frameworks for Java Web Application. We already show you the tutorial on Spring Security with Groovy and Grails. They all the same thing except the core language for development different between Groovy and Java. For this tutorial, the following tools and framework are required:
- Java Development Kit (JDK) 8
- Gradle
- Spring Boot
- Spring MVC
- Spring Data MongoDB
- Spring Security Core
- Thymeleaf
- Spring Initializer
- Netbeans 8.2 or Eclipse
- Terminal or cmd
You can watch the video tutorial from our YouTube channel with the latest Spring Boot version.
Generate a New Spring Boot Gradle Project
We assume that you have installed JDK 8, Gradle and IDE (Netbeans or Eclipse). Next, we will create a new Spring Boot Gradle project using Spring Initializer. Just go to Spring Initializer web-based Spring project generator then fill the required frameworks and libraries.

After filling all fields, click Generate Project. It will automatically download the zipped project. Next, extract the zipped project to your java projects folder. On the project folder root, you will find build.gradle file for register dependencies, initially it looks like this.
buildscript {
    ext {
        springBootVersion = '2.0.2.RELEASE'
    }
    repositories {
        mavenCentral()
    }
    dependencies {
        classpath("org.springframework.boot:spring-boot-gradle-plugin:${springBootVersion}")
    }
}

apply plugin: 'java'
apply plugin: 'eclipse'
apply plugin: 'org.springframework.boot'
apply plugin: 'io.spring.dependency-management'

group = 'com.djamware'
version = '0.0.1-SNAPSHOT'
sourceCompatibility = 1.8

repositories {
    mavenCentral()
}

dependencies {
    compile('org.springframework.boot:spring-boot-starter-data-mongodb')
    compile('org.springframework.boot:spring-boot-starter-security')
    compile('org.springframework.boot:spring-boot-starter-thymeleaf')
    compile('org.springframework.boot:spring-boot-starter-web')
    testCompile('org.springframework.boot:spring-boot-starter-test')
    testCompile('org.springframework.security:spring-security-test')
}
Next, open the terminal then goes to the newly extracted project folder then type this command.
./gradlew build
It will build and install all Gradle dependencies. To configure Spring Data with MongoDB, simply open and edit src/resources/application.properties then add these lines of strings.
spring.data.mongodb.database=springmongodb
spring.data.mongodb.host=localhost
spring.data.mongodb.port=27017
Create Java User and Role Domains or Models or Entities
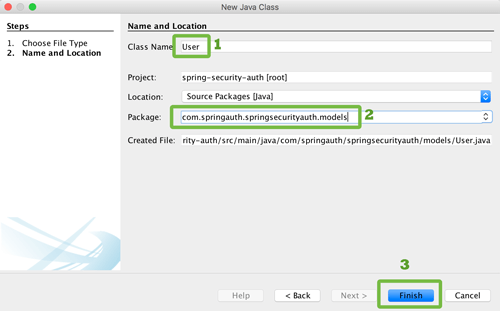
We will store user and role to the MongoDB collections. For that, we have to create models for User and Role. On the Netbeans 8.2 right-click project name then click New then click Java Class.

Give the class name User and the package name com.springauth.springsecurityauth.domain then click the finish button.
It will automatically open the newly created Java Class file. Add these imports of Spring Framework data annotation and the required MongoDB core after the package name.
package com.djamware.springbootmongodbsecurity.domain;

import java.util.Set;
import org.springframework.data.annotation.Id;
import org.springframework.data.mongodb.core.index.IndexDirection;
import org.springframework.data.mongodb.core.index.Indexed;
import org.springframework.data.mongodb.core.mapping.DBRef;
import org.springframework.data.mongodb.core.mapping.Document;
To make this class a Spring Data document and assign to user collection, add this annotation before the class name.
@Document(collection = "user")
public class User {

}
Declare all required fields or variables for user data.
@Id
private String id;
@Indexed(unique = true, direction = IndexDirection.DESCENDING, dropDups = true)
private String email;
private String password;
private String fullname;
private boolean enabled;
@DBRef
private Set<Role> roles;
Create a setter and getter for all above fields. On the Netbeans it can be generated using the menu Source -> Insert Codes then choose getter and setter.
public String getId() {
    return id;
}

public void setId(String id) {
    this.id = id;
}

public String getEmail() {
    return email;
}

public void setEmail(String email) {
    this.email = email;
}

public String getPassword() {
    return password;
}

public void setPassword(String password) {
    this.password = password;
}

public String getFullname() {
    return fullname;
}

public void setFullname(String fullname) {
    this.fullname = fullname;
}

public boolean isEnabled() {
    return enabled;
}

public void setEnabled(boolean enabled) {
    this.enabled = enabled;
}

public Set<Role> getRoles() {
    return roles;
}

public void setRoles(Set<Role> roles) {
    this.roles = roles;
}
Next, do the same thing as the previous step for the role using the name Role and same package name com.springauth.springsecurityauth.domain. After the file opened, replace all codes with this.
package com.djamware.springbootmongodbsecurity.domain;

import org.springframework.data.annotation.Id;
import org.springframework.data.mongodb.core.mapping.Document;
import org.springframework.data.mongodb.core.index.IndexDirection;
import org.springframework.data.mongodb.core.index.Indexed;

@Document(collection = "role")
public class Role {

    @Id
    private String id;
    @Indexed(unique = true, direction = IndexDirection.DESCENDING, dropDups = true)

    private String role;

    public String getId() {
        return id;
    }

    public void setId(String id) {
        this.id = id;
    }

    public String getRole() {
        return role;
    }

    public void setRole(String role) {
        this.role = role;
    }

}
#java #mongodb
