How to Build a Reusable React Login Component
Learn how to build a reusable and shareable Firebase Google login component
In this chapter, we will continue from where we left off in the first chapter that dealt with implementing a Facebook login and initiating a react app structure. We are going to add Google login to the same app we created in the first chapter. This chapter is short, sweet, and simple because we have already completed the problematic section in the previous chapter. We have broken down this tutorial into various sub-headings for you to grasp the concept about React project, Google login, firebase auth, component implementation, etc. and work accordingly.
Now, let’s get on with implementing the Google login!
What you’ll learn …?
- How to create a new React app.
- How to pass props in React.
- How to use Firebase Authentication.
- How to create and set up a Google app.
- How to use Bit.
Most of the points have already been covered in the first chapter, so this chapter makes the concepts even clearer as we move along.
Problem
As we have done most of the problematic section in the first chapter, this chapter only tackles the issue of implementation of Google login; which is relatively simple compared to Facebook login. So, we need a quick win here without wasting much of our time. We need to generate result quickly, which is an important part that keeps us motivated to reach our end milestones.
Requirements
Here’s a complete list of plugins, packages, and services we’re going to need to gain something from this tutorial:
- Nodejs v8.x.x or higher installed along with NPM/yarn.
- Firebase and Bit account.
- You’ve already completed the project from the previous chapter.
- Firebase and Bit package.
Reusable previous code
To make things easier for us, we are going to replicate the Facebook component that we created in the first chapter and change all related names to Google. The project directory structure will look something like below:
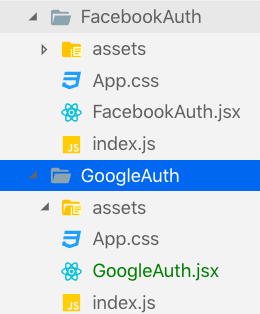
The places where we changed the name from Facebook to Google are mentioned in detail below:
- Folder FacebookAuth is changed to GoogleAuth.
- FacebookAuth.jsx file is changed to GoogleAuth.jsx file.
- In GoogleAuth.jsx file, change the class name to GoogleAuth.
- In handleLogin() function, change the FacebookAuthProvider to GoogleAuthProvider.
Then, we need to change Facebook to Google in the HTML section as given below in the following code snippet:
<li class="firebaseui-list-item">
     <button
        onClick={this.handleLogin}
        class="firebaseui-idp-button mdl-button mdl-js-button mdl-button--raised firebaseui-idp- **google** firebaseui-id-idp-button">
         <span class="firebaseui-idp-icon-wrapper">

           <img class="firebaseui-idp-icon" alt="" src="https://www.gstatic.com/firebasejs/ui/2.0.0/images/auth/ **google**.svg">
          </span>
          <span class="firebaseui-idp-text firebaseui-idp-text-long">
              Sign in with **Google**
          </span>
          <span class="firebaseui-idp-text firebaseui-idp-text-short">
**Google**
          </span>
      </button>
The above code will provide us with the Google login component which we need to import in our App.js file.
Now, we need to copy the code below and add it to our App.js file.
In our GoogleAuth/index.js file, we need to replace all the import of FacebookAuth with GoogleAuth, as shown in the code snippet below:
Now, every change will be made only in our App.js file. We need to change the App.js file to include the component and pass firebase configuration as shown in the code snippet below:
As a result, we will see the following result in our browser screen or app screen:

We can see that this is working fine. Now, we move one to Firebase part of our tutorial chapter.
Activating the Sign-in method in Firebase
In this step, we need to activate the Sign-in method in our firebase console for Google login to work. For that, we need to:
Go to firebase console > Authentication > enable Google Sign-in Method
Lastly, we need to provide a project support email and then click on “save” button as shown in the console screenshot below:

After this is done, we need to return to our app and click on Google Login. We will see the following simulation and result in our browser console:

Finally, we have successfully implemented Google login as well in our react app.
Now, we need to push the code to Bit as in the previous chapter by creating a new collection.
Make it Reusable and Sharable with Bit
To make our code reusable and shareable, we’ll do some restructuring and move all our code to ‘components’ (this is not mandatory but a better practice, when using Bit). Then, we’ll export it (with all its dependencies), to a component collection on Bit’s cloud, to be shared with others and easily reused.
In this step, we are going to push the new component i.e. Google login component to Bit again. We already have our Bit package installed and connected to our Bit account. So, we need to create a collection and start by tracking the component.
Note: The first and second step features an installation of Bit account. These steps can be skipped if you already have a Bit account.
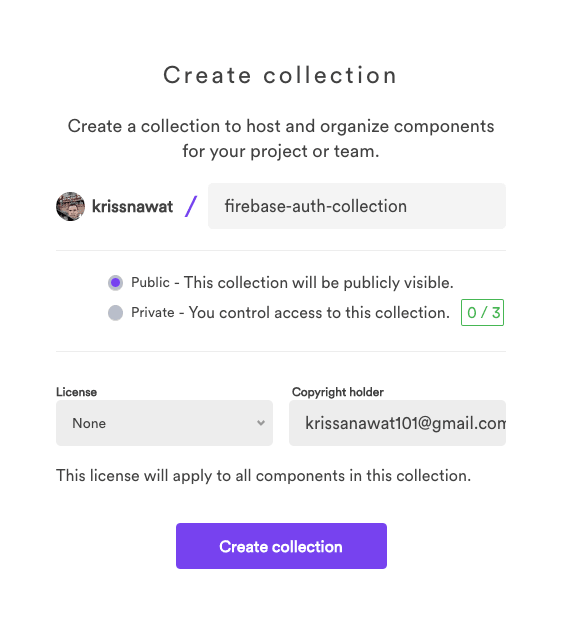
1. Create a collection and initialize Bit on a project
Here, we create a new collection on Bit to which we are going to push all our component code. We use the Bit “create collection” configuration page to create a new collection named “firebase-auth-collection” as shown in the screenshot below:
To successfully push the whole project to Bit, you need to follow the instructions given on the page shown below:

First, we need to install Bit CLI
Using NPM,> npm install bit-bin --global
Then, we need to go to the project directory in our Bit CLI and perform the commands bit init and run bit login on Bit CLI as shown in the screenshot below:

2. Configure a React compiler for our component
When we configure a compiler we tell Bit to capsule the component with it. Capsuling components together with their compilers gives us the freedom to use, build and test them anywhere. This includes being able to run the code in any of the applications we’d like to use the component in, as well as running it in the cloud to enable features such as the live component playground.
bit import bit.envs/compilers/react --compiler
3. Track components
We need to track our component by using the following command in your command prompt or Bit console:
bit add src/components/GoogleAuth
The result after the command is performed is shown below in the screenshot:

4. Tag and export to our collection on Bit’s cloud
Here, we are going to set a version to all tracked components, and export to this collection using following bit command:
bit tag --all 1.0.0

Finally, we need to perform following bit command to push our component code to bit collection that we created before:
bit export krissnawat.firebase-auth-collection
Now, our package is live on Bit. It is our second component in our firebase auth collection as shown in the screenshot below:

Lastly, we need to replace the component in our App.js file as shown in the code snippet below:
import React, { Component } from "react";
	// import "./App.css";
	import "./index.css";
	import FacebookAuth from "@bit/krissnawat.firebase-auth-collection.facebook-auth";
	import GoogleAuth from "./components/GoogleAuth";


	const firebaseConfig = {
	  apiKey: "xxxxxxxx",
	  authDomain: "xxxxxx.firebaseapp.com",
	  databaseURL: "https://xxxxxxx.firebaseio.com",
	  projectId: "xxxxxxx",
	  storageBucket: "xxxxxxx.appspot.com",
	  messagingSenderId: "xxxxxxx",
	  appId: "1:140177169073:web:xxxxxxx"
	};
	class App extends Component {
	  render() {
	    return (
	      <div className="App">
	        <FacebookAuth firebaseConfig={firebaseConfig} />
	        <GoogleAuth firebaseConfig={firebaseConfig} />
	      </div>
	    );
	  }
	}


	export default App;
Finally, the implementation of Google login with firebase auth and uploading the component to Bit is complete. Now, we can run the project locally to test everything.
Conclusion
In this tutorial, we learned how to implement Google login with firebase. We also learned about implementing the re-usable code in the form of components as in the previous chapter. Finally, we were successful in pushing our second component in our Firebase Auth collection.
Thanks for reading. If you liked this post, share it with all of your programming buddies!
Further reading
☞ Typescript Masterclass & FREE E-Book
☞ React - The Complete Guide (incl Hooks, React Router, Redux)
☞ Modern React with Redux [2019 Update]
☞ The Complete React Developer Course (w/ Hooks and Redux)
☞ React JS Web Development - The Essentials Bootcamp
☞ React JS, Angular & Vue JS - Quickstart & Comparison
☞ The Complete React Js & Redux Course - Build Modern Web Apps
☞ React JS and Redux Bootcamp - Master React Web Development
☞ Using React-Router to Optimize Single Page Applications
#reactjs #react-native #javascript #web-development