Sending sensor data to localhost using IoT development board esp8266-12
In this article, I am going to show you how to send sensor sensor data to a local webserver using esp8266.
Before delving into this article , let me explain the term localhost.
Localhost refers to the local computer that a program is running on. For example, if you are running a Web browser on your computer, your computer is considered to be the “localhost”.
The deliverables for this project are:
Xamp webserver download it here https://www.apachefriends.org/
Arduino IDE download here https://www.arduino.cc/
ESP8266 official website https://www.nodemcu.com/
Smartphone used as a router.
Project requirement: Create a folder in the xamp/htdocs named esp8266. In this folder you are going to save the postData.php and databaseConfig.php
To send the sensor data to a database, we need to write an arduino sketch using a TCP protocol to communicate wirelessly to the local webserver.
Let’s get it done now!
Step 1: Install esp8266 board the link to the procedure can be found here https://randomnerdtutorials.com/how-to-install-esp8266-board-arduino-ide/
Step 2: The arduino sketch is shown below. I create two function connectWifi() and sendSensorData() which I invoke respectively in the void setup and void loop. If you are confused please look for a tutorial on basic arduino code.
#include <WiFiClient.h>
#include <ESP8266WebServer.h>
#include <ESP8266HTTPClient.h>
const char *ssid = "MelleB";  //ENTER YOUR WIFI ssid
const char *password = "refj4497";  //ENTER YOUR WIFI password


void setup() {
connectWifi();
}


void loop() {
SendSensorData();
}
//function to connect to wifi
void connectWifi(){
  delay(1000);
  Serial.begin(115200);
  WiFi.mode(WIFI_OFF);        //Prevents reconnection issue (taking too long to connect)
  delay(1000);
  WiFi.mode(WIFI_STA);        //This line hides the viewing of ESP as wifi hotspot
  WiFi.begin(ssid, password);     //Connect to your WiFi router
  Serial.println("");
  Serial.print("Connecting");
  // Wait for connection
  while (WiFi.status() != WL_CONNECTED) {
    delay(500);
    Serial.print(".");
  }
  //If connection successful show IP address in serial monitor
  Serial.print("Connected to ");
  Serial.println(ssid);
  Serial.print("IP address: ");
  Serial.println(WiFi.localIP());  //IP address assigned to your ESP
}


//function to send sensor data
void SendSensorData() {
  HTTPClient http;    //Declare object of class HTTPClient
  String sensorData1,sensorData2,sensorData3,sensorData4,sensorData5,sensorData6,sensorData7, postData;
  sensorData1="High";
    sensorData2="High";
      sensorData3="High";
        sensorData4="High";
          sensorData5="High";
            sensorData6="High";
              sensorData7="High";
  //Post Data
  postData = "sensor1=" +  sensorData1 + "&sensor2=" + sensorData2+ "&sensor3=" + sensorData3+  "&sensor4=" + sensorData4+ "&sensor5=" + sensorData5+ "&sensor6=" + sensorData6+  "&sensor7=" + sensorData7;

  http.begin("http://192.168.43.142/esp8266/postData.php");              //change the ip to your computer ip address
  http.addHeader("Content-Type", "application/x-www-form-urlencoded");    //Specify content-type header

  int httpCode = http.POST(postData);   //Send the request
  String payload = http.getString();    //Get the response payload

  Serial.println(httpCode);   //Print HTTP return code
  Serial.println(payload);    //Print request response payload

  http.end();  //Close connection

  delay(5000);  //Post Data at every 5 seconds
}
Step 3: Create the database sensor and the table name logs and save it in the esp866 folder as databaseConfig.php
//connect to localhost if not exists
	$servername = "localhost";
	$username = "root";
	$password = "";


	// Create connection
	$conn = new mysqli($servername, $username, $password);
	// Check connection
	if ($conn->connect_error) {
	    die("Connection failed: " . $conn->connect_error);
	}


	// Create database
	$sql = "CREATE DATABASE sensor";

	    echo "Database created successfully";
	} else {
	    echo "Error creating database: " . $conn->error;
	}


	$conn->close();


	echo "<br>";
//Connect to database and create table
	$servername = "localhost";
	$username = "root";
	$password = "";
	$dbname = "sensor";


	// Create connection
	$conn = new mysqli($servername, $username, $password, $dbname);
	// Check connection
	if ($conn->connect_error) {
	    die("Connection failed: " . $conn->connect_error);
	}


	$sql = "CREATE TABLE logs (
	id INT(6) UNSIGNED AUTO_INCREMENT PRIMARY KEY,
	sensor1 VARCHAR(30),
	sensor2 VARCHAR(30),
    sensor3 VARCHAR(30),
	sensor4 VARCHAR(50),
	sensor5 VARCHAR(50),
	sensor6 VARCHAR(50),
	sensor7 VARCHAR(50),
	\`Date\` DATE NULL,
	\`Time\` TIME NULL,
	\`TimeStamp\` TIMESTAMP NULL DEFAULT CURRENT\_TIMESTAMP ON UPDATE CURRENT\_TIMESTAMP)";


	if ($conn->query($sql) === TRUE) {
	    echo "Table logs created successfully";
	} else {
	    echo "Error creating table: " . $conn->error;
	}


	$conn->close();
?>
Step 4: Create postData.php in the esp866 folder and paste the code below in it.
//Creates new record as per request
    //Connect to database
    $servername = "localhost";
    $username = "root";
    $password = "";
    $dbname = "sensor";


    // Create connection
    $conn = new mysqli($servername, $username, $password, $dbname);
    // Check connection
    if ($conn->connect_error) {
        die("Database Connection failed: " . $conn->connect_error);
    }


    //Get current date and time
    date\_default\_timezone_set('Asia/Kolkata');
    $d = date("Y-m-d");
    //echo " Date:".$d."<BR>";
    $t = date("H:i:s");


    if(!empty($\_POST\['sensor1'\]) || !empty($\_POST\['sensor2'\]))
    {
    	$sensorData1 = $_POST\['sensor1'\];
    	$sensorData2 = $_POST\['sensor2'\];
		$sensorData3 = $_POST\['sensor3'\];
		$sensorData4 = $_POST\['sensor4'\];
		$sensorData5 = $_POST\['sensor5'\];
		$sensorData6 = $_POST\['sensor6'\];
		$sensorData7 = $_POST\['sensor7'\];


	    $sql = "INSERT INTO logs (sensor1, sensor2,sensor3,sensor4,sensor5,sensor6,sensor7, Date, Time) VALUES ('".$sensorData1."', '".$sensorData2."', '".$sensorData3."', '".$sensorData4."', '".$sensorData5."', '".$sensorData6."', '".$sensorData7."', '".$d."', '".$t."')";


		if ($conn->query($sql) === TRUE) {
		    echo "OK";
		} else {
		    echo "Error: " . $sql . "<br>" . $conn->error;
		}
	}


	$conn->close();
?>
Step 5: software testing
- Open your web browser and type localhost/esp8266. Click on databaseConfig.php you should get a message data base sensor created successfully and do the same with postData.php. If you do not get any error message then you are good to go.
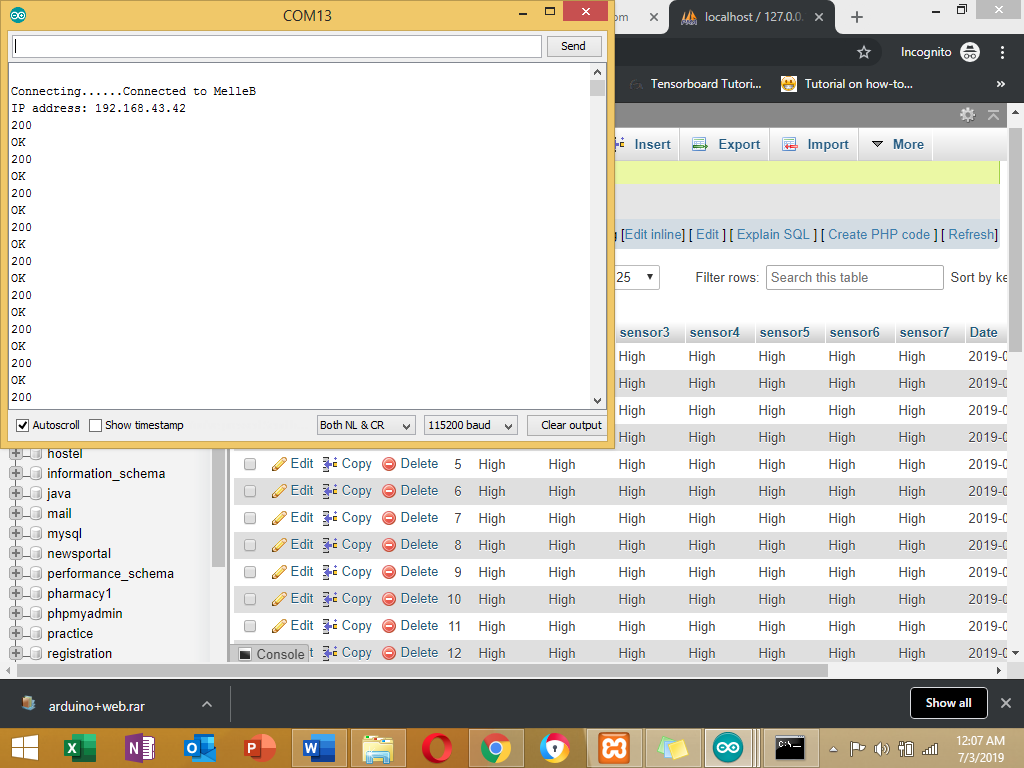
- Open the serial monitor of your arduino and set the baud rate to 115200
- The wifi ssid and ip address should display to the serial monitor
- You should get a response 200 from the server and ok message
- Check your database table you will get all the sensor table high, the date and time.
- ** The output is shown below**
Please let me know in case of any errors.
#arduino #php #apache #database #mysql