Build JWT authentication with Node.js
Have you ever wondered how authentication works? What’s behind all the complexity and abstractions. Actually, nothing special. It’s a way of encrypting a value, in turn creating a unique token that users use as an identifier. This token verifies your identity. It can authenticate who you are, and authorize various resources you have access to. If you by any chance don’t know any of these keywords, be patient, I’ll explain everything below.
Node js JWT Authentication Tutorial is the topic we will discuss today. Full form of JWT is JSON Web Token. If we want to build a secure web application, then we have to implement Authentication. After that, we need to build Authorization. There are two types of Authentication you can use in any web application development.
1 - Session-based Authentication
2 - Token-based Authentication
Why we use Token-based Authentication
Session-based authentication is fine then why we want to use Token-based Authentication? The reasons are following.
- A primary reason is that it is Stateless Authentication. This token is stored client-side local storage but can be stored in session storage or a cookie as well.
- Its most use cases are single page applications, web APIs, and the Internet of Things (IoT).
- If our application is scalable and decoupled, then it is the best choice to use this de facto standard.
- It is mobile ready and web application prepared regardless of which technologies you are using to build your web and mobile app.
How JWT Works?
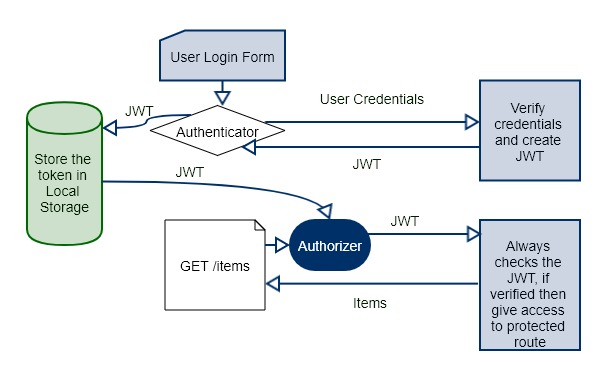
JSON Web Token is the token; we need to put the header in every request to verify the client. The Architecture of JWT Authentication is pretty darn simple.
- First user attempt to login with their credentials.
- After server verifies the credentials, it sends JSON Web Token to the client.
- A client then saves that token in local storage or any other storage mechanism.
- Again if a client wants to request a protected route or resource, then it sends JWT in a request header.
- The server verifies that JWT and if it is correct then return a 200 response with the information, client needs.
- If the JWT is invalid, then it gives unauthorized access or any other restricted message.
Node js JWT Authentication
In this tutorial, we are not using any front-end framework. We will use POSTMAN to request the server. We will check the auth using token. So let us get started.
Step 1: Install node js dependencies.
Create one project folder and go into that folder. Type the following command.
npm initNow, install the following dependencies.
npm install express jsonwebtoken mongoose body-parser --saveIt will install the express web framework, jsonwebtoken package to authenticate the user, mongoose schema model, and body-parser middleware.
Also, we need to install the nodemon development server to prevent the stop and restart the server process. So let us do that first.
npm install nodemon --save-devRest dependencies we will install as our project grows.
Step 2: Configure the Node Server.
In the package.json file, change this object to the following.
"scripts": {
    "start": "nodemon server"
},
So in the terminal when we type npm start command, we bootstrap the server.js file.
In the root folder, make one file called server.js. Configure the node server.
// server.js

const express = require('express');
const app = express();
const bodyParser = require('body-parser');


const PORT = 3000;

app.listen(PORT, function(){
   console.log('Server is running on Port',PORT);
});
Now, go to terminal and hit the following instruction.
npm startIt will start the server, you can see it on a console. So it is ready to consume any request, either web or API.
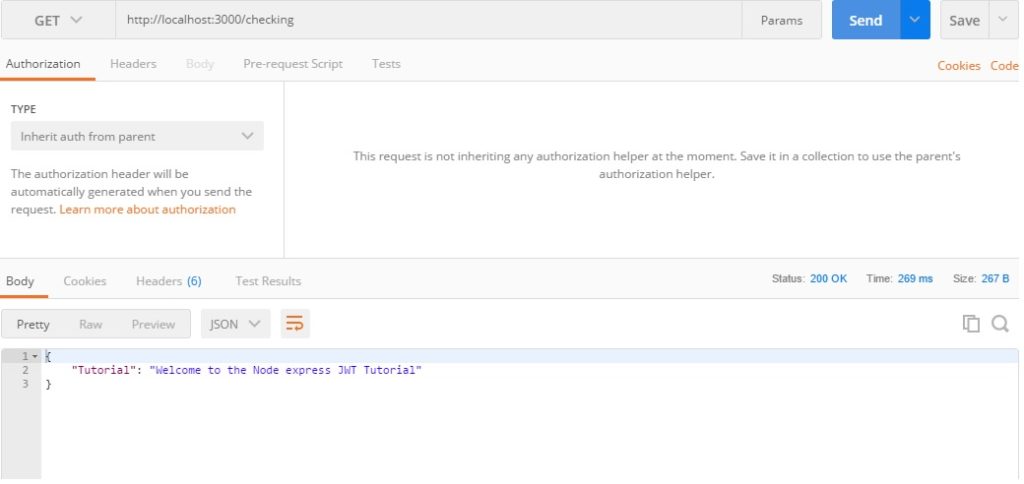
Step 3: Send a request to node server via Postman.
First, we define one route and send the JSON response to the client.
// server.js

app.get('/checking', function(req, res){
   res.json({
      "Tutorial": "Welcome to the Node express JWT Tutorial"
   });
});
Open the Postman and send the get request to http://localhost:3000/checking.
Step 4: Configure the MongoDB Database.
Write the following code to connect the Node.js application to the MongoDB database.
// server.js

const mongoose = require('mongoose');

mongoose.connect('mongodb://localhost/jwtauth');
Also, write the body-parser middleware to the application.
// server.js

app.use(bodyParser.urlencoded({ extended: false }));
app.use(bodyParser.json());
Step 5: Create a User model.
Create one new folder inside root called models. In that, create one file called user.model.js file.
// user.model.js

const mongoose = require('mongoose');

const user = mongoose.Schema({
   _id: mongoose.Schema.Types.ObjectId,
   email: {type: String, required: true},
   password: {type: String, required: true}
});

module.exports = mongoose.model('User', user);
We have defined the schema for the User collection.
Step 6: Create the routes for users.
In the root, make one folder called routes. In that folder, create one file called user.route.js. Now we need to sign the user up for our application. So let us define the post route to signup the user. We also need a bcrypt module to hash the password. We can not store the plain password. So let us install bcrypt module first.
npm install bcrypt --save
Next, write the following code into the user.route.js file.
// user.route.js

const express = require('express');
const router = express.Router();
const mongoose = require('mongoose');
const bcrypt = require('bcrypt');
const User = require('../models/user.model');

router.post('/signup', function(req, res) {
   bcrypt.hash(req.body.password, 10, function(err, hash){
      if(err) {
         return res.status(500).json({
            error: err
         });
      }
      else {
         const user = new User({
            _id: new  mongoose.Types.ObjectId(),
            email: req.body.email,
            password: hash
         });
         user.save().then(function(result) {
            console.log(result);
            res.status(200).json({
               success: 'New user has been created'
            });
         }).catch(error => {
            res.status(500).json({
               error: err
            });
         });
      }
   });
});

module.exports = router;
What it does is that it tries to hash the incoming request’s password property. If it fails to do so then returns a response with an error in json format. If it successes then it will create a new user and add that to the MongoDB database. Now include this user.route.js file in the server.js file. I am writing the whole file now.
// server.js

const express = require('express');
const app = express();
const bodyParser = require('body-parser');
const user = require('./routes/user.route');
const mongoose = require('mongoose');

mongoose.connect('mongodb://localhost/jwtauth');

const PORT = 3000;

app.use(bodyParser.urlencoded({ extended: false }));
app.use(bodyParser.json());

app.get('/checking', function(req, res){
   res.json({
      "Tutorial": "Welcome to the Node express JWT Tutorial"
   });
});

app.use('/user', user);

app.listen(PORT, function(){
   console.log('Server is running on Port',PORT);
});
Step 7: Send a post request from the Postman.
Open the postman send a request in a row format with application type json(application/json).
You can see here, I have created user successfully. Now, I am using Studio 3T for MongoDB. So here is the newly created user in the database.
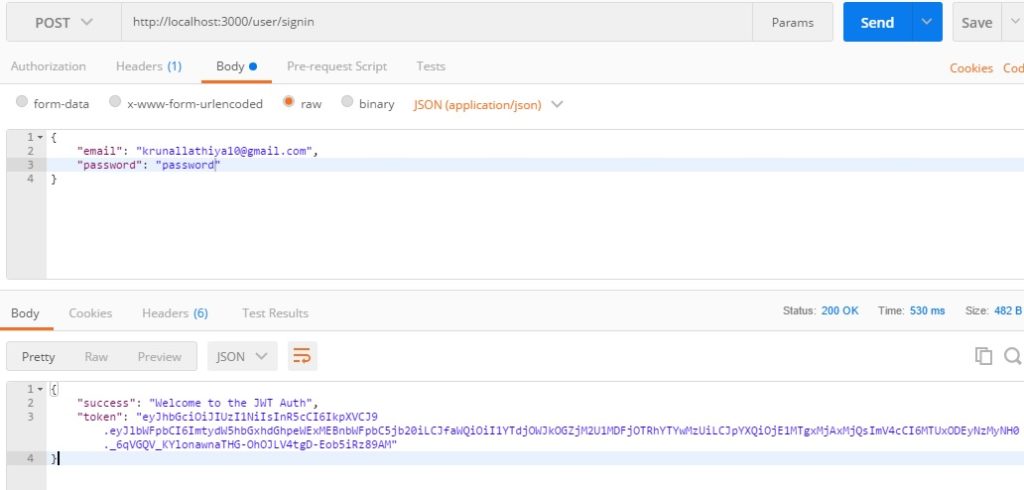
Step 8: Sign In the User.
Go to the user.route.js file and define the signin route.
// user.route.js

router.post('/signin', function(req, res){
   User.findOne({email: req.body.email})
   .exec()
   .then(function(user) {
      bcrypt.compare(req.body.password, user.password, function(err, result){
         if(err) {
            return res.status(401).json({
               failed: 'Unauthorized Access'
            });
         }
         if(result) {
            return res.status(200).json({
               success: 'Welcome to the JWT Auth'
            });
         }
         return res.status(401).json({
            failed: 'Unauthorized Access'
         });
      });
   })
   .catch(error => {
      res.status(500).json({
         error: error
      });
   });;
});
First, I have checked if the user’s email exists or not. If not then return 401 unauthorized access. If email is there then check the password with bcrypted database password if match found then welcome to the JWT auth else 401 unauthorized access.
If the Authentication Attempt is not successful, then we will get the following error.

Step 9: Return the JWT, if auth attempt successful.
If the user’s credentials email and password are valid then in response, we need to return a JWT token. So let us generate the token and return to the user.
// user.route.js

const jwt = require('jsonwebtoken');

if(result) {
   const JWTToken = jwt.sign({
        email: user.email,
        _id: user._id
      },
      'secret',
       {
         expiresIn: '2h'
       });
       return res.status(200).json({
         success: 'Welcome to the JWT Auth',
         token: JWTToken
       });
  }
The format of JWT Token is as following.
HEADER: ALGORITHM & TOKEN TYPE
{
“alg”: “HS256”,
“typ”: “JWT”
}
PAYLOAD:DATA
{
“email”: “quaytayx3@gmail.com”,
“_id”: “5a7c9bd8fc3e501c94aa6035”,
“iat”: 1518120124,
“exp”: 1518127324
}
VERIFY SIGNATURE
HMACSHA256(
  base64UrlEncode(header) + "." +
  base64UrlEncode(payload),
  secret
)
So it is a combination of header, payload, and secretkey, we are providing. Remember, You need to define your secret key in your environment variable file. I have just shown here for the demo purpose. So it will produce the following JWT token.
eyJhbGciOiJIUzI1NiIsInR5cCI6IkpXVCJ9.eyJlbWFpbCI6ImtydW5hbGxhdGhpeWExMEBnbWFpbC5jb20iLCJfaWQiOiI1YTdjOWJkOGZjM2U1MDFjOTRhYTYwMzUiLCJpYXQiOjE1MTgxMjAxMjQsImV4cCI6MTUxODEyNzMyNH0._6qVGQV_KYlonawnaTHG-OhOJLV4tgD-Eob5iRz89AM
Now use this token to access the protected resources to your application and we are done here. So this is how you can generate the JWT Auth Token.
Finally, our Node js JWT Authentication Tutorial From Scratch is over.
Thanks for reading

#node-js #web-development
