Secure Next.js Applications with Authentication and Protected Routes
Learn how to set up authentication and protected routes in Next.js 13 with NextAuth.js in this comprehensive guide. Secure your applications with ease and confidence, and ensure that only authorized users have access to your critical data. With NextAuth.js, you can implement passwordless authentication, social login, and more, with just a few lines of code.
How to Set Up the next-auth.js Library
Once your Next.js application is up and running, we're ready to dive in.
Quick note: I'll be referencing the "app" directory consistently in this guide. If this term is new to you, take a moment to consult the Next.js documentation for clarity. If you're utilizing the "pages" directory, fear not, as the implementation is almost identical.
Install the next-auth.js library with the following command:
npm install next-auth
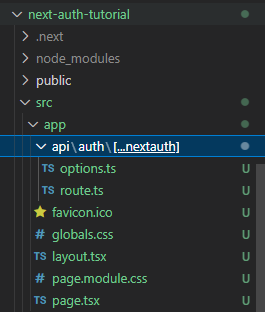
Having completed the installation, create an api folder in your root app folder, and inside it create an auth folder. Finally, create a [...nextauth] folder inside the auth folder.
Inside the [...nextauth] folder, create two files named route.ts and options.ts.
Your folder structure up to this point should look like this:
Afterwards, in the options.ts file, insert the following code:
import type { NextAuthOptions } from 'next-auth'
import GoogleProvider from "next-auth/providers/google";

export const options: NextAuthOptions = {
    providers: [
  GoogleProvider({
    clientId: process.env.GOOGLE_CLIENT_ID as string,
    clientSecret: process.env.GOOGLE_CLIENT_SECRET as string,
  })
]
}
We imported the NextAuthOptions type to ensure the options variable is type-safe.
In order to use Google Provider, we imported GoogleProvider from next-auth as illustrated above.
The options variable is where we embed whichever provider we intend to use from next-auth.js.
Notice that we exported the options variable, enabling us to use it throughout the application (although we mostly need it the route.ts file). As we delve into the implementation in the route.ts file, we'll explore how it is utilized.
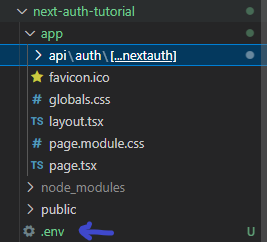
To use the Google Provider effectively, you need to get your clientId and clientSecret properties. Rest assured, we'll delve into this shortly. First, create an .env file where you'll assign values to both properties.
env files are always at the root folder of your application:
Now, we'll see how you can now get your clientId and clientSecret.
Assuming you already have a Google account, follow these easy steps:
- Visit Google Cloud Platform, and click the console button at the top right corner of the navbar.

- You'll be directed to your console dashboard. On the top left, right after the Google Cloud logo, click the dropdown menu to create a new project:

Assign your project any name you prefer, and then click the "Create" button. Mine will be "Next-auth Tutorial".
You will return to your console dashboard, and the same dropdown menu should now display the project you recently created. If it doesn't, click on it and select the project.
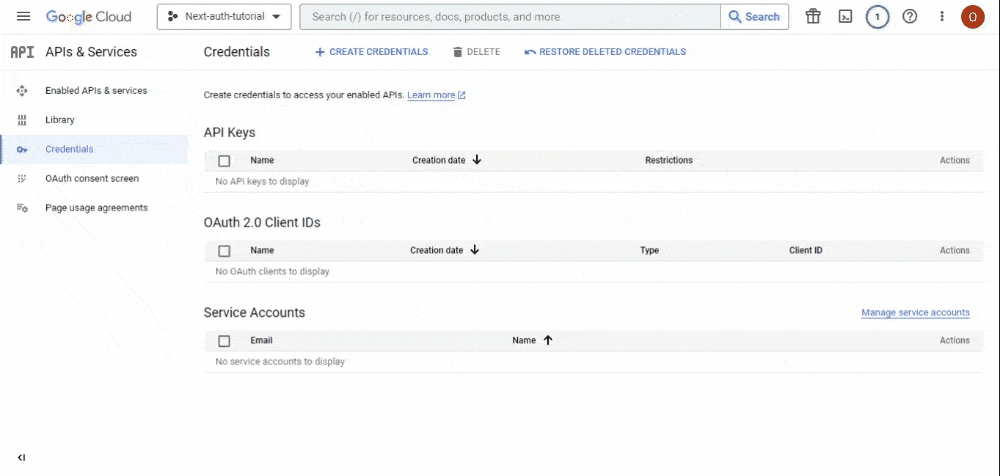
Assuming everything is in order, scroll down to the "Quick Access" section and choose the "API & Services" card. This action will lead you to the "API & Services" page. In the sidebar of this page, select the "Credentials" option:

- You will be directed to the "Credentials" page. Here, click the "CONFIGURE CONSENT SCREEN" button:

- This will take you to the consent screen configuration page, where you will determine how you want to configure and register your app. Opt for the "External" option and proceed by clicking the "Create" button:

- Following this, you'll find yourself on the "OAuth Consent Screen" page. Proceed by completing these four steps:
Beginning with the "OAuth Consent Screen" tab, you'll be prompted to modify your app information. The key sections to focus on are "App Information" and "Developer Contact Information." After filling these fields, click the "SAVE AND CONTINUE" button.
You will then transition to the "Scopes" tab. Here, once again, click the "SAVE AND CONTINUE" button.
Next up is the "Test Users" tab. Likewise, proceed by clicking the "SAVE AND CONTINUE" button.
And finally, you'll reach the last tab, the summary tab. Scroll down and select the "BACK TO DASHBOARD" button.
Upon completing these steps, your dashboard should resemble the following:

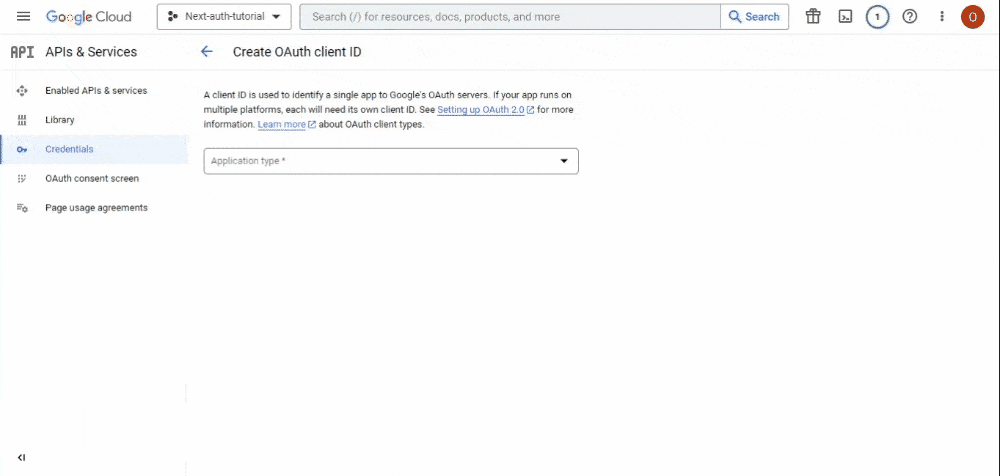
- Return to the "Credentials" page, and there, click the "Create Credentials" button. A dropdown menu will appear. Choose the "OAuth Client ID" option:
- This action will take you to the page where you'll craft your
client ID. On this page, you'll see a single dropdown field for your application type, which will reveal additional fields based on your selection. Select the "Web Application" option from this dropdown:
Scroll down to the "Authorized redirect URI" section and paste the following URI: http://localhost:3000/api/auth/callback/google. Afterwards, hit the "CREATE" button.
- Lastly, a modal will emerge, displaying your unique
Client IDandClient Secret. Keep in mind that both values are confidential, specific to each user, and must be kept secure. For privacy reasons, both values are blurred in the image below:

Once you've completed these steps, go back to your code editor and paste the appropriate values of each variable in the .env file:
GOOGLE_CLIENT_ID = client ID value
GOOGLE_CLIENT_SECRET = client secret value
You'll also need to generate a NEXT_AUTH_SECRET key to enhance the security of the authentication process in next-auth.js. Generate your secret key by executing the following command in your terminal:
openssl rand -base64 32
This command will generate a 32-character string. Copy this string and paste it as the value for the NEXTAUTH_SECRET variable in your .env file. Your final .env file should resemble the following:
GOOGLE_CLIENT_ID = client ID value
GOOGLE_CLIENT_SECRET = client secret value
NEXT_AUTH_SECRET = next auth secret
To conclude, restart your application. It's important to note that the next-auth.js library won't be actively engaged at this point. The reason is that you haven't yet implemented protected routes for it to safeguard your pages. We'll explore this aspect next.
How to Implement Protected Routes with next-auth.js
With the use of Next.js's middleware, protecting routes is very easy.
Begin by creating a middleware.ts file in the root src folder.

To protect all your pages uniformly, insert the following code snippet:
export { default } from 'next-auth/middleware'
Alternatively, you can selectively secure specific pages by utilizing a matcher. For instance, protecting only home and about page would be implemented as follows:
export { default } from 'next-auth/middleware'

export const config = { matcher: ['/', '/about'] }
Now, when you visit both pages on your localhost, they will present an authentication prompt inviting you to "Sign in with Google," instead of displaying the regular content:

Conclusion
In this tutorial, we've covered the essential steps to implement authentication and protected routes in your Next.js application using the next-auth.js library with the Google Provider.