Styling in React Native- A Step By Step Guide
It can be hard to understand exactly why clients pay so much for design work. After all, as long as you have a functional app, it can’t matter that much what it looks like, right?
Unfortunately, this simply isn’t the case. Styling is one of the most important aspects of your online presence. This doesn’t necessarily mean you need to pay an exorbitant amount of money for top-tier designers, but rather that you need to find a style that works for your business.
When it comes to React Native, styling becomes little more tricky as the dynamics of styling for React and React Native are totally opposite. It becomes more brutal if you are coming from a backend domain. In this article, we are going to cover the basics of app styling and design in a step by step manner. I might go for a series depending on the response. Let’s begin with following for now:
- StyleSheet in React Native
- FlexBox in React Native
- Handling Images in React Native
- Custom Fonts in React Native
- Positioning container and elements in React native
StyleSheet in React Native
A StyleSheet is an abstraction similar to CSS StyleSheets. There can be many ways to create styles for your component. Some developers prefer adding it to the bottom of each file while some go for a separate to style all the components at one place. By moving styles away from the render function, you’re making the code easier to understand. Here is the code to use StyleSheet in react native.
import { StyleSheet } from “react-native”;
const styles = StyleSheet.create({
  container: {
    flex: 1,
  },
  title: {
    fontSize: 24,
    fontWeight: 'bold',
  },
});
No matter which option you choose. The declaration of StyleSheet remains the same for both the approaches.
Inline Styling: Like CSS we can also provide inline styling in React Native.
<Text style={{fontSize: 24,color: "#fff"}}>Random Text</Text>

//styling with class styles and inline styles
<Text style={[styles.title,{fontSize: 24,color: "#fff"}]}>
  Random Text
</Text>
Naming:
Naming the styles is a good way to add meaning to the low-level components in the render function. No units such as px, pt or rem are used in React Native. The values are based on screen size.
//It is advised that the styles are named using camel case
flexWrap: "wrap",
fontWeight: "900",
width: 200 | "100%",
height: 300 | "100%",
// There is no unit in react native you can use either of these to adjust styling.
paddingVertical: 30,
paddingHorizontal: 20,
Reusability:
Now reusability depends totally on experience, the more predictable and forecasting is your code more are the chances of reusing the same style for different case scenario in the app or a website. When you are dealing with reusable styling to minimize the code length, always opt for styling which is not component specific and global in nature. You can easily assign the custom values dynamically which adds the freedom to customize the component at the run time and reduces the stress of predictability. color, size, weight, margin, and padding all this should be provided at the run time and should be assigned variable values during styling.
Color codes:
Colors in react native is similar to the CSS styling. We can use both hexadecimal and functional notation:
//All these will give you color black
color: "#000"
color: "black"
color: "rgba(0,0,0,0)"
color: "rgb(0,0,0)"
Learn more about colors and color codes here.
In react native, you can create color variables like this so that if you want to change the color in future you can do by changing it at only one place.
export const colors = {
  white: '#fff',
  black: '#000',
  brand: "#c6bc9d",
}
// importing in the styles file like this
import {colors} from "./colors";
export const styles = StyleSheet.create({
container: {
  flex: 1,
  backgroundColor: colors.brand,
},
Components in React Native
- View: The most fundamental component for building a UI,
Viewis a container that supports layout with flexbox, style, some touch handling, and accessibility controls.Viewmaps directly to the native view equivalent on whatever platform React Native is running on, whether that is aUIView,<div>,android.view, etc.
<View style={styles.container}>
 <View style={styles.inline}>
  <Text style={styles.date}>READ MORE</Text>
  <Text style={styles.date}> Date is </Text>
 </View>
  <Text style={styles.text}>{data.item.title}</Text>
 </View>
</View>
//There should always be a parent in React Native if there are more than one View in the render function.
//Major Styling properties for View are as follow:
borderWidth: 4,
borderWidthColor: "red",
borderRightWidth: 4,
borderLeftWidth: 4,
borderTopWidth: 4,
borderBottomWidth: 4,
paddingVertical: 3,
paddingHorizontal: 3
zIndex: 100
// Shadow color in View
shadowColor: "red"
shadowOffset: "{width:3,height: 3}"
shadowOpacity: 3,
shadowRadius: 4
- Text: A React component for displaying text.
<Text style={styles.baseText}>
 <Text style={styles.titleText} Random Text</Text>
 <Text numberOfLines={5}>
   {this.state.titleText}{'\n'}{'\n'}
 </Text>
</Text>
//Some major Text properties are as follows:
fontSize: 30,
textAlign: "center" | "justify" | "left" | "right",
color: "red",
fontStyle: "normal" | "italic,
textDecoration: "underline" | "none" | "line-through"
fontFamily: "Roboto",
letterSpacing: 5,
textDecorationColor: "#fff",
FlexBox in React Native
If you are aware of Flexbox in CSS. Flex is not going to be a trouble and if you don’t I advise going through this link. Some important properties are as follows:
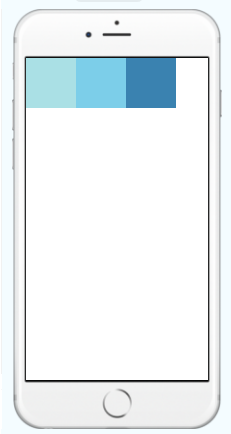
Flex Direction: Default property is a column as in an app the view is basically scrolling on the Y-axis i.e Vertical (top to bottom) and not sidewise i.e Horizontal (left to right). So if you want to scroll across horizontally you can use flexDirection: “row”.
Justify Content: You can basically use the main options which are flex-start,flex-end,space-between,space-around, center.
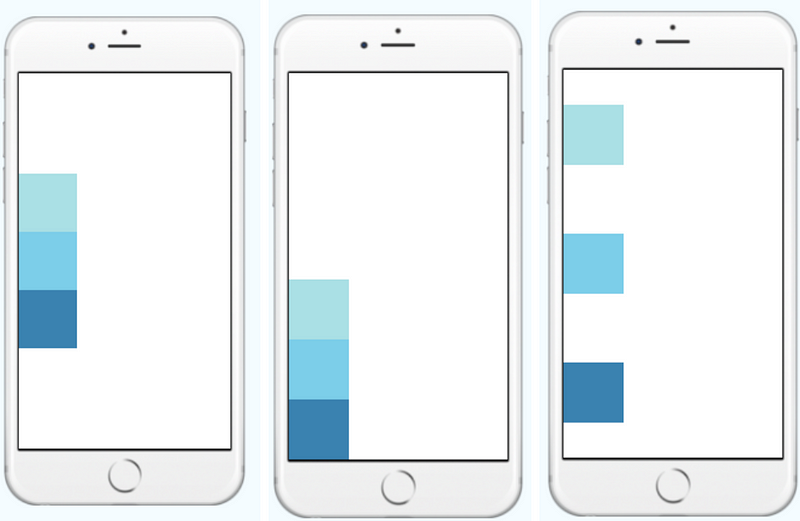
- justify-content: “center”= aligns every child in the center.
- justify-content: “flex-end” = aligns every child to the end.
- justify-content: “flex-start”= aligns every child to the end.
- justify-content: “space-around” =aligns every child with equal spacing with each other.
- justify-content: “space-between” =aligns every child with equal spacing with each other. But the first and last child would be at the corners either top or bottom or left or right.
- Justify Content works for both row and column view. You can opt for styling using flex to avoid unwanted calculations of padding and margin.
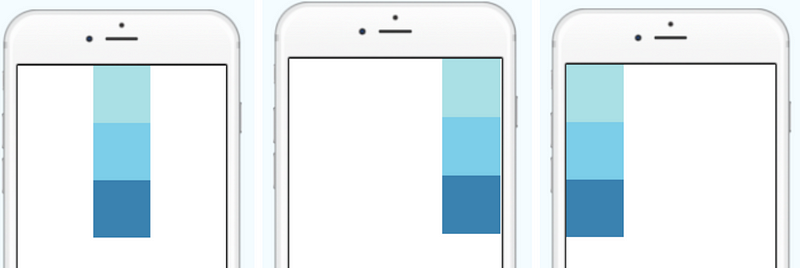
**Align items: **It determines the alignment of children along the **secondary axis. **If the primary axis is a row, then the secondary is a **column **and vice versa. Just like justify content we have few options which are flex-start,flex-end, center, stretch.
**Flex wrap: **It will work as flex-wrap in CSS. For example, if we have so many numbers of boxes and we did not mention flexWrap: ‘wrap’ property to them, then all the boxes render in the parent but we only see the number of boxes fit on the screen, not all the boxes. The default value for flexWrap is nowrap.
<strong>flexWrap: ‘wrap’ | ‘nowrap’</strong>
Handling Images in React Native
React Native provides a unified way of managing images and other media assets in your iOS and Android apps. To add a static image to your app, place it somewhere in your source code tree and reference it like this:
<Image source={require('./my-icon.png')} />
This freedom to use the images in the app in any format .png or .jpg is an asset which is not provided for the native app languages. You can also use Url for getting the image source.
<Image source={{uri: 'app_icon'}} style={{width: 40, height: 40}} />
You can learn more about the images here. When it comes to styling the images based on design. It is advised not to give a custom width and height to the images as it may alter view in various devices. However, we have a property resizeMode which can be used to align the image in a view. The syntax is as follows
resizeMode: 'contain'
resizeMode: 'conver'
resizeMode: 'center'
resizeMode: 'stretch'
when an image in inside a view of particular width and height. You can use any of the above property to align the image with the parent div.
contain: It uses the original width and height of the image and aligns it within the parent div.
cover: It basically fills the whole view with the image not basically advised as it might cut some parts from the image in order to adjust the whole view.
center: It aligns the image to the center of the parent view i.e it makes the image of literally very small size using padding and assigns it to the center of the parent view.
stretch: As the name suggests it stretches the image and aligns it within the parent view. *Not advised as it alters image quality.
Image Background: A common feature request from developers familiar with the web is background-image. To handle this use case, you can use the <ImageBackground> component.
<ImageBackground
  source={...}
  style={{width: '100%', height: '100%'}}
>
  <Text>Inside</Text>
</ImageBackground>
**Dynamic handling of images: **In case there is a scenario in which you want to show two different images based on any condition. You can easily manage the code like this.
var icon = this.props.active ? require('./my-icon-active.png'):  require('./my-icon-inactive.png');

<Image source={icon} />;
If you are using API to handle the image URL then
renderItem=(movies)=>
<TouchableOpacity style={styles.list}
   onPress={()=>this.openModal(movies.item)}>
  <Image style={styles.img} source={{uri: movies.item.poster}} /></TouchableOpacity>
Custom Fonts in React Native
We can use custom fonts in React Native. You can add your custom fonts by the following steps:
- Add fonts folder to asset library:
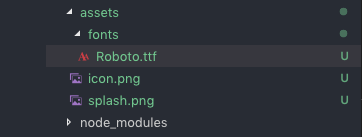
2. Package.json: add rnpm to package.json providing the path to the font files:
"rnpm": { "assets": [ "./assets/fonts/" ]},
- React Native link command to link it to font files
react-native link
- Once the terminal shows that the fonts have been linked you can use it like this in the styling
title: {
  fontFamily: "Roboto",
  fontSize: 30,
  textAlign: "center",
},
Positioning container and elements in React native
Position in React Native is similar to regular CSS, but everything is set to relative by default, so absolute positioning is always just relative to the parent. If you want to position a child using specific numbers of logical pixels relative to its parent, set the child to have an absolute position. If you want to position a child relative to something that is not its parent, just don’t use styles for that. Use the component tree. See https://github.com/facebook/css-layout for more details on how position differs between React Native and CSS.
const styles = StyleSheet.create({
container:{
  backgroundColor: colors.red,
  flex: 1,
  position: "relative",
},
//relative parent for whole screen
close:{
  position: "fixed",
  top: 50,
  right: 20,
  zIndex: 100
},
//positions the close icon at the top-right of the screen
menu:{
  position: "absolute,
  bottom: 0,
  left: 0,
  width: "100%"
},
//positions the menu at the bottom of the screen
})
Conclusion:
Styling and design are a very vast concept and cannot be covered in one article. There might be some scenario when you are struck with some design or component and are unable to style it as per need. Feel free to let me know via my email or website and I would love to help you with solving them. Also, let me know If there is anything missing or needs amendment. Together we will make this world a better and beautiful place.
#reactjs #react-native #javascript #css