A few days ago I decided to work on a simple Vue project and needed to send emails through a contact from I had just created. I wanted to receive an automated email every time someone filled out my contact form.
So I got to searching and stumbled on EmailJs. I decided to write this article because I felt their documentation was great and it was really easy to use. I also hope it helps someone out there :)
Let’s Get Started!
In this article, I will be showing you how to use EmailJS to send emails from your Vuejs application.
Before I continue I am assuming you have Vue CLI installed on your computer as I will be creating a mini demo project with it. If not, you might want to check how to install it here.
We will create the project using this command:
vue create vue-emailjs-demo
We’ll then be prompted with the option to pick a default preset or to manually select features. Select default.
A new project directory will be created, and you can navigate into it using this command:
cd vue-emailjs-demo
How to Install EmailJS
EmailJS helps you send emails using client side technologies only. No server is required – just connect EmailJS to one of the supported email services, create an email template, and use their JavaScript library to trigger an email.
Before we start writing our code, you’ll want to create an EmailJS account. With your account, you’ll be able to create email templates and choose the email you want your automated emails to go to.
Once you sign in to your new account, you will be directed to the dashboard.
How to Create the Email Template
Email templates can optionally contain dynamic variables in almost any field (for example, subject, content, TO email, FROM name, and so on). They are populated from the JavaScript call. We will get into this shortly.
First let’s add an email service. I selected Gmail but you are free to select whichever service best suits your needs.
Also, if you don’t want to start thinking of a name for your Service ID, tap on the search icon and it will be automatically generated for you.
Next, we’ll create our email template. Navigate to the templates page. Create a new template. Our Email template will define the subject of our email, what content it will contain, where it should be sent, and so on.
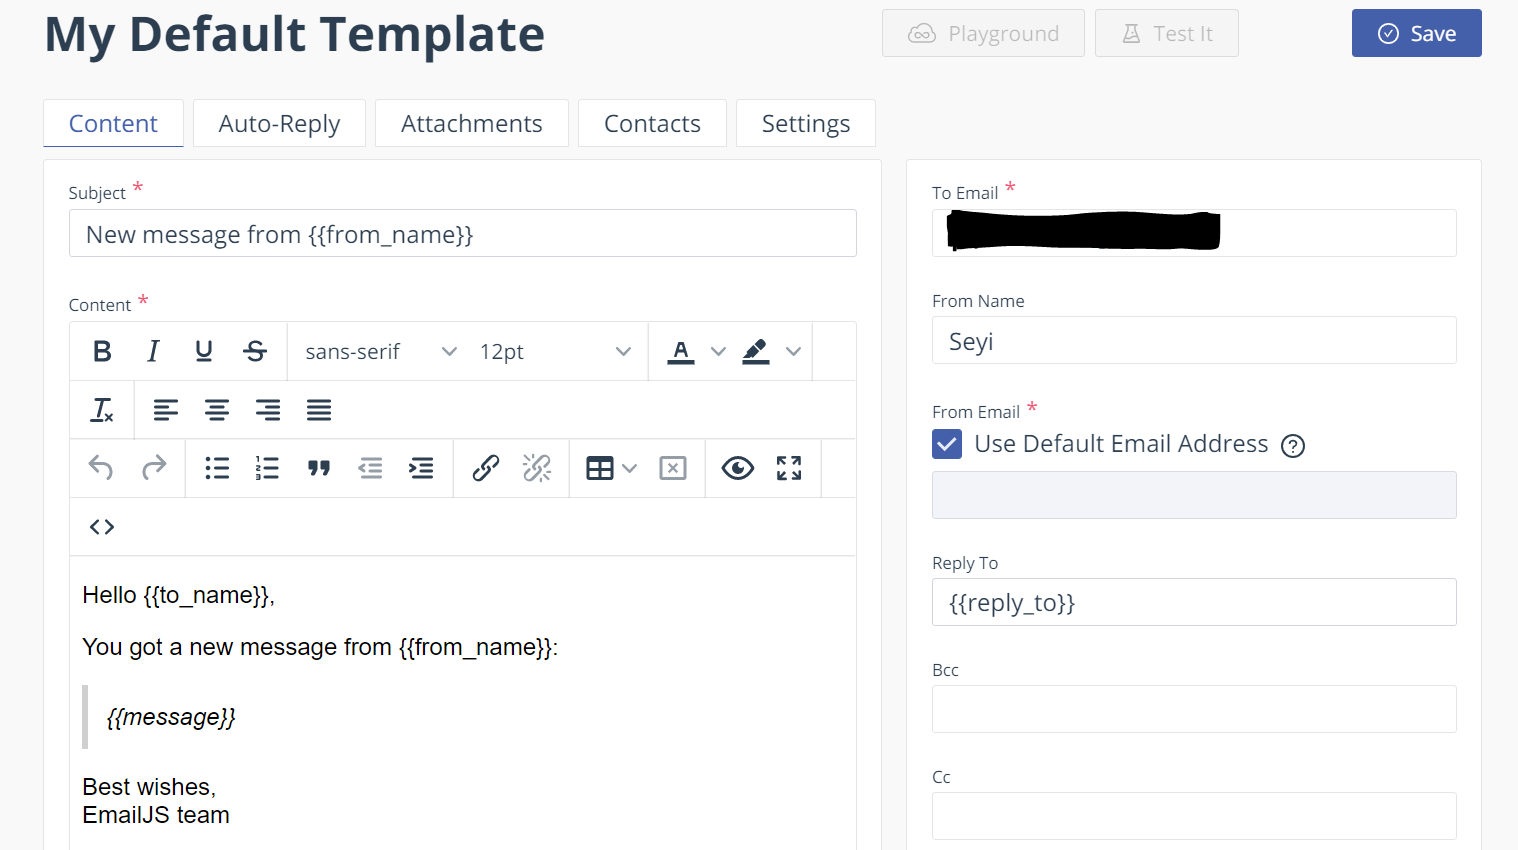
The sets of double curly braces shown above like {{from_name}} are variables. When a user fills out our form, we will pass that information to EmailJS using these variables.
Below is a little explanation of the available fields in our template:
- Subject: The subject of the email.
- Content: Thebody of the email. We are going to pass the user message, their name, and their return address here.
- To Email: Contains the destination of this email.
- From Name: This is optional. But you can write your name there.
- From Email: The sender’s email address as it will appear for the recipient. If the default email address checkbox is enabled then EmailJS will use the email address associated with the email service in use.
- Reply To: Sets the email address to which the replies should be sent.
- BCC and CC: These two fields are typically used to send a copy of the message to everyone you’ve listed. Reply To , BCC and CCwon’t be used in this guide as we want to keep it as simple as possible. If you need further information, you can check the EmailJS docs here.
Note: At a point in this article, we will be using the Service ID and Template ID. We will also need a User ID. You can find your User ID in the integration part of the dashboard. You can copy the details to your clipboard and paste them when they’re needed.
How to Install EmailJS in your application
Now moving on to the code :) To install EmailJS in your application, use this command:
npm install emailjs-com --save
We’re going to be sending email from a very simple contact form. It will collect data including: name (of the sender), email (of the sender), and the message content. Simple stuff!
You can edit the HelloWorld.Vue component that was created automatically for us when we used the Vue CLI or you can create a fresh component called ContactForm.vue. I will be doing the latter.
Below we will build the contact form component, ContactForm.vue.
Let’s start with the template:
<template>
    <div class="container">
        <form>
          <label>Name</label>
          <input
            type="text"
            v-model="name"
            name="name"
            placeholder="Your Name"
          >
          <label>Email</label>
          <input
            type="email"
            v-model="email"
            name="email"
            placeholder="Your Email"
            >
          <label>Message</label>
          <textarea
            name="message"
            v-model="message"
            cols="30" rows="5"
            placeholder="Message">
          </textarea>

          <input type="submit" value="Send">
        </form>
    </div>
</template>
#vue #javascript #programming #developer #web-development
