Store user information with Angular 6, Nodejs and Express.
Let’s create a very simple Angular form application that stores user information locally in memory on a server.
On submitting the form, we’ll populate the data on the next page and add two additional elements to display the guid and customer uid.
The Portfolio API - Grow your coding career effortlessly | gitconnected
Getting Started
First we’ll need Node & NPM installed.
To check if you have node installed run this command in your terminal:
node -v
To confirm that you have npm installed you can run this command:
**npm -v**
If not, you can download & install NodeJS & NPM from https://nodejs.org/en/
Install the Angular CLI:
npm install -g @angular/cli
Generate a new Angular project:
ng new charts6
Navigate to http://localhost:4200/. At this point the application will automatically reload if you change any of the source files. The initial page should be the default Angular 6 page:

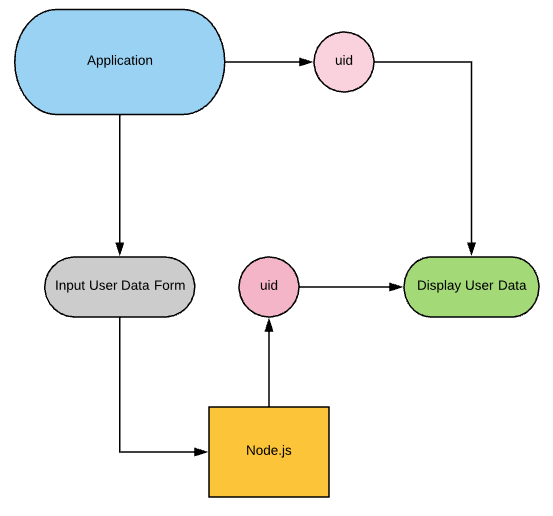
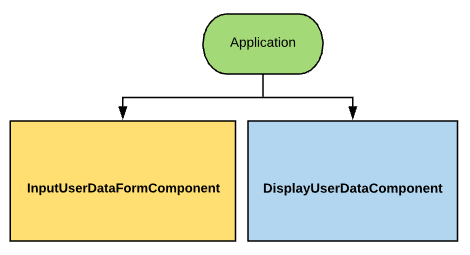
The main Application component will have a UI Router that initially shows the Input User Data Form component. On submitting the form**, Application** component will show the Display User Data component.
The Flow
Create components with ng cli
ng new angular-node-express
cd angular-node-express
ng generate component input-user-data-form --spec false
The CLI will create all the appropriate files and place them into the app folder
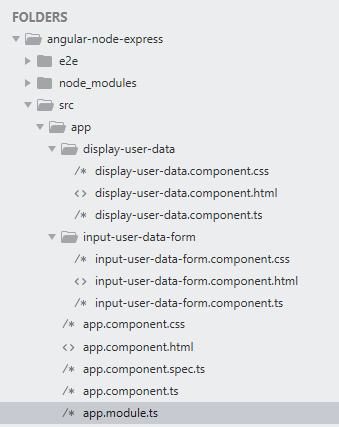
It should also add declarations into the app.module.ts
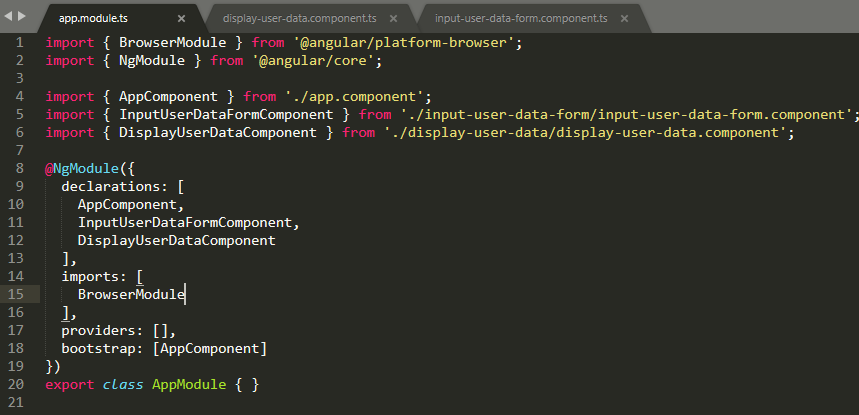
Next, we’ll add bootstrap 3 CSS library into the project to add styling.
npm install --save bootstrap@3
Afterwards add a path to “styles” array in the angular.json
"styles": [
              "node_modules/bootstrap/dist/css/bootstrap.min.css",
              "src/styles.css"
          ]
The Bootstrap grid system uses containers that hold rows and column. Rows and columns are percentage based. It is the container that changes responsively.
The container is used as a wrapper for the content.
We’ll choose a fluid container whose width will always be the width of the device.
<div class="container-fluid">
A grid row acts like a wrapper around the columns.
A row is created by adding the class row to an element inside the container.
<div class="container-fluid">
 <div class="row"></div>
</div>
Ideally, the number of columns equals 12 for every row. Different column class prefixes are used for different sized devices. Here 1 column takes up the size of 12 columns.
Change the app.component.html into the following:
<div class="container-fluid">
  <div class="row">
    <div class="col-xs-12">
      <h1>Hello World!</h1>
    </div>
  </div>
</div>
Running the application in DEV mode
Angular CLI uses webpack underneath to run the application on port 4200.
We’ll run our Node.js API endpoint on port 3000. But making an API call to another server (from port 4200) causes the CORS browser exception.
This is why we’ll use a proxy as a workround to the same-origin policy. The Proxy will re-route our API calls to a Node.js server to avoid the CORS exceptions. CORS is a browser security issue and does not apply to “backend to backend” communication.
All requests made to /api/... from within our application will be forwarded to [http://localhost:3000/api/...](http://localhost:3000/api/....)
With the proxy, our application diagram will look like this:

Create the proxy.conf.json in root folder
{
  "/api/*": {
    "target": "http://localhost:3000",
    "secure": false,
    "logLevel": "debug",
    "changeOrigin": true
  }
}
When starting Angular & Proxy servers use the following command:
ng serve --proxy-config proxy.conf.json
Creating the Input User Data Component
First let’s focus on creating UI and work on API endpoints thereafter
There are 3 rules you must follow when making a Bootstrap form:
- Every field must be wrapped in a div element
- Every should have .control-label class and its for value must match the corresponding <input>’s id, so when the label is clicked, the input becomes focused.
- Every should be given .form-control
Set the input-user-data-form.component.html to the following:
input-user-data-form.component.html
	<form>
	<div class="form-group"> <!-- First Name -->
		<label for="first_name" class="control-label">First Name</label>
		<input type="text" class="form-control" id="first_name" name="first_name" placeholder="Martin">
	</div>

	<div class="form-group"> <!-- Last Name -->
		<label for="last_name" class="control-label">Last Name</label>
		<input type="text" class="form-control" id="last_name" name="last_name" placeholder="Toha">
	</div>

	<div class="form-group"> <!-- Email -->
		<label for="email" class="control-label">E-mail</label>
		<input type="text" class="form-control" id="email" name="email" placeholder="your@email.com">
	</div>

	<div class="form-group"> <!-- Zip Code-->
		<label for="zipcode" class="control-label">Zip Code</label>
		<input type="text" class="form-control" id="zipcode" name="zipcode" placeholder="#####">
	</div>

	<div class="form-group"> <!-- Password -->
		<label for="password" class="control-label">Password</label>
		<input type="text" class="form-control" id="password" name="password" placeholder="*****">
	</div>

	<div class="form-group"> <!-- Register Button -->
		<button type="submit" class="btn btn-primary">Register</button>
	</div>

</form>
Change selector in the input-user-data-form.component.ts to input-user-data-form
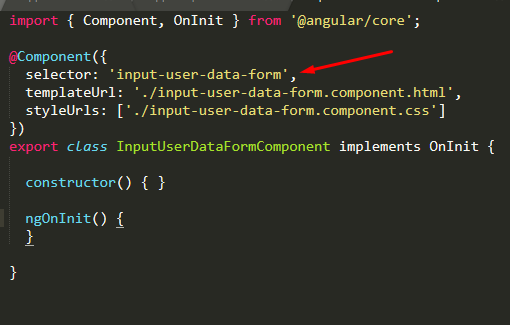
And add it to app.component.html

Field Validation with Bootstrap
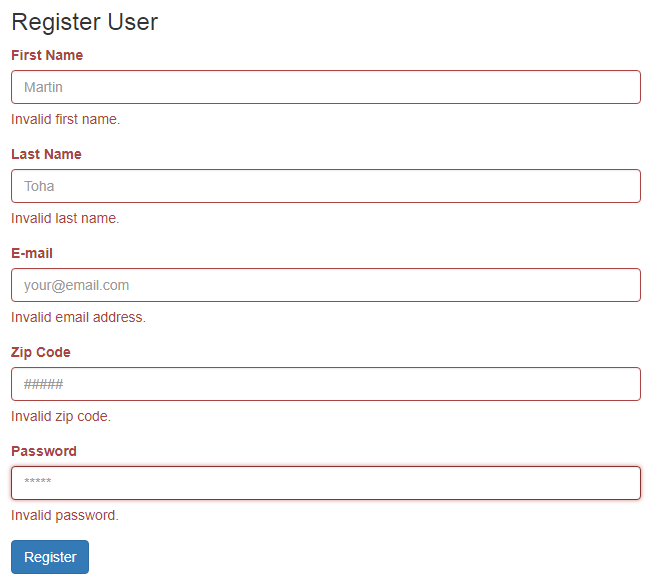
We are going to have to validate our fields prior to submitting the form to the backend. If a field is invalid, we can communicate it to the user by making the entire field red.
For each of the fields, we will:
Add the class .has-error to the .form-groupdiv
And create a <p>with the class .has-textto explain the problem
input-user-data-form.component-validation.html
<form>
	<div class="form-group has-error"> <!-- First Name -->
		<label for="first_name" class="control-label">First Name</label>
		<input type="text" class="form-control" id="first_name" name="first_name" placeholder="Martin">
		<p id="first_name_error" class="help-block">Invalid first name.</p>
	</div>

	<div class="form-group has-error"> <!-- Last Name -->
		<label for="last_name" class="control-label">Last Name</label>
		<input type="text" class="form-control" id="last_name" name="last_name" placeholder="Toha">
		<p id="last_name_error" class="help-block">Invalid last name.</p>
	</div>

	<div class="form-group has-error"> <!-- Email -->
		<label for="email" class="control-label">E-mail</label>
		<input type="text" class="form-control" id="email" name="email" placeholder="your@email.com">
		<p id="email_error" class="help-block">Invalid email address.</p>
	</div>

	<div class="form-group has-error"> <!-- Zip Code -->
		<label for="zipcode" class="control-label">Zip Code</label>
		<input type="text" class="form-control" id="zipcode" name="zipcode" placeholder="#####">
		<p id="zipcode_error" class="help-block">Invalid zip code.</p>
	</div>

	<div class="form-group has-error"> <!-- Password -->
		<label for="password" class="control-label">Password</label>
		<input type="text" class="form-control" id="password" name="password" placeholder="*****">
		<p id="password_error" class="help-block">Invalid password.</p>
	</div>

	<div class="form-group has-error"> <!-- Register Button -->
		<button type="submit" class="btn btn-primary">Register</button>
	</div>

</form>
Here is the form with errors added for every field:
Making a Reactive Form
A reactive form is a bit different from template-driven forms by providing more predictability with synchronous access to the data model, immutability with observable operators, and change tracking through observable streams.
To use the reactive form, we must import the FormsModule & ReactiveFormsModule from the @angular/forms package and add it to our app.module.ts

Next, lets modify the input-user-data-form.component.
We’ll inject the formBuilder into the component for use in the ngOnInit life cycle method. FormBuilder a service that helps making forms easier.
The FormBuilder will create a FormGroup userForm with FormControls. Each FormControl has a default value and a set of Validators.
Think of the userForm as a schema for the actual values. It holds validation rules for fields inside the form.
We’ll add registered & submitted boolean flags to the Component. We’ll use these to indicate the current form state**.**
Also, we’ll create a validator function for every input, see invalidFirstName(), invalidLastName(), invalidEmail(), invalidZipcode(), invalidPassword().
A validator function will be used in markup to hide / show error messages for each field.
input-user-data-form.components.ts
import { Component, OnInit } from '@angular/core';
import { FormBuilder, FormGroup, FormControl, Validators } from '@angular/forms';

@Component({
  selector: 'input-user-data-form',
  templateUrl: './input-user-data-form.component.html',
  styleUrls: ['./input-user-data-form.component.css']
})

export class InputUserDataFormComponent implements OnInit {
	registered = false;
	submitted = false;
	userForm: FormGroup;

  constructor(private formBuilder: FormBuilder)
  {

  }

  invalidFirstName()
  {
  	return (this.submitted && this.userForm.controls.first_name.errors != null);
  }

  invalidLastName()
  {
  	return (this.submitted && this.userForm.controls.last_name.errors != null);
  }

  invalidEmail()
  {
  	return (this.submitted && this.userForm.controls.email.errors != null);
  }

  invalidZipcode()
  {
  	return (this.submitted && this.userForm.controls.zipcode.errors != null);
  }

  invalidPassword()
  {
  	return (this.submitted && this.userForm.controls.password.errors != null);
  }

  ngOnInit()
  {
  	this.userForm = this.formBuilder.group({
  		first_name: ['', Validators.required],
  		last_name: ['', Validators.required],
  		email: ['', [Validators.required, Validators.email]],
  		zipcode: ['', [Validators.required, Validators.pattern('^[0-9]{5}(?:-[0-9]{4})?$')]],
  		password: ['', [Validators.required, Validators.minLength(5), Validators.pattern('^(?=.*[a-z])(?=.*[A-Z])(?=.*[0-9])[a-zA-Z0-9]+$')]],
  	});
  }

  onSubmit()
  {
  	this.submitted = true;

  	if(this.userForm.invalid == true)
  	{
  		return;
  	}
  	else
  	{
  		this.registered = true;
  	}
  }

};
In the input-user-data-form.component.html, and for every Reactive form we’ll use a directive [formGroup] to bind to userForm variable we defined in the component
We’ll bind the onSubmit handler via the (ngSubmit) directive.
To connect an HTML input element to a Reactive form we need to add formControlNameattribute to each of the form inputs.
We’ll use the *ngIf & [ngClass] directives to control error messages. The styles and validation markup will get displayed after user attempts to submit the form. This is controlled with [submitted] property of the component.
After submitting the form, it will be validated every time user changes the input value, causing errors to show & hide dynamically.
input-user-data-form.component-02.html
<form [formGroup]="userForm" (ngSubmit)="onSubmit()">

	<div class="form-group" [ngClass]="{ 'has-error': invalidFirstName() }"> <!-- First Name -->
		<label for="first_name" class="control-label">First Name</label>
		<input type="text" formControlName="first_name" class="form-control" id="first_name" name="first_name" placeholder="Martin">
		<p *ngIf="invalidFirstName()" id="first_name_error" class="help-block">Invalid first name.</p>
	</div>

	<div class="form-group" [ngClass]="{ 'has-error': invalidLastName() }"> <!-- Last Name -->
		<label for="last_name" class="control-label">Last Name</label>
		<input type="text" formControlName="last_name" class="form-control" id="last_name" name="last_name" placeholder="Toha">
		<p *ngIf="invalidLastName()" id="last_name_error" class="help-block">Invalid last name.</p>
	</div>

	<div class="form-group" [ngClass]="{ 'has-error': invalidEmail() }"> <!-- Email -->
		<label for="email" class="control-label">E-mail</label>
		<input type="text" formControlName="email" class="form-control" id="email" name="email" placeholder="your@email.com">
		<p *ngIf="invalidEmail()" id="email_error" class="help-block">Invalid email address.</p>
	</div>

	<div class="form-group" [ngClass]="{ 'has-error': invalidZipcode() }"> <!-- Zip Code-->
		<label for="zipcode" class="control-label">Zip Code</label>
		<input type="text" formControlName="zipcode" class="form-control" id="zipcode" name="zipcode" placeholder="#####">
		<p *ngIf="invalidZipcode()" id="zipcode_error" class="help-block">Invalid zip code.</p>
	</div>

	<div class="form-group" [ngClass]="{ 'has-error': invalidPassword() }"> <!-- Password -->
		<label for="password" class="control-label">Password</label>
		<input type="password" formControlName="password" class="form-control" id="password" name="password" placeholder="*****">
		<p *ngIf="invalidPassword()" id="password_error" class="help-block">Invalid password.</p>
	</div>

	<div class="form-group has-error"> <!-- Register Button -->
		<button type="submit" class="btn btn-primary">Register</button>
	</div>

</form>
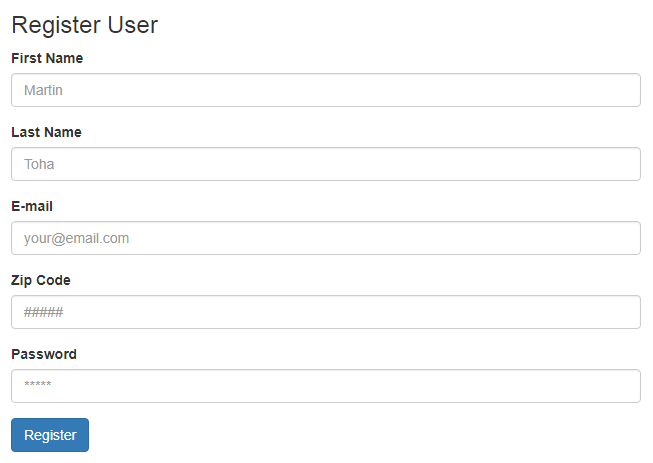
Here is what the form looks like initially:
And the form after filling out some fields with error:
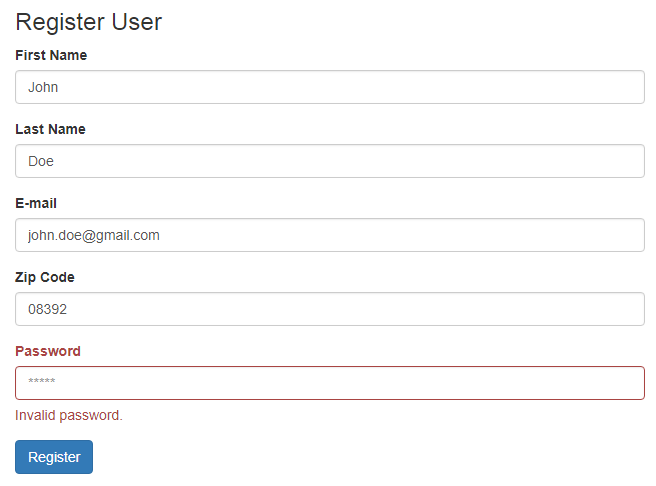
Looks good so far! Lets continue with the next component.
Creating the Display User Data Component
The next Angular component will display user data. This will be a simple component that visualizes a data model passed into it.
Lets create a data model UserInfoModel in app/models, we’ll make it deserialize an object when its passed into the constructor.
export class UserInfoModel
{
	guid: string;
	customerUid: string;

	first_name: string;
	last_name: string;

	email: string;
	zipcode: string;

	password: string;

	constructor(obj: any = null)
	{
		if(obj != null)
		{
			Object.assign(this, obj);
		}
	}
}
The view display-user-data.component.html binds to the model via interpolation {{…}} and displays the information.

display-user-data.component.html
<legend>User Information</legend>
<div>
	<div class="form-group row"> <!-- GUD -->
		<label class="col-xs-6 col-form-label">GUID</label>
		<div class="col-xs-6">{{user.guid}}</div>
	</div>

	<div class="form-group row"> <!-- Customer UID -->
		<label class="col-xs-6 col-form-label">Customer UID</label>
		<div class="col-xs-6">{{user.customerUid}}</div>
	</div>

	<div class="form-group row"> <!-- First Name -->
		<label class="col-xs-6 col-form-label">First Name</label>
		<div class="col-xs-6">{{user.first_name}}</div>
	</div>

	<div class="form-group row"> <!-- Last Name -->
		<label class="col-xs-6 col-form-label">Last Name</label>
		<div class="col-xs-6">{{user.last_name}}</div>
	</div>

	<div class="form-group row"> <!-- E-mail -->
		<label class="col-xs-6 col-form-label">E-mail</label>
		<div class="col-xs-6">{{user.email}}</div>
	</div>

	<div class="form-group row"> <!-- Zip Code -->
		<label class="col-xs-6 col-form-label">Zip Code</label>
		<div class="col-xs-6">{{user.zipcode}}</div>
	</div>

	<div class="form-group row"> <!-- Password -->
		<label class="col-xs-6 col-form-label">Password</label>
		<div class="col-xs-6">{{user.password}}</div>
	</div>

</div>
And just for testing purposes, DisplayUserDataComponent class will assign some default values into the UserInfoModel
display-user-data.component.ts
import { Component, OnInit } from '@angular/core';
import {UserInfoModel} from '../models/userInfo'

@Component({
  selector: 'display-user-data',
  templateUrl: './display-user-data.component.html',
  styleUrls: ['./display-user-data.component.css']
})

export class DisplayUserDataComponent implements OnInit {

	user: UserInfoModel = new UserInfoModel({guid: "D21ds12x",
		customerUid: "cust2dsa12dsa",
		first_name: "John",
		last_name: "Doe",
		email: "email@email.com",
		zipcode: 10283,
		password: "Idasn2x2#"});

	constructor() { }

	ngOnInit()
	{

	}

}

Both of the pages look great!
Now, lets connect the Router into the AppComponent to establish a page flow
Connecting Routes & RouterModule
Our goal with routing is to have the InputUserDataFormComponentrendered when the url is /, and DisplayUserDataComponentshown when the url is /user/:uid
First, lets setup the imports to @angular/router, then define an array routes of our paths and destination pages.
const routes: Routes = [
  {
    path: '',
    component: InputUserDataFormComponent
  },
  {
    path: 'user/:uid',
    component: DisplayUserDataComponent
  }
];
In the importsadd RouterModule.forRoot(routes)
import { BrowserModule } from '@angular/platform-browser';
import { NgModule } from '@angular/core';
import { ReactiveFormsModule, FormsModule } from '@angular/forms';

import { AppComponent } from './app.component';
import { InputUserDataFormComponent } from './input-user-data-form/input-user-data-form.component';
import { DisplayUserDataComponent } from './display-user-data/display-user-data.component';
import { Routes, RouterModule } from "@angular/router";

const routes: Routes = [
  {
    path: '',
    component: InputUserDataFormComponent
  },
  {
    path: 'user/:uid',
    component: DisplayUserDataComponent
  }
];

@NgModule({
  declarations: [
    AppComponent,
    InputUserDataFormComponent,
    DisplayUserDataComponent
  ],
  imports: [
    BrowserModule,
    FormsModule,
    ReactiveFormsModule,
    RouterModule.forRoot(routes)
  ],
  providers: [],
  bootstrap: [AppComponent]
})
export class AppModule { }
Place the router-outletin the app.component.html
<div class="container-fluid">
  <div class="row">
    <div class="col-xs-12">
      <router-outlet></router-outlet>
    </div>
  </div>
</div>
Now the initial “/” root page looks like this:
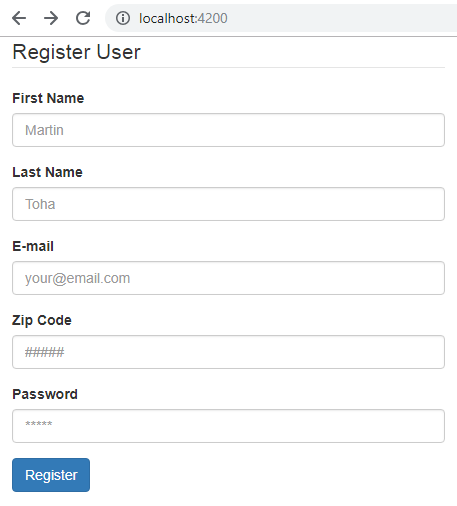
Type “/user/a01” in the address bar and you get the User Information page

All works as intended on the client! Now lets continue with creation of API endpoint.
Creating API endpoint in Node.js & Express
We’ll use the express-generator-api to make a Node.js API quickly by generating a project.
Install express-generator:
npm install -g express-generator-api
Create the API:
express-api angular-node-express-api & cd angular-node-express-api
Install dependencies:
npm install
Тhe file structure generated should be the following:
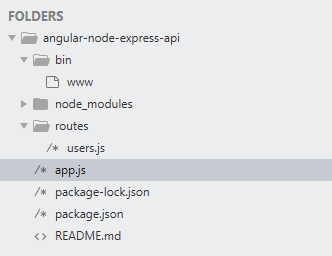
At this point all the basics of an API have been implemented by the generator.
For example, body parser & cookie parser are part of the app.js. Here express will try identify any JSON data that comes into our application and parse it for us.
Next, we are going to make the following API endpoints.
/customer will insert a new customer and return auto-incremented customer.id
/customer/:uid will retrieve a single customer by customer uid
/generate_guid will generate a tracking_guide that Angular UI will use when creating a new customer
Router /generate_uid
Lets copy users.js to generate_uid.js just to have a basic router. We’ll modify this router to return a random uid
Install uid-safe, which generates a uid safe for cookies
npm install uid-safe
Include it in generate_uid.js
var uid = require('uid-safe')
And return it with the response
var express = require('express');
var uid = require('uid-safe');

var router = express.Router();

/* GET a guid. */
router.get('/', function(req, res, next)
{
	var strUid = uid.sync(18);

	res.json({guid: strUid});
});

module.exports = router;
We’ll need to hook up the generate_uid router in the app.js
app.use('/api/v1/generate_uid', generate_uid);
The route returns a JSON with the GUID. Great!
{"guid":"K7VPC3I9kxIJ4Ct2_2ZR7Xb1"}
Router /customer
For every API service I usually have a model for the data and a service that performs all CRUD operations with it; that way there is a level of abstraction between the API request, storage & validation, but also a good way to access the service from anywhere in the application.
In this example, we’ll simply store customer data in memory.
The service will increment a customer UID every time a new customer is created.
We’ll use that customer UID to retrieve the customer data as well.
Create the models directory and add the following model.customer.js in there.
class CustomerModel
{
	constructor(uid, first_name, last_name, email, zipcode, password)
	{
		this.uid = uid;
		this.first_name = first_name;
		this.last_name = last_name;
		this.email = email;
		this.zipcode = zipcode;
		this.password = password;
	}
}

module.exports = CustomerModel;
Then, create services directory and add a service.customer.js in there.
CustomerService implements all the CRUD operations create, read, update and delete the CustomerModel. It uses the counter to increment the customer uid; and stores all the customers into the customers object.
It’s important to validate our data on the server as well as the client. I usually keep validation as part of the service object, which is either a separate method or part of the CRUD operation.
We’ll implement the validation using the fastest-validator library.
Install fastest-validator library:
npm install fastest-validator --save
Import it in the CustomerService service object and create an instance of the Validator with custom schema.
var validator = require('fastest-validator');
The Schema object contains all validation rules, which is then used by the Validator instance to validate data against it.
Then, we’ll need to notify UI if validation fails on the server. If that happens, the create operation will throw an Error with list of errors for every failed validation.
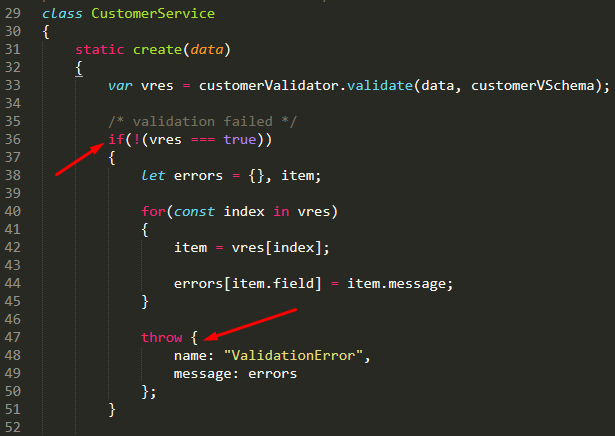
services\service.customer.js
The list of errors will propagate into the response, which will be handled by Angular to communicate an error.
const CustomerModel = require("../models/model.customer");
let Validator = require('fastest-validator');


let customers = {};
let counter = 0;

/* create an instance of the validator */
let customerValidator = new Validator();

/* use the same patterns as on the client to validate the request */
let namePattern = /([A-Za-z\-\’])*/;
let zipCodePattern = /^[0-9]{5}(?:-[0-9]{4})?$/;
let passwordPattern = /^(?=.*[a-z])(?=.*[A-Z])(?=.*[0-9])[a-zA-Z0-9]+$/;

/* customer validator shema */
const customerVSchema = {
		guid: {type: "string", min: 3},

		first_name: { type: "string", min: 1, max: 50, pattern: namePattern},
		last_name: { type: "string", min: 1, max: 50, pattern: namePattern},
		email: { type: "email", max: 75 },
		zipcode: { type: "string", max: 5, pattern: zipCodePattern},

		password: { type: "string", min: 2, max: 50, pattern: passwordPattern}
	};

/* static customer service class */
class CustomerService
{
	static create(data)
	{
		var vres = customerValidator.validate(data, customerVSchema);

		/* validation failed */
		if(!(vres === true))
		{
			let errors = {}, item;

			for(const index in vres)
			{
				item = vres[index];

				errors[item.field] = item.message;
			}

			throw {
			    name: "ValidationError",
			    message: errors
			};
		}

		let customer = new CustomerModel(data.first_name, data.last_name, data.email, data.zipcode, data.password);

		customer.uid = 'c' + counter++;

		customers[customer.uid] = customer;

		return customer;
	}

	static retrieve(uid)
	{
		if(customers[uid] != null)
		{
			return customers[uid];
		}
		else
		{
			throw new Error('Unable to retrieve a customer by (uid:'+ uid +')');
		}
	}

	static update(uid, data)
	{
		if(customers[uid] != null)
		{
			const customer = customers[uid];

			Object.assign(customer, data);
		}
		else
		{
			throw new Error('Unable to retrieve a customer by (uid:'+ cuid +')');
		}
	}

	static delete(uid)
	{
		if(customers[uid] != null)
		{
			delete customers[uid];
		}
		else
		{
			throw new Error('Unable to retrieve a customer by (uid:'+ cuid +')');
		}
	}
}

module.exports = CustomerService;
Lets connect the CustomerService to express router.
We’ll be using the async / await, which is a better way to write asynchronous code. Previous options are callbacks and promises, in fact async/await is built on top of promises; but async / await make the code behave & read a little more like synchronous code.
In the following router we implement all the CRUD operations using the CustomerService singleton.
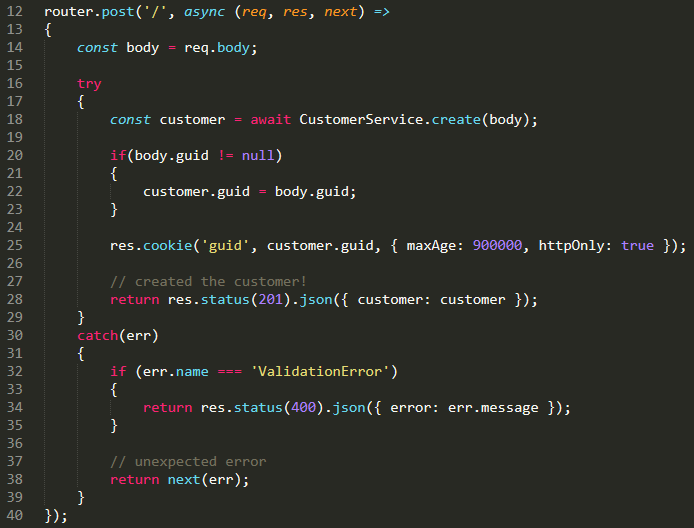
Take a look at the create operation, where we submit user data and how errors are propagated into the response via try / catch block. The code is easy to read.
var express = require('express');
var router = express.Router();
var CustomerService = require('../services/service.customer');

/* GET customer listing. */
router.get('/', async function(req, res, next)
{
	res.json({error: "Invalid Customer UID."});
});

/* adds a new customer to the list */
router.post('/', async (req, res, next) =>
{
	const body = req.body;

	try
	{
		const customer = await CustomerService.create(body);

		if(body.guid != null)
		{
			customer.guid = body.guid;
		}

		res.cookie('guid', customer.guid, { maxAge: 900000, httpOnly: true });

		// created the customer!
		return res.status(201).json({ customer: customer });
	}
	catch(err)
	{
		if (err.name === 'ValidationError')
		{
        	return res.status(400).json({ error: err.message });
		}

		// unexpected error
		return next(err);
	}
});

/* retrieves a customer by uid */
router.get('/:id', async (req, res, next) =>
{
	try
	{
		const customer = await CustomerService.retrieve(req.params.id);

		return res.json({ customer: customer });
	}
	catch(err)
	{
		// unexpected error
		return next(err);
	}
});

/* updates the customer by uid */
router.put('/:id', async (req, res, next) =>
{
	try
	{
		const customer = await CustomerService.update(req.params.id, req.body);

		return res.json({ customer: customer });
	}
	catch(err)
	{
		// unexpected error
		return next(err);
	}
});

/* removes the customer from the customer list by uid */
router.delete('/:id', async (req, res, next) =>
{
	try
	{
		const customer = await CustomerService.delete(req.params.id);

		return res.json({success: true});
	}
	catch(err)
	{
		// unexpected error
		return next(err);
	}
});

module.exports = router;
Next, we’ll need to modify the input-user-data-form.component & its template to support showing the server side errors, in case the validation fails on the server.
In the InputUserDataFormComponent we’ll add the serviceErrors object, which will contain all the server side errors for each fields. And add to the validator methods to check if the error message for that field exists, like so:
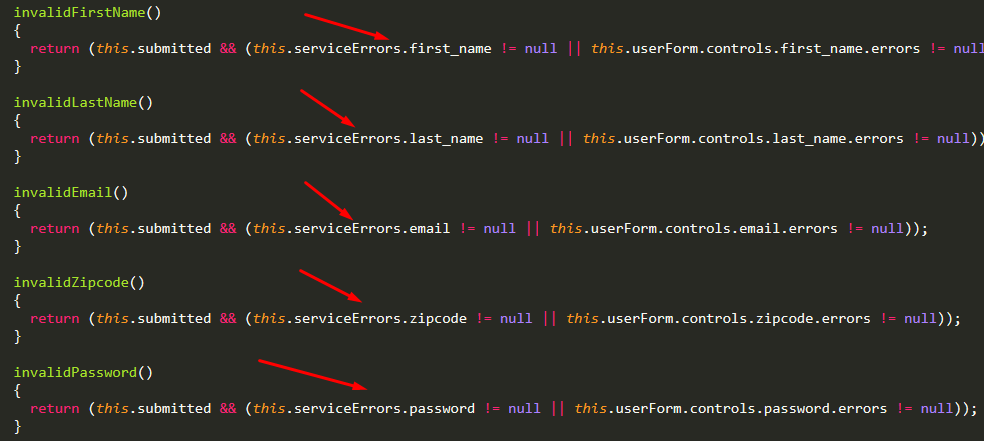
app\input-user-data-form.component.ts
We’ll also modify the onSubmit method, and add an error handler to our request which will simply set serviceErrors object.
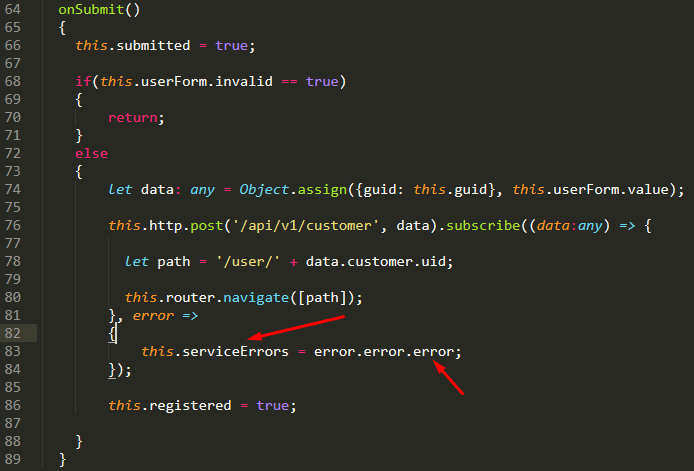
app\input-user-data-form\input-user-data-form.component.ts
Next we’ll add a reference to server side errors in the input-user-data-form.component.html template to display a server side error in case it exists:
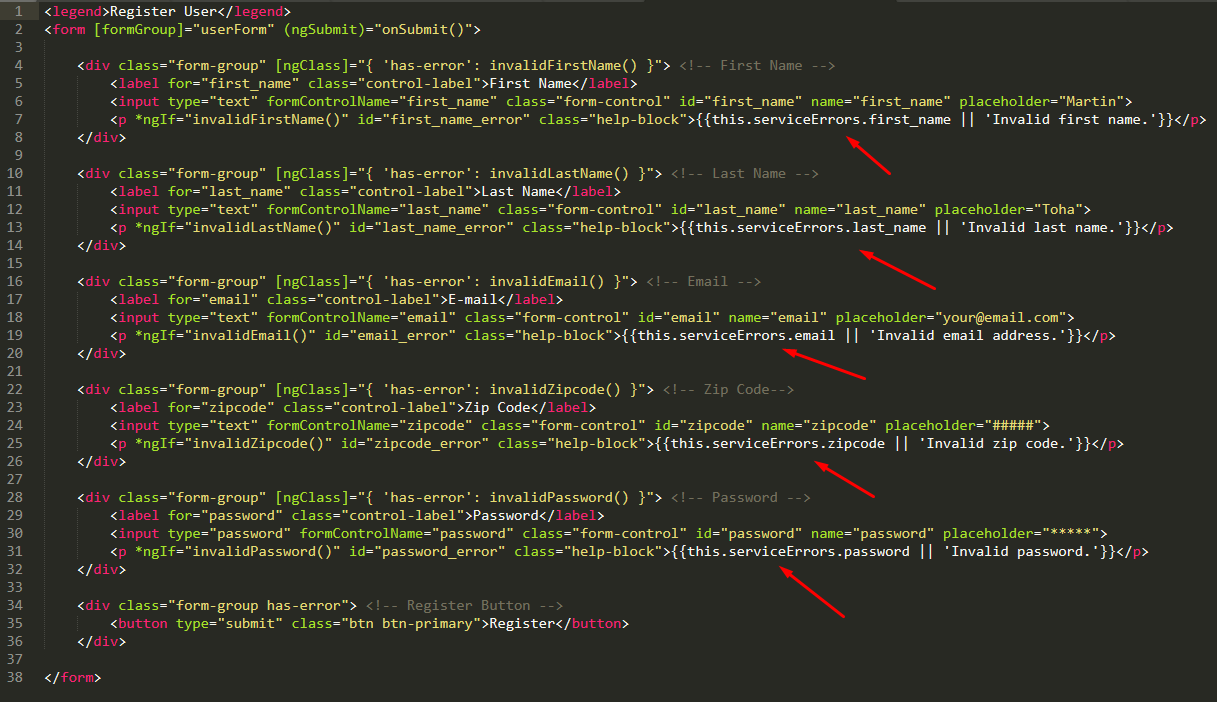
app\input-user-data-form\input-user-data-form.component.html
Now, we’ll know if validation fails on the server, since messages are going to be propagated to Angular UI.
Everything looks good, lets connect our routers in the app.js
var express = require('express');
var path = require('path');
var cookieParser = require('cookie-parser');
var bodyParser = require('body-parser');

var generate_uid = require('./routes/generate_uid');
var customer = require('./routes/customer');


var app = express();

app.use(bodyParser.json());
app.use(bodyParser.urlencoded({ extended: false }));
app.use(cookieParser())

app.use('/api/v1/customer', customer);
app.use('/api/v1/generate_uid', generate_uid);

module.exports = app;
We are almost there!
We are done creating the application, now a couple of minor details.
We are using a proxy in order to go around the CORS browser issue by having the Webpack on port 4200 communicate with Node.js server on port 3000. This is a good solution for the development environment, but we’ll need to have a better implementation when moving to production.
The API server will need to either enable the API for all origins or white list our access point.
For now, lets just enable CORS for all origins
To enable our API for all is easy, just add the following code to app.js
app.use(function(req, res, next) {
  res.header("Access-Control-Allow-Origin", "*");
  res.header("Access-Control-Allow-Headers", "Origin, X-Requested-With, Content-Type, Accept");
  next();
});
Uncaught Exceptions
Another minor detail we haven’t covered is handling of Uncaught Exceptions
Because Node.js runs on a single processor uncaught exceptions are an issue to be aware of when developing applications.
When your application throws an uncaught exception you should consider that your application is now running in an unclean state. You can’t reliably continue your program at this point because you don’t really know what got affected by the error.
The best way to handle a crash is to collect as much data about it, send the errors to an external crash service or log it; and restart the server.
For our simple application, we’ll implement the appropriate functions, just place these in the beginning of your app.js
I’ll keep the reporter method empty, which we will connect in a later article to an external crash service
let reporter = function (type, ...rest)
{
	// remote reporter logic goes here
};

/* handle an uncaught exception & exit the process */
process.on('uncaughtException', function (err)
{
	console.error((new Date).toUTCString() + ' uncaughtException:', err.message);
	console.error(err.stack);

	reporter("uncaughtException", (new Date).toUTCString(), err.message, err.stack);

	process.exit(1);
});

/* handle an unhandled promise rejection */
process.on('unhandledRejection', function (reason, promise)
{
	console.error('unhandled rejection:', reason.message || reason);

	reporter("uncaughtException", (new Date).toUTCString(), reason.message || reason);
})
Finally! To start the API server:
npm start
Try hitting the http://localhost:3000/api/v1/generate_uid
or http://localhost:3000/api/v1/customer
And you should see some JSON data.
Integrating services into the Angular application
To quickly integrate the Angular application we are going to:
Import & Inject HttpClient & Router into the InputUserDataFormComponent

Next, we’ll retrieve the GUID from the ‘/api/v1/generate_uid’ API service in the constructor of the InputUserDataFormComponent and set the guid variable

constructor of InputUserDataFormComponent
In the onSubmit method of the InputUserDataFormComponent we’ll post the data into the ‘/api/v1/customer’ service & navigate the Angular Router to the next page /user/:id
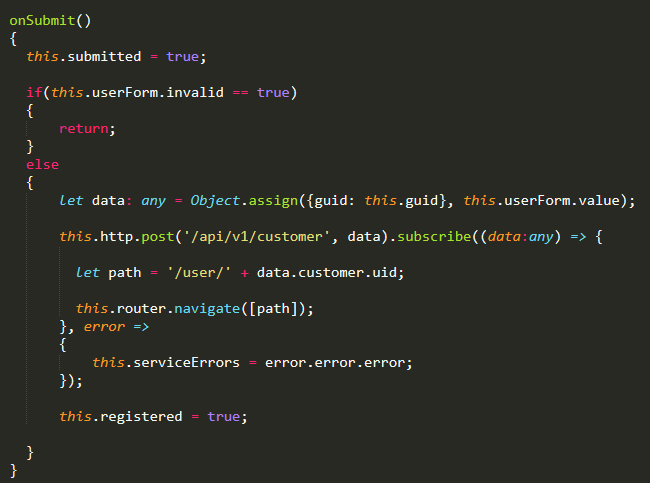
The full source code:
input-user-data-form.component-wroute-api.ts
import { Component, OnInit } from '@angular/core';
import { FormBuilder, FormGroup, FormControl, Validators } from '@angular/forms';
import { HttpClient } from "@angular/common/http";
import { Router } from "@angular/router";

@Component({
  selector: 'input-user-data-form',
  templateUrl: './input-user-data-form.component.html',
  styleUrls: ['./input-user-data-form.component.css']
})

export class InputUserDataFormComponent implements OnInit {
	registered = false;
	submitted = false;
	userForm: FormGroup;
	guid: string;
	serviceErrors:any = {};

  constructor(private formBuilder: FormBuilder, private http: HttpClient, private router: Router)
  {
  	this.http.get('/api/v1/generate_uid').subscribe((data:any) => {
      this.guid = data.guid;
    }, error => {
        console.log("There was an error generating the proper GUID on the server", error);
    });
  }

  invalidFirstName()
  {
  	return (this.submitted && (this.serviceErrors.first_name != null || this.userForm.controls.first_name.errors != null));
  }

  invalidLastName()
  {
  	return (this.submitted && (this.serviceErrors.last_name != null || this.userForm.controls.last_name.errors != null));
  }

  invalidEmail()
  {
  	return (this.submitted && (this.serviceErrors.email != null || this.userForm.controls.email.errors != null));
  }

  invalidZipcode()
  {
  	return (this.submitted && (this.serviceErrors.zipcode != null || this.userForm.controls.zipcode.errors != null));
  }

  invalidPassword()
  {
  	return (this.submitted && (this.serviceErrors.password != null || this.userForm.controls.password.errors != null));
  }

  ngOnInit()
  {
  	this.userForm = this.formBuilder.group({
  		first_name: ['', [Validators.required, Validators.maxLength(50)]],
  		last_name: ['', [Validators.required, Validators.maxLength(50)]],
  		email: ['', [Validators.required, Validators.email, Validators.maxLength(75)]],
  		zipcode: ['', [Validators.required, Validators.pattern('^[0-9]{5}(?:-[0-9]{4})?$')]],
  		password: ['', [Validators.required, Validators.minLength(5), Validators.pattern('^(?=.*[a-z])(?=.*[A-Z])(?=.*[0-9])[a-zA-Z0-9]+$')]],
  	});
  }

  onSubmit()
  {
  	this.submitted = true;

  	if(this.userForm.invalid == true)
  	{
  		return;
  	}
  	else
  	{
  		let data: any = Object.assign({guid: this.guid}, this.userForm.value);

  		this.http.post('/api/v1/customer', data).subscribe((data:any) => {

	      let path = '/user/' + data.customer.uid;

	      this.router.navigate([path]);
	    }, error =>
	    {
	    	this.serviceErrors = error.error.error;
        });

  		this.registered = true;

  	}
  }

};
Then lets Import & Inject HttpClient & ActivatedRoute into the DisplayUserDataComponent

Retrieve customer data from the ‘/api/v1/customer/:id’ API and populate the UserInfoModel with new data, and have DisplayUserDataComponent view redraw itself with new data via interpolation {{…}}


display-user-data.component-wroute-api.ts
import { Component, OnInit } from '@angular/core';
import {UserInfoModel} from '../models/userInfo';
import { HttpClient } from "@angular/common/http";
import { ActivatedRoute } from '@angular/router';

@Component({
  selector: 'display-user-data',
  templateUrl: './display-user-data.component.html',
  styleUrls: ['./display-user-data.component.css']
})

export class DisplayUserDataComponent implements OnInit
{

	user: UserInfoModel = new UserInfoModel({guid: "D21ds12x",
		uid: "cust2dsa12dsa",
		first_name: "John",
		last_name: "Doe",
		email: "email@email.com",
		zipcode: 10283,
		password: "Idasn2x2#"});

	constructor(private http: HttpClient, private route: ActivatedRoute) {

	}

	private subscriber: any;

	ngOnInit()
	{
		this.subscriber = this.route.params.subscribe(params => {

	       this.http.get('/api/v1/customer/' + params.uid).subscribe((data:any) => {

				this.user = new UserInfoModel(data.customer);
		    });
	    });
	}

}
The initial page of the application ‘/’:
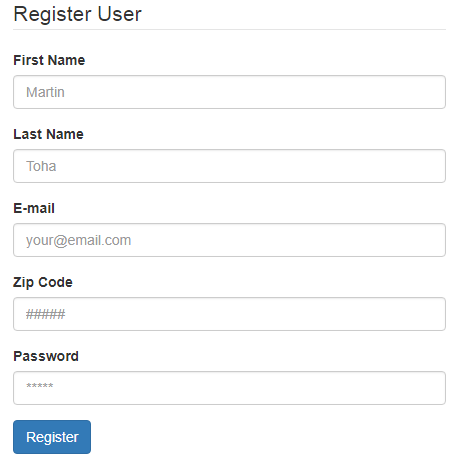
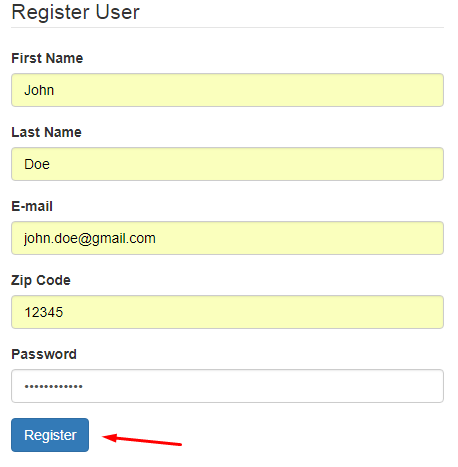
Fill in the form and press Register:
Next page, the user information is displayed.
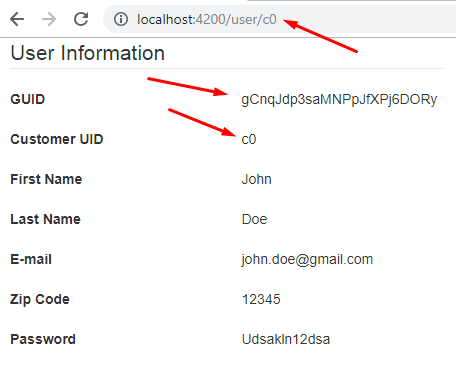
After creating a customer, you can also type in the customer url followed by customer uid to retrieve customer data:
http://localhost:3000/api/v1/customer/c0
{"customer":{"first_name":"John","last_name":"Doe","email":"john.doe@gmail.com","zipcode":"12345","password":"Udsakln12dsa","uid":"c0","guid":"gCnqJdp3saMNPpJfXPj6DORy"}}

Source Code is accessible at Github bellow:
Angular UI:
https://github.com/jsmuster/angular-node-express
Node.js + Express API:
https://github.com/jsmuster/angular-node-express-api
#nodejs #angular #javascript #node-js
