Building a chat widget with Go and JavaScript
Introduction
The process of building products for an online demographic should be thorough and follow modern-day trends. One of such trend is making it possible for the customers and support agents to have realtime discussions over some form of two-way message channel. This would ensure that customers do not click away in confusion and switch to competitors in times of frustration.
In this tutorial, we will see how to build a realtime chat widget with Go, Pusher, and JavaScript. Here’s a demo of the application:
In the above image, we built a website that sells motorcycles and integrates a chat widget. A customer is able to sign up to speak with a support agent and the agent on the other end can manage communication among a number of connected customers.
Prerequisites
To follow along with this article, you will need the following:
- An IDE of your choice like Visual Studio Code.
- Go (version >= 0.10.x) installed on your computer. Here’s how you can install Go.
- Basic knowledge of the Go programming language.
- Basic knowledge of JavaScript (ES6) and jQuery.
- Once you have all the above requirements, we can proceed.
Skip the next section if you have already signed up with Pusher and created an application.## Setting up Pusher
The realtime feature of the chat widget is dependent on Pusher so you need to create an account here if you don’t already have one, after the signup process, you will be asked to create a new application. Let’s keep the app credentials nearby because we will need it to integrate Pusher within the cat widget.
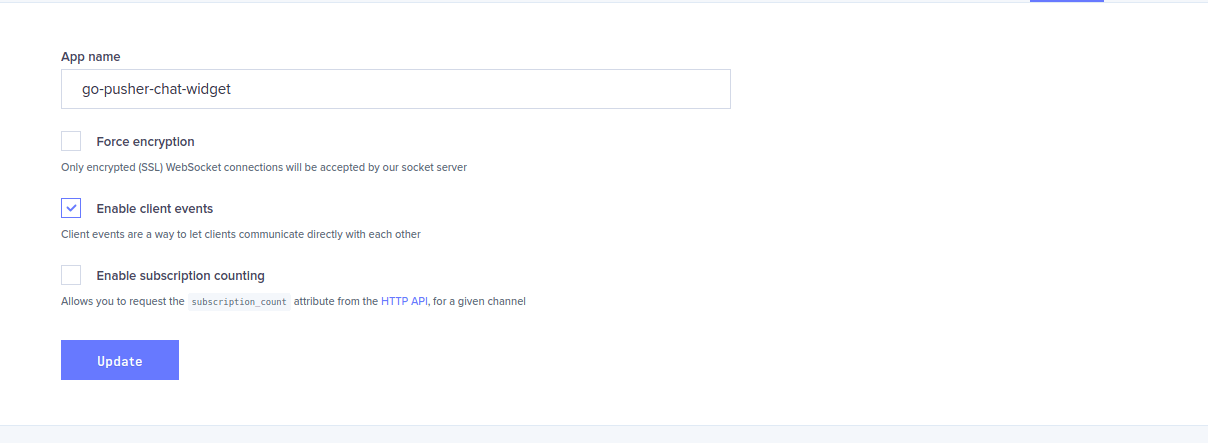
Enabling client events
The final thing we will do is enable the Pusher application to trigger events from the client (browser) over a private channel. We need this feature because it is what will make it possible for a support agent to securely chat with a customer without having to send the message through the backend server first. Follow the steps below to activate client events from the dashboard:
- An IDE of your choice like Visual Studio Code.
- Go (version >= 0.10.x) installed on your computer. Here’s how you can install Go.
- Basic knowledge of the Go programming language.
- Basic knowledge of JavaScript (ES6) and jQuery.
- Once you have all the above requirements, we can proceed.
- An IDE of your choice like Visual Studio Code.
- Go (version >= 0.10.x) installed on your computer. Here’s how you can install Go.
- Basic knowledge of the Go programming language.
- Basic knowledge of JavaScript (ES6) and jQuery.
- Once you have all the above requirements, we can proceed.
That’s all we need to do here.
Setting up the codebase
Let’s begin by navigating into the src directory that is located in the $GOPATH and creating a new directory for our app. This will be the root directory for this project:
    $ cd $GOPATH/src
    $ mkdir go-pusher-chat-widget
    $ cd go-pusher-chat-widget
Let’s create the main Go file (this is the entry point of the application) here and call it chat.go. Next, we will install the Go Pusher library that we will reference within the code for the backend server. Run the following code in the terminal to pull in the package:
$ go get github.com/pusher/pusher-http-go
Skip the next section if you have already signed up with Pusher and created an application.
Open thechat.gofile in your favorite IDE and update it with the following code:
    // File: ./chat.go
    package main

    // Here, we import the required packages (including Pusher)
    import (
        "encoding/json"
        "fmt"
        "io/ioutil"
        "log"
        "net/http"
        pusher "github.com/pusher/pusher-http-go"
    )

    // Here, we register the Pusher client
    var client = pusher.Client{
        AppId:   "PUSHER_APP_ID",
        Key:     "PUSHER_APP_KEY",
        Secret:  "PUSHER_APP_SECRET",
        Cluster: "PUSHER_APP_CLUSTER",
        Secure:  true,
    }

    // Here, we define a customer as a struct
    type customer struct {
        Name  string `json:"name" xml:"name" form:"name" query:"name"`
        Email string `json:"email" xml:"email" form:"email" query:"email"`
    }

    func main() {

        // Serve the static files and templates from the public directory
        http.Handle("/", http.FileServer(http.Dir("./public")))

        // -------------------------------------------------------
        // Listen on these routes for new customer registration and User authorization,
        // thereafter, handle each request using the matching handler function.
        // -------------------------------------------------------
        http.HandleFunc("/new/customer", broadcastCustomerDetails)
        http.HandleFunc("/pusher/auth", pusherAuth)

        // Start executing the application on port 8070
        log.Fatal(http.ListenAndServe(":8070", nil))
    }
In the code above, we registered a new Pusher client with the credentials from the app we created earlier on the dashboard.
Skip the next section if you have already signed up with Pusher and created an application.
In the main function, we defined two endpoints,/new/customerand/pusher/auth. The first will be hit when a new customer signs up and the last will authorize the users so they can subscribe to private channels.
We will be serving all static files from a public directory that we will create shortly.
Skip the next section if you have already signed up with Pusher and created an application.
We also definedcustomeras a struct and attached extra definitions to its properties so that Go knows how to handle incoming payloads and bind their various structures with a new instance of the customer struct.
Let’s create the handler functions for the endpoints, add this code to the chat.go file just before the main function:
    // File: ./chat.go

    // [...]

    func broadcastCustomerDetails(rw http.ResponseWriter, req *http.Request) {
        body, err := ioutil.ReadAll(req.Body)
        if err != nil {
            panic(err)
        }
        var newCustomer customer
        err = json.Unmarshal(body, &newCustomer)
        if err != nil {
            panic(err)
        }
        client.Trigger("one-to-many", "new-customer", newCustomer)
        json.NewEncoder(rw).Encode(newCustomer)
    }

    func pusherAuth(res http.ResponseWriter, req *http.Request) {
        params, _ := ioutil.ReadAll(req.Body)
        response, err := client.AuthenticatePrivateChannel(params)
        if err != nil {
            panic(err)
        }
        fmt.Fprintf(res, string(response))
    }

    // [...]
Above we have two functions. broadcastCustomerDetails receives a new customer’s details and binds it to an instance of the customer struct. We then trigger the received details over to the admin dashboard in an event over the public channel. The pusherAuth authorizes users so they can subscribe to private channels.
This is all the code required for the backend server to work, let’s move on to the frontend.
Building the frontend
In this section, we will start building the frontend of the web application. We will create all the static files that are rendered when a browser is pointed to the address of our application.
Create a new folder in the project directory and call it public, this folder is the root directory for all of our frontend files. In this folder, create three folders css, js and img.
Next, create two files in the root of the public directory named index.html and support.html.
Creating the homepage
Open the index.html file and update it with the following code:
    <!-- File: ./public/index.html -->
    <!DOCTYPE html>
    <html lang="en">
      <head>
        <meta charset="utf-8">
        <meta name="viewport" content="width=device-width, initial-scale=1, shrink-to-fit=no">
        <title>X-Cycles</title>
        <link rel="stylesheet" href="https://maxcdn.bootstrapcdn.com/bootstrap/4.0.0-beta.2/css/bootstrap.min.css" integrity="sha384-PsH8R72JQ3SOdhVi3uxftmaW6Vc51MKb0q5P2rRUpPvrszuE4W1povHYgTpBfshb" crossorigin="anonymous">
        <link rel="stylesheet" href="./css/app.css" >
      </head>

      <body>
        <div class="site-wrapper">
          <div class="site-wrapper-inner">
            <div class="cover-container">

              <header class="masthead clearfix">
                <div class="inner">
                  <h3 class="masthead-brand">X-Cycles</h3>
                  <nav class="nav nav-masthead">
                    <a class="nav-link active" href="#">Home</a>
                    <a class="nav-link" href="#">Features</a>
                    <a class="nav-link" href="#">Contact</a>
                  </nav>
                </div>
              </header>

              <main role="main" class="inner cover">
                <h1 class="cover-heading">X-cycles</h1>
                <p class="lead">We sell the best motorcycles around.</p>
                <p class="lead">
                  <a href="#" class="btn btn-lg btn-secondary">GALLERY</a>
                </p>
              </main>

              <footer class="mastfoot">
              </footer>

            </div>
          </div>
        </div>
        <div class="chatbubble">
            <div class="unexpanded">
                <div class="title">Chat with Support</div>
            </div>
            <div class="expanded chat-window">
              <div class="login-screen container">

                <form id="loginScreenForm">
                  <div class="form-group">
                    <input type="text" class="form-control" id="fullname" placeholder="Name*" required>
                  </div>
                  <div class="form-group">
                    <input type="email" class="form-control" id="email" placeholder="Email Address*" required>
                  </div>
                  <button type="submit" class="btn btn-block btn-primary">Start Chat</button>
                </form>

              </div>
              <div class="chats">
                <div class="loader-wrapper">
                  <div class="loader">
                    <span>{</span><span>}</span>
                  </div>
                </div>
                <ul class="messages clearfix">
                </ul>
                <div class="input">
                  <form class="form-inline" id="messageSupport">
                    <div class="form-group">
                      <input type="text" autocomplete="off" class="form-control" id="newMessage" placeholder="Enter Message">
                    </div>
                    <button type="submit" class="btn btn-primary">Send</button>
                  </form>
                </div>
              </div>
            </div>
        </div>

        <script src="https://js.pusher.com/4.0/pusher.min.js"></script>
        <script src="https://code.jquery.com/jquery-3.2.1.slim.min.js"></script>
        <script src="https://cdnjs.cloudflare.com/ajax/libs/popper.js/1.12.3/umd/popper.min.js"></script>
        <script src="https://maxcdn.bootstrapcdn.com/bootstrap/4.0.0-beta.2/js/bootstrap.min.js"></script>
        <script src="https://cdnjs.cloudflare.com/ajax/libs/axios/0.18.0/axios.min.js"></script>
        <script type="text/javascript" src="./js/app.js"></script>
      </body>
    </html>
In the css directory, create an app.css file and update it with the following code:
    /* File: ./public/css/app.css */
    a,
    a:focus,
    a:hover {
      color: #fff;
    }
    .btn-secondary,
    .btn-secondary:hover,
    .btn-secondary:focus {
      color: #333;
      text-shadow: none;
      background-color: #fff;
      border: .05rem solid #fff;
    }
    html,
    body {
      height: 100%;
      background-color: #333;
    }
    body {
      color: #fff;
      text-align: center;
      text-shadow: 0 .05rem .1rem rgba(0,0,0,.5);
    }
    .site-wrapper {
      display: table;
      width: 100%;
      height: 100%; /* For at least Firefox */
      min-height: 100%;
      box-shadow: inset 0 0 5rem rgba(0,0,0,.5);
      background: url(../img/bg.jpg);
      background-size: cover;
      background-repeat: no-repeat;
      background-position: center;
    }
    .site-wrapper-inner {
      display: table-cell;
      vertical-align: top;
    }
    .cover-container {
      margin-right: auto;
      margin-left: auto;
    }
    .inner {
      padding: 2rem;
    }
    .masthead {
      margin-bottom: 2rem;
    }
    .masthead-brand {
      margin-bottom: 0;
    }
    .nav-masthead .nav-link {
      padding: .25rem 0;
      font-weight: 700;
      color: rgba(255,255,255,.5);
      background-color: transparent;
      border-bottom: .25rem solid transparent;
    }
    .nav-masthead .nav-link:hover,
    .nav-masthead .nav-link:focus {
      border-bottom-color: rgba(255,255,255,.25);
    }
    .nav-masthead .nav-link + .nav-link {
      margin-left: 1rem;
    }
    .nav-masthead .active {
      color: #fff;
      border-bottom-color: #fff;
    }
    @media (min-width: 48em) {
      .masthead-brand {
        float: left;
      }

      .nav-masthead {
        float: right;
      }

    }
    /*
     * Cover
     */

    .cover {
      padding: 0 1.5rem;
    }
    .cover .btn-lg {
      padding: .75rem 1.25rem;
      font-weight: 700;
    }
    .mastfoot {
      color: rgba(255,255,255,.5);
    }
    @media (min-width: 40em) {
      .masthead {
        position: fixed;
        top: 0;
      }

      .mastfoot {
        position: fixed;
        bottom: 0;
      }
      .site-wrapper-inner {
        vertical-align: middle;
      }

      /* Handle the widths */
      .masthead,
      .mastfoot,
      .cover-container {
        width: 100%;
      }

    }
    @media (min-width: 62em) {
      .masthead,
      .mastfoot,
      .cover-container {
        width: 42rem;
      }

    }
    .chatbubble {
        position: fixed;
        bottom: 0;
        right: 30px;
        transform: translateY(300px);
        transition: transform .3s ease-in-out;
    }
    .chatbubble.opened {
        transform: translateY(0)
    }
    .chatbubble .unexpanded {
        display: block;
        background-color: #e23e3e;
        padding: 10px 15px 10px;
        position: relative;
        cursor: pointer;
        width: 350px;
        border-radius: 10px 10px 0 0;
    }
    .chatbubble .expanded {
        height: 300px;
        width: 350px;
        background-color: #fff;
        text-align: left;
        padding: 10px;
        color: #333;
        text-shadow: none;
        font-size: 14px;
    }
    .chatbubble .chat-window {
      overflow: auto;
    }
    .chatbubble .loader-wrapper {
        margin-top: 50px;
        text-align: center;
    }
    .chatbubble .messages {
        display: none;
        list-style: none;
        margin: 0 0 50px;
        padding: 0;
    }
    .chatbubble .messages li {
        width: 85%;
        float: left;
        padding: 10px;
        border-radius: 5px 5px 5px 0;
        font-size: 14px;
        background: #c9f1e6;
        margin-bottom: 10px;
    }
    .chatbubble .messages li .sender {
        font-weight: 600;
    }
    .chatbubble .messages li.support {
        float: right;
        text-align: right;
        color: #fff;
        background-color: #e33d3d;
        border-radius: 5px 5px 0 5px;
    }
    .chatbubble .chats .input {
        position: absolute;
        bottom: 0;
        padding: 10px;
        left: 0;
        width: 100%;
        background: #f0f0f0;
        display: none;
    }
    .chatbubble .chats .input .form-group {
        width: 80%;
    }
    .chatbubble .chats .input input {
        width: 100%;
    }
    .chatbubble .chats .input button {
        width: 20%;
    }
    .chatbubble .chats {
      display: none;
    }
    .chatbubble .login-screen {
      margin-top: 20px;
      display: none;
    }
    .chatbubble .chats.active,
    .chatbubble .login-screen.active {
      display: block;
    }
    /* Loader Credit: https://codepen.io/ashmind/pen/zqaqpB */
    .chatbubble .loader {
      color: #e23e3e;
      font-family: Consolas, Menlo, Monaco, monospace;
      font-weight: bold;
      font-size: 10vh;
      opacity: 0.8;
    }
    .chatbubble .loader span {
      display: inline-block;
      -webkit-animation: pulse 0.4s alternate infinite ease-in-out;
              animation: pulse 0.4s alternate infinite ease-in-out;
    }
    .chatbubble .loader span:nth-child(odd) {
      -webkit-animation-delay: 0.4s;
              animation-delay: 0.4s;
    }
    @-webkit-keyframes pulse {
      to {
        -webkit-transform: scale(0.8);
                transform: scale(0.8);
        opacity: 0.5;
      }

    }
    @keyframes pulse {
      to {
        -webkit-transform: scale(0.8);
                transform: scale(0.8);
        opacity: 0.5;
      }

    }
Skip the next section if you have already signed up with Pusher and created an application.
Now let’s include some JavaScript. In thejsdirectory, create anapp.jsfile and paste the following code:
    // File: ./public/js/app.js
    (function() {
        'use strict';

        var pusher = new Pusher('PUSHER_APP_KEY', {
            authEndpoint: '/pusher/auth',
            cluster: 'PUSHER_APP_CLUSTER',
            encrypted: true
        });

        let chat = {
            name:  undefined,
            email: undefined,
            myChannel: undefined,
        }

        const chatPage   = $(document)
        const chatWindow = $('.chatbubble')
        const chatHeader = chatWindow.find('.unexpanded')
        const chatBody   = chatWindow.find('.chat-window')

        let helpers = {
            ToggleChatWindow: function () {
                chatWindow.toggleClass('opened')
                chatHeader.find('.title').text(
                    chatWindow.hasClass('opened') ? 'Minimize Chat Window' : 'Chat with Support'
                )
            },

            ShowAppropriateChatDisplay: function () {
                (chat.name) ? helpers.ShowChatRoomDisplay() : helpers.ShowChatInitiationDisplay()
            },

            ShowChatInitiationDisplay: function () {
                chatBody.find('.chats').removeClass('active')
                chatBody.find('.login-screen').addClass('active')
            },

            ShowChatRoomDisplay: function () {
                chatBody.find('.chats').addClass('active')
                chatBody.find('.login-screen').removeClass('active')
                setTimeout(function(){
                    chatBody.find('.loader-wrapper').hide()
                    chatBody.find('.input, .messages').show()
                }, 2000)
            },

            NewChatMessage: function (message) {
                if (message !== undefined) {
                    const messageClass = message.sender !== chat.email ? 'support' : 'user'
                    chatBody.find('ul.messages').append(
                        `<li class="clearfix message ${messageClass}">
                            <div class="sender">${message.name}</div>
                            <div class="message">${message.text}</div>
                        </li>`
                    )
                    chatBody.scrollTop(chatBody[0].scrollHeight)
                }
            },

            SendMessageToSupport: function (evt) {
                evt.preventDefault()
                let createdAt = new Date()
                createdAt = createdAt.toLocaleString()
                const message = $('#newMessage').val().trim()

                chat.myChannel.trigger('client-guest-new-message', {
                    'sender': chat.name,
                    'email': chat.email,
                    'text': message,
                    'createdAt': createdAt
                });

                helpers.NewChatMessage({
                    'text': message,
                    'name': chat.name,
                    'sender': chat.email
                })

                $('#newMessage').val('')
            },

            LogIntoChatSession: function (evt) {
                const name  = $('#fullname').val().trim()
                const email = $('#email').val().trim().toLowerCase()

                chatBody.find('#loginScreenForm input, #loginScreenForm button').attr('disabled', true)

                if ((name !== '' && name.length >= 3) && (email !== '' && email.length >= 5)) {
                    axios.post('/new/customer', {"name":name, "email":email}).then(response => {
                        chat.name = name
                        chat.email = email
                        console.log(response.data.email)
                        chat.myChannel = pusher.subscribe('private-' + response.data.email);
                        helpers.ShowAppropriateChatDisplay()
                    })
                } else {
                    alert('Enter a valid name and email.')
                }

                evt.preventDefault()
            }
        }

        pusher.bind('client-support-new-message', function(data){
            helpers.NewChatMessage(data)
        })

        chatPage.ready(helpers.ShowAppropriateChatDisplay)
        chatHeader.on('click', helpers.ToggleChatWindow)

        chatBody.find('#loginScreenForm').on('submit', helpers.LogIntoChatSession)
        chatBody.find('#messageSupport').on('submit', helpers.SendMessageToSupport)
    }());
Above, we instantiated a Pusher object instance and then we created a helpers object. In this object lies the meat of the script. In the helpers object we have a few methods that do specific tasks:
- An IDE of your choice like Visual Studio Code.
- Go (version >= 0.10.x) installed on your computer. Here’s how you can install Go.
- Basic knowledge of the Go programming language.
- Basic knowledge of JavaScript (ES6) and jQuery.
- Once you have all the above requirements, we can proceed.
Skip the next section if you have already signed up with Pusher and created an application.### Creating the support dashboard
Open the support.html file and update it with the following code:
<!-- File: ./public/support.html -->
<!DOCTYPE html>
<html lang="en">
<head>
<meta charset="utf-8">
<meta name="viewport" content="width=device-width, initial-scale=1, shrink-to-fit=no">
<title>X-Cycles | Support </title>
<link rel="stylesheet" href="https://maxcdn.bootstrapcdn.com/bootstrap/4.0.0-beta.2/css/bootstrap.min.css" integrity="sha384-PsH8R72JQ3SOdhVi3uxftmaW6Vc51MKb0q5P2rRUpPvrszuE4W1povHYgTpBfshb" crossorigin="anonymous">
<link rel="stylesheet" href="./css/support.css" >
</head>
<body>
<header>
<nav class="navbar navbar-expand-md navbar-dark fixed-top bg-dark">
<a class="navbar-brand" href="#">Dashboard</a>
</nav>
</header>
<div class="container-fluid">
<div class="row" id="mainrow">
<nav class="col-sm-3 col-md-2 d-none d-sm-block bg-light sidebar">
<ul class="nav nav-pills flex-column" id="rooms">
</ul>
</nav>
<main role="main" class="col-sm-9 ml-sm-auto col-md-10 pt-3" id="main">
<h1>Chats</h1>
<p>👈 Select a chat to load the messages</p>
<p> </p>
<div class="chat" style="margin-bottom:150px">
<h5 id="room-title"></h5>
<p> </p>
<div class="response">
<form id="replyMessage">
<div class="form-group">
<input type="text" placeholder="Enter Message" class="form-control" name="message" />
</div>
</form>
</div>
<div class="table-responsive">
<table class="table table-striped">
<tbody id="chat-msgs">
</tbody>
</table>
</div>
</main>
</div>
</div>
<script src="https://js.pusher.com/4.0/pusher.min.js"></script>
<script src="https://code.jquery.com/jquery-3.2.1.slim.min.js"></script>
<script src="https://cdnjs.cloudflare.com/ajax/libs/popper.js/1.12.3/umd/popper.min.js"></script>
<script src="https://maxcdn.bootstrapcdn.com/bootstrap/4.0.0-beta.2/js/bootstrap.min.js"></script>
<script src="https://cdnjs.cloudflare.com/ajax/libs/axios/0.18.0/axios.min.js"></script>
<script type="text/javascript" src="./js/support.js"></script>
</body>
</html>
Let’s write the style for the support page. In the css directory, create a support.css file and paste the following code:
    /* File: ./public/css/support.css */
    body {
        padding-top: 3.5rem;
    }
    h1 {
        padding-bottom: 9px;
        margin-bottom: 20px;
        border-bottom: 1px solid #eee;
    }
    .sidebar {
        position: fixed;
        top: 51px;
        bottom: 0;
        left: 0;
        z-index: 1000;
        padding: 20px 0;
        overflow-x: hidden;
        overflow-y: auto;
        border-right: 1px solid #eee;
    }
    .sidebar .nav {
        margin-bottom: 20px;
    }
    .sidebar .nav-item {
        width: 100%;
    }
    .sidebar .nav-item + .nav-item {
        margin-left: 0;
    }
    .sidebar .nav-link {
        border-radius: 0;
    }
    .placeholders {
        padding-bottom: 3rem;
    }
    .placeholder img {
        padding-top: 1.5rem;
        padding-bottom: 1.5rem;
    }
    tr .sender {
        font-size: 12px;
        font-weight: 600;
    }
    tr .sender span {
        color: #676767;
    }
    .response {
        display: none;
    }
Now let’s add the JavaScript for the page. In the js directory, create a support.js file and update it with the following code:
    // File: ./public/js/support.js
    (function () {
        var pusher = new Pusher('PUSHER_APP_KEY', {
            authEndpoint: '/pusher/auth',
            cluster: 'PUSHER_APP_CLUSTER',
            encrypted: true
        });

        let chat = {
            messages: [],
            currentRoom: '',
            currentChannel: '',
            subscribedChannels: [],
            subscribedUsers: []
        }

        var generalChannel = pusher.subscribe('one-to-many');

        const chatBody = $(document)
        const chatRoomsList = $('#rooms')
        const chatReplyMessage = $('#replyMessage')

        const helpers = {

            clearChatMessages: () => $('#chat-msgs').html(''),

            displayChatMessage: (message) => {
                if (message.email === chat.currentRoom) {
                    $('#chat-msgs').prepend(
                        `<tr>
                            <td>
                                <div class="sender">${message.sender} @ <span class="date">${message.createdAt}</span></div>
                                <div class="message">${message.text}</div>
                            </td>
                        </tr>`
                    )
                }
            },

            loadChatRoom: evt => {
                chat.currentRoom = evt.target.dataset.roomId
                chat.currentChannel = evt.target.dataset.channelId
                if (chat.currentRoom !== undefined) {
                    $('.response').show()
                    $('#room-title').text(evt.target.dataset.roomId)
                }
                evt.preventDefault()
                helpers.clearChatMessages()
            },

            replyMessage: evt => {
                evt.preventDefault()
                let createdAt = new Date()
                createdAt = createdAt.toLocaleString()
                const message = $('#replyMessage input').val().trim()
                chat.subscribedChannels[chat.currentChannel].trigger('client-support-new-message', {
                    'name': 'Admin',
                    'email': chat.currentRoom,
                    'text': message,
                    'createdAt': createdAt
                });

                helpers.displayChatMessage({
                    'email': chat.currentRoom,
                    'sender': 'Support',
                    'text': message,
                    'createdAt': createdAt
                })

                $('#replyMessage input').val('')
            },
        }

        generalChannel.bind('new-customer', function(data) {
            chat.subscribedChannels.push(pusher.subscribe('private-' + data.email));
            chat.subscribedUsers.push(data);
            // render the new list of subscribed users and clear the former
            $('#rooms').html("");
            chat.subscribedUsers.forEach(function (user, index) {
                    $('#rooms').append(
                        `<li class="nav-item"><a data-room-id="${user.email}" data-channel-id="${index}" class="nav-link" href="#">${user.name}</a></li>`
                    )
            })
        })

        pusher.bind('client-guest-new-message', function(data){
            helpers.displayChatMessage(data)
        })

        chatReplyMessage.on('submit', helpers.replyMessage)
        chatRoomsList.on('click', 'li', helpers.loadChatRoom)
    }())
Above, the script looks almost similar to the app.js script. The helpers object contains the following functions:
- An IDE of your choice like Visual Studio Code.
- Go (version >= 0.10.x) installed on your computer. Here’s how you can install Go.
- Basic knowledge of the Go programming language.
- Basic knowledge of JavaScript (ES6) and jQuery.
- Once you have all the above requirements, we can proceed.
After declaring the helpers, we bind to the Pusher channel and register our listeners.
Skip the next section if you have already signed up with Pusher and created an application.## Running the application
To test the application, we will run the application by typing this command in the terminal:
$ go run chat.go
We can visit these addresses, http://127.0.0.1:8070 and http://127.0.0.1:8070/support.html, on a web browser using different windows to test that the application works correctly. Here’s what we should see:
Conclusion
In this tutorial, we learned how to create a basic realtime web chat widget using Go and JavaScript. The source code for this project is available here on GitHub.
Learn More
☞ Introducing TensorFlow.js: Machine Learning in Javascript
☞ Express.js & Node.js Course for Beginners - Full Tutorial
☞ Full Stack Developers: Everything You Need to Know
☞ ES5 to ESNext — here’s every feature added to JavaScript since 2015
☞ 5 Javascript (ES6+) features that you should be using in 2019
☞ 12 Concepts That Will Level Up Your JavaScript Skills
☞ The Complete JavaScript Course 2019: Build Real Projects!
☞ JavaScript Bootcamp - Build Real World Applications
☞ JavaScript: Understanding the Weird Parts
☞ Vue JS 2 - The Complete Guide (incl. Vue Router & Vuex)
☞ The Full JavaScript & ES6 Tutorial - (including ES7 & React)
#javascript #go