Use Ajax simply with Django
1. General introduction
AJAX has now become an important part of web applications. AJAX also helps Django greatly in increasing efficiency and saving users time. All popular services use it one way or another. Apps like Facebook, Twitter, Instagram, Gmail, Google Maps, Spotify, etc. cannot work without AJAX.
You will have to use AJAX code at some point. Even Google’s search engine uses AJAX. You might have seen those search terms in the search bar while typing, which are results generated by AJAX.

2. AJAX in Django
We talked briefly about AJAX and how it is present on web pages. Now, let’s find out why we need AJAX in Django. AJAX is an acronym for Asynchronous JavaScript and XML (JavaScript and XML are asynchronous). It is a combination of technologies made to solve essential problems. It uses XMLHttpRequest objects to transmit and receive data.
Problems that AJAX solves
- Request from your browser to reload the page.
- The server receives and responds with the newly added messages.
- The process continues every time you want to read a new mail.
This approach is time consuming and inefficient. The problem becomes more serious when the recipient requests an urgent response. Obviously, it was a real situation for websites before 2003.
In late 2003, all browsers solved the problem using XHR. XHR stands for XMLHttpRequest (XMLHttpRequest objects). Browsers use the XHR object to communicate with the server. Transfer occurred without reloading the entire page. The XMLHttpRequest API stands behind the processing of XHR requests.
Now, almost all browsers have XMLHttpRequest API. This makes applications like Gmail and Google Maps a reality.
How AJAX works in Django
AJAX is really just a combination of 2 JavaScript objects and XHR. The concept is simple:
- JavaScript code on the client - The browser will make a request when an event occurs on the web page. The JavaScript will create an XHR object and send it as request object to the server. The XHR object contains some JavaScript data / objects. The XHR object also contains the URL or the name of the call-back function on the server.
- Request is processed by the server with a function callback - The corresponding View function or callback function will process the request. It will send a respone success or failure. Because the request is asynchronous, the rest of the source code is executed without interruption. At that time, the server will process the request.
- Response returned as a success or failure - A successful response may contain some server data in a variety of formats, such as:
**first. Text format **
Html Format (This section contains HTML elements).
**2. JSON format **
JSONP format (also JSON but only when the response comes from another domain).
Script (This section contains some JavaScript that will be changed in the page).
3. XML format
Similarly, a failure response can also be formatted. - JavaScript will execute according to the response received - Normally, AJAX will execute based on data from server. We can change the HTML components or run some JavaScript. Many things can use it.

3. An example of using AJAX in practice
In this article, we will create a simple website application that manages friends list using AJAX in Django.
Initial setting
We will use the jQuery library to easily implement JavaScript; moreover, we will also use Bootstrap 4 to make the application work better.
Below is the base.html template, including the jQuery library and the bootstrap framework. Make sure you include these link and script correctly. Also, note the content and javascript blocks, which will be used later.
base.html
<! DOCTYPE html>
<html lang = "en">

<head>
    <meta charset = "utf-8">
    <meta http-equiv = "X-UA-Compatible" content = "IE = edge">
    <meta name = "viewport" content = "width = device-width, initial-scale = 1, shrink-to-fit = no">
    <title> {% block title%} {% endblock title%} </title>
    <link rel = "stylesheet" href = "https://maxcdn.bootstrapcdn.com/bootstrap/4.0.0/css/bootstrap.min.css">
    {% block style%}
    {% endblock style%}
</head>

<body>
    {% block content%}
    {% endblock content%}

    <script src = "https://cdnjs.cloudflare.com/ajax/libs/jquery/3.3.1/jquery.min.js"> </script>
    <script src = "https://cdnjs.cloudflare.com/ajax/libs/popper.js/1.12.9/umd/popper.min.js"> </script>
    <script src = "https://maxcdn.bootstrapcdn.com/bootstrap/4.0.0/js/bootstrap.min.js"> </script>
    {% block javascript%}
    {% endblock javascript%}
</body>

</html>
I assume that you already know how to set up Django. If not, or if you are new to Django, please follow the Django documentation to get the initial setup.
Embark on the Code
In this article, we will use a real-time example to represent POST and GET AJAX requests in Django.
We will use the ScrapBook script in which the user can create a friend and the application will display it flexibly. It will also check if the nickname is used or not by sending a GET request to the server.
Let’s start by creating a Django application called “my_app” with the command startapp. Make sure you run the following manage.py command where the manage.py file exists, that is, in your project directory.
$ python manage.py startapp my_app
After creating the Django application, make sure you add it in INSTALLED_APPS in the settings.py file.
INSTALLED_APPS + = [
    'my_app',
]
Create Models
Create an example model for a Friend with the minimum number of attributes in the models.py file
from django.db import models

# Create your models here.
Class Friend (models.Model):
    # NICK NAME should be unique
    nick_name = models.CharField (max_length = 100, unique = True)
    first_name = models.CharField (max_length = 100)
    last_name = models.CharField (max_length = 100)
    likes = models.CharField (max_length = 250)
    dob = models.DateField (auto_now = False, auto_now_add = False)
    lives_in = models.CharField (max_length = 150, null = True, blank = True)

    def __str __ (self):
        return self.nick_name
After creating models, execute makemigations and migrate by running the following commands.
$ python manage.py makemigrations
$ python manage.py migrate
Then run Django server.
$ python manage.py runserver
POST Request
To submit the form, we need to make a POST request to the server with all the values of the form filled by the user.
1. Create Forms
Create the Django form by inheriting the ModelForm. In FriendForm, I changed the dob field and activated the DateField utility with some changes for the year. Also note that in the __init__ method, I’ve updated an HTML attribute with form-control for every form field so that Bootstrap is enabled on every field.
Finally, in the Meta subclass, I have included the method class and the fields that are likely to be displayed.
Note that I have created a new file named forms.py in my application directory, with the following content:
from .models import Friend
from django import forms
import datetime

FriendForm class (forms.ModelForm):
    ## change the widget of the date field.
    dob = forms.DateField (
        label = 'What is your birth date?',
        # change the range of the years from 1980 to currentYear - 5
        widget = forms.SelectDateWidget (years = range (1980, datetime.date.today (). year-5))
    )

    def __init __ (self, * args, ** kwargs):
        super (FriendForm, self) .__ init __ (* args, ** kwargs)
        ## add a "form-control" class to each form input
        ## for enabling bootstrap
        for name in self.fields.keys ():
            self.fields [name] .widget.attrs.update ({
                'class': 'form-control',
            })

    Meta class:
        model = Friend
        fields = ("__all__")
2. Create Views
After creating the form, import FriendForm into views. There are 2 views that should be considered in this section, and they are indexView and postFriend.
indexViewcreates aFriendFormobject, takes all friends objects from the database and sends them to theindex.htmltemplate, which we will discuss later.postFriendis an AJAX POST view, processing POST requests. You will notice that it is similar to the normal view, but with some changes, such asJsonResponseandserialize. We use these methods because this is an AJAX view, so we only need to deal with JSON.
The content of the views.py file is as follows:
from django.http import JsonResponse
from django.core import serializers
from .forms import FriendForm
from .models import Friend

def indexView (request):
    form = FriendForm ()
    friends = Friend.objects.all ()
    return render (request, "index.html", {"form": form, "friends": friends})

def postFriend (request):
    # request should be ajax and method should be POST.
    if request.is_ajax and request.method == "POST":
        # get the form data
        form = FriendForm (request.POST)
        # save the data and after fetch the object in instance
        if form.is_valid ():
            instance = form.save ()
            # serialize in new friend object in json
            ser_instance = serializers.serialize ('json', [instance,])
            # send to client side.
            return JsonResponse ({"instance": ser_instance}, status = 200)
        else:
            # some form errors occured.
            return JsonResponse ({"error": form.errors}, status = 400)

    # some error occured
    return JsonResponse ({"error": ""}, status = 400)
3. Create URLs
For the views above, create a URL for each view. Note the name given to the postFriend path, which will be used in the template mentioned later in this article.
The content of the urls.py file is as follows:
from django.urls import path
from my_app.views import (
    indexView,
    postFriend,
)

urlpatterns = [
    # ... other urls
    path ('', indexView),
    path ('post / ajax / friend', postFriend, name = "post_friend"),
    # ...
]
4 Create Templates
Now that you have created the backend, let’s move on to the frontend of this article.
In index.html, we will first extend from base.html, which was mentioned earlier in this article. Moreover, we will write the content inside the blocks.
The template is divided into two parts. The first part renders the form, the second part displays the friends objects previously stored in the table.
index.html
{% extends "base.html"%}

{% block content%}

<div class = "container-fluid">
    <form id = "friend-form">
        <div class = "row">
            {% csrf_token%}
            {% for field in form%}
            <div class = "form-group col-4">
                <label class = "col-12"> {{field.label}} </label>
                {{field}}
            </div>
            {% endfor%}
            <input type = "submit" class = "btn btn-primary" value = "Create Friend" />
        </div>
    <form>
</div>
<hr />

<div class = "container-fluid">
    <table class = "table table-striped table-sm" id = "my_friends">
        <thead>
            <tr>
                <th> Nick name </th>
                <th> First name </th>
                <th> Last name </th>
                <th> Likes </th>
                <th> DOB </th>
                <th> lives in </th>
            </tr>
        </thead>
        <tbody>
        {% for friend in friends%}
        <tr>
            <td> {{friend.nick_name}} </td>
            <td> {{friend.first_name}} </td>
            <td> {{friend.last_name}} </td>
            <td> {{friend.likes}} </td>
            <td> {{friend.dob | date: "Y-m-d"}} </td>
            <td> {{friend.lives_in}} </td>
        </tr>
        {% endfor%}
        </tbody>
    </table>

</div>
{% endblock content%}
Now move on to the JavaScript section of this article.
When submitting the form, we will serialize the form’s data and make an AJAX POST request, then send it to the server.
With the request successful, add a new row to the table.
Note that we used reversed URL, mentioned in the urls.py section. This helps you not to write hard URLs.
You can put this reversed URL tag into the HTML property and then fetch the following property. Put this JavaScript code into the js file.
index.html
{% block javascript%}
<script>
    / *
        On submiting the form, send the POST ajax
        request to server and after successfull submission
        display the object.
    * /
    $ ("# friend-form"). submit (function (e) {
        // preventing from page reload and default actions
        e.preventDefault ();
        // serialize the data for sending the form data.
        var serializedData = $ (this) .serialize ();
        // make POST ajax call
        $ .ajax ({
            type: 'POST',
            url: "{% url 'post_friend'%}",
            data: serializedData,
            success: function (response) {
                // on successfull creating object
                // first\. clear the form.
                $ ("# friend-form"). trigger ('reset');
                // 2\. focus to nickname input
                $ ("# id_nick_name"). focus ();

                // display the newly friend to table.
                var instance = JSON.parse (response ["instance"]);
                var fields = instance [0] ["fields"];
                $ ("# my_friends tbody"). prepend (
                    `<tr>
                    <td> $ {fields ["nick_name"] || ""}} </td>
                    <td> $ {fields ["first_name"] || ""}} </td>
                    <td> $ {fields ["last_name"] || ""}} </td>
                    <td> $ {fields ["likes"] || ""}} </td>
                    <td> $ {fields ["dob"] || ""}} </td>
                    <td> $ {fields ["lives_in"] || ""}} </td>
                    </tr> `
                )
            },
            error: function (response) {
                // alert the error if any error occured
                alert (response ["responseJSON"] ["error"]);
            }
        })
    })
</script>
{% endblock javascript%}
GET Request
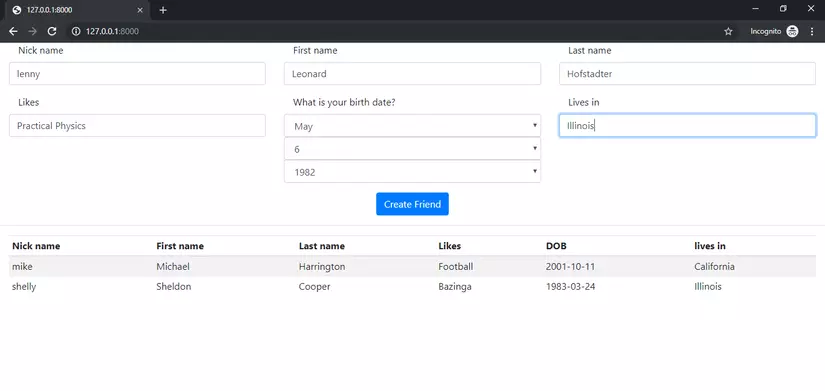
Now switch to GET Request. In our current scenario, before submitting the form, we can check if a nickname already exists in the database by sending the entered nickname back to the server.
The following is a screenshot of what we will build in this section.

1. Create Views
Let’s create a view for this scenario. In the checkNickName view, we first take the nickname that was sent by the AJAX request and then check to see if any of our friends have this nickname in the database. If it already exists, then we return it with a value of False, otherwise it is True.
from django.http import JsonResponse
from .models import Friend

def checkNickName (request):
    # request should be ajax and method should be GET.
    if request.is_ajax and request.method == "GET":
        # get the nick name from the client side.
        nick_name = request.GET.get ("nick_name", None)
        # check for the nick name in the database.
        if Friend.objects.filter (nick_name = nick_name) .exists ():
            # if nick_name found return not valid new friend
            return JsonResponse ({"valid": False}, status = 200)
        else:
            # if nick_name not found, then user can create a new friend.
            return JsonResponse ({"valid": True}, status = 200)

    return JsonResponse ({}, status = 400)
2. Generate URLs
For the above view, create a URL called validate_nickname.
from django.urls import path
from my_app.views import (
    checkNickName
)

urlpatterns = [
    # ... other urls
    path ('get / ajax / validate / nickname', checkNickName, name = "validate_nickname")
    # ...
]
3. Create Templates
Now, write the AJAX GET request for the focusout event of the nick_name input field by retrieving the current nick_name value and sending it to the server.
After a successful GET request, please inform whether nick_name is accepted or not.
{% block javascript%}
<script>
    / *
    On focus out on input nickname,
    call AJAX get request to check if the nickName
    already exists or not.
    * /
    $ ("# id_nick_name"). focusout (function (e) {
        e.preventDefault ();
        // get the nickname
        var nick_name = $ (this) .val ();
        // GET AJAX request
        $ .ajax ({
            type: 'GET',
            url: "{% url 'validate_nickname'%}",
            data: {"nick_name": nick_name},
            success: function (response) {
                // if not valid user, alert the user
                if (! response ["valid"]) {
                    alert ("You cannot create a friend with same nick name");
                    var nickName = $ ("# id_nick_name");
                    nickName.val ("")
                    nickName.focus ()
                }
            },
            error: function (response) {
                console.log (response)
            }
        })
    })
</script>
{% endblock javascript%}
BONUS: Using Class-based Views
If you have some experience with Django, then you probably know that you can create views by function and by Class. Most developers are confused about how to use them and when to use them. So, in this short article, convert the above FBV (function based view) code to the CBV (class based view) code.
In this section, I will combine the indexView and postFriend functions into a single Class called FriendView, inherit the View class and have two methods, get and post, respectively.
The content of the views.py file is as follows:
from django.shortcuts import render
from django.http import JsonResponse
from django.core import serializers
from .forms import FriendForm
from .models import Friend

from django.views import View

FriendView (View) class:
    form_class = FriendForm
    template_name = "index.html"

    def get (self, * args, ** kwargs):
        form = self.form_class ()
        friends = Friend.objects.all ()
        return render (self.request, self.template_name,
            {"form": form, "friends": friends})

    def post (self, * args, ** kwargs):
        if self.request.is_ajax and self.request.method == "POST":
            form = self.form_class (self.request.POST)
            if form.is_valid ():
                instance = form.save ()
                ser_instance = serializers.serialize ('json', [instance,])
                # send to client side.
                return JsonResponse ({"instance": ser_instance}, status = 200)
            else:
                return JsonResponse ({"error": form.errors}, status = 400)

        return JsonResponse ({"error": ""}, status = 400)
Please write urlpattern for CBV discussed above. The content of the urls.py file is as follows:
from django.urls import path
from my_app.views import (
    FriendView
)

urlpatterns = [
    # ... other urls
    path ("", FriendView.as_view (), name = "friend_cbv"),
    # ...
]
To convert from FBV to CBV, you need to change the reverse URL pattern as well.
index.js
// other previous stuff
$ .ajax ({
    type: 'POST',
    url: "{% url 'friend_cbv'%}", // CHANGE the POST url
    // ... continues
// ...
4. Conclusion
AJAX is the best way to perform asynchronous tasks in Django, at least on a small scale. If you want to perform an asynchronous task on a larger scale, you can do socket programming in Django or use front-end JavaScript libraries like Angular, Vue or React.
#python #django
