HTML Form Elements - Explained with Examples
Elevate user interaction with HTML Form Elements! Explore examples for input, select, textarea, and more, mastering versatile form components for seamless web experiences.
This tutorial describes all the different HTML form elements.
The HTML <form> Elements
The HTML <form> element can contain one or more of the following form elements:
<input><label><select><textarea><button><fieldset><legend><datalist><output><option><optgroup>
The <input> Element
One of the most used form elements is the <input> element.
The <input> element can be displayed in several ways, depending on the type attribute.
Example
<label for="fname">First name:</label>
<input type="text" id="fname" name="fname">
The <label> Element
The <label> element defines a label for several form elements.
The <label> element is useful for screen-reader users, because the screen-reader will read out loud the label when the user focus on the input element.
The <label> element also help users who have difficulty clicking on very small regions (such as radio buttons or checkboxes) - because when the user clicks the text within the <label> element, it toggles the radio button/checkbox.
The for attribute of the <label> tag should be equal to the id attribute of the <input> element to bind them together.
The <select> Element
The <select> element defines a drop-down list:
Example
<label for="cars">Choose a car:</label>
<select id="cars" name="cars">
  <option value="volvo">Volvo</option>
  <option value="saab">Saab</option>
  <option value="fiat">Fiat</option>
  <option value="audi">Audi</option>
</select>
The <option> element defines an option that can be selected.
By default, the first item in the drop-down list is selected.
To define a pre-selected option, add the selected attribute to the option:
Example
<option value="fiat" selected>Fiat</option>Visible Values:
Use the size attribute to specify the number of visible values:
Example
<label for="cars">Choose a car:</label>
<select id="cars" name="cars" size="3">
  <option value="volvo">Volvo</option>
  <option value="saab">Saab</option>
  <option value="fiat">Fiat</option>
  <option value="audi">Audi</option>
</select>
Allow Multiple Selections:
Use the multiple attribute to allow the user to select more than one value:
Example
<label for="cars">Choose a car:</label>
<select id="cars" name="cars" size="4" multiple>
  <option value="volvo">Volvo</option>
  <option value="saab">Saab</option>
  <option value="fiat">Fiat</option>
  <option value="audi">Audi</option>
</select>
The <textarea> Element
The <textarea> element defines a multi-line input field (a text area):
Example
<textarea name="message" rows="10" cols="30">
The cat was playing in the garden.
</textarea>
The rows attribute specifies the visible number of lines in a text area.
The cols attribute specifies the visible width of a text area.
This is how the HTML code above will be displayed in a browser:
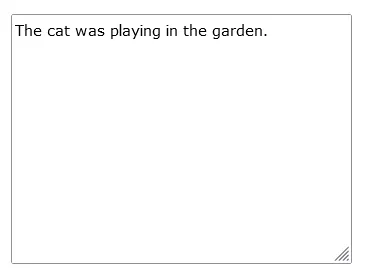
The cat was playing in the garden.
You can also define the size of the text area by using CSS:
Example
<textarea name="message" style="width:200px; height:600px;">
The cat was playing in the garden.
</textarea>
The <button> Element
The <button> element defines a clickable button:
Example
<button type="button" onclick="alert('Hello World!')">Click Me!</button>This is how the HTML code above will be displayed in a browser:

Note: Always specify the type attribute for the button element. Different browsers may use different default types for the button element.
The <fieldset> and <legend> Elements
The <fieldset> element is used to group related data in a form.
The <legend> element defines a caption for the <fieldset> element.
Example
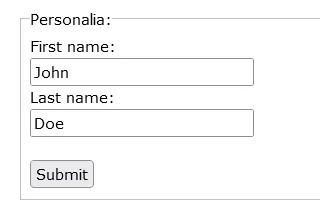
<form action="/action_page.php">
  <fieldset>
    <legend>Personalia:</legend>
    <label for="fname">First name:</label><br>
    <input type="text" id="fname" name="fname" value="John"><br>
    <label for="lname">Last name:</label><br>
    <input type="text" id="lname" name="lname" value="Doe"><br><br>
    <input type="submit" value="Submit">
  </fieldset>
</form>
This is how the HTML code above will be displayed in a browser:
The <datalist> Element
The <datalist> element specifies a list of pre-defined options for an <input> element.
Users will see a drop-down list of the pre-defined options as they input data.
The list attribute of the <input> element, must refer to the id attribute of the <datalist> element.
Example
<form action="/action_page.php">
  <input list="browsers">
  <datalist id="browsers">
    <option value="Edge">
    <option value="Firefox">
    <option value="Chrome">
    <option value="Opera">
    <option value="Safari">
  </datalist>
</form>
The <output> Element
The <output> element represents the result of a calculation (like one performed by a script).
Example
Perform a calculation and show the result in an <output> element:
<form action="/action_page.php"
  oninput="x.value=parseInt(a.value)+parseInt(b.value)">
  0
  <input type="range"  id="a" name="a" value="50">
  100 +
  <input type="number" id="b" name="b" value="50">
  =
  <output name="x" for="a b"></output>
  <br><br>
  <input type="submit">
</form>
#html