PVS-Studio: Analyzing Pull Requests In Azure DevOps Using Self-Hosted Agents
Let’s show you how to configure pull request analysis using self-hosted agents in Microsoft Azure DevOps, using the examples of the Minetest game.
Static code analysis is most effective when changing a project, as errors are always more difficult to fix in the future than at an early stage. We continue expanding the options for using PVS-Studio in continuous development systems. This time, we’ll show you how to configure pull request analysis using self-hosted agents in Microsoft Azure DevOps, using the example of the Minetest game.
 Briefly
About What We Are Dealing With
Minetest is an open-source cross-platform game engine containing about 200,000 lines of code in C, C++, and Lua. It allows you to create different game modes in voxel space. Supports multiplayer, and a lot of mods from community. The project repository is located here: https://github.com/minetest/minetest.
The following tools are used to configure regular error detection:
PVS-Studio is a static code analyzer of the code written in C, C++, C#, and Java to search for errors and security defects.
Azure DevOps is a cloud platform that allows you to develop, run applications, and store data on remote servers.
You can use Windows and Linux agent VMs to perform development tasks in Azure. However, running agents on the local equipment has several important advantages:
- The local host may have more resources than an Azure VM;
- The agent doesn’t “disappear” after completing its task;
- Ability to directly configure the environment and more flexible management of build processes;
- Local storage of intermediate files has a positive effect on build speed;
- You can complete more than 30 tasks per month for free.
Preparation to Using a Self-Hosted Agent
The process of getting started with Azure is described in detail in the article " PVS-Studio in the Clouds: Azure DevOps", so I will go straight to creating a self-hosted agent.
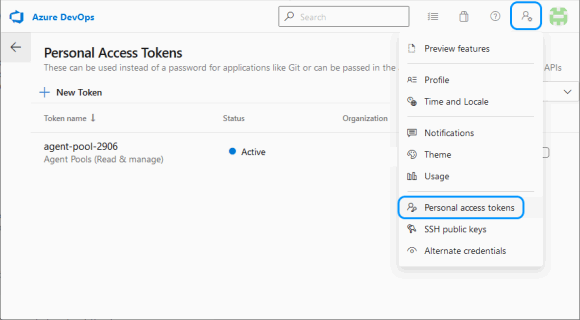
In order for agents to be able to connect to project pools, they need a special Access Token. You can get it on the “Personal Access Tokens” page, in the “User settings” menu.
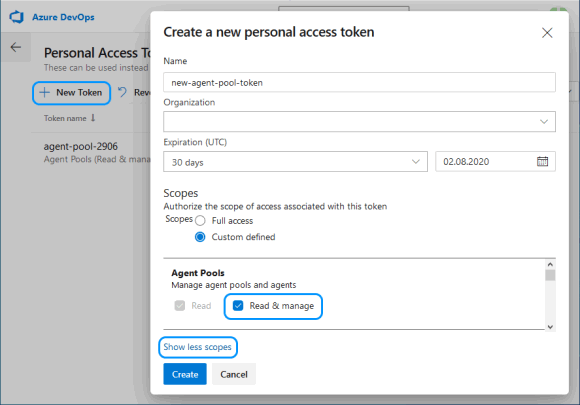
 After clicking on “New token”, you must specify a name and select Read & manage Agent Pools (you may need to expand the full list via “Show all scopes”).
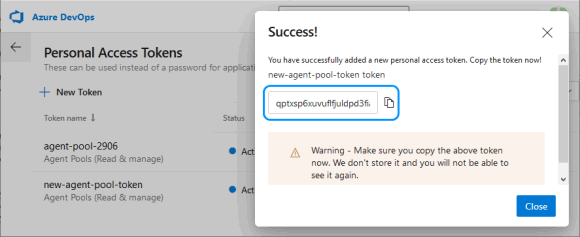
 You need to copy the token, because Azure will not show it again, and you will have to make a new one.
 A Docker container based on Windows Server Core will be used as the agent. The host is my desktop computer on Windows 10 x64 with Hyper-V.
First, you will need to expand the amount of disk space available to Docker containers.
To do this, in Windows, you need to modify the file ‘C:\ProgramData\Docker\config\daemon.json’ as follows:
C++
1
{
2
"registry-mirrors": [],
3
"insecure-registries": [],
4
"debug": true,
5
"experimental": false,
6
"data-root": "d:\\docker",
7
"storage-opts": [ "size=40G" ]
8
}
To create a Docker image for agents with the build system and everything necessary, let’s add a Docker file with the following content in the directory ‘D:\docker-agent’:
C++
1
# escape=`
2
3
FROM mcr.microsoft.com/dotnet/framework/runtime
4
5
SHELL ["cmd", "/S", "/C"]
6
7
ADD https://aka.ms/vs/16/release/vs_buildtools.exe C:\vs_buildtools.exe
8
RUN C:\vs_buildtools.exe --quiet --wait --norestart --nocache `
9
--installPath C:\BuildTools `
10
--add Microsoft.VisualStudio.Workload.VCTools `
11
--includeRecommended
12
13
RUN powershell.exe -Command `
14
Set-ExecutionPolicy Bypass -Scope Process -Force; `
15
[System.Net.ServicePointManager]::SecurityProtocol =
16
[System.Net.ServicePointManager]::SecurityProtocol -bor 3072; `
17
iex ((New-Object System.Net.WebClient)
18
.DownloadString('https://chocolatey.org/install.ps1')); `
19
choco feature enable -n=useRememberedArgumentsForUpgrades;
20
21
RUN powershell.exe -Command `
22
choco install -y cmake --installargs '"ADD_CMAKE_TO_PATH=System"'; `
23
choco install -y git --params '"/GitOnlyOnPath /NoShellIntegration"'
24
25
RUN powershell.exe -Command `
26
git clone https://github.com/microsoft/vcpkg.git; `
27
.\vcpkg\bootstrap-vcpkg -disableMetrics; `
28
$env:Path += '";C:\vcpkg"'; `
29
[Environment]::SetEnvironmentVariable(
30
'"Path"', $env:Path, [System.EnvironmentVariableTarget]::Machine); `
31
[Environment]::SetEnvironmentVariable(
32
'"VCPKG_DEFAULT_TRIPLET"', '"x64-windows"',
33
[System.EnvironmentVariableTarget]::Machine)
34
35
RUN powershell.exe -Command `
36
choco install -y pvs-studio; `
37
$env:Path += '";C:\Program Files (x86)\PVS-Studio"'; `
38
[Environment]::SetEnvironmentVariable(
39
'"Path"', $env:Path, [System.EnvironmentVariableTarget]::Machine)
40
41
RUN powershell.exe -Command `
42
$latest_agent =
43
Invoke-RestMethod -Uri "https://api.github.com/repos/Microsoft/
44
azure-pipelines-agent/releases/latest"; `
45
$latest_agent_version =
46
$latest_agent.name.Substring(1, $latest_agent.tag_name.Length-1); `
47
$latest_agent_url =
48
'"https://vstsagentpackage.azureedge.net/agent/"' + $latest_agent_version +
49
'"/vsts-agent-win-x64-"' + $latest_agent_version + '".zip"'; `
50
Invoke-WebRequest -Uri $latest_agent_url -Method Get -OutFile ./agent.zip; `
51
Expand-Archive -Path ./agent.zip -DestinationPath ./agent
52
53
USER ContainerAdministrator
54
RUN reg add hklm\system\currentcontrolset\services\cexecsvc
55
/v ProcessShutdownTimeoutSeconds /t REG_DWORD /d 60
56
RUN reg add hklm\system\currentcontrolset\control
57
/v WaitToKillServiceTimeout /t REG_SZ /d 60000 /f
58
59
ADD .\entrypoint.ps1 C:\entrypoint.ps1
60
SHELL ["powershell", "-Command",
61
"$ErrorActionPreference = 'Stop';
62
$ProgressPreference = 'SilentlyContinue';"]
63
ENTRYPOINT .\entrypoint.ps1
The result is a build system based on MSBuild for C++, with Chocolatey for installing PVS-Studio, CMake, and Git. Vcpkg is built for convenient management of the libraries that the project depends on. Also, we have to download the latest version of the Azure Pipelines Agent.
To initialize the agent from the ENTRYPOINT Docker file, the PowerShell script ‘entrypoint.ps1’ is called, to which you need to add the URL of the project’s “organization”, the token of the agent pool, and the PVS-Studio license parameters:
C++
1
$organization_url = "https://dev.azure.com/<Microsoft Azure account>"
2
$agents_token = "<agent token>"
3
4
$pvs_studio_user = "<PVS-Studio user name>"
5
$pvs_studio_key = "<PVS-Studio key>"
6
7
try
8
{
9
C:\BuildTools\VC\Auxiliary\Build\vcvars64.bat
10
11
PVS-Studio_Cmd credentials -u $pvs_studio_user -n $pvs_studio_key
12
13
.\agent\config.cmd --unattended `
14
--url $organization_url `
15
--auth PAT `
16
--token $agents_token `
17
--replace;
18
.\agent\run.cmd
19
}
20
finally
21
{
22
# Agent graceful shutdown
23
# https://github.com/moby/moby/issues/25982
24
25
.\agent\config.cmd remove --unattended `
26
--auth PAT `
27
--token $agents_token
28
}
Commands for building an image and starting the agent:
C++
1
docker build -t azure-agent -m 4GB .
2
docker run -id --name my-agent -m 4GB --cpu-count 4 azure-agent
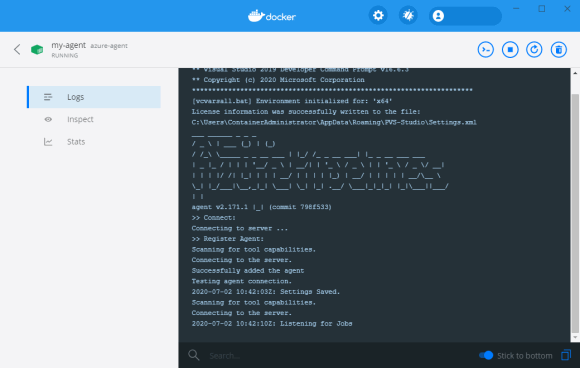 The agent is running and ready to perform tasks.
#devops #cpp #azure devops #sast