How to Use Vue Router with Vue.js
This is what makes navigation easy and really nice in your web applications. So in this article, I’ll explain How to Use Vue Router with Vue.js
To make a single page application with Vue.js, we need to use a URL router to display our pages according to the URLs entered on clicked on a link. Vue.js has Vue Router as an option for routing. We can set this when create the app project or add it later as a package. It is easy to use and comes with Vue.js, so it’s used very frequently for Vue.js single page apps.
Vue Router can map URLs to our pages, it can also run code before loading a URL with the router.beforeEach hook. It takes in to , from , and next parameters. The to parameter indicates where the URL the user will be going to by clicking on a link or entering the URL directly. from is the URL that the user is navigating from, and next is a function that you can call if you want the user to see the route he or she is going to.
In this article, we will make a simple Bitbucket app with authentication. We will let users sign up for an account and set their Bitbucket username and password for their account. Once the user is logged in and set their Bitbucket credentials, they can view their repositories and the commits for each repository.
The front end will be a Vue.js app that uses the Vue Router for routing.
Bitbucket is a great repository hosting service that lets you host Git repositories for free. You can upgrade to their paid plans to get more features for a low price. It also has a comprehensive API for automation and getting data.
Developers have made Node.js clients for Bitbucket’s API. We can easily use it to do what we want like manipulating commits, adding, removing, or editing repositories, tracking issues, manipulating build pipelines and a lot more.
Our app will consist of an back end and a front end. The back end handles the user authentication and communicates with Bitbucket via the Bitbucket API. The front end has the sign up form, log in form, a settings form for setting password and Bitbucket username and password.
Back End
To start building the app, we create a project folder with the backend folder inside. We then go into the backend folder and run the Express Generator by running npx express-generator . Next we install some packages ourselves. We need Babel to use import , BCrypt for hashing passwords, Bitbucket.js for using the Bitbucket API. Crypto-JS for encrypting and decrypting our Bitbucket password, Dotenv for storing hash and encryption secrets, Sequelize for ORM, JSON Web Token packages for authentication, CORS for cross domain communication and SQLite for database.
Run npm i @babel/cli @babel/core @babel/node @babel/preset-env bcrypt bitbucket cors crypto-js dotenv jsonwebtoken sequelize sqlite3 to install the packages.
In the script section of package.json , put:
"start": "nodemon --exec npm run babel-node --  ./bin/www",
"babel-node": "babel-node"
to start our app with Babel Node instead of the regular Node.js runtime so that we get the latest JavaScript features.
Then we create a file called .babelrc in the backend folder and add:
{
    "presets": [
        "@babel/preset-env"
    ]
}
to enable the latest features.
Then we have to add Sequelize code by running npx sequelize-cli init . After that we should get a config.json file in the config folder.
In config.json , we put:
{
  "development": {
    "dialect": "sqlite",
    "storage": "development.db"
  },
  "test": {
    "dialect": "sqlite",
    "storage": "test.db"
  },
  "production": {
    "dialect": "sqlite",
    "storage": "production.db"
  }
}
To use SQLite as our database.
Next we add a middleware for verifying the authentication token, add a middllewares folder in the backend folder, and in there add authCheck.js . In the file, add:
const jwt = require("jsonwebtoken");
const secret = process.env.JWT_SECRET;

export const authCheck = (req, res, next) => {
  if (req.headers.authorization) {
    const token = req.headers.authorization;
    jwt.verify(token, secret, (err, decoded) => {
      if (err) {
        res.send(401);
      } else {
        next();
      }
    });
  } else {
    res.send(401);
  }
};
We return 401 response if the token is invalid.
Next we create some migrations and models. Run:
npx sequelize-cli model:create --name User --attributes username:string,password:string,bitBucketUsername:string,bitBucketPassword:string
to create the model. Note that the attributes option has no spaces.
Then we add unique constraint to the username column of the Users table. To do this, run:
npx sequelize-cli migration:create addUniqueConstraintToUser
Then in newly created migration file, add:
"use strict";

module.exports = {
  up: (queryInterface, Sequelize) => {
    return queryInterface.addConstraint("Users", ["username"], {
      type: "unique",
      name: "usernameUnique"
    });
  },

down: (queryInterface, Sequelize) => {
    return queryInterface.removeConstraint("Users", "usernameUnique");
  }
};
Run npx sequelize-cli db:migrate to run all the migrations.
Next we create the routes. Create a file called bitbucket.js and add:
var express = require("express");
const models = require("../models");
const CryptoJS = require("crypto-js");
const Bitbucket = require("bitbucket");
const jwt = require("jsonwebtoken");
import { authCheck } from "../middlewares/authCheck";

const bitbucket = new Bitbucket();
var router = express.Router();

router.post("/setBitbucketCredentials", authCheck, async (req, res, next) => {
  const { bitBucketUsername, bitBucketPassword } = req.body;
  const token = req.headers.authorization;
  const decoded = jwt.verify(token, process.env.JWT_SECRET);
  const id = decoded.userId;
  const cipherText = CryptoJS.AES.encrypt(
    bitBucketPassword,
    process.env.CRYPTO_SECRET
  );
  await models.User.update(
    {
      bitBucketUsername,
      bitBucketPassword: cipherText.toString()
    },
    {
      where: { id }
    }
  );
  res.json({});
});

router.get("/repos/:page", authCheck, async (req, res, next) => {
  const page = req.params.page || 1;
  const token = req.headers.authorization;
  const decoded = jwt.verify(token, process.env.JWT_SECRET);
  const id = decoded.userId;
  const users = await models.User.findAll({ where: { id } });
  const user = users[0];
  const bytes = CryptoJS.AES.decrypt(
    user.bitBucketPassword.toString(),
    process.env.CRYPTO_SECRET
  );
  const password = bytes.toString(CryptoJS.enc.Utf8);
  bitbucket.authenticate({
    type: "basic",
    username: user.bitBucketUsername,
    password
  });
  let { data } = await bitbucket.repositories.list({
    username: user.bitBucketUsername,
    page,
    sort: "-updated_on"
  });
  res.json(data);
});

router.get("/commits/:repoName", authCheck, async (req, res, next) => {
  const token = req.headers.authorization;
  const decoded = jwt.verify(token, process.env.JWT_SECRET);
  const id = decoded.userId;
  const users = await models.User.findAll({ where: { id } });
  const user = users[0];
  const repoName = req.params.repoName;
  const bytes = CryptoJS.AES.decrypt(
    user.bitBucketPassword.toString(),
    process.env.CRYPTO_SECRET
  );
  const password = bytes.toString(CryptoJS.enc.Utf8);
  bitbucket.authenticate({
    type: "basic",
    username: user.bitBucketUsername,
    password
  });
  let { data } = await bitbucket.commits.list({
    username: user.bitBucketUsername,
    repo_slug: repoName,
    sort: "-date"
  });
  res.json(data);
});

module.exports = router;
In each route, we get the user from the token, since we will add the user ID into the token, and from there we get the Bitbucket username and password, which we use to log into the Bitbucket API. Note that we have to decrypt the password since we encrypted it before saving it to the database.
We set the Bitbucket credentials in the setBitbucketCredentials route. We encrypt the password before saving to keep it secure.
Then in the repos route, we get the repos of the user and sort by reversed update_on order since we specified -updated_on in the sort parameter. The commits are listed in reverse date order since we specified -date in the sort parameter.
Next we add the user.js in the routes folder and add:
const express = require("express");
const models = require("../models");
const bcrypt = require("bcrypt");
const jwt = require("jsonwebtoken");
import { authCheck } from "../middlewares/authCheck";
const router = express.Router();

router.post("/signup", async (req, res, next) => {
  try {
    const { username, password } = req.body;
    const hashedPassword = await bcrypt.hash(password, 10);
    const user = await models.User.create({
      username,
      password: hashedPassword
    });
    res.json(user);
  } catch (error) {
    res.status(400).json(error);
  }
});

router.post("/login", async (req, res, next) => {
  const { username, password } = req.body;
  const users = await models.User.findAll({ where: { username } });
  const user = users[0];
  const response = await bcrypt.compare(password, user.password);
  if (response) {
    const token = jwt.sign({ userId: user.id }, process.env.JWT_SECRET);
    res.json({ token });
  } else {
    res.status(401).json({});
  }
});

router.post("/changePassword", authCheck, async (req, res, next) => {
  const { password } = req.body;
  const token = req.headers.authorization;
  const decoded = jwt.verify(token, process.env.JWT_SECRET);
  const id = decoded.userId;
  const hashedPassword = await bcrypt.hash(password, 10);
  await models.User.update({ password: hashedPassword }, { where: { id } });
  res.json({});
});

router.get("/currentUser", authCheck, async (req, res, next) => {
  const token = req.headers.authorization;
  const decoded = jwt.verify(token, process.env.JWT_SECRET);
  const id = decoded.userId;
  const users = await models.User.findAll({ where: { id } });
  const { username, bitBucketUsername } = users[0];
  res.json({ username, bitBucketUsername });
});

module.exports = router;
We have routes for sign up, log in, and change password. We hash the password before saving when we sign up or changing password.
The currentUser route will be used for a settings form in the front end.
In app.js we replace the existing code with:
require("dotenv").config();
var createError = require("http-errors");
var express = require("express");
var path = require("path");
var cookieParser = require("cookie-parser");
var logger = require("morgan");
const cors = require("cors");

var indexRouter = require("./routes/index");
var usersRouter = require("./routes/users");
var bitbucketRouter = require("./routes/bitbucket");

var app = express();

// view engine setup
app.set("views", path.join(__dirname, "views"));
app.set("view engine", "jade");
app.use(logger("dev"));
app.use(express.json());
app.use(express.urlencoded({ extended: false }));
app.use(cookieParser());
app.use(express.static(path.join(__dirname, "public")));
app.use(cors());

app.use("/", indexRouter);
app.use("/users", usersRouter);
app.use("/bitbucket", bitbucketRouter);

// catch 404 and forward to error handler
app.use(function(req, res, next) {
  next(createError(404));
});

// error handler
app.use(function(err, req, res, next) {
  // set locals, only providing error in development
  res.locals.message = err.message;
  res.locals.error = req.app.get("env") === "development" ? err : {};

// render the error page
  res.status(err.status || 500);
  res.render("error");
});

module.exports = app;
to add the CORS add-on to enable cross domain communication, and add the users and bitbucket routes in our app by adding:
app.use("/users", usersRouter);
app.use("/bitbucket", bitbucketRouter);
This finishes the back end portion of the app.
Front End
Now we can build the front end.
We will build it with Vue, so we start by running npx @vue/cli frontend in the project’s root folder. Be sure to choose ‘Manually select features’ then choose to include Babel and Vue Router.
Next we have to install some packages. We need Axios for making HTTP requests, Bootstrap for styling, Vee-Validate for form validation, and Vue-Filter-Date-Format package for formatting dates.
We install all the packages by running:
npm i axios bootstrap-vue vee-validate vue-filter-date-format
Once that’s done, we can start writing the front end app. First we add the top bars for our front end. We make one to display when the user is logged in and another one for when the user is logged out.
Create LoggedInTopBar.vue in the components folder and add:
<template>
  <b-navbar toggleable="lg" type="dark" variant="info">
    <b-navbar-brand to="/">Bitbucket App</b-navbar-brand>

<b-navbar-toggle target="nav-collapse"></b-navbar-toggle>

<b-collapse id="nav-collapse" is-nav>
      <b-navbar-nav>
        <b-nav-item to="/settings" :active="path  == '/settings'">Settings</b-nav-item>
        <b-nav-item to="/repos" :active="path.includes('/repos')">Repos</b-nav-item>
        <b-nav-item @click="logOut()">Log Out</b-nav-item>
      </b-navbar-nav>
    </b-collapse>
  </b-navbar>
</template>

<script>
export default {
  name: "LoggedInTopBar",
  data() {
    return {
      path: this.$route && this.$route.path
    };
  },
  watch: {
    $route(route) {
      this.path = route.path;
    }
  },
  methods: {
    logOut() {
      localStorage.clear();
      this.$router.push("/");
    }
  }
};
</script>
We watch the URL that the user is currently navigated to to set the active prop, which highlights the link when the user goes to the URL with the condition in the code.
b-navbar is provided by BootstrapVue.
Similarly, we create LoggedOutTopBar.vue in the same folder and add:
<template>
  <b-navbar toggleable="lg" type="dark" variant="info">
    <b-navbar-brand to="/">Bitbucket App</b-navbar-brand>

    <b-navbar-toggle target="nav-collapse"></b-navbar-toggle>

    <b-collapse id="nav-collapse" is-nav>
      <b-navbar-nav>
        <b-nav-item to="/" :active="path  == '/'">Home</b-nav-item>
      </b-navbar-nav>
    </b-collapse>
  </b-navbar>
</template>

<script>
export default {
  name: "LoggedOutTopBar",
  data() {
    return {
      path: this.$route && this.$route.path
    };
  },
  watch: {
    $route(route) {
      this.path = route.path;
    }
  }
};
</script>
Next we create a mixins folder in the src folder and add a requestsMixin.js file to make shared code that lets our components make HTTP requests. In this file, we add:
const APIURL = "http://localhost:3000";
const axios = require("axios");

axios.interceptors.request.use(
  config => {
    config.headers.authorization = localStorage.getItem("token");
    return config;
  },
  error => Promise.reject(error)
);

axios.interceptors.response.use(
  response => {
    return response;
  },
  error => {
    if (error.response.status == 401) {
      localStorage.clear();
    }
    return error;
  }
);

export const requestsMixin = {
  methods: {
    signUp(data) {
      return axios.post(`${APIURL}/users/signup`, data);
    },

    logIn(data) {
      return axios.post(`${APIURL}/users/login`, data);
    },

    changePassword(data) {
      return axios.post(`${APIURL}/users/changePassword`, data);
    },

    currentUser() {
      return axios.get(`${APIURL}/users/currentUser`);
    },

    setBitbucketCredentials(data) {
      return axios.post(`${APIURL}/bitbucket/setBitbucketCredentials`, data);
    },

repos(page) {
      return axios.get(`${APIURL}/bitbucket/repos/${page || 1}`);
    },

    commits(repoName) {
      return axios.get(`${APIURL}/bitbucket/commits/${repoName}`);
    }
  }
};
We have a HTTP request interceptor to add the authentication token to the header of our requests and in the response interceptor, we intercept the response and clear local storage if 401 response is received.
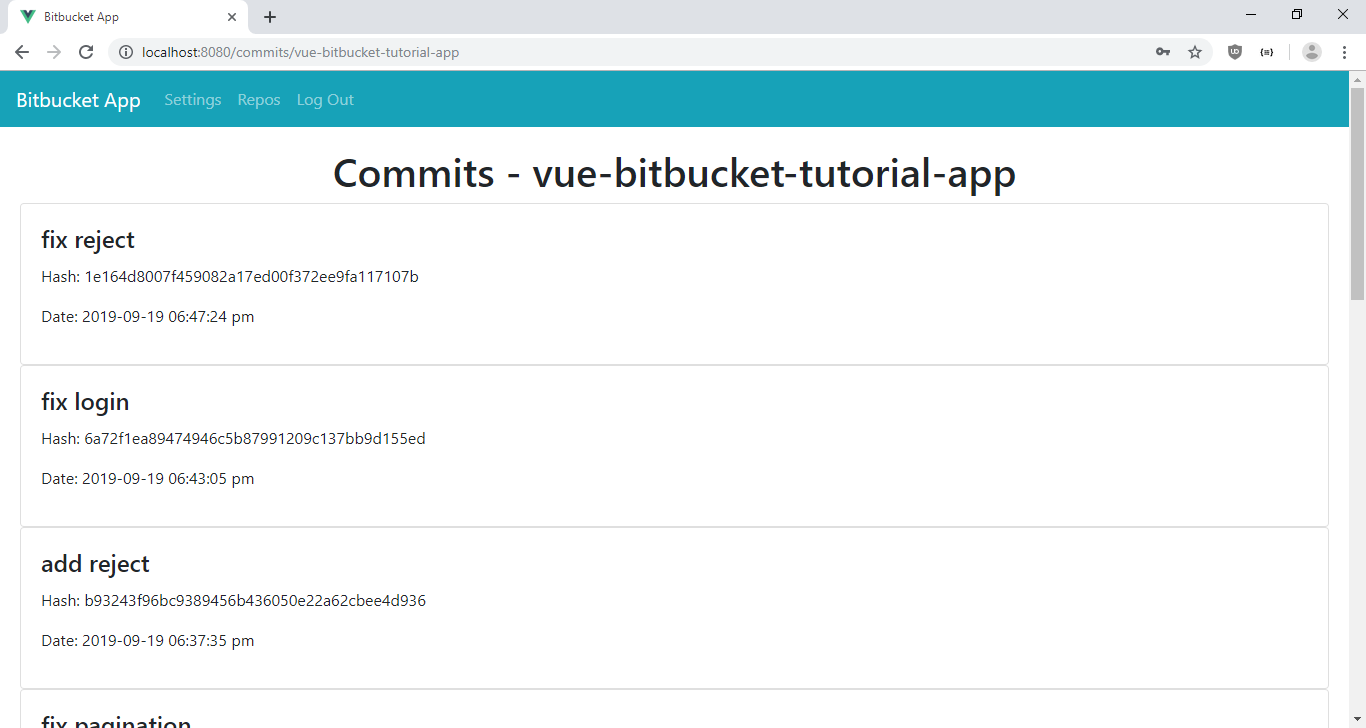
Next we make our pages. First we make a page to list the commits of a repository given the repository name in the URL. Create a file in the views folder called CommitsPage.vue and add:
<template>
  <div>
    <LoggedInTopBar />
    <div class="page">
      <h1 class="text-center">Commits - {{repoName}}</h1>
      <b-card :title="b.message" v-for="b in bitBucketCommits" :key="b.hash">
        <b-card-text>
          <p>Hash: {{b.hash}}</p>
          <p>Date: {{ new Date(b.date) | dateFormat('YYYY-MM-DD hh:mm:ss a') }}</p>
        </b-card-text>
      </b-card>
    </div>
  </div>
</template>

<script>
// @ is an alias to /src
import LoggedInTopBar from "@/components/LoggedInTopBar.vue";
import { requestsMixin } from "../mixins/requestsMixin";

export default {
  name: "home",
  mixins: [requestsMixin],
  components: {
    LoggedInTopBar
  },
  data() {
    return {
      bitBucketCommits: [],
      repoName: ""
    };
  },
  methods: {},
  async beforeMount() {
    this.repoName = this.$route.params.repoName;
    const response = await this.commits(this.repoName);
    this.bitBucketCommits = response.data.values;
  }
};
</script>
We get the repository name from the URL, then get the commits of the repository with the given name and display them in BootstrapVue cards.
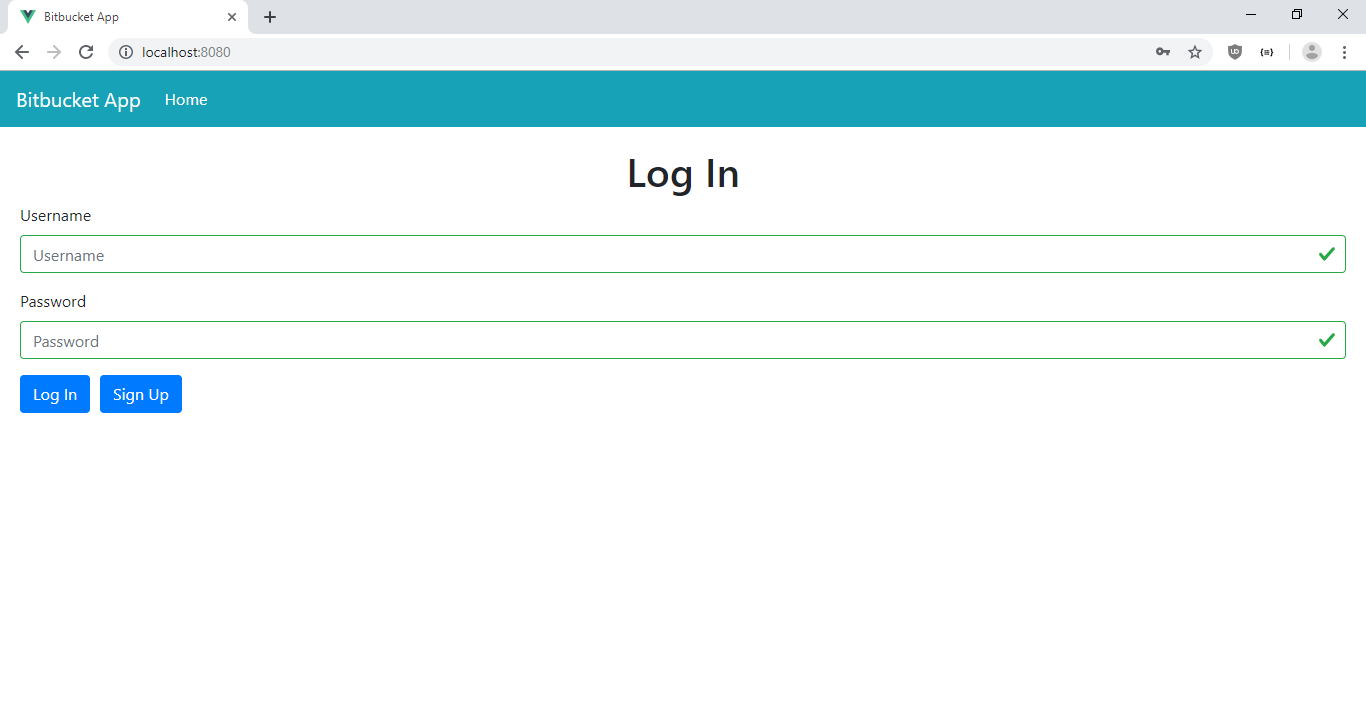
Next we replace the content of Home.vue with:
<template>
  <div>
    <LoggedOutTopBar />
    <div class="page">
      <h1 class="text-center">Log In</h1>
      <ValidationObserver ref="observer" v-slot="{ invalid }">
        <b-form @submit.prevent="onSubmit">
          <b-form-group label="Username" label-for="username">
            <ValidationProvider name="username" rules="required" v-slot="{ errors }">
              <b-form-input
                :state="errors.length == 0"
                v-model="form.username"
                type="text"
                required
                placeholder="Username"
                name="username"
              ></b-form-input>
              <b-form-invalid-feedback :state="errors.length == 0">Username is required</b-form-invalid-feedback>
            </ValidationProvider>
          </b-form-group>

<b-form-group label="Password" label-for="password">
            <ValidationProvider name="password" rules="required" v-slot="{ errors }">
              <b-form-input
                :state="errors.length == 0"
                v-model="form.password"
                type="password"
                required
                placeholder="Password"
                name="password"
              ></b-form-input>
              <b-form-invalid-feedback :state="errors.length == 0">Password is required</b-form-invalid-feedback>
            </ValidationProvider>
          </b-form-group>

<b-button type="submit" variant="primary" style="margin-right: 10px">Log In</b-button>
          <b-button type="button" variant="primary" @click="$router.push('/signup')">Sign Up</b-button>
        </b-form>
      </ValidationObserver>
    </div>
  </div>
</template>

<script>
// @ is an alias to /src
import LoggedOutTopBar from "@/components/LoggedOutTopBar.vue";
import { requestsMixin } from "../mixins/requestsMixin";

export default {
  name: "home",
  mixins: [requestsMixin],
  components: {
    LoggedOutTopBar
  },
  data() {
    return {
      form: {}
    };
  },
  methods: {
    async onSubmit() {
      const isValid = await this.$refs.observer.validate();
      if (!isValid) {
        return;
      }
      try {
        const response = await this.logIn(this.form);
        localStorage.setItem("token", response.data.token);
        this.$router.push("/settings");
      } catch (error) {
        alert("Invalid username or password");
      }
    }
  }
};
</script>
This page is our sign up page. We use Vee-Validate to validate our forms. We wrapped the whole form with ValidationObserver to get the validation status with await this.$refs.observer.validate() in the onSubmit function. We put each input in a ValidationProvider so that each field is validated against the defined rules.
Once this.logIn promise resolves successfully, we get an authentication token, which we set in local storage for access by our requests.
Next we create RepoPage.vue in the views folder and add:
<template>
  <div>
    <LoggedInTopBar />
    <div class="page">
      <h1 class="text-center">Repos</h1>
      <b-card :title="b.name" v-for="b in bitBucketRepos" :key="b.slug">
        <b-card-text>
          <p>Updated on: {{ new Date(b.updated_on) | dateFormat('YYYY-MM-DD hh:mm:ss a') }}</p>
        </b-card-text>

<b-button :to="`/commits/${b.slug}`" variant="primary">See Commits</b-button>
      </b-card>
      <br />
      <b-pagination-nav :link-gen="linkGen" :number-of-pages="numPages" use-router v-model="page"></b-pagination-nav>
    </div>
  </div>
</template>

<script>
// @ is an alias to /src
import LoggedInTopBar from "@/components/LoggedInTopBar.vue";
import { requestsMixin } from "../mixins/requestsMixin";

export default {
  name: "home",
  mixins: [requestsMixin],
  components: {
    LoggedInTopBar
  },
  data() {
    return {
      bitBucketRepos: [],
      page: 1,
      numPages: 1
    };
  },
  methods: {
    linkGen(pageNum) {
      return pageNum === 1 ? "?" : `?page=${pageNum}`;
    },
    async getRepos() {
      const response = await this.repos(this.page);
      this.bitBucketRepos = response.data.values;
      this.numPages = response.data.size / response.data.pagelen;
    }
  },
  beforeMount() {
    this.getRepos();
  },
  watch: {
    async page(val) {
      await this.getRepos(val);
    }
  }
};
</script>
to get the repositories of the given user. Note that we have pagination, since pagination is provided by back end. We use the BootstrapVue paginator, which takes a link-gen prop for passing in a function to generate the link content, and number-of-pages prop which is the number of pages. We need v-model so that this.page is updated, and we can use the watch block that we defined to get the repositories of the set page.
this.getRepos is from requestsMixin .
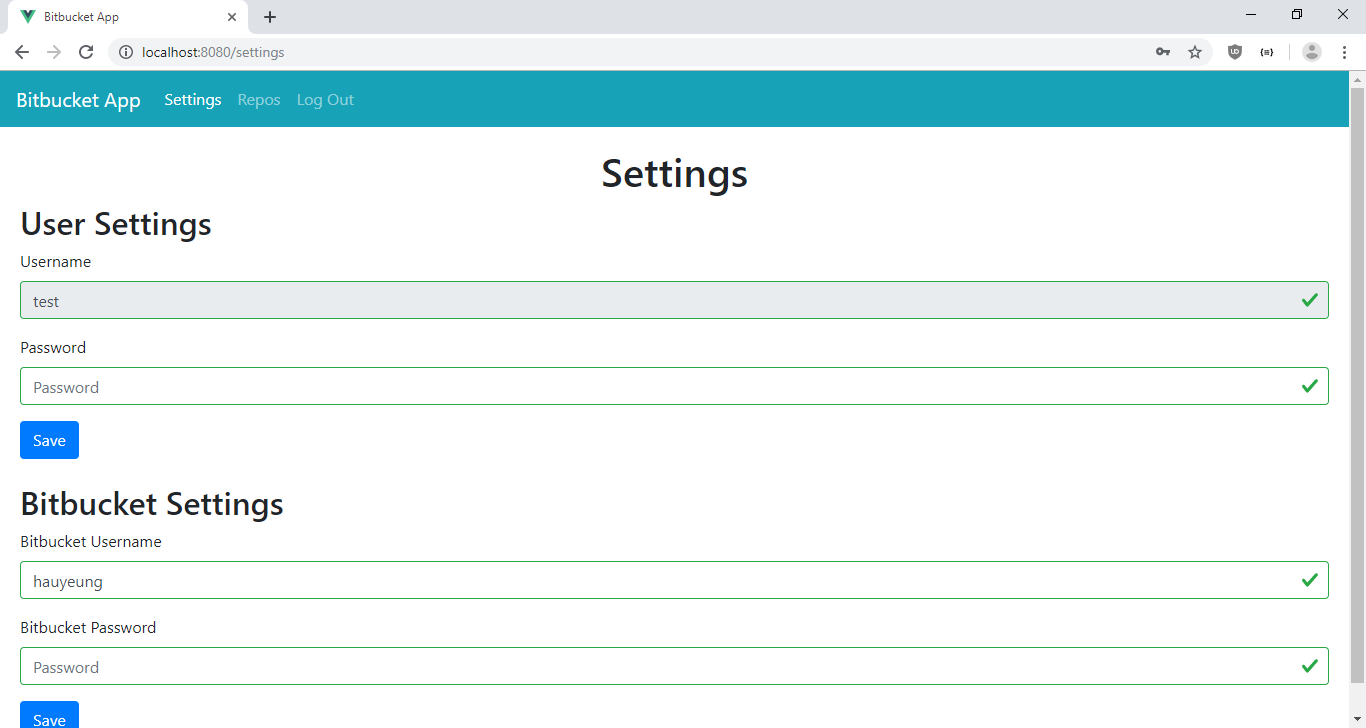
Next create a SettingsPage.vue file in the views folder and add:
<template>
  <div>
    <LoggedInTopBar />
    <div class="page">
      <h1 class="text-center">Settings</h1>

      <h2>User Settings</h2>
      <ValidationObserver ref="userObserver" v-slot="{ invalid }">
        <b-form @submit.prevent="onUserSettingSubmit">
          <b-form-group label="Username" label-for="username">
            <ValidationProvider name="username" rules="required" v-slot="{ errors }">
              <b-form-input
                disabled
                :state="errors.length == 0"
                v-model="form.username"
                type="text"
                required
                placeholder="Username"
                name="username"
              ></b-form-input>
              <b-form-invalid-feedback :state="errors.length == 0">Username is required</b-form-invalid-feedback>
            </ValidationProvider>
          </b-form-group>

<b-form-group label="Password" label-for="password">
            <ValidationProvider name="password" rules="required" v-slot="{ errors }">
              <b-form-input
                :state="errors.length == 0"
                v-model="form.password"
                type="password"
                required
                placeholder="Password"
                name="password"
              ></b-form-input>
              <b-form-invalid-feedback :state="errors.length == 0">Password is required</b-form-invalid-feedback>
            </ValidationProvider>
          </b-form-group>

<b-button type="submit" variant="primary">Save</b-button>
        </b-form>
      </ValidationObserver>

<br />

      <h2>Bitbucket Settings</h2>
      <ValidationObserver ref="bitbucketObserver" v-slot="{ invalid }">
        <b-form @submit.prevent="onBitbucketSettingSubmit">
          <b-form-group label="Bitbucket Username" label-for="bitBucketUsername">
            <ValidationProvider name="username" rules="required" v-slot="{ errors }">
              <b-form-input
                :state="errors.length == 0"
                v-model="bitBucketForm.bitBucketUsername"
                type="text"
                required
                placeholder="Username"
                name="bitBucketUsername"
              ></b-form-input>
              <b-form-invalid-feedback :state="errors.length == 0">Username is required</b-form-invalid-feedback>
            </ValidationProvider>
          </b-form-group>

          <b-form-group label="Bitbucket Password" label-for="bitBucketPassword">
            <ValidationProvider name="password" rules="required" v-slot="{ errors }">
              <b-form-input
                :state="errors.length == 0"
                v-model="bitBucketForm.bitBucketPassword"
                type="password"
                required
                placeholder="Password"
                name="bitBucketPassword"
              ></b-form-input>
              <b-form-invalid-feedback :state="errors.length == 0">Password is required</b-form-invalid-feedback>
            </ValidationProvider>
          </b-form-group>

<b-button type="submit" variant="primary">Save</b-button>
        </b-form>
      </ValidationObserver>
    </div>
  </div>
</template>

<script>
// @ is an alias to /src
import LoggedInTopBar from "@/components/LoggedInTopBar.vue";
import { requestsMixin } from "../mixins/requestsMixin";

export default {
  name: "home",
  mixins: [requestsMixin],
  components: {
    LoggedInTopBar
  },
  data() {
    return {
      form: {},
      bitBucketForm: {}
    };
  },
  methods: {
    async onUserSettingSubmit() {
      const isValid = await this.$refs.userObserver.validate();
      if (!isValid) {
        return;
      }
      await this.changePassword(this.form);
      alert("Password changed");
    },

    async onBitbucketSettingSubmit() {
      const isValid = await this.$refs.bitbucketObserver.validate();
      if (!isValid) {
        return;
      }
      await this.setBitbucketCredentials(this.bitBucketForm);
      alert("Bitbucket credentials changed");
    }
  },
  async beforeMount() {
    const response = await this.currentUser();
    const { username, bitBucketUsername } = response.data;
    this.form = { username };
    this.bitBucketForm = { bitBucketUsername };
  }
};
</script>
We have our forms for setting our account password and setting the Bitbucket credentials here. The forms work the same way as the log in form in Home.vue . The this.changePassword and this.setBitbucketCredentials functions are from our requestsMixin . The functions make the HTTP requests.
Next we create SignUpPage.vue in the views folder and add:
<template>
  <div>
    <LoggedOutTopBar />
    <div class="page">
      <h1 class="text-center">Sign Up</h1>
      <ValidationObserver ref="observer" v-slot="{ invalid }">
        <b-form @submit.prevent="onSubmit">
          <b-form-group label="Username" label-for="username">
            <ValidationProvider name="username" rules="required" v-slot="{ errors }">
              <b-form-input
                :state="errors.length == 0"
                v-model="form.username"
                type="text"
                required
                placeholder="Username"
                name="username"
              ></b-form-input>
              <b-form-invalid-feedback :state="errors.length == 0">Username is required</b-form-invalid-feedback>
            </ValidationProvider>
          </b-form-group>

<b-form-group label="Password" label-for="password">
            <ValidationProvider name="password" rules="required" v-slot="{ errors }">
              <b-form-input
                :state="errors.length == 0"
                v-model="form.password"
                type="password"
                required
                placeholder="Password"
                name="password"
              ></b-form-input>
              <b-form-invalid-feedback :state="errors.length == 0">Password is required</b-form-invalid-feedback>
            </ValidationProvider>
          </b-form-group>

<b-button type="submit" variant="primary">Sign Up</b-button>
        </b-form>
      </ValidationObserver>
    </div>
  </div>
</template>

<script>
// @ is an alias to /src
import LoggedOutTopBar from "@/components/LoggedOutTopBar.vue";
import { requestsMixin } from "../mixins/requestsMixin";

export default {
  name: "home",
  mixins: [requestsMixin],
  components: {
    LoggedOutTopBar
  },
  data() {
    return {
      form: {}
    };
  },
  methods: {
    async onSubmit() {
      const isValid = await this.$refs.observer.validate();
      if (!isValid) {
        return;
      }
      try {
        await this.signUp(this.form);
        alert("Sign up successful");
      } catch (error) {
        alert("Username is already taken");
      }
    }
  }
};
</script>
We create the sign up form here and submit the data with the HTTP request by calling this.signUp from the requestsMixin to submit the data.
Next in App.vue , replace the existing code with:
<template>
  <router-view />
</template>

<style lang="scss">
.page {
  padding: 20px;
}
</style>
We have router-view so we can view our components routed by Vue Router, and we add some padding to the pages.
Next in main.js , replace the existing code with:
import Vue from "vue";
import App from "./App.vue";
import router from "./router";
import store from "./store";
import "bootstrap/dist/css/bootstrap.css";
import "bootstrap-vue/dist/bootstrap-vue.css";
import BootstrapVue from "bootstrap-vue";
import { ValidationProvider, extend, ValidationObserver } from "vee-validate";
import { required } from "vee-validate/dist/rules";
import VueFilterDateFormat from "vue-filter-date-format";

extend("required", required);
Vue.component("ValidationProvider", ValidationProvider);
Vue.component("ValidationObserver", ValidationObserver);
Vue.use(BootstrapVue);
Vue.use(VueFilterDateFormat);

Vue.config.productionTip = false;

router.beforeEach((to, from, next) => {
  const token = localStorage.getItem("token");
  if (to.fullPath != "/" && to.fullPath != "/signup") {
    if (!token) {
      router.push("/");
    }
  }

  next();
});

new Vue({
  router,
  store,
  render: h => h(App)
}).$mount("#app");
This is where we include the libraries we used in this app, and also intercept the Vue Router navigation to check if the authentication token is present in the authenticated routes. We call next if the token is present if a user tries to go to authenticated routes.
We also import the Bootstrap CSS in this file so we see Bootstrap styling.
Finally, in index.html , replace the existing code with:
<!DOCTYPE html>
<html lang="en">
  <head>
    <meta charset="utf-8" />
    <meta http-equiv="X-UA-Compatible" content="IE=edge" />
    <meta name="viewport" content="width=device-width,initial-scale=1.0" />
    <link rel="icon" href="<%= BASE_URL %>favicon.ico" />
    <title>Bitbucket App</title>
  </head>
  <body>
    <noscript>
      <strong
        >We're sorry but frontend doesn't work properly without JavaScript
        enabled. Please enable it to continue.</strong
      >
    </noscript>
    <div id="app"></div>
    <!-- built files will be auto injected -->
  </body>
</html>
to change the title of our app.
After all the hard work is done, we run the back end app by going into the backend folder and run npm start . And then go into the frontend folder and run npm run serve .
At the end, we get:

Thank for reading !
#Vuejs #Vue Router #JavaScript #Nodejs #Programming