Build Your First Open Source Python Project
In this article, we’ll go through each step to make a basic Python package. In future articles we’ll set up automated tests and doc builds. We’ll also integrate other helpful apps to improve your package development.
A step-by-step guide to a working package
Every software developer and data scientist should go through the exercise of making a package. You’ll learn so much along the way.
Making an open source Python package may sound daunting, but you don’t need to be a grizzled veteran. You also don’t need an elaborate product idea. You do need persistence and time. Hopefully this guide will help you need less of both. 😃
You can then expand what you’ve built to suit your needs.
This guide is for macOS with Python 3.7. Everything works now, but things change fast, so no guarantees if your reading this in 2030, or even 2020. Replace my_package, my_file, etc. with your own names.
Let’s get to it! 🚀
Step 1: Make a Plan
We’re eventually planning to make a very simple library for use in a Python program. The package will allow the user to easily convert a Jupyter notebook into an HTML file or a Python script.
The first iteration of our package will allow a user to call a function that will print a statement.
Now that we know what we want to make, we need to decide what to call the package.
Step 2: Name it
Naming things is tricky. Names should be unique, short, and memorable. They should also be all lowercase and definitely not have any dashes or other punctuation in them. Underscores are discouraged. When you’re building your package, check that the name is available on GitHub, Google, and PyPI.
If you have high hopes that your package will some day have 10,000 GitHub stars, then you might want to check if the name is available on social networks. In this example, I’m going to name my package notebookc because it’s available, short, and semi-descriptive. 😄
Step 3: Configure Environment
Make sure you have Python 3.7, GitHub, and Homebrew installed and configured. If you need any of those here are the details:
Python
Download Python 3.7 here and install it.
GitHub
If you don’t have a GitHub account, go here and sign up for a free one. See how to install and configure Git here. You want the command line tool. Follow the links to download it, install it, set your username, and set your commit email address.
Homebrew
Homebrew is a Mac-specific package manager. Install instructions are here.
Venv
As of Python 3.6, it is recommended to use venvto create your virtual environment for package development. There are many ways to manage virtual environments with Python and the recommendations have evolved. See discussion here, but beware going down this rabbit hole. 🕳
venv comes installed with Python since Python 3.3. Note that venv installs pip and setuptools into the virtual environment since Python 3.4 .
Create a Python 3.7 virtual environment with the following command:
python3.7 -m venv my_env
Replace my_env with any name you like. Activate your virtual environment like this:
source my_env/bin/activate
You should now see (my_env)— or whatever you named your virtual environment— to the far left in your terminal prompt.
When you’re finished with your development, deactivate your virtual environment with deactivate.
Now let’s take care of setting up things on GitHub.
Step 4: Create Organization on GitHub
GitHub is the market leader in version control registries. GitLab and Bitbucket are other popular options. We’ll be using GitHub in this guide.
- You’ll use Git and GitHub a bunch, so if you aren’t familiar, check out my article here.
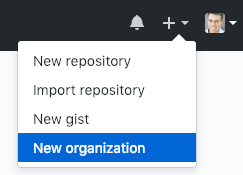
- Create a new organization on Github. Follow the prompts. I named my organization notebooktoall. You could create the repo under your own personal account, but part of the goal is to learn how to setup an open source project for the larger community.
Step 5: Set up GitHub Repo
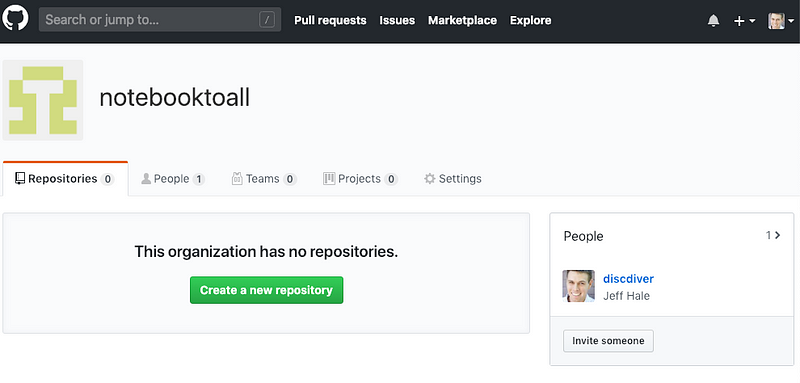
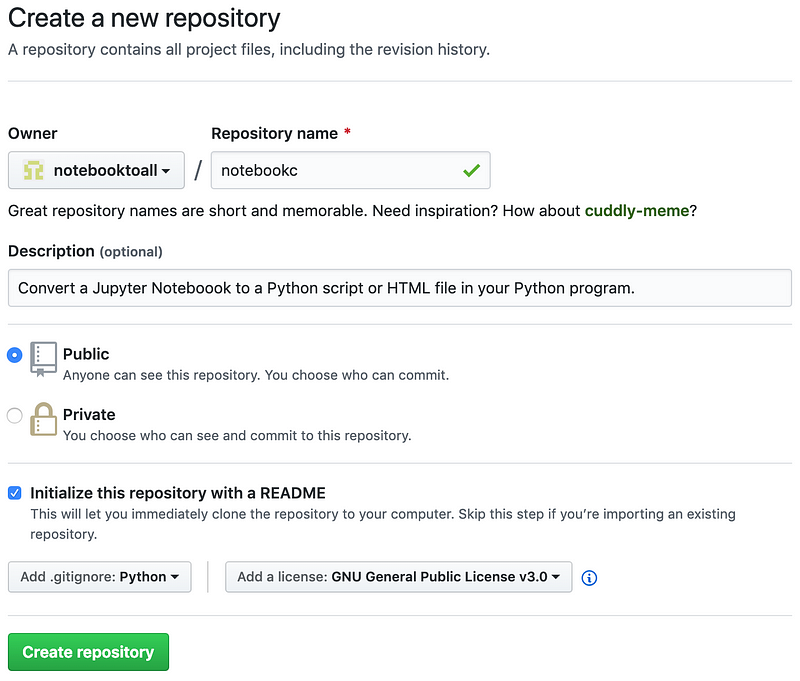
Create a new repository. I named my repo notebookc.
Add a .gitignore from the dropdown list. Choose Python for your repository. The contents of your .gitignore file will match folders and file types to exclude from your Git repo. You can alter your .gitignore later to exclude other unnecessary or sensitive files.
I suggest you choose a license from the Add a license dropdown_._ The licensedefines what users of your repository content can do. Some licenses are more permissive than others. Default copyright laws apply if no license is chosen. Learn more about licenses here.
For this project I chose the GNU General Public License v3.0 because it is popular, legit, and “guarantees end users the freedom to run, study, share and modify the software” — source.
Step 6: Clone and Add Directories
Choose where you want to clone your repo locally and run the following:
git clone [[https://github.com/notebooktoall/notebookc.git](https://github.com/notebooktoall/notebook_convert.git)](https://github.com/notebooktoall/notebookc.git](https://github.com/notebooktoall/notebook_convert.git) "https://github.com/notebooktoall/notebookc.git](https://github.com/notebooktoall/notebook_convert.git)")
Substitute your organization and repo.
Move into your project folder with your desktop GUI or code editor. Or use the command line with cd my-project and then view your files with ls —A. Your initial folders and files should look like this:
.git
.gitignore
LICENSE
README.rst
Create a subfolder for your primary project files. I suggest you name this primary subfolder the same name as your package. Make sure the name doesn’t have any spaces in it.
Make a file named init*.py* in your primary subfolder. This file will remain empty for now. This file is necessary for the files in this folder to be imported.
Make another file with the same name as your primary subfolder with .py appended to it. My file is named notebookc.py. You could name this Python file whatever you like. Your package users will
My notebookc directory contents now look like this:
.git
.gitignore
LICENSE
README.rst

notebookc/__init__.py
notebookc/notebookc.py
Step 7: Create and Install requirements_dev.txt
In the top level of your project directory, create a requirements_dev.txt file. Often this file is named requirements.txt. Calling it requirements_dev.txt highlights that these packages are only installed by project developers.
In requirements_dev.txt, specify that pip and wheel should be installed.
pip==19.0.3
wheel==0.33.1
Notice that we specify exact versions of these packages with double equals signs and full major.minor.micro version numbers.

A collaborator who forks the project repo and installs the pinned requirements_dev.txt packages with pip will have the same package versions you did. You know they will work for them. Also, Read The Docs will use this file to install packages when it builds your documentation.
In your activated virtual environment, install the packages in requirements_dev.txt with the following command:
pip install -r requirements_dev.txt
You’ll want to keep these packages updated as newer versions are released. For now, you can install whatever versions are newest by searching PyPI.
We’ll install a tool to help with this process in a future article. Follow me to make sure you don’t miss it.
Step 8: Code and Commit
Let’s create a basic function for demonstration purposes. You can create your own awesome function later. 👍
Type the following into your primary file (for me that’s notebookc/notebookc/notebookc.py):
def convert(my_name):
    """
    Print a line about converting a notebook.
    Args:
        my_name (str): person's name
    Returns:
        None
    """

print(f"I'll convert a notebook for you some day, {my_name}.")
That’s our function in all its glory. 😃
The docstrings begin and end with three consecutive double quotes. They’ll be used in later article to automatically create documentation.
Let’s commit our changes. See this article if you’d like a Git workflow refresher.
Step 9: Create setup.py
The setup.py file is the build script for your package. The setup function from Setuptools will build your package for upload to PyPI. Setuptools includes information about your package, your version number, and which other packages are required for users.
Here’s my example setup.py file:
from setuptools import setup, find_packages

with open("README.md", "r") as readme_file:
    readme = readme_file.read()

requirements = ["ipython>=6", "nbformat>=4", "nbconvert>=5", "requests>=2"]

setup(
    name="notebookc",
    version="0.0.1",
    author="Jeff Hale",
    author_email="jeffmshale@gmail.com",
    description="A package to convert your Jupyter Notebook",
    long_description=readme,
    long_description_content_type="text/markdown",
    url="https://github.com/your_package/homepage/",
    packages=find_packages(),
    install_requires=requirements,
    classifiers=[
        "Programming Language :: Python :: 3.7",
        "License :: OSI Approved :: GNU General Public License v3 (GPLv3)",
    ],
)
Notice that long_description is set to the contents of your README.md file.
The requirements list specified in setuptools.setup.install_requires includes all necessary package dependencies for for your package to work.
Unlike the list of packages required for development in requirements_dev.txt, this list of packages should be as permissive as possible. Read more about why here.
Limit this install_requires list of packages to only wants needed — you don’t want to make users install unnecessary packages. Note that you only need to list packages that aren’t part of the Python standard library. Your user will have Python installed if they will be using your package. 😄
Our package doesn’t require any external dependencies, so you can exclude the four packages listed aboveA collaborator who forks the project repo and installs the pinned packages with pip will have the same package versions you did. You know they will work.
Change the other setuptools information to match your package information. There are many other optional keyword arguments and classifiers — see a list here. More in-depth guides to setup.py can be found here and here.
Commit your code to your local Git repo. Let’s get ready to build a package!
Step 10: Build First Version
Twine is a collection of utilities for securely publishing Python packages on PyPI. Add the Twine package to the next blank line of requirements_dev.txt like so:
twine==1.13.0
Then install Twine into your virtual environment by reinstalling your requirements_dev.txt packages.
pip install -r requirements_dev.txt
Then run the following command to create your package files:
python setup.py sdist bdist_wheel
Multiple hidden folders should be created: dist, build, and — in my case — notebookc.egg-info. Let’s look at the files in the dist folder. The .whl file is the Wheel file — the built distribution. The .tar.gz file is the a source archive.
On a user’s machine, pip will install packages as wheels whenever it can. Wheels are faster to install. When pip can’t install a wheel, it falls back on the source archive.
Let’s get ready to upload our wheel and source archive.
Step 11: Create TestPyPI Account
PyPI stands for Python Package Index. It’s the official Python package manager. pip grabs files from PyPI when they aren’t already installed locally.
TestPyPI is a functioning test version of PyPI. Create a TestPyPI account here and confirm your email address. Note that you’ll have separate passwords for uploading to the test site and official site.
Step 12: Publish to TestPyPI

Use Twine to securely publish your package to TestPyPI. Enter the following command — no modifications are necessary.
twine upload --repository-url [[https://test.pypi.org/legacy/](https://test.pypi.org/legacy/)](https://test.pypi.org/legacy/](https://test.pypi.org/legacy/) "https://test.pypi.org/legacy/](https://test.pypi.org/legacy/)") dist/*
You’ll be prompted for your username and password. Remember, TestPyPI and PyPI have different passwords!
If needed, fix any errors, make a new version number in setup.py, and delete the old build artifacts: the build, dist, and egg folders. Rebuild with python setup.py sdist bdist_wheel and re-upload with Twine. Having version numbers on TestPyPI that don’t signify anything isn’t a big deal — you’re the only one who will use those package versions. 😄
Once you’ve successfully uploaded your package, let’s make sure you can install it and use it.
Step 13: Verify Installation and Use
Create another tab in your terminal shell and make another virtual environment.
python3.7 -m venv my_env
Activate it.
source my_env/bin/activate
If you had uploaded your package to the official PyPI site you would then pip install your-package. We can retrieve the package from TestPypPI and install it with a modified command.
Here are the official instructions to install your package from TestPyPI:
You can tell pip to download packages from TestPyPI instead of PyPI by specifying the — index-url flag> You can tell pip to download packages from TestPyPI instead of PyPI by specifying the — index-url flag> You can tell pip to download packages from TestPyPI instead of PyPI by specifying the — index-url flag> You can tell pip to download packages from TestPyPI instead of PyPI by specifying the — index-url flag> You can tell pip to download packages from TestPyPI instead of PyPI by specifying the — index-url flag> You can tell pip to download packages from TestPyPI instead of PyPI by specifying the — index-url flag> You can tell pip to download packages from TestPyPI instead of PyPI by specifying the — index-url flag
If your package has dependencies, use the second command and substitute your package name.
You should see the latest version of your package installed in your virtual environment.
To verify you can use your package, start an IPython session in your terminal with:
python
Import your function and call your function with a string argument. Here’s what my code looks like:
from notebookc.notebookc import convert
convert(“Jeff”)
I then see this output:
I’ll convert a notebook for you some day, Jeff.
Sure you will. 😉
Alright, let’s upload our work to GitHub.
Step 14: Push to GitHub
Make sure you have your code committed.
My notebookc project folder looks like this:
.git
.gitignore
LICENSE
README.md
requirements_dev.txt
setup.py

notebookc/__init__.py
notebookc/notebookc.py
Exclude any virtual environments you don’t want to upload. The Python .gitignore file that we chose when we made the repo should keep build artifacts from being indexed. You may need to delete your virtual environment folders.
Push your local branch to GitHub with git push origin my_branch.
Step 15: Create and Merge PR
From your browser, navigate to GitHub. You should see an option to make a pull request. Keep pressing the green buttons to create and merge your PR, and delete your remote feature branch.
Back in your terminal, delete your local feature branch with git branch -d my_feature_branch.
We’ll add many more files and folders in future articles.
Let’s recap our steps.
Recap: 15 Steps to a Working Package
- Make a Plan
- Name it
- Configure Environment
- Create Organization on Github
- Set up GitHub Repo
- Clone and Add Directories
- Create and Install requirements_dev.txt
- Code and Commit
- Create setup.py
- Build First Version
- Create TestPyPI Account
- Push to TestPyPI
- Verify Installation and Use
- Push to GithHub
- Create and Merge PR
Wrap
I hope you found this guide to making and releasing your first Python package useful. If you did, please share it on your favorite social media channels so others can find it too. 👏
Happy building!
Learn More
☞ Learn Programming with Python Step by Step
☞ Complete Python: Go from zero to hero in Python
☞ Applied Deep Learning with PyTorch - Full Course
☞ Build a Simple CRUD App with Python, Flask, and React
☞ Learn Python 3 Programming for Beginners
☞ An A-Z of useful Python tricks
☞ A Complete Machine Learning Project Walk-Through in Python
☞ Learning Python: From Zero to Hero
☞ MongoDB with Python Crash Course - Tutorial for Beginners
☞ Introduction to PyTorch and Machine Learning
☞ Complete Python Bootcamp: Go from zero to hero in Python 3
☞ Python and Django Full Stack Web Developer Bootcamp
☞ The Python Bible™ | Everything You Need to Program in Python
#python
