But what is web scraping?
Web scraping* is data scraping used for extracting data from websites*
And you then may ask, why would someone want to conduct web scraping. Well, there are countless applications for the practice. For example, it could be used to grab flight times or accommodation details. Gather email address from various directories for marketing/promotion purposes or simply gather data from one website to be used on another website.
However, while this may all sound great, there are a few important issues surrounding this practice. Depending on the usage of the web scraping, your application may be performing potential illegal operations. A DOS, or **Denial-of-Service **attack, is a cyber-attack in which the perpetrator seeks to make a machine or network resource unavailable for its intended purpose. By scraping a large amount of data by completing an equally large amount of requests to the resource, this could be seen as a DOS attack. In addition to this, there are many cases in which web scraping will be a breach of the Terms of Service or Terms of Use.
The process that we will be using can be broken down into a few simple steps:
- Get the HTML source code from the **website **of choice
- Find the information that we want to extract, and manually decode the markup to find the required elements
- Extracting the information and exporting it into a usable format
Right, let’s get set up.
For reference, I am developing on Ubuntu and my code editor of choice is **Visual Studio Code **which you can find here
As we are going to be using Node.JS and **NPM **for this, make sure you have both these tools already set up. If you don’t already have them installed, you can grab them from here. Just to test if they were installed correctly, or at still functioning as intended to can run the following commands:
$ node -v # output v8.10.0
$ npm -v # output 3.5.2
Note that your results may vary depending on the versions on the tools you currently have installed.
In an empty directory, create an empty **index.js **file, this will be where all of the code we write is contained. Next, we need to initialise the project and then install the dependencies we need, so run the following commands from a terminal or gitBash, while inside the newly created directory:
# this will set up a new npm package
$ npm init
# and this will install the dependencies that we need
$ npm install --save request request-promise cheerio objects-to-csv
There are three packages that we are going to be using for this:
- request-promise — A simple HTTP client, that we will use to make our requests. There are plenty of good alternatives such as axios.
- cheerio.js — Cheerio is the package that will be parsing the markup for us. It’s important to note that it does not interpret a web page in the same way that a web browser does. In particular, it will **NOT **execute javascript, load external resources, provide a visual render or apply CSS. What this means is that if you need to scrape a site, that is rendered client side, or has some specific functionality that needs to execute before you can scrape the data, you should look at a different library, such as PhantomJS
- objects-to-csv— This allows us to convert JS objects and optionally, save it to a CSV file. As with the other two, there are plenty of different libraries that can provide similar or more functionality.
Now, we can code.
With the project setup, open the **index.js **file in a text editor. First, we need to import the modules we have installed and declare the variables for the website we will scrape which for this **tutorial **will be Wikipedia. In particular this page — https://en.wikipedia.org/wiki/ListofEuropean_countries_by_population.
// Import the modules we need
const rp = require("request-promise");
const otcsv = require("objects-to-csv");
const cheerio = require("cheerio");

// Define the URLS we will be scraping
const baseURL = "https://en.wikipedia.org";
const countriesURL = "/wiki/List_of_European_countries_by_population";

// Define the method for collecting the data
const getCountriesData = async () => {
  const html = await rp(baseURL + countriesURL);
  console.log(html);
};

// Call the method
getCountriesData();
The above segment will first import the npm modules we installed earlier into the document and define the URLs we will need for retrieving data. Finally the method we will expand on to get our data. Now in the terminal, run the following from the project directory.
$ node index.js
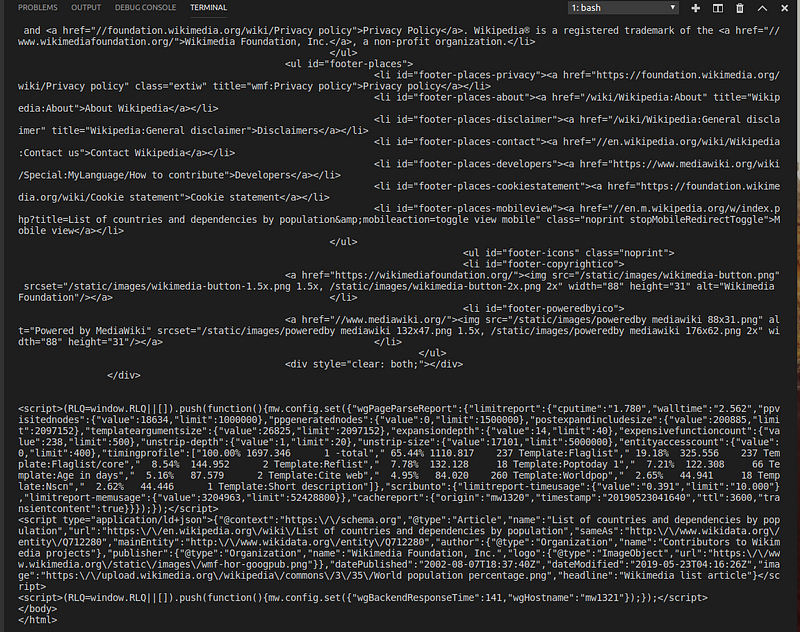
This will run our request and the output will contain all of the **HTML **for the web page. It should look something like this.
So the goal we are aiming to reach is retrieving a list of countries along with the capital from each. The first thing we need to do is work out which elements on the page contain the data we want and to do this we will be using the inspector of our web browser. I will be using the chrome dev tools. The first element we want is the country name, which could be found within the table of countries on the page :
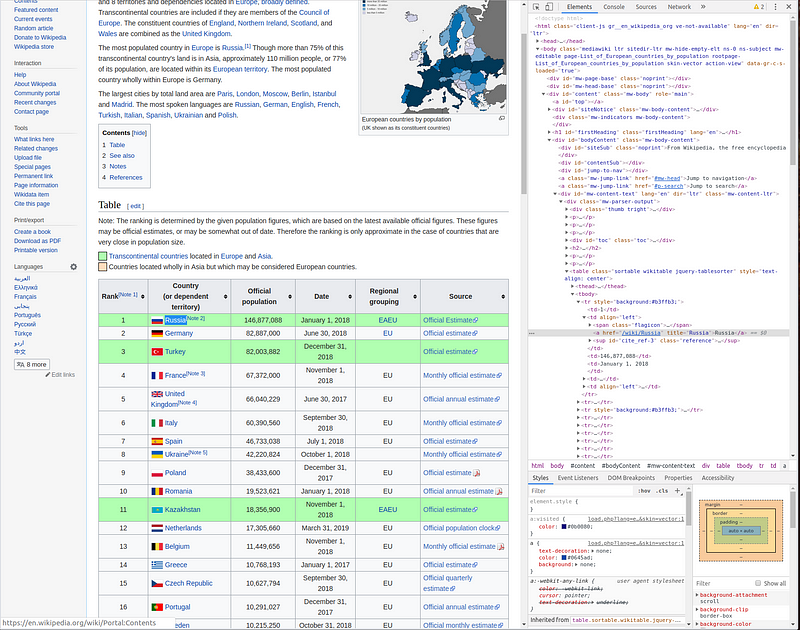
So the element we need is the following:
<a href="/wiki/Russia" title="Russia">Russia</a>
This contains the country name as well as a href attribute, which we will need later to get the other piece of data. The link is nested under several elements, which is part of how we will tell Cheerio what to select. The other is which column of table the data we want is in. So let’s update our **getCountriesData **method with the following.
// Define the method for collecting the data
const getCountriesData = async () => {
  const html = await rp(baseURL + countriesURL);

  const countriesMap = cheerio("tr > td:nth-child(2) > a", html)
    .map(async (index, element) => {
      console.log(element.children[0].data);
    })
    .get();
};
If you now run the code again with** node index.js** you will see a list of the countries from the web page printed to your console. The selector we are using to get the country name is :
"tr > td:nth-child(2) > a"
What this tells Cheerio to look for is an anchor element, that is nested under a table cell, that is the second child of its parent, that is nested within a table row. Now we have this we can go back to our inspector to find the last piece of information we want to find, the capital. If we head back into the dev tools, and follow the link for Russia, we can see that the capital city is displayed in the table to the right:
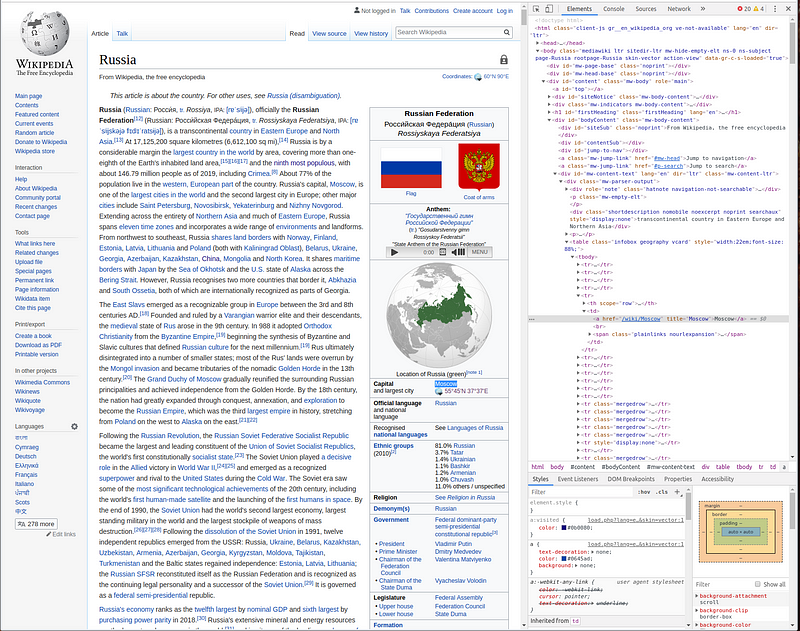
The element we want is:
<a href="/wiki/Moscow" title="Moscow">Moscow</a>
However, there is not a clear way to identify this piece of data so we have to create a slightly more complex query. Update your code to reflect this:
// Define the method for collecting the data
const getCountriesData = async () => {
  const html = await rp(baseURL + countriesURL);

  const countriesMap = cheerio("tr > td:nth-child(2) > a", html)
    .map(async (index, element) => {
      const link = baseURL + element.attribs.href; // Get the link for the country
      const name = element.children[0].data; // Get the country name
      const innerHTML = await rp(link);
      const tableHead = cheerio("tr > th", innerHTML);
      var capital;
      if (
        tableHead
          .text()
          .toLowerCase()
          .includes("capital")
      ) {
        const td = tableHead.next();
        const a = cheerio("a", td).first();
        capital = a.text();
        return {
          name,
          link,
          capital
        };
      }
    })
    .get();
  return Promise.all(countriesMap);
};

// Call the method
getCountriesData()
  .then(data => {
    console.log(data);
  })
  .catch(error => {
    console.log(error);
  });
In order to get the capital city, we first have to find all of the table headings on the page. We then check if the heading contains ‘capital’ and if it does, we have found the table row that we want to extract the city name from. So we can simply use the **.next() **method to get the next sibling of the selected element, which for us will be a table cell. We can then simply get the first anchor element, which should be the name of the capital. Finally, then return the data as an object.
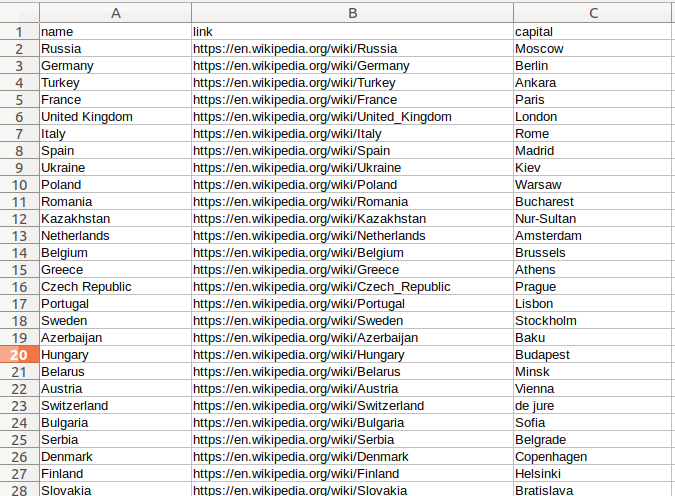
The result will produce an array containing elements with the country, a link and the capital if you run it again.
[ { name: 'Russia',
    link: 'https://en.wikipedia.org/wiki/Russia',
    capital: 'Moscow' },
  { name: 'Germany',
    link: 'https://en.wikipedia.org/wiki/Germany',
    capital: 'Berlin' },
  { name: 'Turkey',
...
You may notice that we have one issue with the data we are getting back. For the channel islands of the UK, we are getting the country as the United Kingdom and in turn, the capital returned is London, rather than the correct data for the appropriate island. However, for this example, this is not a major issue.
The final step is to export the data to a CSV which is easily taken care of for us by the objects-to-csv package we installed earlier. Update where you call the getCountriesData method to the following:
// Call the method
getCountriesData()
  .then(data => {
    const transformed = new otcsv(data);
    return transformed.toDisk("./countryData.csv");
  })
  .then(() => {
    console.log("Web Scrape Complete!");
  })
  .catch(error => {
    console.log(error);
  });
This will produce a csv file with all the data we have scraped from wiki:
Conclusion
So in conclusion, web scraping is a powerful tool that can be used to extract and store data from various websites fairly easily. While it might involve a bit of manual work to get the queries setup, automatic this data collection process can be a time-saving venture.
Here is a full gist of the completed code:
// Import the modules we need
const rp = require("request-promise");
const otcsv = require("objects-to-csv");
const cheerio = require("cheerio");

// Define the URLS we will be scraping
const baseURL = "https://en.wikipedia.org";
const countriesURL = "/wiki/List_of_European_countries_by_population";

// Define the method for collecting the data
const getCountriesData = async () => {
  const html = await rp(baseURL + countriesURL);

  const countriesMap = cheerio("tr > td:nth-child(2) > a", html)
    .map(async (index, element) => {
      const link = baseURL + element.attribs.href; // Get the link for the country
      const name = element.children[0].data; // Get the country name
      const innerHTML = await rp(link);
      const tableHead = cheerio("tr > th", innerHTML);
      var capital;
      if (
        tableHead
          .text()
          .toLowerCase()
          .includes("capital")
      ) {
        const td = tableHead.next();
        const a = cheerio("a", td).first();
        capital = a.text();
        return {
          name,
          link,
          capital
        };
      }
    })
    .get();
  return Promise.all(countriesMap);
};

// Call the method
getCountriesData()
  .then(data => {
    const transformed = new otcsv(data);
    return transformed.toDisk("./countryData.csv");
  })
  .then(() => {
    console.log("Web Scrape Complete!");
  })
  .catch(error => {
    console.log(error);
  });
#node-js #javascript #web-development