Introduction
I am going to spend some time with the project set up to keep things well organized and easy to maintain in the future.
I am intending to make this into an episode-based tutorial so I will add in other parts things like File Upload using Firebase cloud storage and Smart Push Notifications
So, let’s get started.
What we are building
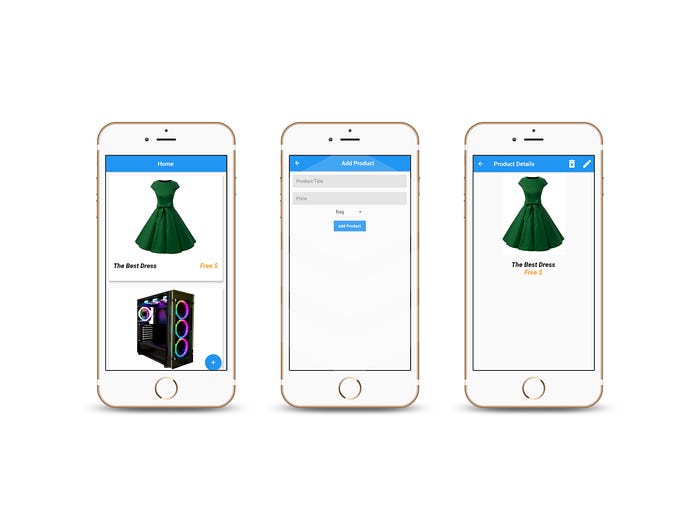
In this tutorial, we will build an app where you can different types of products and show these products in the main view.
Our final app will look like this:
Prerequisites
In order to follow this guide, you need the following:
- Firebase console (usually linked with the Google account)
- A Flutter project, e.g. course.productapp ( you need to decide on a project ID for your app using the following pattern <com>.<brand>.<app>. For example, the app would be com.course.productapp.)
- iOS or ANDROID setup for the Flutter project
Project setup
Before diving into the real coding part, let’s see what are the plugins and assets required in this project.
Firebase console: Project setup
To get started with Firebase, you need to have a Google account. Visit https://firebase.google.com/ and log in with your Google account credentials. You will be logged in to the Firebase console where you need to set up your project. Once logged in you can create a project.
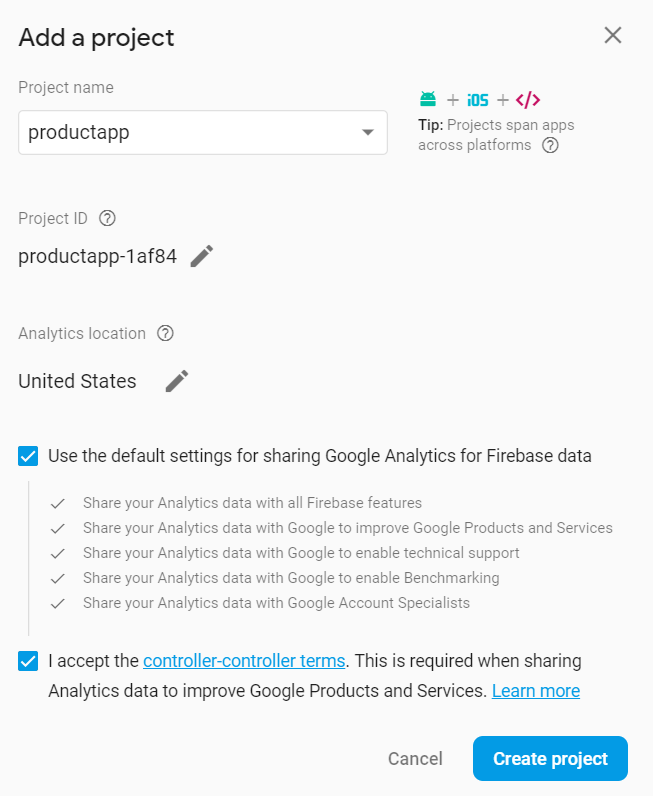
Now, let’s create our Demo project.
In the Firebase console clique add project and chose your project name
ANDROID SetupOnce the project is created, go to the Firebase Console and register your app by clicking Add Firebase to your app Android. Enter your project ID
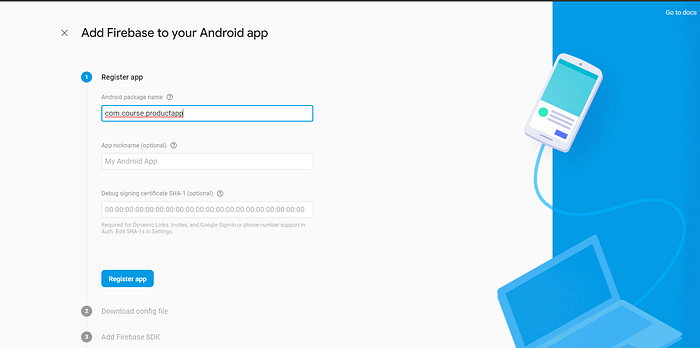
Download the google-services.json file to the android/app directory
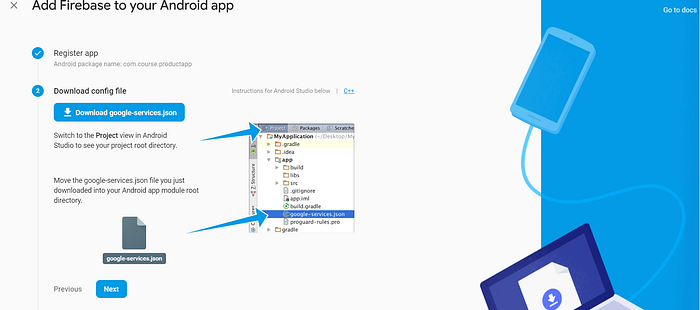
At this point, you can skip all remaining steps in the Firebase console (Flutter does this stuff automatically).Now we need to register our Google services in the Gradle build files under android/build.gradle
buildscript {
   dependencies {
       // …
       classpath ‘com.google.gms:google-services:4.2.0’   // <-- here
   }
}
Next, update your project ID and register the Google services plugin at the bottom of the gradle build file in the app directory.
defaultConfig {
        applicationId “com.course.product” // <-- update this line
        minSdkVersion 21 // <-- you might also need to change this to 21
        // …
    }
// … bottom of file
apply plugin: ‘com.google.gms.google-services’ // <-- add
That’s it. Our android app is ready to go
IOS Setup
The iOS setup is easier and can be completed in one step.
Click add your app to iOS then download the GoogleService-Info.plist file into the ios/Runner/Runnerdirectory from XCode (Make sure to use XCode ).
Plugins
The plugins needed for this project are:
1.cloud_firestore(A Flutter plugin to use the Cloud Firestore API.)
2.firebase_core( Flutter plugin for Firebase Core, enabling connecting to multiple Firebase apps.)
3.provider( A dependency injection system built with widgets for widgets. provider is mostly syntax sugar for InheritedWidget, to make common use-cases straightforward.)
4.get_it(we will use it for dependency injection with provider)
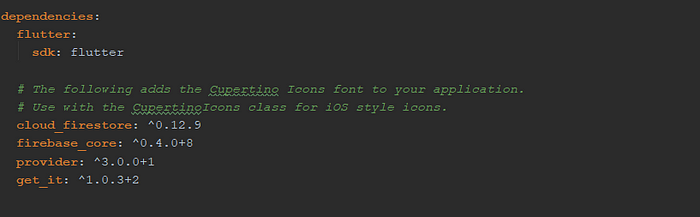
Don’t forget to run flutter packages getAssets
we will need some images for this project which we will use for our product app. (you can find them in under the asset folder in the Github project)
Now . we should be ready to start coding.
Implementation
you can follow the setup project in Github under code_setup branch.
Code Setup
the architecture I am going to use was introduced by Dane Mackier so feel free to check his article Here
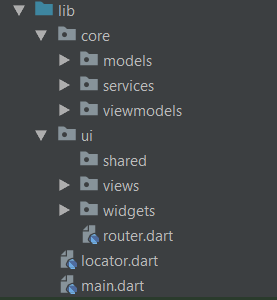
Let’s quickly go over the structure. The lib folder is divided into two folders. core and UI. Core contains all the files associated with the logic. UI contains all the files associated with the UI. Core is divided into three folders.
- Models: Contains all the plain data models
- Services: Contains the dedicated files that will handle actual business logic
- ViewModels: Contains the Provider models for each of the Widget views
UI is also divided into three folders.
- Shared: Contains files used in multiple other UI files
- Views: Contains the files for the app views
- Widgets: Contains widget files that are too big to keep in the view files.
we will not be providing a bunch of models and services at the beginning of our app at global context scale. Instead, we’ll inject it using the locator setup in locator.dart
So this is how our project will look
Step 1: Create model class
We’ll go through the app view by view and add what we need.
Our application will need a Product model so under models we will create productModel.dartfile.
This file contains 2 methods :
Product.fromMap(Map snapshot, String id): When data is fetched from Firebase, it is in JSON format. this method allows us to map data from JSON format to our Product format.
toJson() : The toJson() does the opposite which is to map the data back into JSON format before we upload into Firebase.
class Product {
  String id;
  String price;
  String name;
  String img;
  Product({this.id, this.price, this.name,this.img});
  Product.fromMap(Map snapshot,String id) :
        id = id ?? ‘’,
        price = snapshot[‘price’] ?? ‘’,
        name = snapshot[‘name’] ?? ‘’,
        img = snapshot[‘img’] ?? ‘’;
  toJson() {
    return {
      “price”: price,
      “name”: name,
      “img”: img,
    };
  }
}
Step 2: Create Api class
Under our Services directory will perform all the Network work. we will Create an Api class that will request /Read/Delete/ update data from Firebase. That class will contain different methods like fetching data as a stream , getting the document by id, removing/deleting a document …
class Api{
  final Firestore _db = Firestore.instance;
  final String path;
  CollectionReference ref;
  Api( this.path ) {
    ref = _db.collection(path);
  }
  Future<QuerySnapshot> getDataCollection() {
    return ref.getDocuments() ;
  }
  Stream<QuerySnapshot> streamDataCollection() {
    return ref.snapshots() ;
  }
  Future<DocumentSnapshot> getDocumentById(String id) {
    return ref.document(id).get();
  }
  Future<void> removeDocument(String id){
    return ref.document(id).delete();
  }
  Future<DocumentReference> addDocument(Map data) {
    return ref.add(data);
  }
  Future<void> updateDocument(Map data , String id) {
    return ref.document(id).updateData(data) ;
  }
}
Now to hook it up. As mentioned we will not be providing a bunch of models and services at the beginning of our app at global context scale. Instead, we’ll inject it using the locator setup in locator.dart
void setupLocator() {
  locator.registerLazySingleton(() => Api(‘products’));
}
Step 3: Create CRUD Model
The CRUD Model will use the Api class to Handle the different operations. Under viewmodels create the CRUDModel.dart file and add the different functions needed. This model (as well as every other service and model) will be injected using the locator.
class CRUDModel extends ChangeNotifier {
  Api _api = locator<Api>();
  List<Product> products;
  Future<List<Product>> fetchProducts() async {
    var result = await _api.getDataCollection();
    products = result.documents
        .map((doc) => Product.fromMap(doc.data, doc.documentID))
        .toList();
    return products;
  }
  Stream<QuerySnapshot> fetchProductsAsStream() {
    return _api.streamDataCollection();
  }
  Future<Product> getProductById(String id) async {
    var doc = await _api.getDocumentById(id);
    return  Product.fromMap(doc.data, doc.documentID) ;
  }
  Future removeProduct(String id) async{
     await _api.removeDocument(id) ;
     return ;
  }
  Future updateProduct(Product data,String id) async{
    await _api.updateDocument(data.toJson(), id) ;
    return ;
  }
  Future addProduct(Product data) async{
    var result  = await _api.addDocument(data.toJson()) ;
    return ;
  }
}
Now we register it in the locator file.
void setupLocator() {
  locator.registerLazySingleton(() => Api(‘products’));
  locator.registerLazySingleton(() => CRUDModel()) ;
}
that should be all for the logic now we will move to creating our UI and consuming these services.
Step 4: Routing and main configuration
Our app will have 4 screens. To keep things nice and clean we’ll put all the routing in a separate file called router.dart under the UI folder his function receives RouteSettings which contains the name of the route being requested. We’ll also return an error view for any undefined route.
class Router {
  static Route<dynamic> generateRoute(RouteSettings settings) {
    switch (settings.name) {
      case ‘/’ :
        return  MaterialPageRoute(
          builder: (_)=> HomeView()
        );
      case ‘/addProduct’ :
        return MaterialPageRoute(
          builder: (_)=> AddProduct()
        ) ;
      case ‘/productDetails’ :
        return MaterialPageRoute(
            builder: (_)=> ProductDetails()
        ) ;
      default:
        return MaterialPageRoute(
            builder: (_) => Scaffold(
              body: Center(
                child: Text(‘No route defined for ${settings.name}’),
              ),
            ));
    }
  }
}
now under the main file, we will provide the onGenerateRoute property with the static generateRoute function from the Router. You can remove the home property and set the initialRoute to ‘/’ instead. and we will initialize our Provider parameters in the MultiProvider and setup our locator.
void main() {
  setupLocator();
  runApp(MyApp());
}
class MyApp extends StatelessWidget {
  @override
  Widget build(BuildContext context) {
    return MultiProvider(
      providers: [
        ChangeNotifierProvider(builder: (_) => locator<CRUDModel>()),
      ],
      child: MaterialApp(
        debugShowCheckedModeBanner: false,
        initialRoute: ‘/’,
        title: ‘Product App’,
        theme: ThemeData(),
        onGenerateRoute: Router.generateRoute,
      ),
    );
  }
}
Step 5: Creating Home Screen
In HomeView.dartwe will fetch different products from the collection products and display them in cards. Whenever the list of products is edited or a new product is added the stream will fetch it from Firebase with the help of our provider CRUDModeafter calling it, we will store it into local list variables List<Product> products and then display it.
class _HomeViewState extends State<HomeView> {
  List<Product> products;
  @override
  Widget build(BuildContext context) {
    final productProvider = Provider.of<CRUDModel>(context);
    return Scaffold(
      floatingActionButton: FloatingActionButton(
        onPressed: () {
          Navigator.pushNamed(context, ‘/addProduct’);
        },
        child: Icon(Icons.add),
      ),
      appBar: AppBar(
        title: Center(child: Text(‘Home’)),
      ),
      body: Container(
        child: StreamBuilder(
            stream: productProvider.fetchProductsAsStream(),
            builder: (context, AsyncSnapshot<QuerySnapshot> snapshot) {
              if (snapshot.hasData) {
                products = snapshot.data.documents
                    .map((doc) => Product.fromMap(doc.data, doc.documentID))
                    .toList();
                return ListView.builder(
                  itemCount: products.length,
                  itemBuilder: (buildContext, index) =>
                      ProductCard(productDetails: products[index]),
                );
              } else {
                return Text(‘fetching’);
              }
            }),
      ),
    );
    ;
  }
}
Now we will create ProductCard() to display the details of the product:
import ‘package:flutter/material.dart’;import ‘package:productapp/core/models/productModel.dart’;
import ‘package:productapp/ui/views/productDetails.dart’;
class ProductCard extends StatelessWidget {
final Product productDetails;
ProductCard({@required this.productDetails});
@override
Widget build(BuildContext context) {
return GestureDetector(
onTap: (){
Navigator.push(context, MaterialPageRoute(builder: (_) => ProductDetails(product: productDetails)));
},
child: Padding(
padding: EdgeInsets.all(8),
child: Card(
elevation: 5,
child: Container(
height: MediaQuery
.of(context)
.size
.height * 0.45,
width: MediaQuery
.of(context)
.size
.width * 0.9,
child: Column(
children: <Widget>[
Hero(
tag: productDetails.id,
child: Image.asset(
‘assets/${productDetails.img}.jpg’,
height: MediaQuery
.of(context)
.size
.height *
0.35,
),
),
Padding(
padding: EdgeInsets.all(16),
child: Row(
mainAxisAlignment:
MainAxisAlignment.spaceBetween,
children: <Widget>[
Text(
style: TextStyle(
fontWeight: FontWeight.w900,
fontSize: 22,
fontStyle: FontStyle.italic),
),
Text(
‘${productDetails.price} $’,
style: TextStyle(
fontWeight: FontWeight.w900,
fontSize: 22,
fontStyle: FontStyle.italic,
color: Colors.orangeAccent),
),
],
),
)
],
),
),
),
),
);
}
}
Step 6: Creating Product details and add product Screens
to create a new Product item, we will take the name input and price by the user . We instantiate a new Product object using our Finally we upload to Firebase using our addProduct() function called using the CRUD provider
Scaffold(appBar: AppBar(),
body: Padding(
padding: EdgeInsets.all(12),
child: Form(
key: _formKey,
child: Column(
children: <Widget>[
TextFormField(
decoration: InputDecoration(
border: InputBorder.none,
hintText: ‘Product Title’,
fillColor: Colors.grey[300],
filled: true,
),
validator: (value) {
if (value.isEmpty) {
return ‘Please enter Product Title’;
}
},
onSaved: (value) => title = value
),
SizedBox(height: 16,),
TextFormField(
keyboardType: TextInputType.numberWithOptions(),
decoration: InputDecoration(
border: InputBorder.none,
hintText: ‘Price’,
fillColor: Colors.grey[300],
filled: true,
),
validator: (value) {
if (value.isEmpty) {
return ‘Please enter The price’;
}
},
onSaved: (value) => price = value
),
DropdownButton<String>(
value: productType,
onChanged: (String newValue) {
setState(() {
productType = newValue;
});
},
items: <String>[‘Bag’, ‘Computer’, ‘Dress’, ‘Phone’,‘Shoes’]
.map<DropdownMenuItem<String>>((String value) {
return DropdownMenuItem<String>(
value: value,
child: Text(value),
);
}).toList(),
),
RaisedButton(
splashColor: Colors.red,
onPressed: () async{
if (_formKey.currentState.validate()) {
_formKey.currentState.save();
await productProvider.addProduct(Product(name: title,price: price,img: productType.toLowerCase()));
Navigator.pop(context) ;
}
},
child: Text(‘add Product’, style: TextStyle(color: Colors.white)),
color: Colors.blue,
)
],
),
),
),
);
Now to delete or update a product we will add another screen to check for the product details and from there we can either delete it or change it
class ProductDetails extends StatelessWidget {
final Product product;
ProductDetails({@required this.product});
@override
Widget build(BuildContext context) {
final productProvider = Provider.of<CRUDModel>(context);
return Scaffold(
appBar: AppBar(
title: Text(‘Product Details’),
actions: <Widget>[
IconButton(
iconSize: 35,
icon: Icon(Icons.delete_forever),
onPressed: ()async {
await productProvider.removeProduct(product.id);
Navigator.pop(context) ;
},
),
IconButton(
iconSize: 35,
icon: Icon(Icons.edit),
onPressed: (){
Navigator.push(context, MaterialPageRoute(builder: (_)=> ModifyProduct(product: product,)));
},
)
],
),
body: Column(
mainAxisSize: MainAxisSize.max,
crossAxisAlignment: CrossAxisAlignment.center,
children: <Widget>[
Hero(
tag: product.id,
child: Image.asset(
‘assets/${product.img}.jpg’,
height: MediaQuery.of(context).size.height * 0.35,
width: MediaQuery.of(context).size.width,
),
),
SizedBox(
height: 20,
),
Text(
style: TextStyle(
fontWeight: FontWeight.w900,
fontSize: 22,
fontStyle: FontStyle.italic),
),
Text(
‘${product.price} $’,
style: TextStyle(
fontWeight: FontWeight.w900,
fontSize: 22,
fontStyle: FontStyle.italic,
color: Colors.orangeAccent),
)
],
),
);
}
}
That’s all our app Should Be ready to rock .
Github
Source code available
Final Thoughts
I hope this helped. There are many other things to add on, but this is where you want to start. I am intending to add other functionalities in the future instead of fetching the photos locally we will store it in Firebase storage or adding Firebase ML Kit to recognize the product details and give more information about it
Thanks for reading ❤
If you liked this post, share it with all of your programming buddies!
Follow us on Facebook | Twitter
Further reading
☞ Learn Flutter & Dart to Build iOS & Android Apps
☞ Flutter & Dart - The Complete Flutter App Development Course
☞ Dart and Flutter: The Complete Developer’s Guide
☞ Flutter Tutorial - Flight List UI Example In Flutter
☞ Flutter Tutorial for Beginners - Full Tutorial
☞ A Beginners Guide to the Flutter Bottom Sheet
☞ Flutter Course - Full Tutorial for Beginners (Build iOS and Android Apps)
☞ Flutter Tutorial For Beginners - Build Your First Flutter App
☞ Building the SwiftUI Sample App in Flutter
☞ Building Cryptocurrency Pricing App with Flutter
#flutter #firebase #mobile-apps #ios #database