Learn about Angular Libraries and Microservices
We live in a Microservices world, and this world is here to stay. Back-end developers need to dive into Domain Driven Design, write stateless, resilient, highly available services, keep data synchronized through Change Data Capture, handle network failure, deal with authentication, authorization, JWT... and expose a beautiful Hypermedia API so the front-end developers can add a great user interface to it.
Good! But what about the front-end?
Let's say we have several microservices, several teams, several APIs and, therefore, several user-interfaces. How can you create an integrated and consistent user interface so your users don't actually see that there are as many user-interfaces as there are Microservices? In this post, I'm implementing the Client-side UI composition design pattern using Angular Libraries.
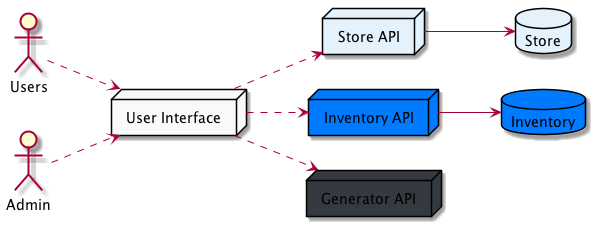
Let's say we have a CD BookStore application that allows customers to buy CDs and Books online, as well as administrators to check the inventory. We also have some complex ISBN number generator to deal with. If we model this application into Microservices, we might end up splitting it into 3 separate microservices:
- Store: Deals with displaying information on CDs and books, allows users to buy them.
- Inventory: Allows administrators to check the availability of an item in the warehouse and buy new items if needed.
- Generator: Generates ISBN numbers each time a new book is created.
We end up with two roles (user and admin) interacting with these 3 APIs through a single user interface:
So far, so good. But remember that these three microservices are developed by three different teams and therefore, have three different user interfaces. On one hand, we have three different UIs, and on the other hand, we want our users to navigate into what they see as a single and integrated application. There are several ways of doing it, and the one way I'm describing here is called the Client-side UI composition design pattern:
Problem: How to implement a UI screen or page that displays data from multiple services?
Solution: Each team develops a client-side UI component, such an Angular component, that implements the region of the page/screen for their service. A UI team is responsible for implementing the page skeletons that build pages/screens by composing multiple, service-specific UI components.
The idea is to aggregate, on the client side, our three user interfaces into a single one and end up with something that looks like this:
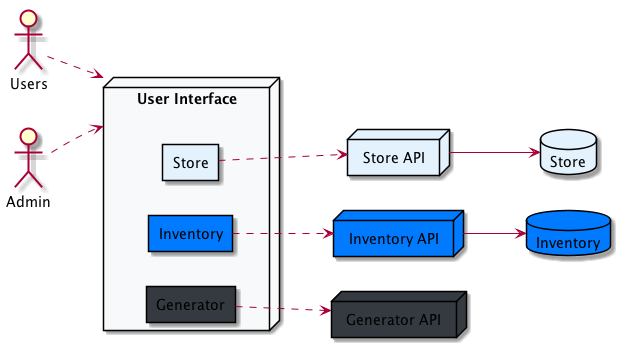
Aggregating several UIs into a single one works better if they use compatible technologies of course. In this example, I am using Angular and only Angular to create the 3 user-interfaces and the page skeleton.
One novelty with Angular CLI 6 is the ability to easily create libraries. Coming back to our architecture, we could say the page skeleton is the Angular application (the CDBookStore application), and then, each microservice user-interface is a library (Store, Inventory, Generator).
In terms of Angular CLI commands, this is what we have:
# Main app called CDBookStore $ ng new cdbookstore --directory cdbookstore --routing trueThe 3 libraries for our 3 microservices UI
$ ng generate library store --prefix str
$ ng generate library inventory --prefix inv
$ ng generate library generator --prefix gen
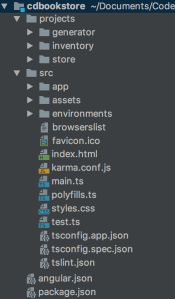
Once you’ve executed these commands, you will get the following directory structure:
- src/app/ is the good old Angular structure. In this directory, we will have the page skeleton of the CDBookStore application. As you will see, this skeleton page is only a sidebar to navigate from one Microservice UI to another one
- projects/ is the directory where all the libraries end up
- projects/generator: the UI for the Generator microservice
- projects/inventory: the UI for the Inventory microservice
- projects/store: the UI for the Store microservice
The skeleton page is there to aggregate all the other components. Basically, it’s only a sidebar menu (allowing us to navigate from one Microservice UI to another one) and a <router-outlet>. It is where you could have login/logout and other user preferences. It looks like this:
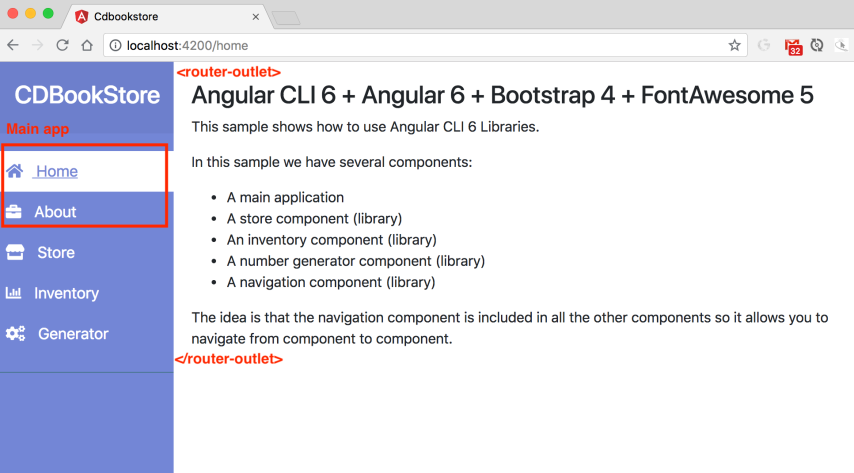
In terms of code, despite using Bootstrap, there is nothing special. What’s interesting is the way the routes are defined. The AppRoutingModule only defines the routes of the main application (here, the Home and the About menus).
const routes: Routes = [
{path: ‘’, component: HomeComponent},
{path: ‘home’, component: HomeComponent},
{path: ‘about’, component: AboutComponent},];
@NgModule({
imports: [RouterModule.forRoot(routes)],
exports: [RouterModule]
})
export class AppRoutingModule { }
In the HTML side of the side menu bar, we can find the navigation directive and the router:
<ul class=“list-unstyled components”>

<li>

<a [routerLink]=“[‘/home’]”>

<i class=“fas fa-home”></i>

Home

</a>

<a [routerLink]=“[‘/str’]”>

<i class=“fas fa-store”></i>

Store

</a>

<a [routerLink]=“[‘/inv’]”>

<i class=“fas fa-chart-bar”></i>

Inventory

</a>

<a [routerLink]=“[‘/gen’]”>

<i class=“fas fa-cogs”></i>

Generator

</a>

</li>

</ul>

<!-- Page Content -->

<div id=“content”>

<router-outlet></router-outlet>

</div>
As you can see in the code above, the routerLink directive is used to navigate to the main app components as well as libraries components. The trick here is that /home is defined in the routing module, but not /str, /inv or /gen. These routes are defined in the libraries themselves.
Now when we click on Store, Inventory or Generator, we want the router to navigate to the library’s components
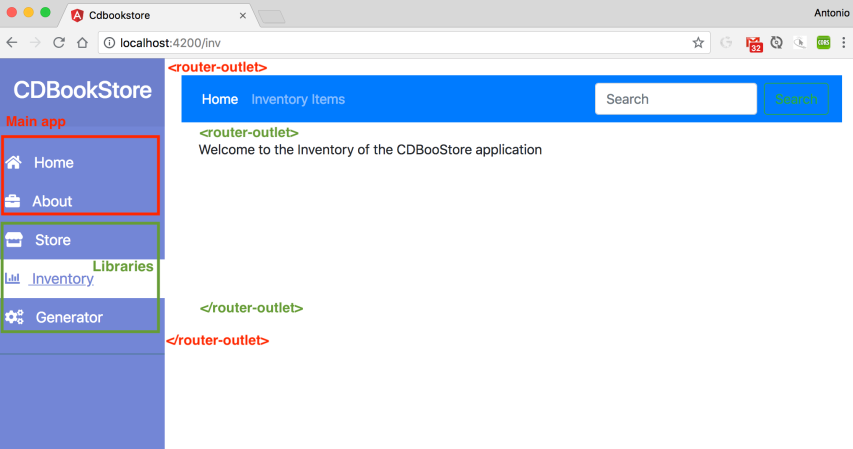
Notice the parent/child relationship between routers. In the image above, the red router-outlet is the parent and belongs to the main app. The green router-outlet is the child and belongs to the library. Notice that in the store-routing.module.ts we use str has the main path, and all the other paths are children (using the children keyword):
const routes: Routes = [
{
path: ‘str’, component: StoreComponent, children: [
{path: ‘’, component: HomeComponent},
{path: ‘home’, component: HomeComponent},
{path: ‘book-list’, component: BookListComponent},
{path: ‘book-detail’, component: BookDetailComponent},
]
},
];@NgModule({
imports: [RouterModule.forRoot(routes)],
exports: [RouterModule]
})
export class StoreRoutingModule {
}
The beauty of having a parent/child router relationship is that you can benefit from “feature” navigation. This means that if you navigate to /home or /about you stay in the main application, but if you navigate to /str, /str/home, /str/book-list or /str/book-detail, you navigate to the Store library. You can even do lazy loading on a per feature based (only load the Store library if needed).

The Store library has a navigation bar at the top, therefore, it needs the routerLink directive. Notice that we only need to use the child path [routerLink]=“[‘book-list’]” without having to specify /str (no need to [routerLink]=“[‘/str/book-list’]”):
<nav>

<div class=“collapse navbar-collapse”>

<ul class=“navbar-nav mr-auto”>

<li class=“nav-item dropdown”>

<a class=“nav-link dropdown-toggle”>Items</a>

<div class=“dropdown-menu” aria-labelledby=“navbarDropdownMenuLink”>

<a class=“dropdown-item” [routerLink]=“[‘book-list’]”>Books</a>

<a class=“dropdown-item” [routerLink]=“[‘cd-list’]”>CDs</a>

<a class=“dropdown-item” [routerLink]=“[‘dvd-list’]”>DVDs</a>

</div>

</li>

</ul>

</div>

</nav>

<!-- Page Content -->

<div id=“content”>

<router-outlet></router-outlet>

</div>
The Client-side UI composition design pattern has some pros and cons. If you already have existing user-interfaces per microservices, and if each one is using totally different technologies (Angular vs React vs Vue.JS vs …) or different framework versions (Bootstrap 2 vs Bootstrap 4), then aggregating them might be tricky and you might have to rewrite bits and pieces to have them compatible.
But this can actually be beneficial. If you don’t have extended teams with hundreds of developers, you might end up being the one moving from one team to another one and will be happy to find (more or less) the same technologies. This is defined in the Chassis pattern. And for your end users, the application will have the same look and feel (on mobile phones, laptops, desktops, tablets), which gives a sense of integration.
With the way Angular Libraries are structured, having a mono repo is much easier. Of course, each library can have their own life cycle and be independent, but at the end of the day, it makes it easier to have them on the same repo. I don’t know if you love MonoRepos or not, but some do.
We’ve been architecting and developing Microservices for several decades now (yes, it used to be called distributed systems, or distributed services), so we roughly know how to make them work on the back-end. Now, the challenge is to be able to have a user interface which communicates with several Microservices, developed by different teams, and at the same time feels consistent and integrated for the end-user. You might not always have this need (see how Amazon has totally different UIs for its services), but if you do, then the Client-side UI composition design pattern is a good alternative.
If you want to give it a try, download the code, install and run it (there is only the front-end, no back-end APIs). I hope this tutorial will surely help and you if you liked this tutorial, please consider sharing it with others, thanks for reading!
This post was originally published here
#angular #angular-js #microservices #web-development #devops
