This is a quick step by step tutorial about WebSocket, Node/Express and Typescript.
The full source code provided in these examples is lovely hosted by Github.
WebSocket is a communications protocol that provides a full-duplex communication channels over a single TCP connection established between a web browser (client) and a web server (this take place through the “classic HTTP mechanism” of handshaking, implemented using request/response headers).
This allows the server to send content to the browser without being called by the client, pushing data through the opened connection, defining ws and wss as URI schemes used respectively for unencrypted and encrypted connections.
In this tutorial we are going to use ws, a simple client/server library for Node.js that helps us to manage all the stuff under the protocol.
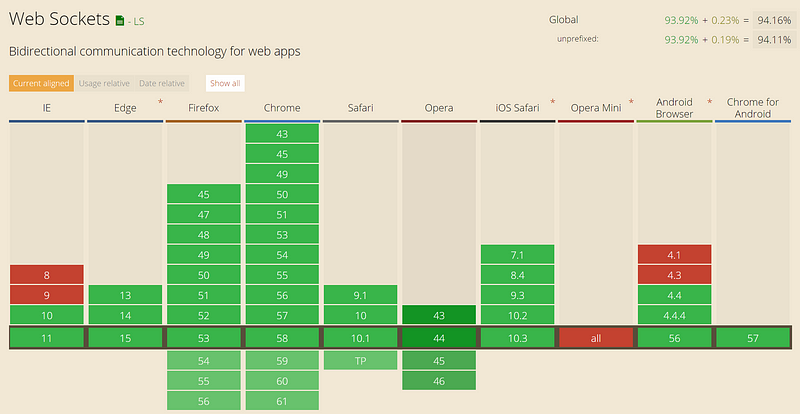
I choose this library instead of the well known Socket.IO because today the WebSocket protocol is natively supported in most major browsers (see the screenshot below) allowing to exclude all the overhead introduced by the several features of Socket.IO (see here for a head to head comparison).
Another useful thing that comes with the usage of HTTP concerns the possibility of use the “good old” Authorization header for Basic/Bearer Token Auth.
Now that we know a little more about what is hidden under the hood, let’s write some code.
First step
Let’s assume that we want to create a simple WebSocket server using Node.js and Express. Open your favorite console ad type the following commands (notice that this tutorial supposes that you have node installed on your machine: if it is not the case get it here:)
mkdir websocket-node-express
cd websocket-node-express

npm init

// add the details of your project

npm i ws express --save

// install the necessary types (and typescript)...

npm i typescript @types/ws @types/express -D

// ...optionally install typescript globally (tnx _Maxxx_)

npm i -g typescript
Now we can add some code to understand how it works. The minimal script in order to get a basic result is the following (copy it in src/server.ts):
import * as express from 'express';
import * as http from 'http';
import * as WebSocket from 'ws';

const app = express();

//initialize a simple http server
const server = http.createServer(app);

//initialize the WebSocket server instance
const wss = new WebSocket.Server({ server });

wss.on('connection', (ws: WebSocket) => {

    //connection is up, let's add a simple simple event
    ws.on('message', (message: string) => {

        //log the received message and send it back to the client
        console.log('received: %s', message);
        ws.send(`Hello, you sent -> ${message}`);
    });

    //send immediatly a feedback to the incoming connection
    ws.send('Hi there, I am a WebSocket server');
});

//start our server
server.listen(process.env.PORT || 8999, () => {
    console.log(`Server started on port ${server.address().port} :)`);
});
websocket-node-express.server-minimal.ts hosted with ❤ by GitHub
It starts a new instance of a simple http server using express. Later we add the WebSocket server specifying a (fat arrow) function that will be triggered by the ‘connection’ event (line 13): it is responsible to handle all the incoming connections from clients.
In this case we immediately send back a welcome message (line 24), registering at the same time the ‘message’ event: this function will be called on every message sent by the client. Here we log the received message and then we send it back to the client (like an echo service — this time using the Typescript string interpolation ${}).
Ok let me see if it works…
Before that add a minimal tsconfig.json (we’re using Typescript, aren’t we?)
{
    "compilerOptions": {
        "target": "es6",
        "module": "commonjs",
        "outDir": "./dist/server",
        "strict": true,
        "sourceMap": true,
        "typeRoots": [
            "node_modules/@types"
        ]
    },
    "exclude": [
        "dist",
        "node_modules"
    ]
}
websocket-node-express.tsconfig.json hosted with ❤ by GitHub
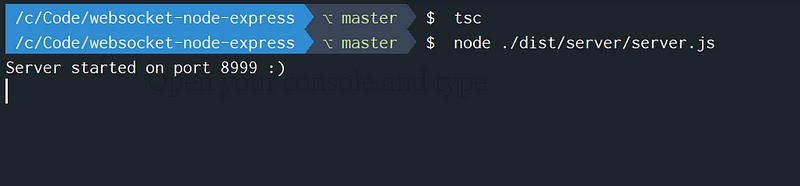
Open your terminal and type
// please compile my code
./node_modules/.bin/tsc    // or simply tsc (if installed globally)


// then run the server
node ./dist/server/server.js
You should get something like this in your console (here I’m on Windows10 using cmder and a simple bash extension).
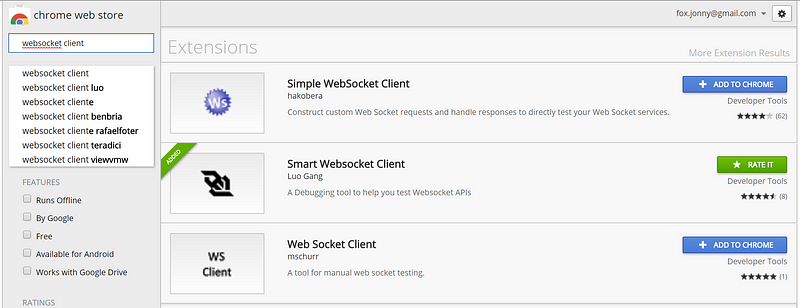
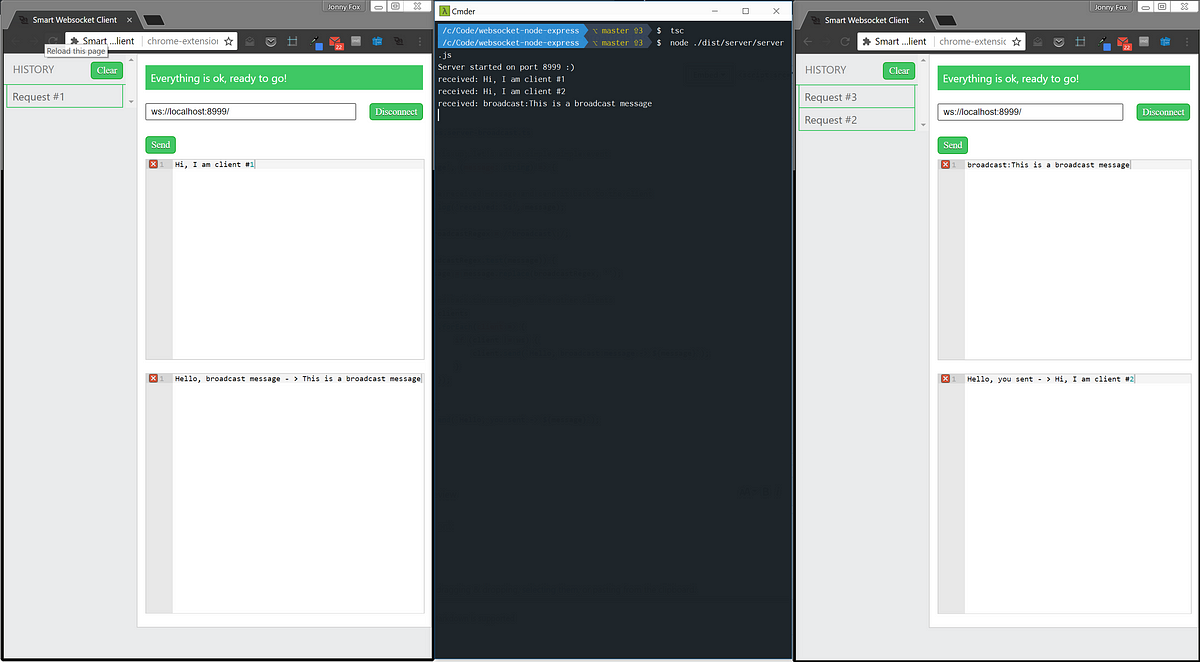
Now it’s time to make some connection using a WebSocket test client: these screenshots come from Smart Websocket Client (an extension of Chrome from the Chrome Web Store).
Add the server address **ws://localhost:8999**, press connect and send a message.
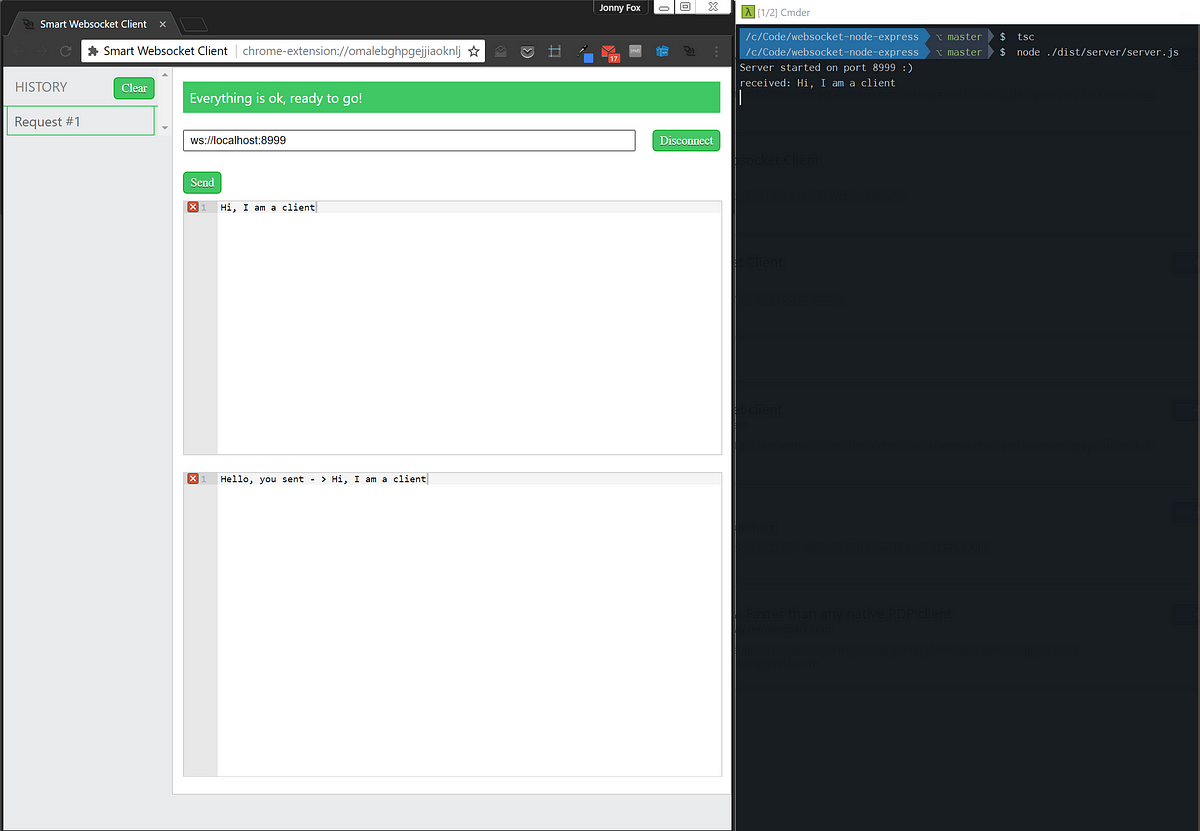
The server logs the message sent by the client and return it back. Obviously now we can go on and create another client and see if the server can manage another incoming connection.

Going deeper — Broadcasting
Now that we are able to start our server let’s add some code to enable a new feature: message broadcasting.
Modify the code in server.ts substituting the 'message’ event with this new version:
    //connection is up, let's add a simple simple event
    ws.on('message', (message: string) => {

        //log the received message and send it back to the client
        console.log('received: %s', message);

        const broadcastRegex = /^broadcast\:/;

        if (broadcastRegex.test(message)) {
            message = message.replace(broadcastRegex, '');

            //send back the message to the other clients
            wss.clients
                .forEach(client => {
                    if (client != ws) {
                        client.send(`Hello, broadcast message -> ${message}`);
                    }
                });

        } else {
            ws.send(`Hello, you sent -> ${message}`);
        }
});
websocket-node-express.server-broadcast.ts hosted with ❤ by GitHub
The trick here is to fetch the request sent by a client in order to understand if it is a broadcast message (there are a lot of different ways to do this: sniffing headers, using a common message structure in json, etc… but let’s keep things simple, we’re not in production!).
Here I’m using a simple regex to figure out if this is a broadcast message and to remove the “label” from the message content.
If this is the case forward the message content to the other connected clients.
Bonus track — Handle broken connections
The link between the server and the client can be interrupted in a way that both are unaware of the broken state of the connection. To avoid this situation we can simply use ping messages to check if the client is still responsive.
wss.on('connection', (ws: ExtWebSocket) => {

    ws.isAlive = true;

    ws.on('pong', () => {
        ws.isAlive = true;
    });

    //connection is up, let's add a simple simple event
    ws.on('message', (message: string) => {
        //[...]
    }
});

setInterval(() => {
    wss.clients.forEach((ws: ExtWebSocket) => {

        if (!ws.isAlive) return ws.terminate();

        ws.isAlive = false;
        ws.ping(null, false, true);
    });
}, 10000);

//start our server
server.listen(process.env.PORT || 8999, () => {
    console.log(`Server started on port ${server.address().port} :)`);
});
websocket-node-express.server-bonus-add.ts hosted with ❤ by GitHub
As you can see here we set ws.isAlive = true when the ‘connection’ starts, doing the same when the ‘pong’ event is called (more on this later).
Before the server startup we set an interval (10 seconds in this case) that checks if the client is alive:
- if the value of
isAliveis false we terminate the client connection; - if the value of
isAliveis true, we set its value to false and then we execute a ping. Pings and Pongs are just regular frames, but they are specific control frames defined by the specs of WebSocket protocol in order to check if the remote endpoint is still connected. In this case we are setting theisAliveto false to understand if the client pong event sets it back to true, completing the connection check.
Conclusion
This was only a quick walk-through of the main functionalities proposed by the Web Socket protocol. Maybe next time we can add a simple client written in Angular, but this is another story ☺
Update
Checkout my new Angular WebSocket client article 😙.
#node-js #express #typescript #angular #web-development