Load the C/C++ code in JavaScript programs using Node’s N-API
Before we begin with this tutorial, let me start with a little disclaimer. I am not a professional C and C++ programmer. But I always wanted to use some of the public C++ libraries inside JavaScript code for performance reasons. Then I stumbled upon Native Addon feature of Node.js.
In this article, I will walk you through step by step process of creating node modules written in C++ language. If you spot any errors in the definition or explanation of some native concepts, inform me through private notes so that I can fix the as earliest.
What is a Native Addon?
Before we jump into building Native Addons, we need to know first what they are? A Native Addon in the context of the Node.js is a binary file that is compiled from a low-level language like C and C++. Hence like importing a JavaScript file using require, we would be importing a Native Addon.
Native Addon like any other .js file exposes its API on module.exports or exports object. A collection of these files when wrapped inside a node module also called as Native Module.
Since we want to load and run this Native Addon in our JavaScript application, this Native Addon must be compatible with our JavaScript environment and must expose a compatible API so that it can be consumed like a normal node module.
A Native Addon is normally written in C or C++ language and compile using a standard compiler to a Dynamically Linked Library (DLL). It is also called as a Shared Library or Shared Object (SO).
A DLL can be loaded into a program dynamically, at runtime. This DLL contains the compiled native code of our C or C++ program and an API to communicate with this compiled code.
Recommended: You can follow this article to understand the difference between statically linked libraries and dynamically linked libraries.
In Node.js, when we compile the native C or C++ code into a DLL, it should be exported to a file .node extension. We can use require function, as usual, to import this file inside a JavaScript program.
Node.js can perfectly handle import of a file with .js , .node or .json extension using CommonJS require function.
How Native Addons work?
Alright! So far we got a brief idea of what a Native Addon is but how do they really work behind the scene? To understand this, we need to look at the Node.js architecture and how things are bundled together.
Node.js is a collection of many open-source libraries.
Node.js uses Google’s open-source V8 engine as the default JavaScript engine which executes the JavaScript code. The V8 engine is written in C++ language and you can find the source code of this project on GitHub from their official v8/v8 repository.
For asynchronous I/O, event loop and other low-level features, Node.js depends on the Libuv library. This library is written in C language and you can find the source of this project from libuv/libuv repository.
You can actually find all the libraries Node.js depends on from their official source code on GitHub. If you navigate to deps directory, you will be able to find V8 (v8) and Libuv (uv) libraries which contain a clone of their original projects on GitHub.
When we install Node.js on our system, we generally installed a compiled version of the whole Node.js source code along with its dependent libraries. This way, we don’t have to install these libraries manually. However, Node.js can also be build from the source code of these libraries.
This sounds really sophisticated but how this is really related to the Native Addons? Since Node.js is written in low-level languages like C and C++, it can talk to other programs that are written in C and C++ and vice-versa.
Node.js can dynamically load an external C or C++ DLL file at runtime and utilize its API to perform some operations written inside it from a JavaScript program. This is basically how a Native Addon works in Node.js.
Application Binary Interface (ABI)
An Application Binary Interface is a way for a program to communicate with other compiled programs. This is a lot similar to an API but in the case of ABI, we are interacting with a binary file and accessing memory addresses to look for symbols like numbers, objects, classes, functions, etc.
But, what ABI has to do with Native Addons? The compiled DLL file (Native Addon) when loaded into Node.js runtime actually communicates with Node.js using an ABI provided by the Node.js to access/register values and to perform tasks through APIs exposed by Node.js and its libraries.
For example, a Native Addon might want to add some values into exports object like a function with the name sayHello which returns a Hello World string. It could also access Libuv API to perform an asynchronous task by creating a separate thread and run a callback function when the task is done.
This is all done through ABI provided by the Node.js itself. Hence, when the Native Addon is compiled, it needs to have the idea of what APIs are exposed by the Node.js itself and its libraries.
Typically, when we compile a C or C++ program into a DLL, we use some meta-data files called header files, which ends with .h extension. These header files are provided by Node.js and its libraries and they contain the declarations of the APIs exposed by the Node.js and its libraries.
You can read about header files from this documentation.
A typical C or C++ program can import these header files using #include preprocessor directive, for example, #include<v8.h> and use the declarations to write a meaningful program that can be executed by Node.
You will be able to understand Dynamically Linked Libraries in depth from the below example I’ve created in C++. However, the way Native Addons work is more complex in nature than this example.
1. shared.h
#pragma once

// extern: https://docs.microsoft.com/en-us/cpp/cpp/extern-cpp?view=vs-2019
// why extern "C" : https://stackoverflow.com/a/42183390/2790983
extern "C" {
    // function declaration
    int add(int, int);
}
2. shared.cpp
#include <iostream>
#include "shared.h"

// function definition
int add(int a, int b) {
    return a + b;
}
3. main.cpp
#include <iostream>
#include <dlfcn.h> // https://pubs.opengroup.org/onlinepubs/7908799/xsh/dlfcn.h.html
#include "shared.h"

int main() {

    // declaration (template) of add function
    // function typedef: http://www.iso-9899.info/wiki/Typedef_Function_Type
    typedef int add_t(int, int);

    // load shared library
    // https://pubs.opengroup.org/onlinepubs/7908799/xsh/dlopen.html
    void *handler = dlopen("./shared.so", RTLD_LAZY);

    // extract `add` symbol (pointer) and convert it to function pointer
    // https://pubs.opengroup.org/onlinepubs/7908799/xsh/dlsym.html
    add_t *add = (add_t*) dlsym( handler, "add" );

    // execute function
    std::cout << (*add)(5, 2) << std::endl;
}
4. commands.sh
# compilation process: https://en.wikibooks.org/wiki/C%2B%2B_Programming/Programming_Languages/C%2B%2B/Code/Compiler/Linker
# Shared library concept: http://ehuss.com/shared/

# 1. Creating the shared library
# Command reference: https://www.oreilly.com/library/view/c-cookbook/0596007612/ch01s05.html
g++ -dynamiclib -fPIC shared.cpp -o shared.so # MacOS

# 2. Creating the main executable file
g++ main.cpp -o main.exe

# 3. Running main executable
./main.exe
(Source: https://gist.github.com/thatisuday/e9d402a889d26a9b88e034027b27f76b)
There are different ways to utilize these header files. Basically, there are four ways we can write a C or C++ program that can be compiled to run by Node.js, however, they all do not produce the same output.
You can read more about ABI and ABI Stability from this documentation on Node.js official documentation guide. I advise you to go through this document and understand how ABI actually works in nutshell.
1. Using Core Implementation
We can use header files provided by Node.js and its libraries. For example, v8.h contains an internal implementation of the V8 engine and uv.h provides API for the Libuv library.
These header files and other indirect dependencies are located inside /include/node/ folder of your Node.js installation directory.
However, doing this we are adding tight dependency between our Native Addon and internal implementation of Node.js and its libraries.
Since the internal implementation of the libraries used by the Node.js could change and so these header files, a Native Addon compiled for the older version of Node.js would become incompatible for the ABI released with the new version of the Node.js.
To maintain ABI stability, it becomes the responsibility of the Addon maintainers to rewrite, build and publish the new version of this Native Module when a new version of Node.js is launched.
This is not a very reliable approach. Hence NAN module was introduced which creates an abstraction layer between Native Addon and internal implementation of Node.js and its libraries.
In addition to these drawbacks, only Native Addons written in C++ can be used with this approach. You can take a look at examples of writing Native Addons with this approach from Node.js official documentation.
This way of developing Native Addons is not recommended and there are better alternative ways which are explained below.
2. Using Native Abstractions for Node (NAN)
NAN project was the initial effort to abstract the internal implementation of Node.js and the V8 engine by adding C++ wrappers around their APIs.
This is basically is an NPM module which can be installed using npm install command and it contains nan.h header file which contains abstracted definitions of APIs exposed by Node.js and V8 library.
However, NAN does not completely abstract V8 API and does not provide full support for all the libraries used inside Node.js.
NAN is not a core part of the Node.js project as it is maintained independently. With every release of Node.js, this project has to be updated so that internal changes of Node.js can be mapped with new abstractions.
You can find the source of this project from the official GitHub repository.
Due to these factors, new Native Addons are recommended to be developed with the official abstraction API like the N-API or node-addon-api module.
3. Using the N-API
The N-API is just like the NAN project but it is maintained as a part of the Node.js project itself. Hence, we do not need to install external dependencies to import the header files. It provides a much reliable abstraction layer.
The N-API exposes node_api.h header file which contains API that abstracts internal implementation of Node.js and its libraries. With every release of Node.js, the N-API is optimized to guarantee ABI stability.
These header files and other indirect dependencies are located inside /include/node/ directory of your Node.js installation directory.
Hence, when we write a Native Addon, it is guaranteed to compile against with all new versions of Node.js as all the heavy lifting of maintaining the compatibility is done by node_api.h.
You can find API official documentation of N-API on here. You should also read this column on ABI Stability of N-API.
This API is written in C language which can be used in both C and C++ programs. However, the C++ API can be much easier to work with. Hence, this project maintains another node-addon-api project.
4. Using node-addon-api module
node-addon-api is an NPM module that provides napi.h header file. This header file contains C++ wrapper classes for N-API and it is officially maintained along with the N-API.
You can find the source of this module from the official GitHub repository.
We are going to work with node-addon-api or napi.h to create a sample Native Addon for the demo purposes.
Since C++ API is much easier to work with, you should consider node-addon-api for developing Native Addons in C++.
Prerequisites
Before we start building Native Addons, we need to have some dependencies installed first. As we know, we are going to eventually compile C or C++ code, we need to have C and C++ compilers installed on our system.
Next, we need the node-gyp NPM package globally installed. This package provides a CLI to generate boilerplate code which is used to compile C or C++ code into Native Addon or DLL with .node extension.
The boilerplate is generated from a binding.gyp file by the node-gyp which contains some instructions about the name of the Native Addon (the DLL file) and what files should be considered in the compilation.
This boilerplate contains necessary build instruction files based on the type of platform and architecture our system has. It also provides the necessary header and source files to the C or C++ programs we are going to compile.
To use node-gyp, we need to have Python installed in our system since node-gyp is based on GYP tool which is written in Python. GYP is an acronym for Generate Your Project, hence node-gyp is not a compiler but a facilitator.
The complete instructions on how to install these dependencies are listed on the GitHub repository of node-gyp module.
Setting up the project
After installing all the dependencies mentioned in the previous section, we can proceed with the project setup.
Installing Dependencies
In a nutshell, a Native Module is just a regular node module or an NPM package. Hence, the overall project structure shouldn’t look that different from a JavaScript-based Node module.
Let’s initialize the package.json file using npm init -y command. You should ignore -y flag and provide information about your package manually.
We are going to create a Native Module module with the name greet, hence we should have greet as the value of name property inside package.json.
native-greet-module/
└── package.json
Now that we have package.json, we can install some dependencies. From the earlier example, we have discussed about node-addon-api which provides napi.h header file (and other indirect dependencies).
$ npm install -S node-addon-api
Create sample C++ application
We are going to create a very simple C++ program that returns Hello MIKE! string. We will save our C++ programs (code files) inside src directory of this sample project for simplicity.
// src/greeting.h
#include <string>
std::string helloUser( std::string name );
===================================
// src/greeting.cpp
#include <iostream>
#include <string>
#include "greeting.h"
std::string helloUser( std::string name ) {
  return "Hello " + name + "!";
}
You should create a test program that imports the declaration from greeting.h file and tests the result of helloUser function.
Let’s create another file with the name index.cpp which contains the logic of implementing Node.js API using napi.h header file. But for now, let’s keep it empty and we will take a look at it again after a while.
Setting up the binding.gyp file
The binding.gyp is a Python file that contains JSON like data structure to tell node-gyp about the configuration of our Native Module. It contains the name of the module, which files need to be compiled and other meta-data.
Structure binding.gyp at the moment is poorly documented on official documentation of Node.js. However, you can follow this official documentation of GYP to get the idea of the standard .gyp file structure.
Based on our project structure, our binding.gyp file will look like below.
{
  "targets": [
    {
      "target_name": "greet",
      "cflags!": [ "-fno-exceptions" ],
      "cflags_cc!": [ "-fno-exceptions" ],
      "sources": [
        "./src/greeting.cpp",
        "./src/index.cpp"
      ],
      "include_dirs": [
        "<!@(node -p \"require('node-addon-api').include\")"
      ],
      'defines': [ 'NAPI_DISABLE_CPP_EXCEPTIONS' ],
    }
  ]
}
The important properties to look at in binding.gyp are target_name, sources and include_directories. Other properties are used here to ignore compiler exceptions and warnings.
The targets list contains a number of Native Addons or DLL files to be generated. At the moment, we are interested in only one DLL file. The target_name key specifies the name of this DLL file.
The sources list contains the list of .cpp files to be compiled to generate the DLL file. The include_dirs list contains the directories where the sources should look for header files if the compiler could not locate them.
Since we are going to need napi.h file soon, we need to provide its location inside include_dirs. The <!@(node -p \"require('node-addon-api').include\") command is executed by node-gyp to find the correct directory path of node-addon-api module while building the Native Addons.
The index.cpp file is going to contain some logic that will communicate with Node.js through N-API (using node-addon-api). Hence this file is also going to import napi.h header file.
If you think about typical JavaScript-based node module, it exposes its API through module.exports or exports object available to it. Similarly, our index.cpp file is going to access exports object provided by Node.js during runtime and add some symbols in exports object.
A symbol in the programming universe can be number, string, function, class or any exportable element. Hence, we can set a property on exports object which is assigned with a symbol in our C++ program.
However, unlike in JavaScript, using exports is a little tricky since we have to do that in C++ using N-API through declarations provided by napi.h.
We are going to export greetHello function from our Native Addon which executes a C++ function and returns a string. This means we also need to set greetHello property on the exports object and point it to a C++ function.
This implementation of Native Addon source code (on bare minimal level) looks like below. Take a look at the comments and file structure as well.
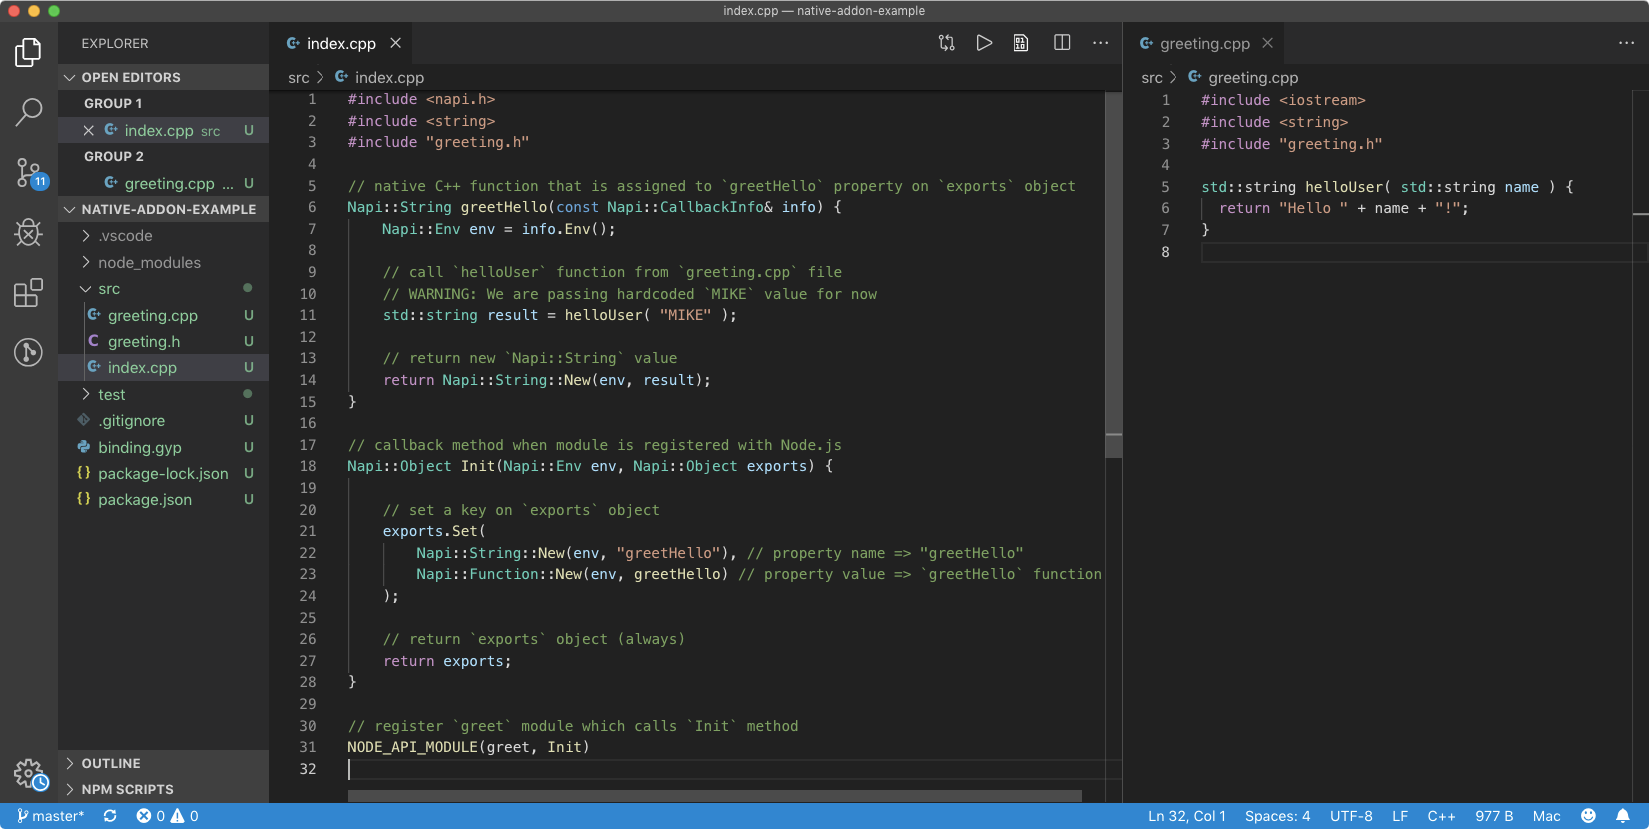
(C++ program and library)
- Firstly, we have imported
napi.hheader file provided bynode-addon-apimodule. The resolution of the location of this file will be taken care of bynode-gypin the compilation phase usingbinding.gypfile. - We have also imported
<string>standard header to usestringdata type in our C++ code. Since this is a standard header, we do not need to worry about its resolution, the C++ compiler will take care of that. - Also,
greeting.his needed to use declarations for symbols defined insidegreeting.cpp. We have double-quotes (“”) instead of angle brackets (<>) with the#includedirective to signify that it will be imported from the current directory (explanation). - The rest of the code below
#includestatements is standard C++ code. However, all the types, macros, and other non-standard declarations are provided bynapi.hheader file. (If you pressCommandkey and hover over a declaration in VS Code, you will be able to see its implementation.) NODE_API_MODULEis a function (macro) provided bynapi.hwhich wrapsNAPI_MODULEmacro provided bynode_api.h(N-API). This function will be invoked when we import this Native Addon in a JavaScript program usingrequirefunction.- The first argument to this function is the unique name used by the Node.js while registration of the module (when we import it using
requirefunction). Ideally, it should be equal to thetarget_namespecified insidebinding.gypfile but just as a label and not as a"string"value. - The second argument is a C++ function which is invoked when Node.js starts the registration process of the module. This function will be invoked with
envandexportsarguments. Napi::prefix is used because declarations provided bynapi.hare defined insideNapinamespace. Since macros can not be namespaced likeNODE_API_MODULE, they are not used with this prefix.- The
envvalue is of type Napi::Env which contains information about the environment in which the registration of the module is happening. This value is needed while performing N-API operations. - The
exportsobject is the low-level API ofmodule.exportsobject available in JavaScript. It is a type of Napi::Object which is similar toObjectdata type in JavaScript. We can use itsSetmethod to add some properties to it (documentation). This function must returnexportsobject back. - On line no. 31, we are registering
greetmodule and providedInitcallback function. InsideInitfunction, we are settinggreetHelloproperty onexportsobject which is assigned withgreetHellofunction. - The property name on
exportsobject will ofNapi::Stringclass type. However, the value of this property can be of any type like String, Number, Array, Object, Function, etc. (This is analogous to a JavaScript program where key on theexportsobject is a string (Stringtype) and value can be of any valid JavaScript object). - In the above example, we are assigning a new instance of
greetHellofunction using Napi::Function class to thegreetHelloproperty onexportsobject.greetHellofunction receives Napi:callbackInfo object which contains arguments invoked by the function caller. - Since we want to return a string from this function, the return type of this function is
Napi::String. UsingNapi::String::New, we can create a string value fromUTF-8string literal and return it. - Inside
greetHellofunction, we are callinghelloUserC++ function which returns a UTF-8stringvalue. We can use this value to compose an appropriateNapi::Stringreturn value for thegreetHellofunction.
Generating Build Boilerplate
Since we are done with the native implementation of our module, it’s time to focus on actually compiling the C++ programs into a Native Addon.
But first, we need some instructions on how to generate the Native Addon (DLL) file which can be imported in Node.js as a module. To help the compilation process, node-gyp provide a boilerplate which contains all necessary build instructions and configurations.
To generate this boilerplate in the root directory of our module where binding.gyp is located, we use the below node-gyp command.
$ node-gyp configure
This command generates this boilerplate inside build directory.
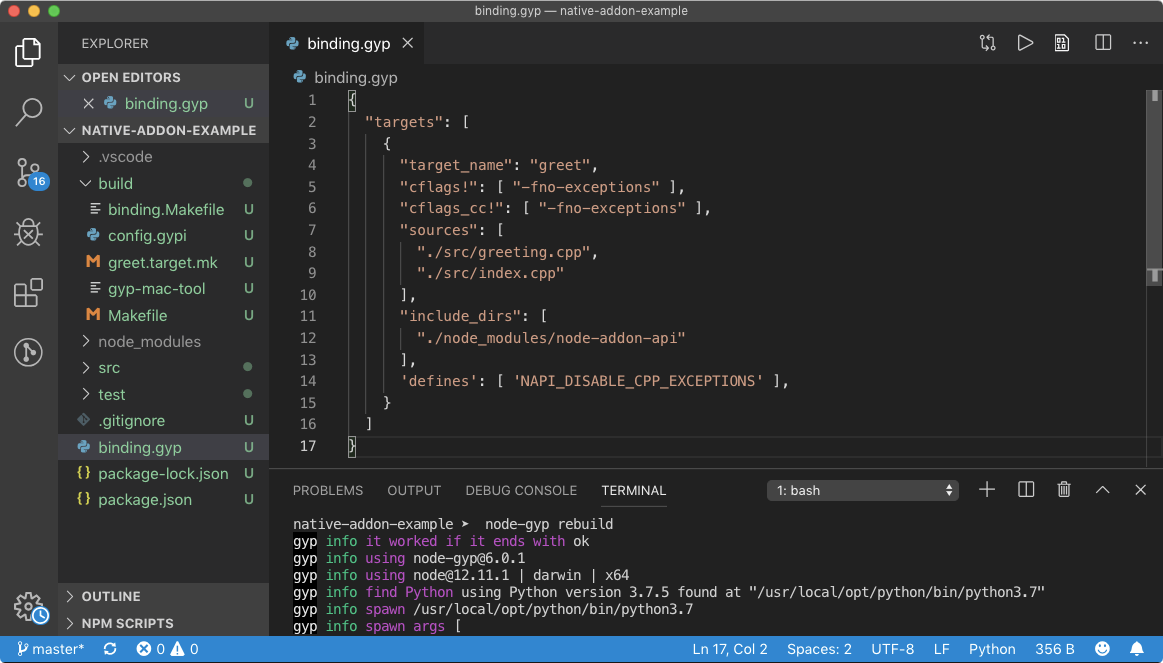
($ node-gyp configure)
As you can see from the above example, we have some important files like Makefile which contains instruction on how to build our native source code into a Dynamically Linked Library (DLL) compatible with Node.js runtime.
Now that we have build instructions for C/C++ compiler, we can build our Native Addons. To make this easier, node-gyp provides the below command.
$ node-gyp build
This command goes to the files in the build and generates a DLL file with .node extension. This file will be placed inside build/Release directory.
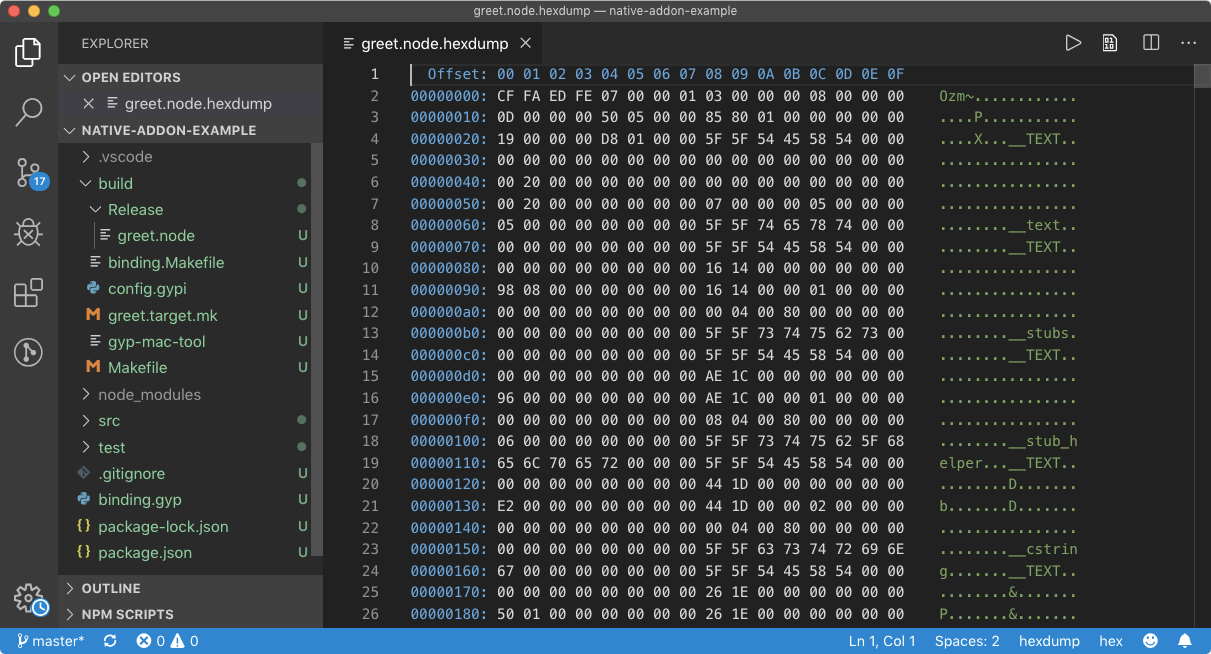
(Native Addon DLL file)
As you can see from the above example, we now have greet.node inside build/Release which is our Native Addon.
Since this is a compiled binary file as all Shared Libraries or DLLs are, it is not human readable, unlike a JavaScript module.
We can import this file inside a JavaScript program and utilize properties available on exports object. The way we consume a Native Module is no different than a regular JavaScript module.
Let’s create an index.js inside the project root directory and implement greetHello function to test if it is working as expected.
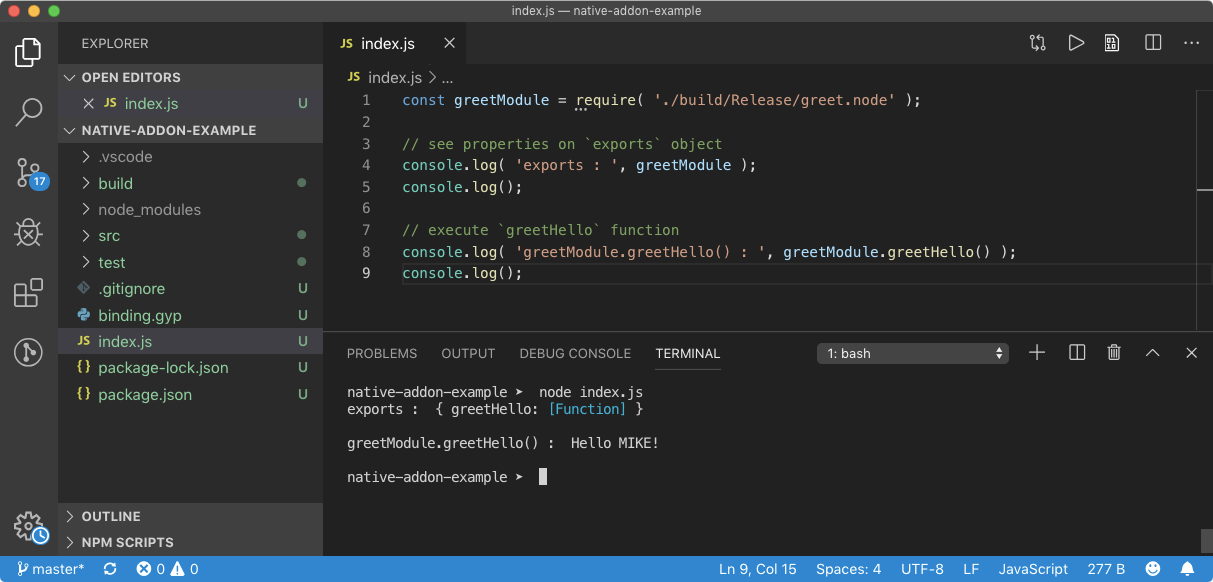
(Test Native Addon API)
From the above result, we can see that greet.node Native Module provides greetHello function. When we call the greetHello function, it returns Hello MIKE! string which is what we actually wrote in our C++ programs.
If you are wondering if this a magic, then let me assure you that it’s not.
When we require .node file, this Native Addon is loaded into memory at runtime and Init callback function was invoked (since it was registered with NODE_API_MODULE macro function). The Init function communicates with Node.js using ABI to provide the exports object.
Inside Init function, we can do whatever we want. We can call other functions or third-party library functions to provide useful features on exports object. In nutshell, the Init function is the entry point of module registration and this is where we define API of our Native Module.
Extending greetHello function
The helloUser function is capable of accepting a string argument and returning Hello <value>! string. But at the moment our greetHello function inside index.cpp is calling helloUser function with hardcoded MIKE value.
What we want is, the consumer of this Native Addon should be able to pass this argument from greetHello function exposed to the exports object from inside a JavaScript program.
Since a Napi::Function type receives Napi::CallbackInfo object and we can access arguments passed by the caller to this function from this object and we should be able to utilize helloUser function properly.
If you take a look at the CallbackInfo object documentation, we should be able to access arguments from the CallbackInfo object itself. An argument on this object is accessed using an index using CallbackInfo[index] syntax.
The Napi::CallbackInfo object can be accessed like a C++ array because of the [] operator overloading (documented here).
This syntax returns a Napi::Value object. If you take a look at Napi::Value documentation, it is inherited by other concrete classes. Hence, by using its As method, we should be able to cast a value to an appropriate type.
However, Napi::Value also provide some shortcut methods like ToString and ToNumber which converts argument value to a specific data type. As we are expecting the first argument to be a string, we’ll use ToString method.
// BEFORE
std::string result = helloUser( "MIKE" );
------------
// AFTER
std::string user = (std::string) info[0].ToString();
std::string result = helloUser( user );
Since we have made changes to our source files only, we do not need to re-configure the project using node-gyp configure command. However, it is a good practice to configure and then build the Native Addon.
If you take a look at the documentation of Napi::String class, it provides a casting operator for std::string data type, which returns C++ string value. Hence we have use (std::string) cast in the above example.
To make this process simple, node-gyp provides node-gyp rebuild command which cleans, configures and builds the project, all at once. Let’s execute this command and test the Native Addon by passing a string argument.
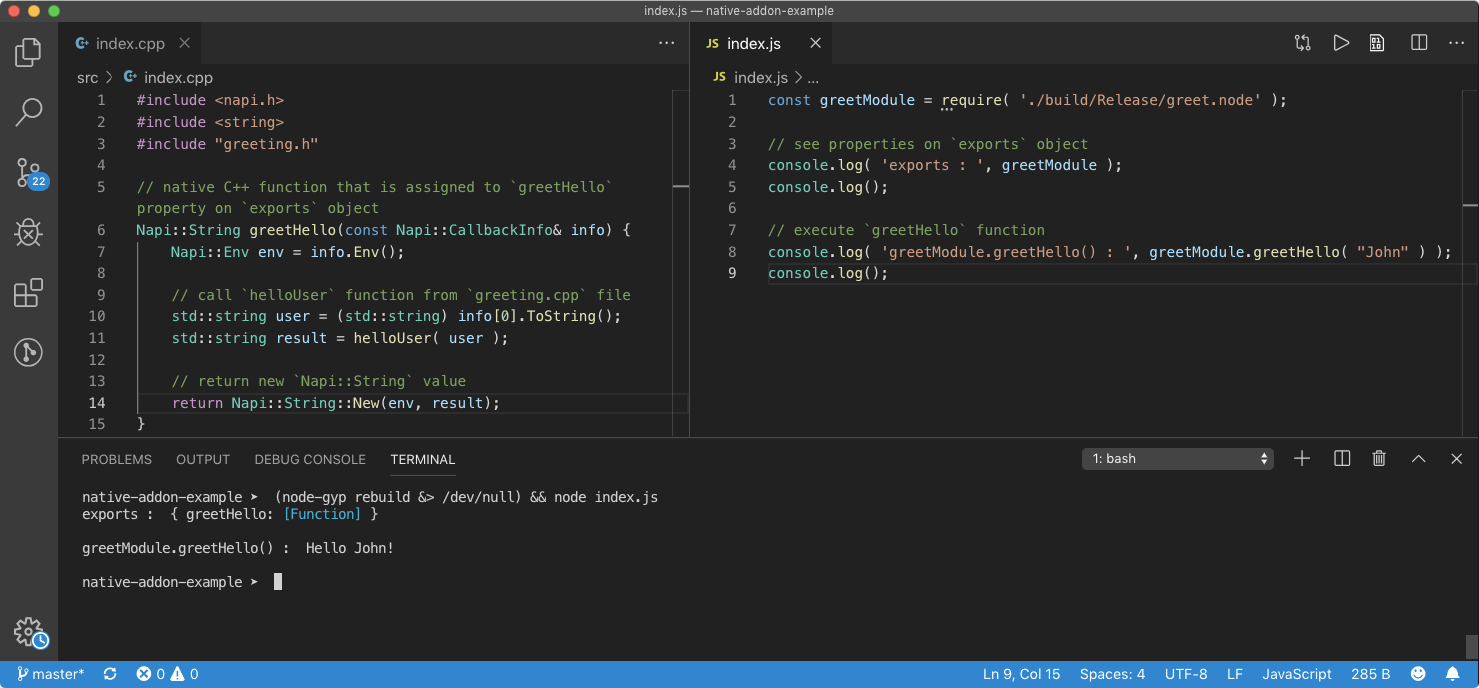
($ node-gyp rebuild)
Publishing Native Module
When a user imports a regular JavaScript-based node module, he/she imports it using require('_modname'_) call. When it comes to importing a Native Module, as we have seen from the above example, it’s not a very different case.
However, there are certain precautions and installation steps we need to handle such that our Native Module becomes easier to manage and consume.
Define an Entry Point
The main field in package.json points to the location of a JavaScript file in the module which will be the entry point of the module. This is the file that will get imported when we use require function.
Using this main field, we can point to the .node DLL file and it will work. However, if we have multiple build targets (defined inside binding.gyp file), then we have multiple .node DLL files to deal with.
Ideally, a node package should have a single entry point and it should expose all the API endpoints of the module. Hence, it is better to create a index.js file as we did in the previous example and export APIs of each .node files as a whole by modifying the exports object available to it.
Not only this will make user’s life better but with this, API of our module become consistent and detached from what .node files are exporting. This will also help code editors to provide autocomplete support on our module since properties are explicitly defined on exports object.
// greet module: index.js
const addon = require('./build/Release/greet.node');
exports.hello = addon.greetHello;
// consumer: program.js
const greet = require('greet');
greet.hello('John'); // Hello John!
If we are planning to return a single entity on module.exports like a function, then using index.js would also be helpful, as explained below.
// greet module: index.js
const addon = require('./build/Release/greet.node');
module.exports = addon.greetHello;
// consumer: program.js
const greet = require('greet');
greet('John'); // Hello John!
Install bindings package
In the above example, we have used a relative path of .node file to import it inside index.js file. However, depending on the version of Node.js and node-gyp a user is using, this path could be different.
To avoid this inconsistency, we use bindings package. This package resolves the correct path of .node file in the Native Module based on the name we provide to it. But first, let’s install it locally.
$ npm install -S bindings
This package provides a function which when called with the target name of our Native Addon or the filename of the .node file resolve the correct file path and automatically calls require on it.
// greet module: index.js
const addon = require('bindings')('greet'); // import 'greet.node'
exports.hello = addon.greetHello;
// consumer: program.js
const greet = require('greet');
greet.hello('John'); // Hello John!
Publishing the module
Publishing a Native Module is business as usual. All we need to do is make sure everything is in place by running some tests and use npm publish command. It would also be great if we could publish this code on GitHub for other people to contribute and to look at.
You can find the source code of the example discussed in this article on GitHub. You can also install and test this module using the below command.
$ npm install native-addon-example
To test this Native Module, use the below example.
const addon = require( 'native-addon-example' );
console.log( addon.hello( 'World' ) );
// Hello World!
Thinking Bigger
So far, we have gained good understanding of how Native Addon and Native Module works. However, we can extend our knowledge by understanding N-API in depth as well as some key concepts to release Native Modules to the public. Let’s go through these ones one at a time.
Understanding N-API
Since N-API is a part of Node.js, it is documented in-depth on their official documentation. But as we are using C++ wrapper around N-API, the official source code of node-addon-api is available in their GitHub repository.
The complete API documentation of node-addon-api is also available on the GitHub repository which you can find from this link. I recommend you to go through this API documentation and understand basic types, error handling, working with JavaScript values and other important things.
Node.js team has put together some great examples of creating Native Addons using the nan module, N-API and node-addon-api module. These examples are located inside node-addon-examples repository.
Inside every example provided by node-addon-examples repository, you should be able to find folders dedicated to each of these APIs.

(node-addon-examples)
Custom Module Build Instructions (optional)
Normally, while publishing the module, we wouldn’t check-in the build directory which contains .node files. This because .node files are native binary files, which means they are architecture-dependent.
Not only the architecture but Native Addon files need to be compiled again for every major release of Node.js to provide ABI stability.
When we use node-gyp build command, the C/C++ compiler creates .node DLL files based on the Node.js version and architecture of the system it is compiling on. Which means, these files can only be used on the system with similar architecture and compatible Node.js version.
However, when we publish our module and users’ system consume .node files (implicitly or explicitly), it might not be able to understand the binary instructions because it has a different architecture.
To avoid this, we generally ignore build directory while publishing our Native Module. Instead, when a user installs this module using npm install command, we run configure and build command of node-gyp.
On a high level, once a user installs our Native Module, he/she needs to run these commands manually from the directory of our Native Module. Which also means that the user also need to install node-gyp globally.
To avoid this, NPM provides an easy solution. If NPM CLI finds binding.gyp file inside the root directory of the module user is trying to install, it runs node-gyp rebuild command (documentation).
NPM will also install node-gyp locally when it finds binding.gyp file in the root directory of a module. Hence node-gyp rebuild comand runs successfully.
This also means that when a user installs our Native Module, NPM will automatically build Native Addons. However, we can override this default feature of NPM by adding install script in the package.json to run a custom build command when the package is installed.
Cross-platform Support (optional)
As we have learned, when a user installs a Native Module, the node-gyp build will be invoked automatically by NPM to create Native Addon files using instruction provided by the binding.gyp file.
This also means that a user’s system must have all the necessary build tools mentioned inside the prerequisites section earlier. This can easily drive anyone crazy if a system does not have proper build tools to compile the Native Addons or if a system is giving a hard time installing them.
To avoid this, a Native Module developer can build Native Addons (.node files) for all the major platforms out there and provide instructions to NPM while installing the Native Module to download compatible Native Addons instead of building them on the users’ system using node-gyp.
This can be achieved by hosting these Addon files publically and using install script of package.json to download them. This process can also be automated. The node-pre-gyp package can do that for you.
But first, since we want to release pre-built Native Addons, we need to build them first for the platforms, architectures, and Node.js versions we want to target. This can be easily done by the prebuild package. It can also upload these files to GitHub as release artifacts.
Instead of using a sophisticated configuration of node-pre-gyp, we can also use prebuild-install package which installs the compatible Native Addon files from GitHub published by prebuild package.
Implementing 3rd party library
The Native Module we built in this article has two C++ program files viz. greeting.cpp and index.cpp. The index.cpp file defines the entry point of greet Native Addon while greeting.cpp file provides helloUser function.
The greeting.cpp file is a kind of mini-library whose functionality and features are exposed by index.cpp to the JavaScript world.
We can implement the same logic on a bigger scale. We can import a powerful library like ImageMagick to perform blazing fast image processing capability to the JavaScript world.
My favorite image processing node module is sharp is developed by Lovell Fuller using libvips library written in C and C++ and nan API. You should take a look at the source of the sharp module especially the package.json file as well as binding.gyp file to understand how things are working.
If you want to try out the third party C++ library, then use Magick++ which provides C++ API around ImageMagick core. Then you can follow this simple example of cropping an image to get started.
ImageMagick Native Module already exists. You can follow this source code.
#nodejs #javascript #node-js
