CSS Container Queries: A Comprehensive Guide for Beginners
In this tutorial, we will learn what CSS container queries are and when to use them. CSS container queries and media queries are paramount to building responsive websites.
The days of having to change the layout of a webpage based on only its viewport are over. The introduction of CSS container queries now enables developers and designers to create webpages that are very responsive by ensuring that styles are applied to components based on their width and height and not based on the viewport of the full page.
In this article, we will learn what CSS container queries are and when to use them. We will also explore what media queries are and when to use those. Finally, we will look at the differences between container queries and media queries. Let’s get started.
Contents:
- What are CSS container queries?
- Exploring examples of CSS container queries
- Defining containers
- Vertically stacking cards
- Aspects of CSS container queries
- Shorthand syntax for CSS container queries
- Why use CSS container queries?
- Create components with their independent styles
- Style elements based on their size rather than the browser viewport
- Create fluid typography
- Use new responsive units
- When to use CSS container queries
- What are CSS media queries?
- Using media types
- Implementing media features
- Aspects of CSS media queries
- When to use CSS media queries
What are CSS container queries?
CSS container queries allow us to style an element with regard to its parent or container size (width and height). Container queries differ from media queries in the sense that media queries target the viewport (width and height) of the web browser in order to apply the style to an element.
Suppose we have a card with an image and a text horizontally stacked together by default. We can style it inside container queries or media queries. When using container queries, we will say something like Whenever the card container (parent element) is 500px let the card be vertically stacked. However, with a media query, we will say something like Whenever the viewport or the device is 500px, let the card be vertically stacked.
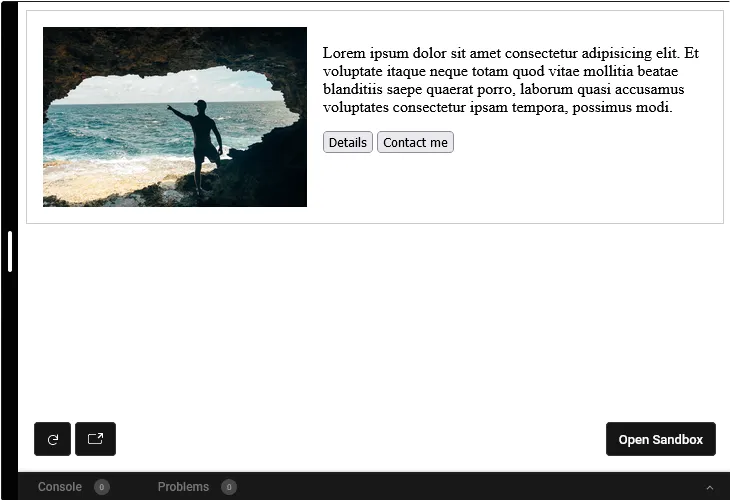
To better understand what CSS container queries are, we will look at an example without any container queries below:

Exploring examples of CSS container queries
In the example above, we have an HTML file with a linked CSS, a div with the card-container class, and another div with the card class. The .card contains two div with card-header and card-body classes, respectively. The .card-header contains an image, while the .card-body contains a p tage and two button tags, respectively.
In the CSS, we just made the card a CSS flexbox with a horizontal direction and added a gap, border, and some padding. Then, we gave the .card-header a maximum width before giving our img the style that will allow it to assume the width and height of its parent, .card-header. The markup above looks great. However, there is a problem with it. The problem arises when we are on a small device or shrink the viewport. The image becomes squashed on smaller screens, and the card looks awful.
To fix the issue above, we can use a container query to make the card vertically stacked when it reaches a particular width. However, we will need to define the container.
Defining containers
To define a container, we will have to select the element using any CSS selector, such as a class or an ID, and then use the container-type property on the element. Generally, container-type can accept three options, size, inline-size, and normal. We can write the following style:
.card-container {
container-type: size;
}
Or this:
.card-container {
container-type: inline-size;
}
We can also write this:
.card-container {
container-type: normal;
}
Whenever we set a container-type: normal on an element, it means that the element is not a query container for any container size. However, it is still valid because it can be used to apply styles to the element.
Vertically stacking cards
The container-type: inline-size; will cause the container not to assume the position it has on the viewport. This means that you must explicitly set the height and width of the container. Meanwhile, the container-type: inline-size; will ensure that the element assumes the position it has on the viewport. We can then use the container by using the @container syntax. To stack the card vertically, we can do this:
@container (max-width: 500px) {
  .card {
    flex-direction: column;
  }
}
Therefore, it means that whenever the width of .card is 500px or below, we will stack it vertically. The complete code for the CSS will look like this:
The @container rule above simply targets the first container it sees in the markup, and we can scope the container to a particular element using the container-name property. So, you can use any name as the container-name value and set the container name like so:
.card-container {
  container-type: inline-size;
  container-name: cardContainer;
}
Then, you can use the set name in your @container rule like this:
@container cardContainer (max-width: 500px) {
  .card {
    flex-direction: column;
  }
}
A complete example is shown below:

Note: Always add an extra element that wraps the children after the parent if you want to make the parent a container. Then, you can apply your normal styles to the newly added element and then make the parent a container. Therefore you should do the following:
<!-- Make the header the container -->
<header>
<!-- Apply normal css styles to the wrapper element -->
  <div class='wrapper'>
    <p>Child one</p>
    <p>Child two</p>
    <p>Child three</p>
  </div>
</header>
And:
/* Make the header the container */
header {
  container-name: headerContainer;
  container-type: inline-size;
}
/* Apply other normal styles to the wrapper */
.wrapper {
  display: flex;
  border: 1px solid red;
  background-color: white;
}
Aspects of CSS container queries
The container-name property is optional. However, it is recommended because it helps eliminate errors when working on a large CSS file. It is case-sensitive, which implies that container-name: cardContainer is different from container-name: cardcontainer. The @container CSS rule can accept the syntax similar to what we have for media queries such as max-width and min-width:
@container (max-width: 500px) {
    /* Normal css styles can go here */
}
@container (min-width: 500px) {
    /* Normal css styles can go here */
}
The @container CSS rule can also accept conditionals such as: >,>=, <, and <=. This implies that you can write the following syntax:
@container (width > 500px) {
    /* Normal css styles can go here */
}
@container (width >= 500px) {
    /* Normal css styles can go here */
}
@container (width < 500px) {
    /* Normal css styles can go here */
}
@container (width <= 500px) {
    /* Normal css styles can go here */
}
Interestingly, the @container CSS rule can accept logical keywords such as and, or, and not. It can be stated like this:
@container (width >= 500px) and (height >= 500px) {
    /* Normal css styles can go here */
}

@container (width > 760px) not (height > 670px) {
    /* Normal css styles can go here */
}
@container not (height <= 1080px) {
    /* Normal css styles can go here */
}
@container (width < 500px) or (height < 500px) {
    /* Normal css styles can go here */
}
The first rule checks for when the container has a width greater than or equal to 500px and also has a height greater than or equal to 500px. The second rule checks for when the container has a width greater than 760px and does not have a height greater than 670px. The third container checks for when the container has a height that is not less than or equal to 1080px, while the last checks for when the container has a width of 500px or a height less than 500px.
Shorthand syntax for CSS container queries
You can easily combine the CSS container properties into one single property known as container. The container-name comes first, followed by the container-type. Hence, you can do this:
.card-container {
 container: cardContainer / inline-size;
}
The above code works together, meaning you cannot have only the container-name or the container-type.
Why use CSS container queries?
Container queries are essential in modern-day websites that have to account for different screen orientations, sizes, and kinds. They help solve responsiveness issues very effectively without writing any extra JavaScript. Here are some of the issues container queries solve:
- Create components with their independent styles
- Style elements based on their size rather than the browser viewport
- Create fluid typography
- Use new responsive units
Create components with their independent styles
The ability to truly create components with their independent styles is a cool feature that CSS containers introduced. It allows us to create our webpages using the concept of components (containers) and apply styles independently to the children of the container. Let’s examine the markup below:
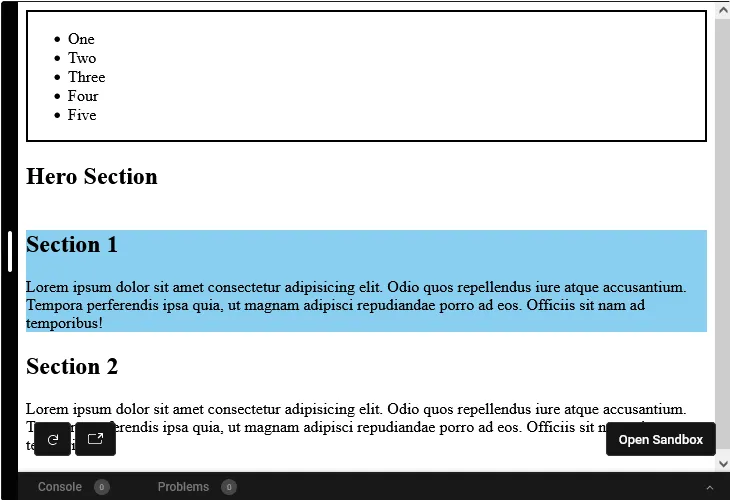
In the markup above, we have a header element with a div that is our wrapper component before our nav, ul, and five li inside it. The next element is the main with its own wrapper element. Inside it, we have two section elements, each with an h2 and a p element. In the CSS file, we have selected the header and made it a container with the following properties and values:
header {
  container-name: headerContainer;
  container-type: inline-size;
}
Then, we define the @container rule and add the following styles for .section-one and nav:
@container headerContainer (max-width: 700px) {
  /* This style will not be applied because it is outside of headerContainer element  */
  .section-one {
    border: 2px solid black;
  }
  /* This style will  be applied because it is inside of headerContainer element  */
  nav {
    border: 2px solid black;
  }
}
You will notice that the style we added in .section-one was not applied. This is because .section-one is not a child of header element where the container was defined. However, the nav style was applied. Furthermore, we also created a CSS container for the main using the following code:
main {
  container-name: mainContainer;
  container-type: inline-size;
}
Then, we added the @container rule before adding another style for nav and .section-one, as shown below:
@container mainContainer (width < 800px) {
  /* This style will  be applied because it is inside of mainContainer element  */
  .section-one {
    background-color: #89cff0;
  }
  /* This style will not be applied because it is outside of mainContainer element  */
  nav {
    background-color: green;
  }
}
You will notice that the style for .section-one was applied on the element because it is a child of main element, where the container was declared. However, it was not applied to nav because it was not a child of main element. Rather, nav is a child of header element where the headerContainer was defined.
Style elements based on their size rather than the browser viewport
CSS container queries allow us to style elements based on their width, height, aspect ratio, orientation, block size, and inline size. This means we can set a style on an element on a specific width, as we did in the example above. Here’s what that looks like:
@container cardContainer (max-width: 500px) {
  .card {
    flex-direction: column;
  }
}
Create fluid typography
CSS containers can help us create typography that scales accordingly on different screen sizes and element sizes. This can be achieved by smartly setting a dynamic font size on elements, as shown below:
<header>
  <div class='wrapper'>
    <p class='child-one'>Child one</p>
    <p>Child two</p>
    <p>Child three</p>
  </div>
</header>
And:
header {
  container-name: headerContainer;
  container-type: inline-size;
}
@container (width >= 420px) {
  h1 {
    font-size: calc(1.6em + 2vw);
  }
}
@container (width >= 920px) {
  h1 {
    font-size: calc(2.1em + 2vw);
  }
}
Use new responsive units
The introduction of CSS container queries brought about the addition of new units that will enable us to write more responsive webpages. The units are as follows:
cqwcqhcqicqbcqmincqmax
The following guide will explain more about the units.
When to use CSS container queries
Essentially, we use CSS container queries whenever we need to account for different screen sizes and restrict styles. We also use it to change the styles of elements depending on their size. Let’s examine the example below:
What are CSS media queries?
CSS media queries are an important tool for making websites responsive. Essentially, media queries are used to style elements differently on different screen sizes or device types. For instance, we can decide to give an element a padding of 50px on screen sizes that are greater than 700px and, at the same time, set a padding of 25px on screen sizes that are smaller than 700px. To achieve this, we can use the @media CSS rule and then select any element inside it before applying the styles of our choice, as shown below:
.box {
  border: 1px solid black;
}
@media (min-width: 700px) {
  .box {
    padding: 50px;
  }
}
@media (max-width: 700px) {
  .box {
    padding: 25px;
  }
}
We can look at the sample in the sample below to see it in action:
Using media types
Interestingly, CSS media queries can accept media types such as print, screen, or all. This means that you can style elements based on where they are viewed. For instance, you can specify a different background color for an element that will only be visible in print mode or when the document is printed:
@media print {
 .box {
    background-color: yellow;
  }
}
Implementing media features
Media features are used to check for any specific characteristics of the device being used to view a webpage, and such a device can be known as a user agent. We can attach some styles to the webpage when the checked media features are found. Some of the media features that can be checked include prefers-color-scheme, prefers-contrast, orientation, inverted-colors, and aspect-ratio, among others. You can view the complete list here.
For instance, we can use the prefers-color-scheme media type to determine the current theme the user has set in the user-agent, such as light or dark. Suppose the current color scheme of the user-agent is dark or the user is using dark mode; we can provide a different set of styles for the webpage as demonstrated in the code below:
@media (prefers-color-scheme: dark) {
 .box {
   background: black;
   color: white;
 }
}
And, when it is light, we can also provide another set of styles, such as:
@media (prefers-color-scheme: light) {
  .box {
    background: white;
    color: black;
  }
}
With media features, we can truly customize webpages to match the users preferred mood or user-agent settings. This improves UX and helps us keep up with the modern trend.
Aspects of CSS media queries
Generally, we can use logical keywords with media queries such as and and not. Hence, we can do the following:
@media (min-width: 500px) and (orientation: landscape) {
.box{
    border: 5px solid black;
}
}
Interestingly, we can also use conditionals such as >,>=, <, and <=. So, we can do this:
@media (width >= 500px) {
.box{
    border: 10px solid red;
}
}
When to use CSS media queries
Essentially, we use CSS media queries when we want to add styles for devices with a certain width, as shown below:
@media (min-width: 700px) {
  .box {
    padding: 50px;
  }
}
Also, we use media queries when we want to provide styles based on the features that are present on the user-agent. With media queries, we can check the orientation of the user-agent, such as:
@media (orientation: landscape) {
  .box {
    height: 200px;
    wiidth: 500px;
  }
}
@media (orientation: portrait) {
  .box {
     height: 500px;
    wiidth: 200px;
  }
}
We can use media queries to check when a user-agent supports hover, pointer, grid, etc. So, you can do this:
@media (hover: hover) {
  .box:hover {
    border-style: dotted;
  }
}
Conclusion
CSS container queries and media queries are paramount to building responsive websites. Therefore, I recommend using them in the websites we build to enhance the UX. Thank you for reading through. I hope you enjoyed this article, and be sure to leave a comment if you have any questions. Happy coding!
Source: https://blog.logrocket.com
#css