Learn how to write and read from the terminal in Node.js
Build a Command-Line Progress Bar in Node.JS
Project Setup
First, make sure you have Nodejs binaries installed on your machine. If not installed head over to Nodejs download page and download the binary for your machine. We will need npm but don’t worry it comes bundled with Nodejs executable.
Now, we will create our project folder:
mkdir cli-prgbar
cd cli-prgbar
npm init --y
This will create a folder cli-prgbar and also creates package.json in the folder.
Let’s create an index.js file:
touch index.js
This is the default file that will be run when we run the node . command.
The Progress Bar
We are done setting up our project. Let’s talk about the progress bar and how we are going to implement it.
The terminal or cmd or bash is divided into cells where texts, numbers or symbols are displayed. The cells ar place into a 2-D matrix. The order of the cells is from left-to-right and from top-to-bottom.
We can assign the cursor in the terminal matrix and write to any cell with the x,y relative position.
Our terminal has a cursor, which indicates where the next data is to be written. In Nodejs, it has a library readline which has APIs that enables us to set the cursor.
It id the cursorTo API:
cursorTo(stream, Nodejs.WritableStream, x: number, y: number)
The first argument is the reference to the WritableStream in our case it would be process.stdout which points to the terminal. x: number is the position in the x-plane in the terminal, y: number points to the position in the y-plane of the terminal.
To set the cursor on the first column and 3rd row:
readline.cursorTo(process.stdout,0,3)
process.stdout.write("A")

To set the cursor on the first row and 3rd column:
readline.cursorTo(process.stdout, 3, 0)
process.stdout.write("A")

Also, it has a process object which we can use to get Writable stream to write to the terminal.
To make a loading bar in the CLI, we need to write to different cells position at a particular time interval, this creates the loading effect.
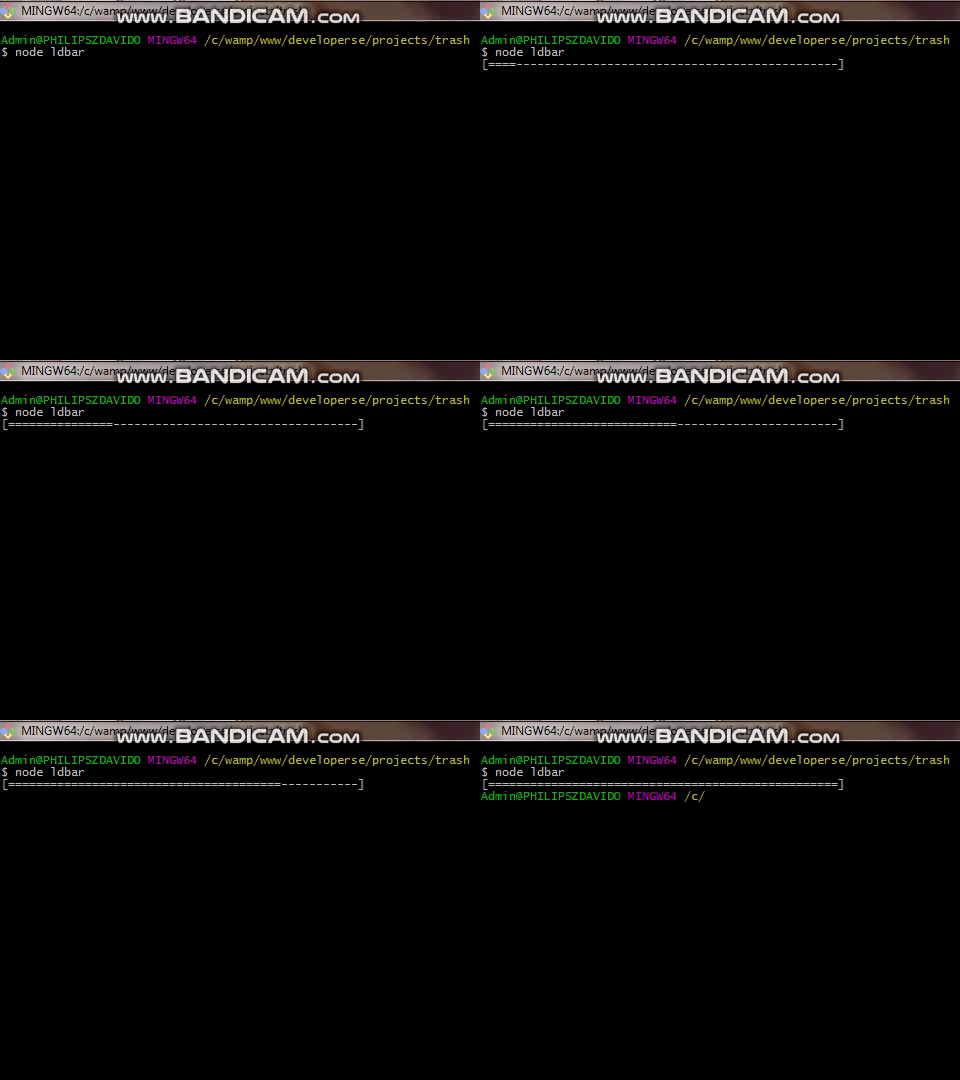
Now, we will create our loading bar to look like this:
[-----------------------------]
[================-------------]
[=============================]
The - shows the data is not yet loaded, = indicates data has been loaded. Breaking the above into cells:
0 1 2 3 4 5 6 7 8 9 10 11 12 13 14 15 16 17 18 19 20 21
[ - - - - - - - - -  -  -  -  -  -  -  - -  -  -  -  -22 23 24 25 26 27 28 29 30
-  -  -  -  -  -  -  -   ]

See, the [ is a cell 0 and -s from 1 to 29 and ] at cell 30. So now to simulate loading, we will have to write = from cells 1 to 29.
To start, let’s create a class LoadingBar.
class LoadingBar {}
Now, we need to know the amount of data or size of the data that you want the progress shown.
class LoadingBar {    constructor(size) {
        this.size = size
    }
}
we will have a start method that when called will start the loading:
class LoadingBar {    constructor(size) {
        this.size = size
    }    start() {    }
}
First, we have to disable the cursor, to do that we use the write method in process.stdout Writable stream to write "\x1B[?25l", this will remove the cursor from the terminal, to enable it we will write "\x1B[?25h".
start() {
        process.stdout.write("\x1B[?25l")
    }
Next, we will write [ the opening bracket
start() {
        process.stdout.write("\x1B[?25l")
        process.stdout.write("[")
    }
Now, we write the - the foreground symbol, now, we will loop over the size given to use to know how many of - to write:
start() {
        process.stdout.write("\x1B[?25l")
        process.stdout.write("[")
        for (let i = 0; i < this.size; i++) {
            process.stdout.write("-")
        }
    }
Now, the size of the data is indeterminate till runtime, so we have to track the cursor position. To do that we will create a cursor variable and set it to 0, then, increase by one when we write the -. This will be helpful when we want to render the = symbol to show loading, it will help us to know which cell position to start rendering = and where to stop which is important:
constructor(size) {
        this.size = size
        this.cursor = 0
    }    start() {
        process.stdout.write("\x1B[?25l")
        process.stdout.write("[")
        this.cursor++
        for (let i = 0; i < this.size; i++) {
            process.stdout.write("-")
            this.cursor++
        }
    }
Now, after rendering the — the size of this.size, we will write the closing bracket ]:
constructor(size) {
        this.size = size
        this.cursor = 0
    }    start() {
        process.stdout.write("\x1B[?25l")
        process.stdout.write("[")
        this.cursor++
        for (let i = 0; i < this.size; i++) {
            process.stdout.write("-")
            this.cursor++
        }
        process.stdout.write("]")
    }
Now, we have to simulate the loading effect. To do that we will use the setInterval API. The setInterval API is used to execute a block of code at a specified interval of time. We know that the = have to be written over the - cells at an interval to look like loading. So, we will call the setInterval with a time interval of 100ms and a callback function.
In the callback function passed to the setInterval, we will start from the cell after the opening bracket [ and write = till the end of the - before ].
// index.js...
constructor(size) {
        this.size = size
        this.cursor = 0
    }    start() {
        process.stdout.write("\x1B[?25l")
        process.stdout.write("[")
        for (let i = 0; i < this.size; i++) {
            process.stdout.write("-")
        }
        process.stdout.write("]")
        this.cursor = 1
        rdl.cursorTo(process.stdout, this.cursor, 0)
        setInterval(() => {
            process.stdout.write("=")
            this.cursor++
            if (this.cursor >= this.size) {}
        }, 100)
    }
See, we used the cursorTo API in readline library to set the cursor to cell 1, so when we call the write method it will begin from the cell 1 to write data. We set the cursor at cell 1 because the [ is at cell 0 so we will start at cell 1 not to overwrite it.
See the callback function in the setInterval, write = then, increase the variable cursor by one. It checks if the cursor variable is greater than or equal to the size of the data, if it is true we know we are at the ] cell so we need to stop.
We need to stop the time interval setup by the setInterval API, to do that we need to get hold of the Timer instance returned by the API, so we can stop it by passing it to clearInterval API.
// index.js...
constructor(size) {
        this.size = size
        this.cursor = 0
        this.timer = null
    }    start() {
        process.stdout.write("\x1B[?25l")
        process.stdout.write("[")
        for (let i = 0; i < this.size; i++) {
            process.stdout.write("-")
        }
        process.stdout.write("]")
        this.cursor = 1
        rdl.cursorTo(process.stdout, this.cursor, 0);
        this.timer = setInterval(() => {
            process.stdout.write("=")
            this.cursor++;
            if (this.cursor >= this.size) {
                clearTimeout(this.timer)
            }
        }, 100)
    }
See, we created a timer variable then, assigned it to the value returned by setInterval call. We then called the clearInterval with the timer instance. This will make the loading effect to stop when we are the end of the cell. After that, we re-enabled the cursor by writing "\x1B[?25h" to the stdout stream.
With this our loading bar is complete.
See the full code:
// index.js
const process = require("process")
const rdl = require("readline")class LoadingBar {
    constructor(size) {
        this.size = size
        this.cursor = 0
        this.timer = null
    }    start() {
        process.stdout.write("\x1B[?25l")
        process.stdout.write("[")
        for (let i = 0; i < this.size; i++) {
            process.stdout.write("-")
        }
        process.stdout.write("]")
        this.cursor = 1
        rdl.cursorTo(process.stdout, this.cursor, 0);
        this.timer = setInterval(() => {
            process.stdout.write("=")
            this.cursor++;
            if (this.cursor >= this.size) {
                clearTimeout(this.timer)
                process.stdout.write("\x1B[?25h")
            }
        }, 100)
    }
}
Let’s run it:
// index.js
...
const ld = new LoadingBar(50)
ld.start()
We made the size to be 50.
node .

Making it Single Bar
We used = and - to simulate loading progress, now we will use the bar instead:
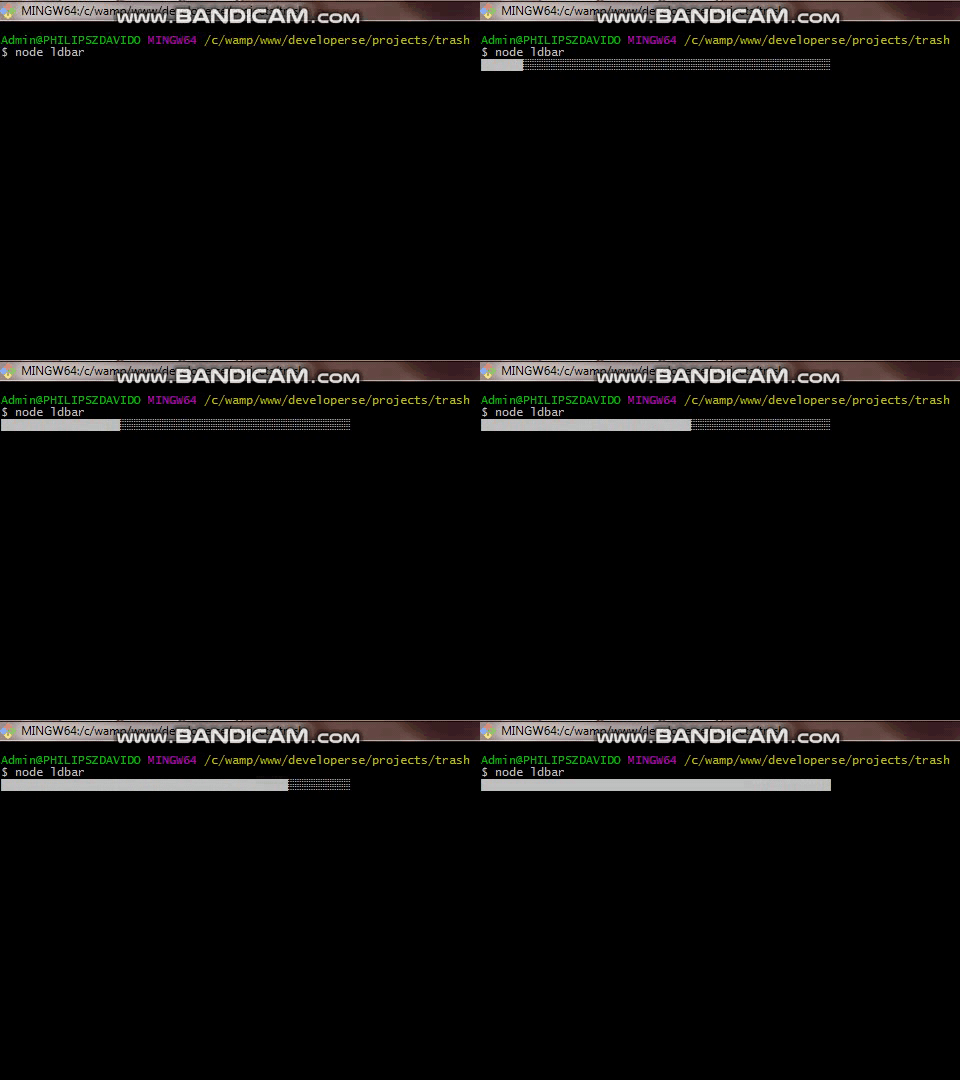
█ ░
░ will serve as the foreground just as -. It will stretch out to fill the cells, then █ to overwrite it to show the progress lie = did. That will be more captivating than - and =.
Now we will touch our LoadingBar class:
class LoadingBar {
    constructor(size) {
        this.size = size
        this.cursor = 0
        this.timer = null
    }    start() {
        process.stdout.write("\x1B[?25l")
1.➥    process.stdout.write("[")
        for (let i = 0; i < this.size; i++) {
2.➥        process.stdout.write("-")
        }
3.➥    process.stdout.write("]")
4.➥    this.cursor = 1
        rdl.cursorTo(process.stdout, this.cursor, 0);
        this.timer = setInterval(() => {
5.➥        process.stdout.write("=")
            this.cursor++;
            if (this.cursor >= this.size) {
                clearTimeout(this.timer)
            }
        }, 100)
    }
}
1. goes away because there will be no [. 2. - will be changed to be ░, the string “\u2591” does the effect. 3. Yeah, the closing bracket goes away, the decision was up to me you can leave it in your implementation then touch the code to incorporate the addition. 4. the cursor won’t start from cell 0 because there is no more [ which occupies it. So the loading effect filling should start from cell 0. 5. = is now replaced by the bar █, to display we will pass the string "\u2588" to stdout.
Now, our updated code would be this:
class LoadingBar {
    constructor(size) {
        this.size = size
        this.cursor = 0
        this.timer = null
    }    start() {
        process.stdout.write("\x1B[?25l")
        for (let i = 0; i < this.size; i++) {
            process.stdout.write("\u2591")
        }
        rdl.cursorTo(process.stdout, this.cursor, 0);
        this.timer = setInterval(() => {
            process.stdout.write("\u2588")
            this.cursor++;
            if (this.cursor >= this.size) {
                clearTimeout(this.timer)
            }
        }, 100)
    }
}
Running it would give us this effect:
node .

Final Code 👍
// index.js
const process = require("process")
const rdl = require("readline")
class LoadingBar {
    constructor(size) {
        this.size = size
        this.cursor = 0
        this.timer = null
    }
start() {
        process.stdout.write("\x1B[?25l")
        for (let i = 0; i < this.size; i++) {
            process.stdout.write("\u2591")
        }
        rdl.cursorTo(process.stdout, this.cursor, 0);
        this.timer = setInterval(() => {
            process.stdout.write("\u2588")
            this.cursor++;
            if (this.cursor >= this.size) {
                clearTimeout(this.timer)
            }
        }, 100)
    }
}
const ld = new LoadingBar(50)
ld.start()
Conclusion
This was just a guideline on how to build your own CLI loading bar. It is meant for you to understand the dynamics and concepts behind making the loading effect on the terminal using Nodejs. It is very simple, once you know that the terminal is divided into rows and columns, then you can manipulate the cursor to point at the cell of your choice.
Thanks !!!
#node-js
