An easy way to bring up the Kubernetes Cluster using kubeadm for your test environment.

All the managed clusters GKE, AKS, and EKS on the cloud have only two states Start or Delete Clusters. Although AKS does provide an auto-shutdown choice, you still need to enable the script. And also you do not have the master node configuration at your end. In this article, we will install Kubernetes using kubeadm on virtual machines so that we can stop and restart the cluster at our convenience and not get billed during the stoppage time. Also, we have the master node and its configuration which we can tweak.
Let’s go over the installation of Kubernetes Cluster on a VM step-by-step.
Here I am assuming that you know the basics of Kubernetes. I am not going to go over the components of Kubernetes it’s architecture and functionality now. This is solely to install a Kubernetes cluster using “kubeadm” and to make life easier for people who want a cluster for their understanding/testing applications etc…
**Pre-requisites: **Steps 1 and 2 below applies to all the nodes in the cluster
- Hardware Requirements: The instances should have a minimum of 2 vCPUs for the k8s to install the required components. The RAM and Storage should be optimal as per your Application needs. You would need two instances; one for the Master and another for the Node for a 2 node cluster. It could be on any Cloud of your choice (AWS, GCP, Azure, DO, RackSpace, IBMCloud etc…)
- Software Requirements: Make sure the VM operating system is 64 bit and this code is tested for “ubuntu” operating system (16.04, 18.04, and 20.04 versions )
Package requirements for the operating system:
2.1 Make sure you have installed the latest python version: Otherwise, follow the below steps to upgrade / fresh install of python
$ git pull https://github.com/rangapv/pyUpgrade.git
$ ls
  py.sh
$ ./py.sh
2.2 Make sure you have docker installed correctly: Otherwise, follow the below steps for docker and docker-compose installs.
Note attempt section 2.1 and then 2.2
$ git pull https://github.com/rangapv/doker.git
$ ls
  dock.sh
$ ./dock.sh
Let’s check if the installs are fine
$ python --version
  Python 3.5.2

$ docker --version
  Docker version 19.03.8, build afacb8b7f0
$ docker-compose --version
  docker-compose version 1.25.5, build unknown
Once section 1 and section 2 of hardware and software needs are satisfied let’s jump into the Kubernetes installation.
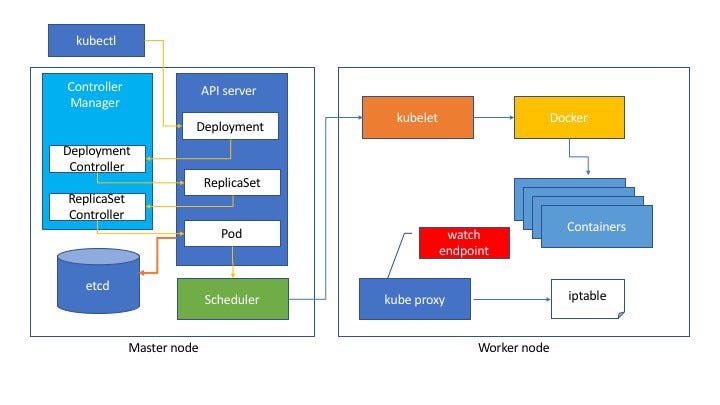
Our Kubernetes Architecture will look similar to this. It is a simple 2 node cluster with One master and One Node. The networking is via flannel.

K8s Architecture courtesy @tsuyoshiushio
Let’s begin with the Master Node preparation:
I will name the Master as “kubeadm”. Setting up the Master requires us to install the k8s components, networking, and finally the dashboard for user access. Let’s go over this one-by-one and in this particular order.
- Install the k8s component (adm_install.sh)
- Install the flannel network (kube-flannel.yaml)
- Install the dashboard (recommended.yaml & dashboard-adminuser.yaml)
#containers #devops #kubeadm #kubernetes #cloud-computing
