In the 2020v2 release of ComponentOne we added a FilterEditor control for WPF, which provides an intuitive UI for filtering data sources at run time. This post demonstrates how we can integrate the FilterEditor for WPF with the C1DataFilter control to create rule-based filtering for an e-mail client application. Using the filter editor to create rule-based filtering, we’ll see how a user can break down a large data set (i.e., the list of e-mails here) into a hierarchical tree of logically formed nodes. Each node corresponds to smaller, related, and more manageable datasets.
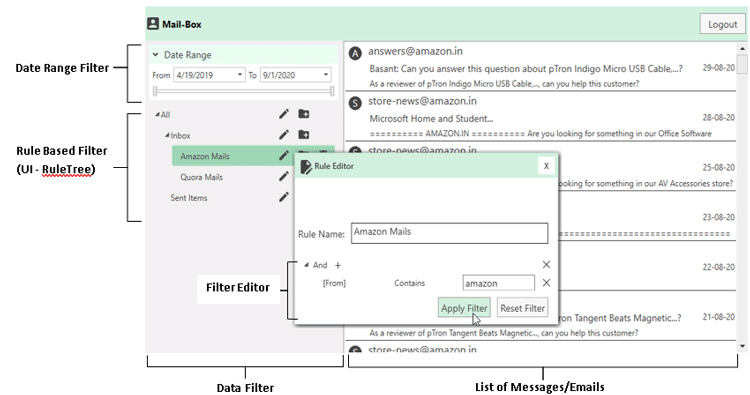
In this blog, we will first have a quick look at the FilterEditor structure. After that, we will cover
- Creating the models required for the MailBox.
- Creating the RuleEditor using the FilterEditor control.
- Creating the RuleTree to be displayed in the DataFilter.
- Integrating the RuleTree with a custom filter (named RuleBasedFilter) for the DataFilter.
- Adding the custom filter to the DataFilter control.
FilterEditor for WPF: A Review of the Structure
The following image shows what the FilterEditor control looks like:
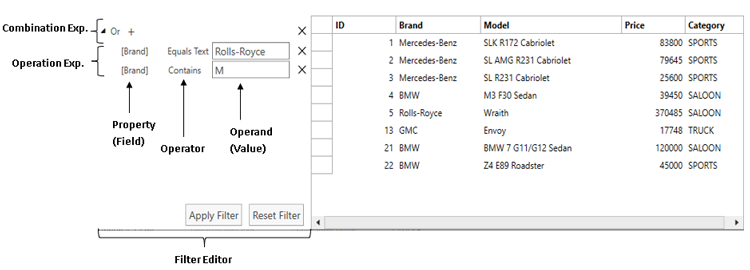
It displays a tree of filter nodes where each node represents either a Combination or an Operation expression. These are the building blocks for creating any filter criteria for our data source at runtime. You can read more about the FilterEditor structure from the documentation and this blog. Next, let’s look at the mailbox that we’ll be creating.
#.net #desktop
