Paths in Flutter: A Visual Guide
In this article, we will go through each function which in Path class and see how they behave.
Flutter gives us a lot of standard views to use in our projects, but from time to time we need to create custom views. We will go through each function which in Path class and see how they behave.
One of the most common way to do this is, using paths.
But first, let’s quickly go over our base playground.
p.s. I wanted to pick Totoro as a the header because of my latest trip to Japan and also it is cute :) Also there is a path in the gif :)
import 'package:flutter/material.dart';

void main() => runApp(
      MaterialApp(
        home: PathExample(),
      ),
    );

class PathExample extends StatelessWidget {
  @override
  Widget build(BuildContext context) {
    return CustomPaint(
      painter: PathPainter(),
    );
  }
}

class PathPainter extends CustomPainter {
  @override
  void paint(Canvas canvas, Size size) {
    Paint paint = Paint()
      ..color = Colors.red
      ..style = PaintingStyle.stroke
      ..strokeWidth = 8.0;

    Path path = Path();
    // TODO: do operations here
    path.close();
    canvas.drawPath(path, paint);
  }

  @override
  bool shouldRepaint(CustomPainter oldDelegate) => true;
}
Basically what we have here is a StatelessWidgetwith CustomPaintas a child and it gets our CustomPainteras a painter. CustomPaint is a widget that provides us a canvas to be used by the CustomPainter to paint what we provided in the paint method.
For painting options, we created a Paint object and decided to draw everything stroke style with a width of 8 in color red.
Next, we have our Path in our code to be used for drawing. Path is basically a collection of drawn elements. These elements are drawn according to its starting point. The initial starting point for a Path is (0,0).
Lastly, we have our canvas . We use canvas for drawing our path on it with the paint that we created.
Now that we are done with the playground, let’s talk about the screen coordinate system in case it is not familiar to some people.

For the screen, the start point (0,0) is the screen’s top left corner. X coordinate direction is the horizontal axis and the right edge of the screen is the positive visible limit and its value is the width of the screen. Y coordinate direction is the vertical axis and bottom edge of the screen is the positive visible limit and its value is the height of the screen.
Now we are ready to start.
moveTo
moveTo method helps us to move the starting point of the sub-path to the point provided within the method.
  @override
  void paint(Canvas canvas, Size size) {
    Paint paint = Paint()
      ..color = Colors.red
      ..style = PaintingStyle.stroke
      ..strokeWidth = 8.0;

    Path path = Path();
    // Moves starting point to the center of the screen
    path.moveTo(size.width / 2, size.height / 2);
    canvas.drawPath(path, paint);
}
Moves starting point to center
lineTo
lineTo is the method to draw a line from the current point of the path to the point provided within the method.
  @override
  void paint(Canvas canvas, Size size) {
    Paint paint = Paint()
      ..color = Colors.red
      ..style = PaintingStyle.stroke
      ..strokeWidth = 8.0;

    Path path = Path();
    // Draws a line from left top corner to right bottom
    path.lineTo(size.width, size.height);
    canvas.drawPath(path, paint);
}
Draws a line from top left to bottom right

lineTo example
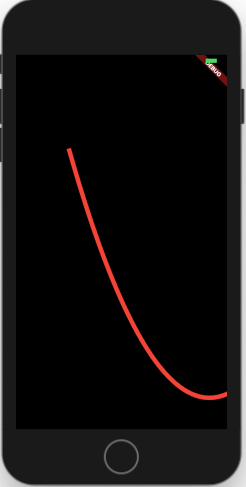
quadraticBezierTo
quadraticBezierTo method was for me the most complicated one to understand. It draws a Bezier Curves and as we learn from Mathematics, it does this with the control point provided.
Disclaimer: Since it’s a complicated concept, I wanted to keep this as visual as possible, you can see how bezier curves are calculated.
From the left center of the screen, we draw a bezier curve to the right center of the screen.
  @override
  void paint(Canvas canvas, Size size) {
    Paint paint = Paint()
      ..color = Colors.red
      ..style = PaintingStyle.stroke
      ..strokeWidth = 8.0;

    Path path = Path();
    path.moveTo(0, size.height / 2);
    path.quadraticBezierTo(size.width / 2, size.height, size.width, size.height / 2);
    canvas.drawPath(path, paint);
}

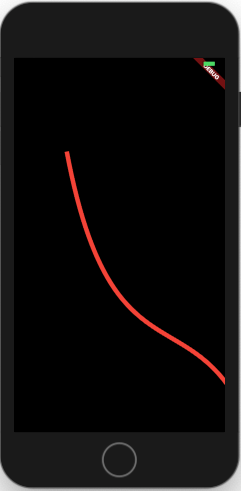
cubicTo
cubicTo method adds a Bezier curve in cubic style.
Unlike to quadraticBezierTo, we assign two different control points for . This way you can have the bezier calculations for two control points to have cool views like a wave.
  @override
  void paint(Canvas canvas, Size size) {
    Paint paint = Paint()
      ..color = Colors.red
      ..style = PaintingStyle.stroke
      ..strokeWidth = 8.0;

    Path path = Path();
    path.cubicTo(size.width / 4, 3 * size.height / 4, 3 * size.width / 4, size.height / 4, size.width, size.height);
    canvas.drawPath(path, paint);
}

conicTo
conicTo is also basically acting like a quadraticBeizerTo wit the only difference being the weight variable. If the weight is bigger than 1, the drawn shape is a hyperbola. If the weight is 1 then drawn shape is parabola and if it’s smaller than 1, the drawn shape would be an ellipse.
One important thing to note is, as the weight increases, the curve is pulled more to control point.
  @override
  void paint(Canvas canvas, Size size) {
    Paint paint = Paint()
      ..color = Colors.red
      ..style = PaintingStyle.stroke
      ..strokeWidth = 8.0;

    Path path = Path();
    path.conicTo(size.width / 4, 3 * size.height / 4, size.width, size.height, 20);
    canvas.drawPath(path, paint);
}
arcTo
arcTo is accepting an oval then, gets a start angle and sweep angle as a radian. It starts drawing the oval from the start angle and adds the sweep angle to the start angle.
e.g. For drawing an arc starting from left middle edge to top edge of an oval, we will start from 0 which is the radian value for 0 and add 1.57 which is the radian value for 90.
The example below shows the arc of an oval drawn from the center of the screen.
  @override
  void paint(Canvas canvas, Size size) {
    Paint paint = Paint()
      ..color = Colors.red
      ..style = PaintingStyle.stroke
      ..strokeWidth = 8.0;

    // Method to convert degree to radians
    num degToRad(num deg) => deg * (Math.pi / 180.0);

    Path path = Path();
    path.arcTo(Rect.fromLTWH(size.width / 2, size.height / 2, size.width / 4, size.height / 4), degToRad(0), degToRad(90), true);
    canvas.drawPath(path, paint);
}

addRect
addRect adds a rectangle as a new sub-path.
  @override
  void paint(Canvas canvas, Size size) {
    Paint paint = Paint()
      ..color = Colors.red
      ..style = PaintingStyle.stroke
      ..strokeWidth = 8.0;

    Path path = Path();
    // Adds a rectangle
    path.addRect(Rect.fromLTWH(size.width / 2, size.height / 2, size.width / 4, size.height / 4));
    canvas.drawPath(path, paint);
}

addOval
addOval adds an oval as a sub-path. From the example above, we will only change the method call.
  @override
  void paint(Canvas canvas, Size size) {
    Paint paint = Paint()
      ..color = Colors.red
      ..style = PaintingStyle.stroke
      ..strokeWidth = 8.0;

    Path path = Path();
    // Adds an oval
    path.addOval(Rect.fromLTWH(size.width / 2, size.height / 2, size.width / 4, size.height / 4));
    canvas.drawPath(path, paint);
}

addArc
addArcis acting as arcTo.
e.g. For drawing an arc starting from left middle edge to top edge of an oval, we will start from 3.14 which is the radian value for 180 and add 1.57 which is the radian value for 90.
For making things easier, I added a function to calculate the radian from degree.
  @override
  void paint(Canvas canvas, Size size) {
    Paint paint = Paint()
      ..color = Colors.red
      ..style = PaintingStyle.stroke
      ..strokeWidth = 8.0;

    // Method to convert degree to radians
    num degToRad(num deg) => deg * (Math.pi / 180.0);

    Path path = Path();
    // Adds a quarter arc
    path.addArc(Rect.fromLTWH(0, 0, size.width, size.height), degToRad(180), degToRad(90));
    canvas.drawPath(path, paint);
}

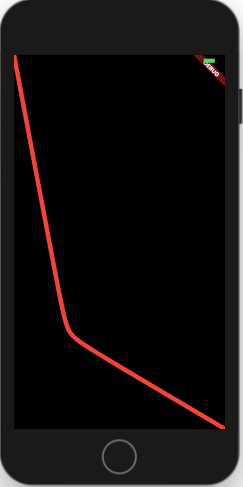
addPolygon
addPolygon method draws polygon from sets of points. It gets a set of Offset values which will be the positions for the polygon. Lastly it accepts a boolean, true acts like path.close() and draws a straight line between the last and first point and false does nothing.
  @override
  void paint(Canvas canvas, Size size) {
    Paint paint = Paint()
      ..color = Colors.red
      ..style = PaintingStyle.stroke
      ..strokeWidth = 8.0;

    Path path = Path();
    // Adds a polygon from the starting point to quarter point of the screen and lastly
    // it will be in the bottom middle. Close method will draw a line between start and end.
    path.addPolygon([
      Offset.zero,
      Offset(size.width / 4, size.height / 4),
      Offset(size.width / 2, size.height)
    ], true);
    canvas.drawPath(path, paint);
}
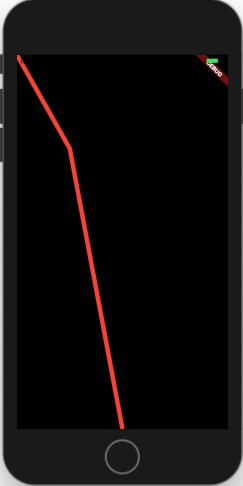
close = false

close = true
addRRect
addRRect is a method to create a rounded cornered rectangle. We will use the rectangle above and corners with radius of 16.
  @override
  void paint(Canvas canvas, Size size) {
    Paint paint = Paint()
      ..color = Colors.red
      ..style = PaintingStyle.stroke
      ..strokeWidth = 8.0;

    Path path = Path();
    path.addRRect(
      RRect.fromRectAndRadius(Rect.fromLTWH(size.width / 2, size.height / 2, size.width / 4, size.height / 4), Radius.circular(16))
    );
    canvas.drawPath(path, paint);
}

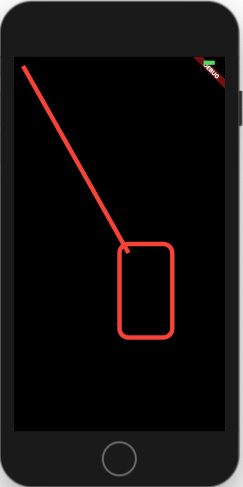
addPath
addPath is the method to add one path to another one with an offset. We will add one path with line to the rounded corner rectangle above.
  @override
  void paint(Canvas canvas, Size size) {
    Paint paint = Paint()
      ..color = Colors.red
      ..style = PaintingStyle.stroke
      ..strokeWidth = 8.0;

    Path path = Path();
    path.addRRect(
        RRect.fromRectAndRadius(Rect.fromLTWH(size.width / 2, size.height / 2, size.width / 4, size.height / 4), Radius.circular(16))
    );
    Path secondPath = Path();
    secondPath.lineTo(size.width / 2, size.height / 2);
    path.addPath(secondPath, Offset(16, 16));
    canvas.drawPath(path, paint);
}
relativeLineTo
relativeLineTo is basically behaving like lineTo but only offsets the drawn shape to the current point. Width the same code lineTo would have the half of the length.
  @override
  void paint(Canvas canvas, Size size) {
    Paint paint = Paint()
      ..color = Colors.red
      ..style = PaintingStyle.stroke
      ..strokeWidth = 8.0;

    Path path = Path();
    path.moveTo(size.width / 4, size.height / 4);
    path.relativeLineTo(size.width / 2, size.height / 2);
    canvas.drawPath(path, paint);
}

relativeQuadraticBezierTo
relativeQuadraticBezierTo method acts like quadraticBezierTo method. Current point is calculated relative to the current position of the path.
  @override
  void paint(Canvas canvas, Size size) {
    Paint paint = Paint()
      ..color = Colors.red
      ..style = PaintingStyle.stroke
      ..strokeWidth = 8.0;

    Path path = Path();
    path.moveTo(size.width / 4, size.height / 4);
    path.relativeQuadraticBezierTo(size.width / 2, size.height, size.width, size.height / 2);
    canvas.drawPath(path, paint);
}
relativeConicTo
relativeConicTo behaves exactly like conicto method. It calculates the current point relative to the path’s current position.
  @override
  void paint(Canvas canvas, Size size) {
    Paint paint = Paint()
      ..color = Colors.red
      ..style = PaintingStyle.stroke
      ..strokeWidth = 8.0;

    Path path = Path();
    path.moveTo(size.width / 4, size.height / 4);
    path.relativeConicTo(size.width / 4, 3 * size.height / 4, size.width, size.height, 20);
    canvas.drawPath(path, paint);
}

relativeCubicTo
relativeCubicTo method behaves exactly like cubicTo. Only difference is, it’s current position will be calculated relative to the current position of the path.
  @override
  void paint(Canvas canvas, Size size) {
    Paint paint = Paint()
      ..color = Colors.red
      ..style = PaintingStyle.stroke
      ..strokeWidth = 8.0;

    Path path = Path();
    path.moveTo(size.width / 4, size.height / 4);
    path.relativeCubicTo(size.width / 4, 3 * size.height / 4, 3 * size.width / 4, size.height / 4, size.width, size.height);
    canvas.drawPath(path, paint);
}
Conclusion
Drawing custom shapes with canvas are really important and it’s helpful for us to use our creativity in our application development. These operations can be used to create a cool background, graphics and so on.
So, go ahead and play around with it, if you have any questions either leave a comment below.
Thank you!
Learn More
☞ Getting started with Flutter
☞ Android Studio for beginners
☞ Flutter Tutorial - Flight List UI Example In Flutter
☞ Let’s Develop a Mobile App in Flutter
☞ Mastering styled text in Flutter
☞ A Design Pattern for Flutter
☞ Weather App with “flutter_bloc”
☞ An introduction to Dart and Flutter
☞ Learn Flutter & Dart to Build iOS & Android Apps
☞ Flutter & Dart - The Complete Flutter App Development Course
☞ Dart and Flutter: The Complete Developer’s Guide
#flutter #mobile-apps #ios #android