Why you should learn the Rust programming language
Discover the history, key concepts, and tools for using Rust
A recent Stack Overflow survey found that almost 80% of respondents loved using or wanted to develop with the Rust language. That’s an incredible number! So, what’s so good about Rust? This article explores the high points of this C-like language and illustrates why it should be next on your list of languages to learn.
Rust and its genealogy
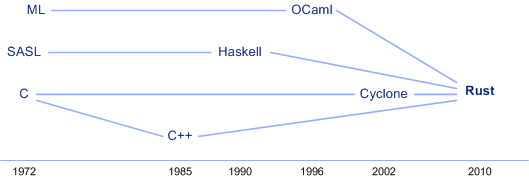
First, let’s start with a quick history lesson. Rust is a new language relative to its predecessors (most importantly C, which preceded it by 38 years), but its genealogy creates its multiparadigm approach. Rust is considered a C-like language, but the other features it includes create advantages over its predecessors (see Figure 1).
First, Rust is heavily influenced by Cyclone (a safe dialect of C and an imperative language), with some aspects of object-oriented features from C++. But, it also includes functional features from languages like Haskell and OCaml. The result is a C-like language that supports multiparadigm programming (imperative, functional, and object oriented).
Figure 1. Rust and its family tree
Key concepts in Rust
Rust has many features that make it useful, but developers and their needs differ. I cover five of the key concepts that make Rust worth learning and show these ideas in Rust source.
First, to get a feel for the code, let’s look at the canonical “Hello World” program that simply emits that message to the user (see Listing 1).
Listing 1. “Hello World” in Rust
fn main()
{
   println!( "Hello World.");
}
This simple program, similar to C, defines a main function that is the designated entry point for the program (and every program has one). The function is defined with the fnkeyword followed by an optional set of parameters within parentheses (()). The curly braces ({}) delineate the function; this function consists of a call to the println! macro, which emits formatted text to the console (stdout), as defined by the string parameter.
Rust includes a variety of features that make it interesting and worth the investment to learn. You’ll find concepts like modules for reusability, memory safety and guarantees (safe vs. unsafe operations), unrecoverable and recoverable error handling features, support for concurrency, and complex data types (called collections).
Reusable code via modules
Rust allows you to organize code in a way that fosters its reuse. You achieve this organization by using modules, which contain functions, structures, and even other modules that you can make public (that is, expose to users of the module) or private (that is, use only within the module and not by the module users — at least not directly). The module organizes code as a package that others can use.
You use three keywords to create modules, use modules, and modify the visibility of elements in modules.
- The
modkeyword creates a new module - The
usekeyword lets you use the module (expose the definitions into scope to use them) - The
pubkeyword makes elements of the module public (otherwise, they’re private).
Listing 2 provides a simple example. It starts by creating a new module called bits that contains three functions. The first function, called pos, is a private function that takes a u32 argument and returns a u32 (as indicated by the -> arrow), which is a 1 value shifted left bit times. Note that a return keyword isn’t needed here. This value is called by two public functions (note the pub keyword): decimal and hex. These functions call the private pos function and print the value of the bit position in decimal or hexadecimal format (note the use of to indicate hexadecimal format). Finally, it declares a main function that calls the bits module’s two public functions, with the output shown at the end of Listing 2 as comments.
Listing 2. Simple module example in Rust
mod bits {
   fn pos(bit: u32) ‑> u32 {
      1 << bit
   }

   pub fn decimal(bit: u32) {
      println!("Bits decimal {}", pos(bit));
   }

   pub fn hex(bit: u32) {
      println!("Bits decimal 0x{:x}", pos(bit));
   }
}
Modules enable you to collect functionality in public or private ways, but you can also associate methods to objects by using the impl keyword.
Safety checks for cleaner code
The Rust compiler enforces memory safety guarantees and other checking that make the programming language safe (unlike C, which can be unsafe). So, in Rust, you’ll never have to worry about dangling pointers or using an object after it has been freed. These things are part of the core Rust language. But, in fields such as embedded development, it’s important to do things like place a structure at an address that represents a set of hardware registers.
Rust includes an unsafe keyword with which you can disable checks that would typically result in a compilation error. As shown in Listing 3, the unsafe keyword enables you to declare an unsafe block. In this example, I declare an unmutable variable x, and then a pointer to that variable called raw. Then, to de-reference raw (which in this case would print 1 to the console), I use the unsafe keyword to permit this operation, which would otherwise be flagged at compilation.
Listing 3. Unsafe operations in Rust
fn main() {
   let a = 1;
   let rawp = &a as const i32;

   unsafe {
      println!("rawp is {}", rawp);
   }
}
You can apply the unsafe keyword to functions as well as blocks of code within a Rust function. The keyword is most common in writing bindings to non-Rust functions. This feature makes Rust useful for things like operating system development or embedded (bare-metal) programming.
Better error handling
Errors happen, regardless of the programming language you use. In Rust, errors fall into two camps: unrecoverable errors (the bad kind) and recoverable errors (the not-so-bad kind).
Unrecoverable errors
The Rust panic! function is similar to C‘s assert macro. It generates output to help the user debug a problem (as well as stopping execution before more catastrophic events occur). The panic! function is shown in Listing 4, with its executable output in comments.
Listing 04. Handling unrecoverable errors in Rust with panic!
fn main() {
   panic!("Bad things happening.");
}

// thread 'main' panicked at 'Bad things happening.', panic.rs:2:4
// note: Run with RUST_BACKTRACE=1 for a backtrace.
From the output, you can see that the Rust runtime indicates exactly where the issue occurred (line 2) and emitted the provided message (which could emit more descriptive information). As indicated in the output message, you could generate a stack backtrace by running with a special environment variable called RUST_BACKTRACE. You can also invoke panic! internally based on detectable errors (such as accessing an invalid index of a vector).
Recoverable errors
Handling recoverable errors is a standard part of programming, and Rust includes a nice feature for error checking (see Listing 5). Take a look at this feature in the context of a file operation. The File::open function returns a type of Result<T, E>, where T and Erepresent generic type parameters (in this context, they represent std::fs::File and std::io::Error). So, when you call File::open and no error has occurred (E is Ok), T would represent the return type (std::fs::File). If an error occurred, E would represent the type of error that occurred (using the type std::io::Error). (Note that my file variable _fuses an underscore [_] to omit the unused variable warning that the compiler generated.)
I then use a special feature in Rust called match, which is similar to the switch statement in C but more powerful. In this context, I match _f against the possible error values (Okand Err). For Ok, I return the file for assignment; for Err, I use panic!.
Listing 5. Handling recoverable errors in Rust with Result<t, e>
use std::fs::File;

fn main() {
   let _f = File::open("file.txt");

   let _f = match _f {
      Ok(file) => file,
      Err(why) => panic!("Error opening the file {:?}", why),
   };
}

// thread 'main' panicked at 'Error opening the file Error { repr: Os
// { code: 2, message: "No such file or directory" } }', recover.rs:8:23
// note: Run with RUST_BACKTRACE=1 for a backtrace.
Recoverable errors are simplified within Rust when you use the Result enum; they’re further simplified through the use of match. Note also in this example the lack of a File::close operation: The file is automatically closed when the scope of _f ends.
Support for concurrency and threads
Concurrency commonly comes with issues (data races and deadlocks, to name two). Rust provides the means to spawn threads by using the native operating system but also attempts to mitigate the negative effects of threading. Rust includes message passing to allow threads to communicate with one another (via send and recv as well as locking through mutexes). Rust also provides the ability to permit a thread to borrow a value, which gives it ownership and effectively transitions the scope of the value (and its ownership) to a new thread. Thus, Rust provides memory safety along with concurrency without data races.
Consider a simple example of threading within Rust that introduces some new elements (vector operations) and brings back some previously discussed concepts (pattern matching). In Listing 6, I begin by importing the thread and Duration namespaces into my program. I then declare a new function called my_thread, which represents the thread that I’ll create later. In this thread, I simply emit the thread’s identifier, and then sleep for a short time to permit the scheduler to allow another thread to run.
My main function is the heart of this example. I begin by creating an empty mutable vector that I can use to store values of the same type. I then create 10 threads by using the spawn function and push the resulting join handle into the vector (more on this later). This spawn example is detached from the current thread, which allows the thread to live after the parent thread has exited. After emitting a short message from the parent thread, I finally iterate the vector of JoinHandle types and wait for each child thread to exit. For each JoinHandle in the vector, I call the join function, which waits for that thread to exit before continuing. If the join function returns an error, I’ll expose that error through the match call.
Listing 6. Threads in Rust
use std::thread;
use std::time::Duration;

fn mythread() {
   println!("Thread {:?} is running", std::thread::current().id());
   thread::sleep(Duration::from_millis(1));
}

fn main() {
   let mut v = vec![];

   for _i in 1..10 {
      v.push( thread::spawn(|| { my_thread(); } ) );
   }

   println!("main() waiting.");

   for child in v {
      match child.join() {
         Ok() => (),
         Err(why) => println!("Join failure {:?}", why),
      };
   }
}
On execution, I see the output provided in Listing 7. Note here that the main thread continued to execute until the join process had begun. The threads then executed and exited at different times, identifying the asynchronous nature of threads.
Listing 7. Thread output from the example code in Listing 6
main() waiting.
Thread ThreadId(7) is running
Thread ThreadId(9) is running
Thread ThreadId(8) is running
Thread ThreadId(6) is running
Thread ThreadId(5) is running
Thread ThreadId(4) is running
Thread ThreadId(3) is running
Thread ThreadId(2) is running
Thread ThreadId(1) is running
Support for complex data types (collections)
The Rust standard library includes several popular and useful data structures that you can use in your development, including four types of data structures: sequences, maps, sets, and a miscellaneous type.
For sequences, you can use the vector type (Vec), which I used in the threading example. This type provides a dynamically resizeable array and is useful for collecting data for later processing. The VecDeque structure is similar to Vec, but you can insert it at both ends of the sequence. The LinkedList structure is similar to Vec, as well, but with it, you can split and append lists.
For maps, you have the HashMap and BTreeMap structures. You use the HashMap structure to create key-value pairs, and you can reference elements by their key (to retrieve the value). The BTreeMap is similar to the HashMap, but it can sort the keys, and you can easily iterate all the entries.
For sets, you have the HashSet and BTreeSet structures (which you’ll note follow the maps structures). These structures are useful when you don’t have values (just keys) and you easily recall the keys that have been inserted.
Finally, the miscellaneous structure is currently the BinaryHeap. This structure implements a priority queue with a binary heap.
Installing Rust and its tools
One of the simplest ways to install Rust is by using curl through the installation script. Simply execute the following string from the Linux® command line:
curl -sSf <a href="https://static.rust-lang.org/rustup.sh" target="_blank">https://static.rust-lang.org/rustup.sh</a> | sh
This string transfers the rustup shell script from rust-lang.org, and then passes the script to the shell for execution. When complete, you can execute rustc -v to show the version of Rust you installed. With Rust installed, you can maintain it by using the rustuputility, which you can also use to update your Rust installation.
The Rust compiler is called rustc. In the examples shown here, the build process is simply defined as:
rustc threads.rs
…where the rust compiler produces a native executable file called threads. You can symbolically debug Rust programs by using either rust-lldb or rust-gdb.
You’ve probably noticed that the Rust programs I’ve demonstrated here have a unique style. You can learn this style through the automatic Rust source formatting by using the rustfmt utility. This utility, executed with a source file name, will automatically format your source in a consistent, standardized style.
Finally, although Rust is quite strict in what it accepts for source, you can use the rust-clippy program to dive further in to your source to identify elements of bad practice. Think of rust-clippy as the C lint utility.
Windows considerations
On Windows, Rust additionally requires the C++ build tools for Visual Studio 2013 or later. The easiest way to acquire the build tools is by installing Microsoft Visual C++ Build Tools 2017 which provides just the Visual C++ build tools. Alternately, you can install Visual Studio 2017, Visual Studio 2015, or Visual Studio 2013 and during the install, select C++ tools.
For further information about configuring Rust on Windows, see the Windows-specific rustup documentation.
Going further
In mid-February 2018, the Rust team released version 1.24. This version includes incremental compilation, automatic source formatting with rustfmt, new optimizations, and library stabilizations. You can learn more about Rust and its evolution at the Rust blog and download Rust from the Rust Language website. There, you can read about the many other features Rust offers, including pattern matching, iterators, closures, and smart pointers.
Originally published on https://developer.ibm.com
#rust #web-development #javascript #webassembly
