Hello World, today we are going to make a custom switch. Why? Because the default one looks so boring and ugly. Why we use a switch? As the name suggests, the switch is used to trigger the value either it is on, or it is off. Let’s see, how our custom switch will look at the end of the tutorial.
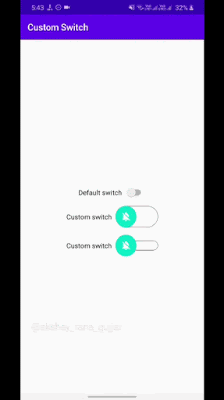
In the above gif, there are 3 switches. The First one is the default one and the second and third are our custom switches. To make these custom switches we need to follow certain steps are as follows:
Step 1. Add Switch to Activity Layout
First, we need to add the switch to our layout XML file. We will add SwitchCompat to the layout.
Look at the below code for better understanding.
<?xml version="1.0" encoding="utf-8"?>
<androidx.constraintlayout.widget.ConstraintLayout xmlns:android="http://schemas.android.com/apk/res/android"
    xmlns:app="http://schemas.android.com/apk/res-auto"
    xmlns:tools="http://schemas.android.com/tools"
    android:layout_width="match_parent"
    android:layout_height="match_parent"
    tools:context=".MainActivity"
    >
    <androidx.appcompat.widget.SwitchCompat
        android:layout_width="wrap_content"
        android:layout_height="wrap_content"
        android:id="@+id/customSwitch"
        app:layout_constraintBottom_toBottomOf="parent"
        app:layout_constraintLeft_toLeftOf="parent"
        app:layout_constraintRight_toRightOf="parent"
        app:layout_constraintTop_toTopOf="parent"

        app:track="@drawable/track"
        android:thumb="@drawable/thumb"

        android:text="Custom switch  "

        />
</androidx.constraintlayout.widget.ConstraintLayout>
In the above code, things to be noticed are app:track and android:thumb attributes.
The track is the horizontal container where our thumb or round shape view is placed and the thumb is, as I told you before, is the round shape where we will add an image on top of it.
Step 2. Make Custom Track for Switch
To make our custom track we need to make a drawable file and set the root element as a selector. So click on the drawable folder and make a new file and name it as track.
In our track.xml we write this code for making the custom track.
#android-dev #android-app-development #android-development #android-studio #androiddev #android-tutorial #android-hacks #android-p-developer