The K-nearest neighbors (KNN) algorithm is a type of supervised machine learning algorithms. KNN is extremely easy to implement in its most basic form, and yet performs quite complex classification tasks. It is a lazy learning algorithm since it doesn’t have a specialized training phase. Rather, it uses all of the data for training while classifying a new data point or instance. KNN is a non-parametric learning algorithm, which means that it doesn’t assume anything about the underlying data. This is an extremely useful feature since most of the real world data doesn’t really follow any theoretical assumption e.g. linear-separability, uniform distribution, etc.
In this article, we will see how KNN can be implemented with Python’s Scikit-Learn library. But before that let’s first explore the theory behind KNN and see what are some of the pros and cons of the algorithm.
Theory
The intuition behind the KNN algorithm is one of the simplest of all the supervised machine learning algorithms. It simply calculates the distance of a new data point to all other training data points. The distance can be of any type e.g Euclidean or Manhattan etc. It then selects the K-nearest data points, where K can be any integer. Finally it assigns the data point to the class to which the majority of the K data points belong.
Let’s see this algorithm in action with the help of a simple example. Suppose you have a dataset with two variables, which when plotted, looks like the one in the following figure.
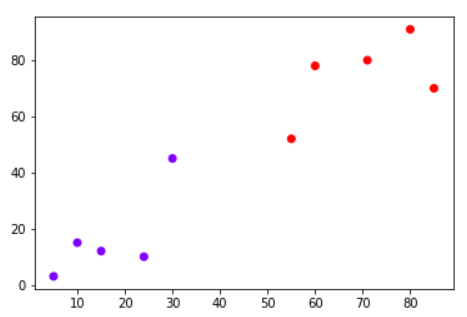
Your task is to classify a new data point with ‘X’ into “Blue” class or “Red” class. The coordinate values of the data point are x=45 and y=50. Suppose the value of K is 3. The KNN algorithm starts by calculating the distance of point X from all the points. It then finds the 3 nearest points with least distance to point X. This is shown in the figure below. The three nearest points have been encircled.
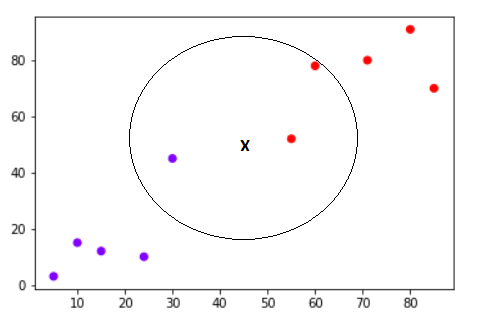
The final step of the KNN algorithm is to assign new point to the class to which majority of the three nearest points belong. From the figure above we can see that the two of the three nearest points belong to the class “Red” while one belongs to the class “Blue”. Therefore the new data point will be classified as “Red”.
Pros and Cons of KNN
In this section we’ll present some of the pros and cons of using the KNN algorithm.
Pros
- It is extremely easy to implement
- As said earlier, it is lazy learning algorithm and therefore requires no training prior to making real time predictions. This makes the KNN algorithm much faster than other algorithms that require training e.g SVM, linear regression, etc.
- Since the algorithm requires no training before making predictions, new data can be added seamlessly.
- There are only two parameters required to implement KNN i.e. the value of K and the distance function (e.g. Euclidean or Manhattan etc.)
Cons
- The KNN algorithm doesn’t work well with high dimensional data because with large number of dimensions, it becomes difficult for the algorithm to calculate distance in each dimension.
- The KNN algorithm has a high prediction cost for large datasets. This is because in large datasets the cost of calculating distance between new point and each existing point becomes higher.
- Finally, the KNN algorithm doesn’t work well with categorical features since it is difficult to find the distance between dimensions with categorical features.
Implementing KNN Algorithm with Scikit-Learn
In this section, we will see how Python’s Scikit-Learn library can be used to implement the KNN algorithm in less than 20 lines of code. The download and installation instructions for Scikit learn library are available at here.
Note: The code provided in this tutorial has been executed and tested with Python Jupyter notebook.
The Dataset
We are going to use the famous iris data set for our KNN example. The dataset consists of four attributes: sepal-width, sepal-length, petal-width and petal-length. These are the attributes of specific types of iris plant. The task is to predict the class to which these plants belong. There are three classes in the dataset: Iris-setosa, Iris-versicolor and Iris-virginica. Further details of the dataset are available here.
Importing Libraries
import numpy as np
import matplotlib.pyplot as plt
import pandas as pd
Importing the Dataset
To import the dataset and load it into our pandas dataframe, execute the following code:
url = "https://archive.ics.uci.edu/ml/machine-learning-databases/iris/iris.data"

# Assign colum names to the dataset
names = ['sepal-length', 'sepal-width', 'petal-length', 'petal-width', 'Class']

# Read dataset to pandas dataframe
dataset = pd.read_csv(url, names=names)
To see what the dataset actually looks like, execute the following command:
dataset.head()
#python #machine-learning #developer