Learn how to add authentication to your Next.js application with Passport.
So you are thinking about developing your next great application with Next.js, huh? Or maybe you already started developing it and now you want to add authentication to your app. Either way, you are in the right place. If you are just starting to build your app with Next.js, now it is a good time to learn how to add authentication to it. If you already have something going on, it is never late to add authentication the right way.
In this article, you will learn how to leverage Passport to secure your Next.js app. What is cool about the approach you will learn here is that it even supports Server-Side Rendering (SSR) of protected routes. That is, with this setup, if an unknown user requests a secured route (those that are only accessible by authenticated users), your app will redirect them to the login page. On the other hand, if an authenticated user tries to load the same route, your Next.js app will recognize them and render the page on the server. Sounds cool? If so, keep reading!
This GitHub repository was created by the author while writing the article. You can use it as a reference if needed.## Prerequisites
To go through this tutorial, you will need Node.js and NPM installed. You should download and install them before continuing.
You’ll also need some basic knowledge of React. You only need to know the basic scaffolding of components and JSX to follow along, but it will be difficult if you’re a total beginner. If that’s you, you can read our article on building and securing your first React app before continuing.
Scaffolding Next.js Applications
First thing you will need is a directory to put your project’s source code. Also, you will have to transform this directory into an NPM project (if you prefer using Yarn, keep in mind you will have to adjust the commands accordingly). To achieve that, issue the following commands from a terminal:
# create a directory for your application
mkdir nextjs-passport

# move into it
cd nextjs-passport

# start it as an NPM project
npm init -y
After that, use the following command to add some dependencies to your new project:
npm i body-parser bootstrap dotenv \
  dotenv-webpack express isomorphic-fetch \
  next react react-bootstrap \
  react-dom styled-components
This command, as you can see, is installing a lot of dependencies. Some of them are required; some of then are optional. More specifically, these are the required dependencies:
<a href="https://github.com/expressjs/body-parser" target="_blank">body-parser</a>: This package lets your Express application parse different types of request bodies (e.g.,application/json)<a href="https://github.com/motdotla/dotenv" target="_blank">dotenv</a>: This package helps you read environment variables from a file.<a href="https://github.com/mrsteele/dotenv-webpack" target="_blank">dotenv-webpack</a>: This package allows you to adjust some of the settings of Next.js.<a href="https://github.com/expressjs/express" target="_blank">express</a>: This package will allow you to define a backend app more easily.<a href="https://github.com/matthew-andrews/isomorphic-fetch" target="_blank">isomorphic-fetch</a>: This package adds an isomorphicfetchfunction that you can use both on the frontend and the backend.<a href="https://github.com/zeit/next.js" target="_blank">next</a>,<a href="https://github.com/facebook/react" target="_blank">react</a>, and<a href="https://auth0.com/blog/next-js-authentication-tutorial/" target="_blank">react-dom</a>: Together, these packages let you build React apps that support server-side rendering.
While these are the optional ones:
<a href="https://github.com/twbs/bootstrap" target="_blank">bootstrap</a>and<a href="https://github.com/react-bootstrap/react-bootstrap" target="_blank">react-bootstrap</a>: These packages allow you to use Bootstrap components without having to use jQuery.<a href="https://www.styled-components.com/" target="_blank">styled-components</a>: This package lets you use CSS in JavaScript.
Note: If you choose not to install the optional dependencies, you will have to refactor the code to your needs. Also, don’t worry if the explanation above is vague. Soon, you will learn how the pieces work together.## Configuring Next.js Projects
After installing these dependencies, it’s time to configure them. For starters, create a file called .babelrc inside the project root and add the following code to it:
// ./.babelrc

{
  "presets": ["next/babel"],
  "plugins": [["styled-components", { "ssr": true }]]
}
This file will make styled-components work with Next.js and let Babel know that you are developing with this package. Configuring Babel with the <a href="https://nextjs.org/blog/next-7#babel-7" target="_blank">next/babel</a> preset is needed to make this package compile your code accordingly.
With that in place, the next thing you will do is to create a file called .env inside the project root. For now, you will only use this file to define what port your app will listen to:
# ./.env

PORT=3000
In a few moments (while setting up authentication), you will add more properties to this file.
Now, you will create a file called next.config.js inside the project root, and you will add the following code to it:
// ./next.config.js

require("dotenv").config();

const path = require("path");
const Dotenv = require("dotenv-webpack");

module.exports = {
  webpack: config => {
    config.plugins = config.plugins || [];

    config.plugins = [
      ...config.plugins,

      // Read the .env file
      new Dotenv({
        path: path.join(__dirname, ".env"),
        systemvars: true
      })
    ];

    return config;
  }
};
The goal here is to help Next.js parse the configuration file you just created (i.e., the .env).
With that in place, create a directory called src inside the project root, then create three subdirectories inside it: components, pages, and state. To speed up, you can use the following commands to create these directories:
# the -p flag makes sure src is created first
mkdir -p src/components
mkdir src/pages
mkdir src/state
Next.js will use src/pages as the main directory to define what routes (pages) are available in your app.
After creating these directories, add a new file called index.js inside src/pages and add the following code to it:
// ./src/pages/index.js
import styled from "styled-components";

const Rocket = styled.div`
  text-align: center;
  img {
    width: 630px;
  }
`;

function Index() {
  return (
    <Rocket>
      <img src="https://media.giphy.com/media/QbumCX9HFFDQA/giphy.gif" />
    </Rocket>
  );
}

export default Index;
Next, you will create a file called _document.js inside src/pages and add the following code to it:
// ./src/pages/_document.js

import Document, { Head, Html, Main, NextScript } from "next/document";
import { ServerStyleSheet } from "styled-components";

export default class MyDocument extends Document {
  static async getInitialProps(ctx) {
    const sheet = new ServerStyleSheet();
    const originalRenderPage = ctx.renderPage;

    try {
      ctx.renderPage = () =>
        originalRenderPage({
          enhanceApp: App => props => sheet.collectStyles(<App {...props} />)
        });

      const initialProps = await Document.getInitialProps(ctx);
      return {
        ...initialProps,
        styles: (
          <>
            {initialProps.styles}
            {sheet.getStyleElement()}
          </>
        )
      };
    } finally {
      sheet.seal();
    }
  }

  render() {
    return (
      <Html>
        <Head>
          <link
            rel="stylesheet"
            href="https://bootswatch.com/4/darkly/bootstrap.min.css"
          />
        </Head>
        <body>
          <Main />
          <NextScript />
        </body>
      </Html>
    );
  }
}
The code above defines a class with a static function called <a href="https://nextjs.org/docs#fetching-data-and-component-lifecycle" target="_blank">getInitialProps</a> that might look confusing. Don’t worry about this method. Its purpose is to make Next.js capable of server-side rendering your styled component (i.e., you need this to make styled-components work properly on the server side). Besides that, this class defines the render method to be able to inject Bootstrap’s stylesheet on the HTML that Next.js generates.
Note: By default, pages in Next.js skip the definition of the surrounding document’s markup. That is, you will never include
htmlandbodytags on pages. To override the default structure, you need this<a href="https://nextjs.org/docs#custom-document" target="_blank">_document.js</a>file.
To wrap things in this section, open thepackage.jsonfile and replace thescriptsproperty with this:
// ./package.json

"scripts": {
  "dev": "next ./src"
},
Note: By default, Next.js will use the project root to look for your source code (e.g., the
pagesdirectory and its routes). However, this article uses thesrcdirectory to keep things more organized. As such, you need to add./srcto tell Next.js about this change. Feel free to move things around to better suit your needs.
After defining thedevscript, you can executenpm run devfrom your terminal to run the first version of your Next.js app. If everything works as expected, in a few seconds, you will be able to open<a href="http://localhost:3000/" target="_blank">http://localhost:3000/</a>in a web browser.

Developing Next.js Applications
In this section, you will develop a Next.js application that will allow users to do two things: share their thoughts (similar to what they do on Twitter) and consume the thoughts others shared. For the moment, these thoughts will have no information about the user who entered them (i.e., no identity management). In the next section though, you will add authentication to your app and will make it link thoughts to users.
Building custom APIs with Next.js
To support this application, you will need an API that serves thoughts when requested and that is capable of persisting new thoughts that users share. To build this API, the first thing you will do is to create a file called thoughts-api.js inside src; then you will add the following code to this file:
// ./src/thoughts-api.js
const bodyParser = require("body-parser");
const express = require("express");
const router = express.Router();
router.use(bodyParser.json());
const thoughts = [
{ _id: 123, message: "I love pepperoni pizza!", author: "unknown" },
{ _id: 456, message: "I'm watching Netflix.", author: "unknown" }
];
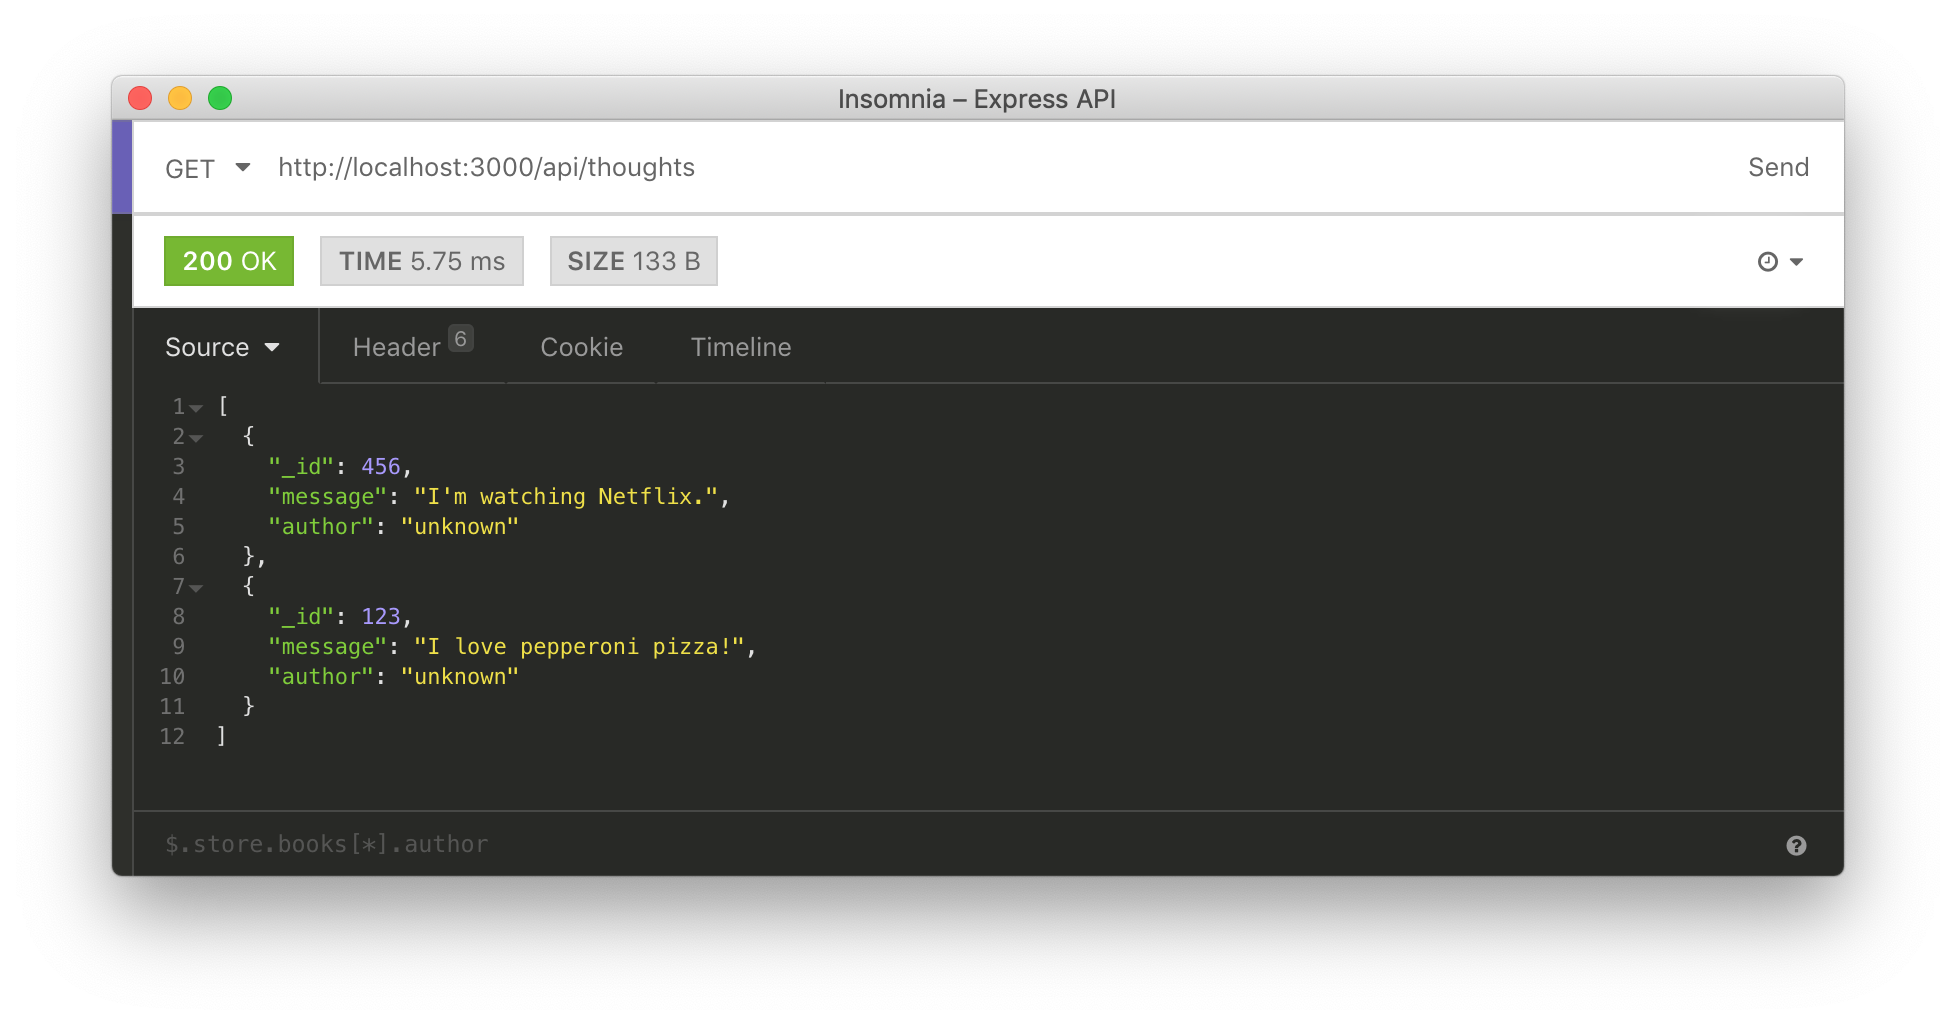
router.get("/api/thoughts", (req, res) => {
const orderedThoughts = thoughts.sort((t1, t2) => t2._id - t1._id);
res.send(orderedThoughts);
});
router.post("/api/thoughts", (req, res) => {
const { message } = req.body;
const newThought = {
_id: new Date().getTime(),
message,
author: "unknown"
};
thoughts.push(newThought);
res.send({ message: "Thanks!" });
});
module.exports = router;
This file is defining two Express endpoints. The first one allows clients to issue HTTP GET requests to get all thoughts. The second one will enable clients to issue HTTP POST requests to insert new thoughts.
After defining the endpoints, create a file called server.js inside src and add the following code to it:
// ./src/server.js

require("dotenv").config();
const express = require("express");
const http = require("http");
const next = require("next");
const thoughtsAPI = require("./thoughts-api");

const dev = process.env.NODE_ENV !== "production";
const app = next({
  dev,
  dir: "./src"
});
const handle = app.getRequestHandler();

app.prepare().then(() => {
  const server = express();

  server.use(thoughtsAPI);

  // handling everything else with Next.js
  server.get("*", handle);

  http.createServer(server).listen(process.env.PORT, () => {
    console.log(`listening on port ${process.env.PORT}`);
  });
});
This file is using Express to extend the default functionality that Next.js provides. After Next.js finishes preparing itself to serve requests (app.prepare().then), this file creates an Express server, adds to it the endpoints that thoughts-api.js defines, and starts listening to HTTP requests. Note that, apart from adding your custom endpoints to the Express server, this file is also stating that Next.js must handle all the other requests (i.e., the ones that are not seeking your custom endpoints). Without this setting, your Next.js app would end up serving only the custom API endpoints.
To wrap the custom API creation, open the package.json file and replace the scripts property with this:
// ./package.json

"scripts": {
  "dev": "node ./src/server.js",
  "build": "next build ./src",
  "start": "NODE_ENV=production node ./src/server.js"
},
Now, back in your terminal, issue npm run dev to confirm that everything is working as expected (you might need to stop the previous process first). After running your development server, you must be able to issue HTTP GET requests to <a href="http://localhost:3000/api/thoughts" target="_blank">http://localhost:3000/api/thoughts</a> to list thoughts.
Consuming custom APIs with Next.js
After adding a custom API to your Next.js application, the next thing you will do is to make your application consume the API. To do so, the first thing you will do is to create a component that will render the details of a single thought. So, create a file called Thought.js inside src/components and add the following code to it:
// ./src/components/Thought.js

import Card from "react-bootstrap/Card"

export default function Thought({ thought }) {
  const cardStyle = { marginTop: "15px" };
  return (
    <Card bg="secondary" text="white" style={cardStyle}>
      <Card.Body>
        <Card.Title>{thought.message}</Card.Title>
        <Card.Text>by {thought.author}</Card.Text>
      </Card.Body>
    </Card>
  );
}
This component will use the Card component that react-bootstrap provides to show the message entered by the user. As mentioned, thoughts won’t hold information about their author yet. So, for the moment, they will all show “unknown” on the author property.
After creating this component, you will create a component that will render all thoughts. In this case, create a file called Thoughts.js inside src/components and add the following code to it:
// ./src/components/Thoughts.js

import Col from "react-bootstrap/Col";
import Row from "react-bootstrap/Row";
import Thought from "./Thought";

export default function Thoughts(props) {
  return (
    <Row>
      <Col xs={12}>
        <h2>Latest Thoughts</h2>
      </Col>
      {props.thoughts &&
        props.thoughts.map(thought => (
          <Col key={thought._id} xs={12} sm={6} md={4} lg={3}>
            <Thought thought={thought} />
          </Col>
        ))}
      {!props.thoughts && <Col xs={12}>Loading...</Col>}
    </Row>
  );
}
As you can see, this component will get a list of thoughts through props and will iterate (thoughts.map) over them to create multiple Thought (now singular) elements. Just like the other component, this one takes advantage of React Bootstrap to render a nice user interface.
Lastly, you will open the index.js file and replace its code with this:
// ./src/pages/index.js

import Container from "react-bootstrap/Container";
import fetch from "isomorphic-fetch";
import Thoughts from "../components/Thoughts";

function Index(props) {
  return (
    <Container>
      <Thoughts thoughts={props.thoughts} />
    </Container>
  );
}

Index.getInitialProps = async ({ req }) => {
  const baseURL = req ? `${req.protocol}://${req.get("Host")}` : "";
  const res = await fetch(`${baseURL}/api/thoughts`);
  return {
    thoughts: await res.json()
  };
};

export default Index;
The new version of this file uses <a href="https://github.com/zeit/next.js/#fetching-data-and-component-lifecycle" target="_blank">getInitialProps</a> (a feature that Next.js provides) to fetch thoughts from the custom API. By using this feature, you make Next.js render thoughts on the server side before issuing an HTML response to a client (usually a browser). Besides that, Next.js will also use this method when users trigger client-side navigation.
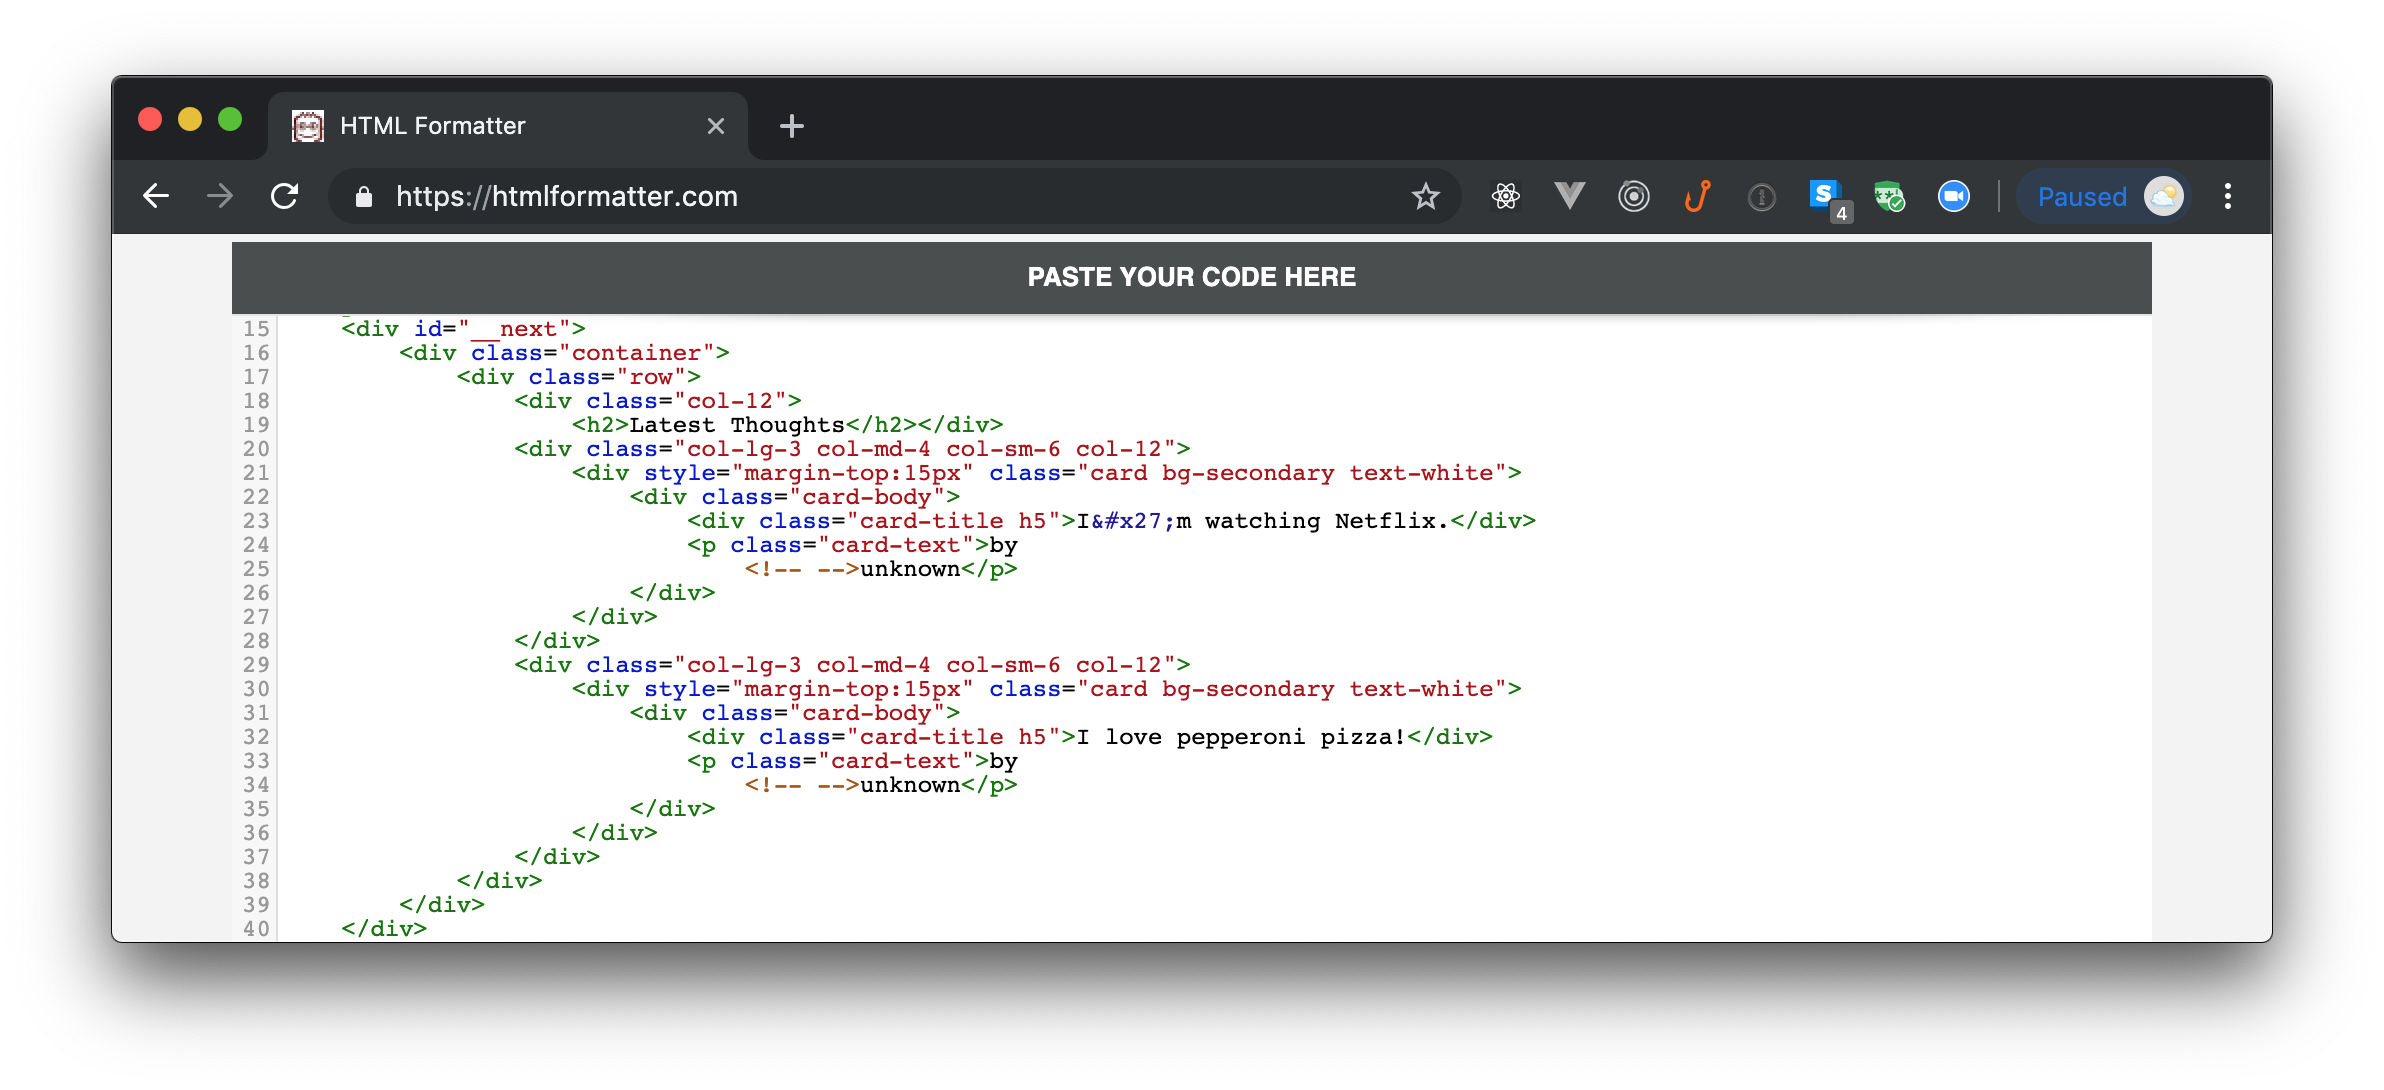
After creating these components, if you issue a request to <a href="http://localhost:3000" target="_blank">http://localhost:3000</a>, you will get an HTML response that includes all thoughts that the custom API return. To confirm that this is working, you can use any HTTP client to issue the request; then you can copy the HTML response and paste on a tool like HTML formatter to check the response more easily.
Feeding custom APIs with Next.js
After learning how to consume a custom API, the next thing you will do is to create a route where users will be able to share their thoughts. The idea here is to create a route that is protected and that only authenticated users can access. However, to make the authentication process easier to be digested, you will first create this route publicly; then, in the next section, you will secure the route and the endpoint that supports it.
As your users will have to navigate to this route, you need to enable them to do so. For that, you could simply add a link above the list of thoughts. However, to make this app more realistic, you will create a navigation bar that will include this link.
To create the navigation bar, create a file called Navbar.js inside src/components and add the following code to it:
// ./src/components/Navbar.js

import Link from "next/link";
import Container from "react-bootstrap/Container";
import Navbar from "react-bootstrap/Navbar";
import Nav from "react-bootstrap/Nav";

export default function AppNavbar() {
  const navbarStyle = { marginBottom: "25px" };
  return (
    <Navbar bg="light" expand="lg" style={navbarStyle}>
      <Container>
        <Navbar.Brand>
          <Link href="/">
            <a>Thoughts!</a>
          </Link>
        </Navbar.Brand>
        <Navbar.Toggle aria-controls="basic-navbar-nav" />
        <Navbar.Collapse id="basic-navbar-nav">
          <Nav className="mr-auto">
            <Link href="/share-thought">
              <a className="nav-link">New Thought</a>
            </Link>
          </Nav>
        </Navbar.Collapse>
      </Container>
    </Navbar>
  );
}
The component uses three React Bootstrap components (Container, Navbar, and Nav) to create a good-looking navigation bar. Now, as you don’t want to include this bar inside each route manually, you will create a file called _app.js inside src/pages and add the following code to it:
// ./src/pages/_app.js

import React from "react";
import App, { Container as NextContainer } from "next/app";
import Head from "next/head";
import Container from "react-bootstrap/Container";
import Jumbotron from "react-bootstrap/Jumbotron";
import Navbar from "../components/Navbar";

class MyApp extends App {
  render() {
    const { Component, pageProps } = this.props;

    return (
      <NextContainer>
        <Head>
          <title>Thoughts!</title>
        </Head>
        <Navbar />
        <Container>
          <Jumbotron>
            <Component {...pageProps} />
          </Jumbotron>
        </Container>
      </NextContainer>
    );
  }
}

export default MyApp;
By defining this file, you are extending the Next.js default <a href="https://nextjs.org/docs#custom-app" target="_blank">App</a> component behavior to add your Navbar on every page. Besides that, you are nesting the contents of your pages inside a Jumbotron, which will make your app look better.
After creating the navigation bar and extending the App component, you can finally define your new route. To implement this route, create a new file called share-thought.js inside src/pages and insert the following code into it:
// ./src/pages/share-thought.js

import Form from "react-bootstrap/Form";
import Router from "next/router";
import Button from "react-bootstrap/Button";
import Container from "react-bootstrap/Container";
const { useState } = require("react");

export default function ShareThought() {
  const [message, setMessage] = useState("");

  async function submit(event) {
    event.preventDefault();
    await fetch("/api/thoughts", {
      method: "POST",
      headers: {
        "Content-Type": "application/json"
      },
      body: JSON.stringify({
        message
      })
    });
    Router.push("/");
  }

  return (
    <Container>
      <Form onSubmit={submit}>
        <Form.Group>
          <Form.Label>What is in your mind?</Form.Label>
          <Form.Control
            type="text"
            placeholder="Say something"
            onChange={e => setMessage(e.target.value)}
            value={message}
          />
        </Form.Group>
        <Button variant="primary" type="submit">
          Share
        </Button>
      </Form>
    </Container>
  );
}
This code might be a bit lengthy, but its behavior is somewhat easy to understand. First, after importing its dependencies, the ShareThought components starts by using the <a href="https://reactjs.org/docs/hooks-state.html" target="_blank">useState</a> hook. This feature allows developers to use state inside functional components. After that, the code defines a function called submit that the component will call when users click on the Share button. For now, this method simply issues a POST AJAX request to the backend API with the message that the user entered. Lastly, this code defines what the route will look like (i.e., defines what components React will use to put the view together).
With that in place, if you refresh your app on the browser (<a href="http://localhost:3000" target="_blank">http://localhost:3000</a>), you will see its new version. This version will show the navigation bar at the top and will allow users to navigate to the route where they will be able to share their thoughts.

Securing Next.js Applications with Passport
All right. After bootstrapping and developing the base application, you are now ready to learn how to secure your Next.js application with Passport. In this section, you will use Passport along with Auth0 to take advantage of the cool benefits we provide (e.g., out-of-the-box features like sign-in, sign-up, password reset, single sign-on, and multifactor authentication). However, if you prefer using another alternative, don’t worry. Switching authentication strategies on Passport is easy and there are plenty of options available.
For starters, you will need an Auth0 application. If you don’t have one yet, now it is a good time to sign up for a free Auth0 account. If you already have an account, you can reuse it.
After signing into the Auth0 dashboard, head to the Applications section and click on Create Application. Clicking on this button will make Auth0 show a dialog where you will have to fill the following options:
- Name: In this field, you can type something meaningful and easily identifiable. For example: “Next.js and Passport”
- Type: Here, you will have to choose Regular Web Application.
After filling this form, click on Create. Doing so will make Auth0 redirect you to the Quick Start section of your new application. From there, click on Settings and update your Auth0 application as follows:
- Allowed Callback URLs:
<a href="http://localhost:3000/callback" target="_blank">http://localhost:3000/callback</a> - Allowed Logout URLs:
<a href="http://localhost:3000" target="_blank">http://localhost:3000</a>
You will need this configuration because Auth0 will only redirect users (after a successful login or logout process) to the URLs whitelisted in these fields. So, scroll to the bottom of the page and click on Save Changes. Don’t close this page yet, you will need to copy some values from it soon.
Now, head back to your terminal, stop the development server (Ctrl + C), and execute the following command:
npm install passport passport-auth0 express-session uid-safe
This will make NPM install four packages that you will need for a proper setup:
<a href="https://github.com/jaredhanson/passport#readme" target="_blank">passport</a>: This is the main Passport package.<a href="https://github.com/auth0/passport-auth0#readme" target="_blank">passport-auth0</a>: This is the Auth0 strategy for Passport.<a href="https://github.com/expressjs/session#readme" target="_blank">express-session</a>: This is the official Express middleware for session handling.<a href="https://github.com/crypto-utils/uid-safe#readme" target="_blank">uid-safe</a>: A package that helps creating safe UIDs for URLs and cookies.
After installing these dependencies, open the server.js file and replace its contents with this:
// ./src/server.js

require("dotenv").config();
const express = require("express");
const http = require("http");
const next = require("next");
const session = require("express-session");
// 1 - importing dependencies
const passport = require("passport");
const Auth0Strategy = require("passport-auth0");
const uid = require('uid-safe');
const authRoutes = require("./auth-routes");
const thoughtsAPI = require("./thoughts-api");

const dev = process.env.NODE_ENV !== "production";
const app = next({
  dev,
  dir: "./src"
});
const handle = app.getRequestHandler();

app.prepare().then(() => {
  const server = express();

  // 2 - add session management to Express
  const sessionConfig = {
    secret: uid.sync(18),
    cookie: {
      maxAge: 86400 * 1000 // 24 hours in milliseconds
    },
    resave: false,
    saveUninitialized: true
  };
  server.use(session(sessionConfig));

  // 3 - configuring Auth0Strategy
  const auth0Strategy = new Auth0Strategy(
    {
      domain: process.env.AUTH0_DOMAIN,
      clientID: process.env.AUTH0_CLIENT_ID,
      clientSecret: process.env.AUTH0_CLIENT_SECRET,
      callbackURL: process.env.AUTH0_CALLBACK_URL
    },
    function(accessToken, refreshToken, extraParams, profile, done) {
      return done(null, profile);
    }
  );

  // 4 - configuring Passport
  passport.use(auth0Strategy);
  passport.serializeUser((user, done) => done(null, user));
  passport.deserializeUser((user, done) => done(null, user));

  // 5 - adding Passport and authentication routes
  server.use(passport.initialize());
  server.use(passport.session());
  server.use(authRoutes);

  server.use(thoughtsAPI);

  // 6 - you are restricting access to some routes
  const restrictAccess = (req, res, next) => {
    if (!req.isAuthenticated()) return res.redirect("/login");
    next();
  };

  server.use("/profile", restrictAccess);
  server.use("/share-thought", restrictAccess);

  // handling everything else with Next.js
  server.get("*", handle);

  http.createServer(server).listen(process.env.PORT, () => {
    console.log(`listening on port ${process.env.PORT}`);
  });
});
The new version of this file adds six important changes to your custom API. The following list summarizes these changes:
- You are importing five new modules. One for each of the four dependencies you just installed, and one for a module called
auth-routes. This module (which you will create soon) will define the authentication routes. - You are making your Express server use the session package (
server.use(session(sessionConfig))) to persist user sessions. Note that, through the<a href="https://github.com/expressjs/session#readme" target="_blank">sessionConfig</a>object, you are defining how this package will behave (e.g., you are usinguid-safeto generate a safe secret to hash your cookies, and you are defining that cookies will stay valid for 24 hours). - You are configuring the
Auth0Strategywith four environment variables. You will learn how to set them later. - You are configuring Passport to use Auth0’s strategy, and you are telling this package what data it should keep on users sessions.
- ou are making your Express server use Passport, and you are adding the authentication routes to it.
- ou are restricting access to the
/profileand the/share-thoughtroutes.
After refactoring your Express server to use Passport, you will need to create a file called auth-routes.js inside src. In this file, you will add the following code to define the authentication routes:
// ./src/auth-routes.js

const express = require("express");
const passport = require("passport");

const router = express.Router();

router.get("/login", passport.authenticate("auth0", {
  scope: "openid email profile"
}), (req, res) => res.redirect("/"));

router.get("/callback", (req, res, next) => {
  passport.authenticate("auth0",  (err, user) => {
    if (err) return next(err);
    if (!user) return res.redirect("/login");
    req.logIn(user, (err) => {
      if (err) return next(err);
      res.redirect("/");
    });
  })(req, res, next);
});

router.get("/logout", (req, res) => {
  req.logout();

  const {AUTH0_DOMAIN, AUTH0_CLIENT_ID, BASE_URL} = process.env;
  res.redirect(`https://${AUTH0_DOMAIN}/logout?client_id=${AUTH0_CLIENT_ID}&returnTo=${BASE_URL}`);
});

module.exports = router;
As you can see, your application will have to support three new routes:
/login: When users reach this route, your app will call Passport’s authentication method telling it to use Auth0’s strategy. This will make your app redirect users to Auth0’s Universal Login Page./callback: After authenticating, Auth0 will redirect users to this URL. There, your app will get a code back from the authentication process and will use it (along with theAUTH0_DOMAIN,AUTH0_CLIENT_ID, andAUTH0_CLIENT_SECRETenvironment variables) to exchange for user details (a profile, mainly)./logout: When your users want to log out from the application, they will request this URL. This endpoint will log users out from your app and from Auth0 as well.
Then, you can open the .env file and update it as follows:
# ./.env

# ... keep PORT untouched ...

AUTH0_DOMAIN=...
AUTH0_CLIENT_ID=...
AUTH0_CLIENT_SECRET=...
AUTH0_CALLBACK_URL=http://localhost:3000/callback
BASE_URL=http://localhost:3000
To replace the AUTH0_DOMAIN, AUTH0_CLIENT_ID, and AUTH0_CLIENT_SECRET variables, you can copy the Domain, Client ID, and Client Secret values from the Settings section of your Auth0 Application.
Note: Don’t push these values to a version control system like Git (mainly
AUTH0_CLIENT_SECRET, which should be kept private)..envfiles are designed to keep environment variables that are specific to an environment (in this case, your machine) and should not be shared.
Next, you will open thethoughts-api.jsfile and will replace the POST method of the/api/thoughtsendpoint with this:
// ./src/thoughts-api.js

function ensureAuthenticated(req, res, next) {
  if (req.isAuthenticated()) return next();
  res.send(401);
}

router.post("/api/thoughts", ensureAuthenticated, (req, res) => {
  const { message } = req.body;
  const newThought = {
    _id: new Date().getTime(),
    message,
    author: req.user.displayName
  };
  thoughts.push(newThought);
  res.send({ message: "Thanks!" });
});
This will make your endpoint respond with an HTTP 401 unauthorized status to unauthenticated users. Authenticated users will still be able to use this endpoint.
With that in place, you can open the Navbar.js file and replace its contents with this:
// ./src/components/Navbar.js

import Link from "next/link";
import Container from "react-bootstrap/Container";
import Navbar from "react-bootstrap/Navbar";
import Nav from "react-bootstrap/Nav";

export default function AppNavbar({ user }) {
  const navbarStyle = { marginBottom: "25px" };
  return (
    <Navbar bg="light" expand="lg" style={navbarStyle}>
      <Container>
        <Navbar.Brand>
          <Link href="/">
            <a>Thoughts!</a>
          </Link>
        </Navbar.Brand>
        <Navbar.Toggle aria-controls="basic-navbar-nav" />
        <Navbar.Collapse id="basic-navbar-nav">
          <Nav className="mr-auto">
            {user && (
              <>
                <Link href="/share-thought">
                  <a className="nav-link">New Thought</a>
                </Link>
                <Link href="/profile">
                  <a className="nav-link">Profile</a>
                </Link>
                <Link href="/logout">
                  <a className="nav-link">Log Out</a>
                </Link>
              </>
            )}
            {!user && (
              <Link href="/login">
                <a className="nav-link">Log In</a>
              </Link>
            )}
          </Nav>
        </Navbar.Collapse>
      </Container>
    </Navbar>
  );
}
As you can see, this version of your navigation bar will receive a user props and will use it to decide if it must show the login button, or if it shows the logout button and a button to redirect users to a profile page.
This profile page is a page where your users will be able to see what your app knows about them. To define it, create a file called profile.js inside src/pages and add the following code to it:
// ./src/pages/profile.js

import styled from "styled-components";

const Picture = styled.img`
  border-radius: 50%;
  border: 3px solid white;
  width: 100px;
`;

function Profile({ user }) {
  return (
    <div>
      <h2>
        <Picture src={user.picture} alt={user.displayName} /> Hello, {user.displayName}
      </h2>
      <p>This is what we know about you:</p>
      <ul>
        { Object.keys(user).map(key => (
          <li key={key}>{key}: {user[key].toString()}</li>
        ))}
      </ul>
    </div>
  );
}

export default Profile;
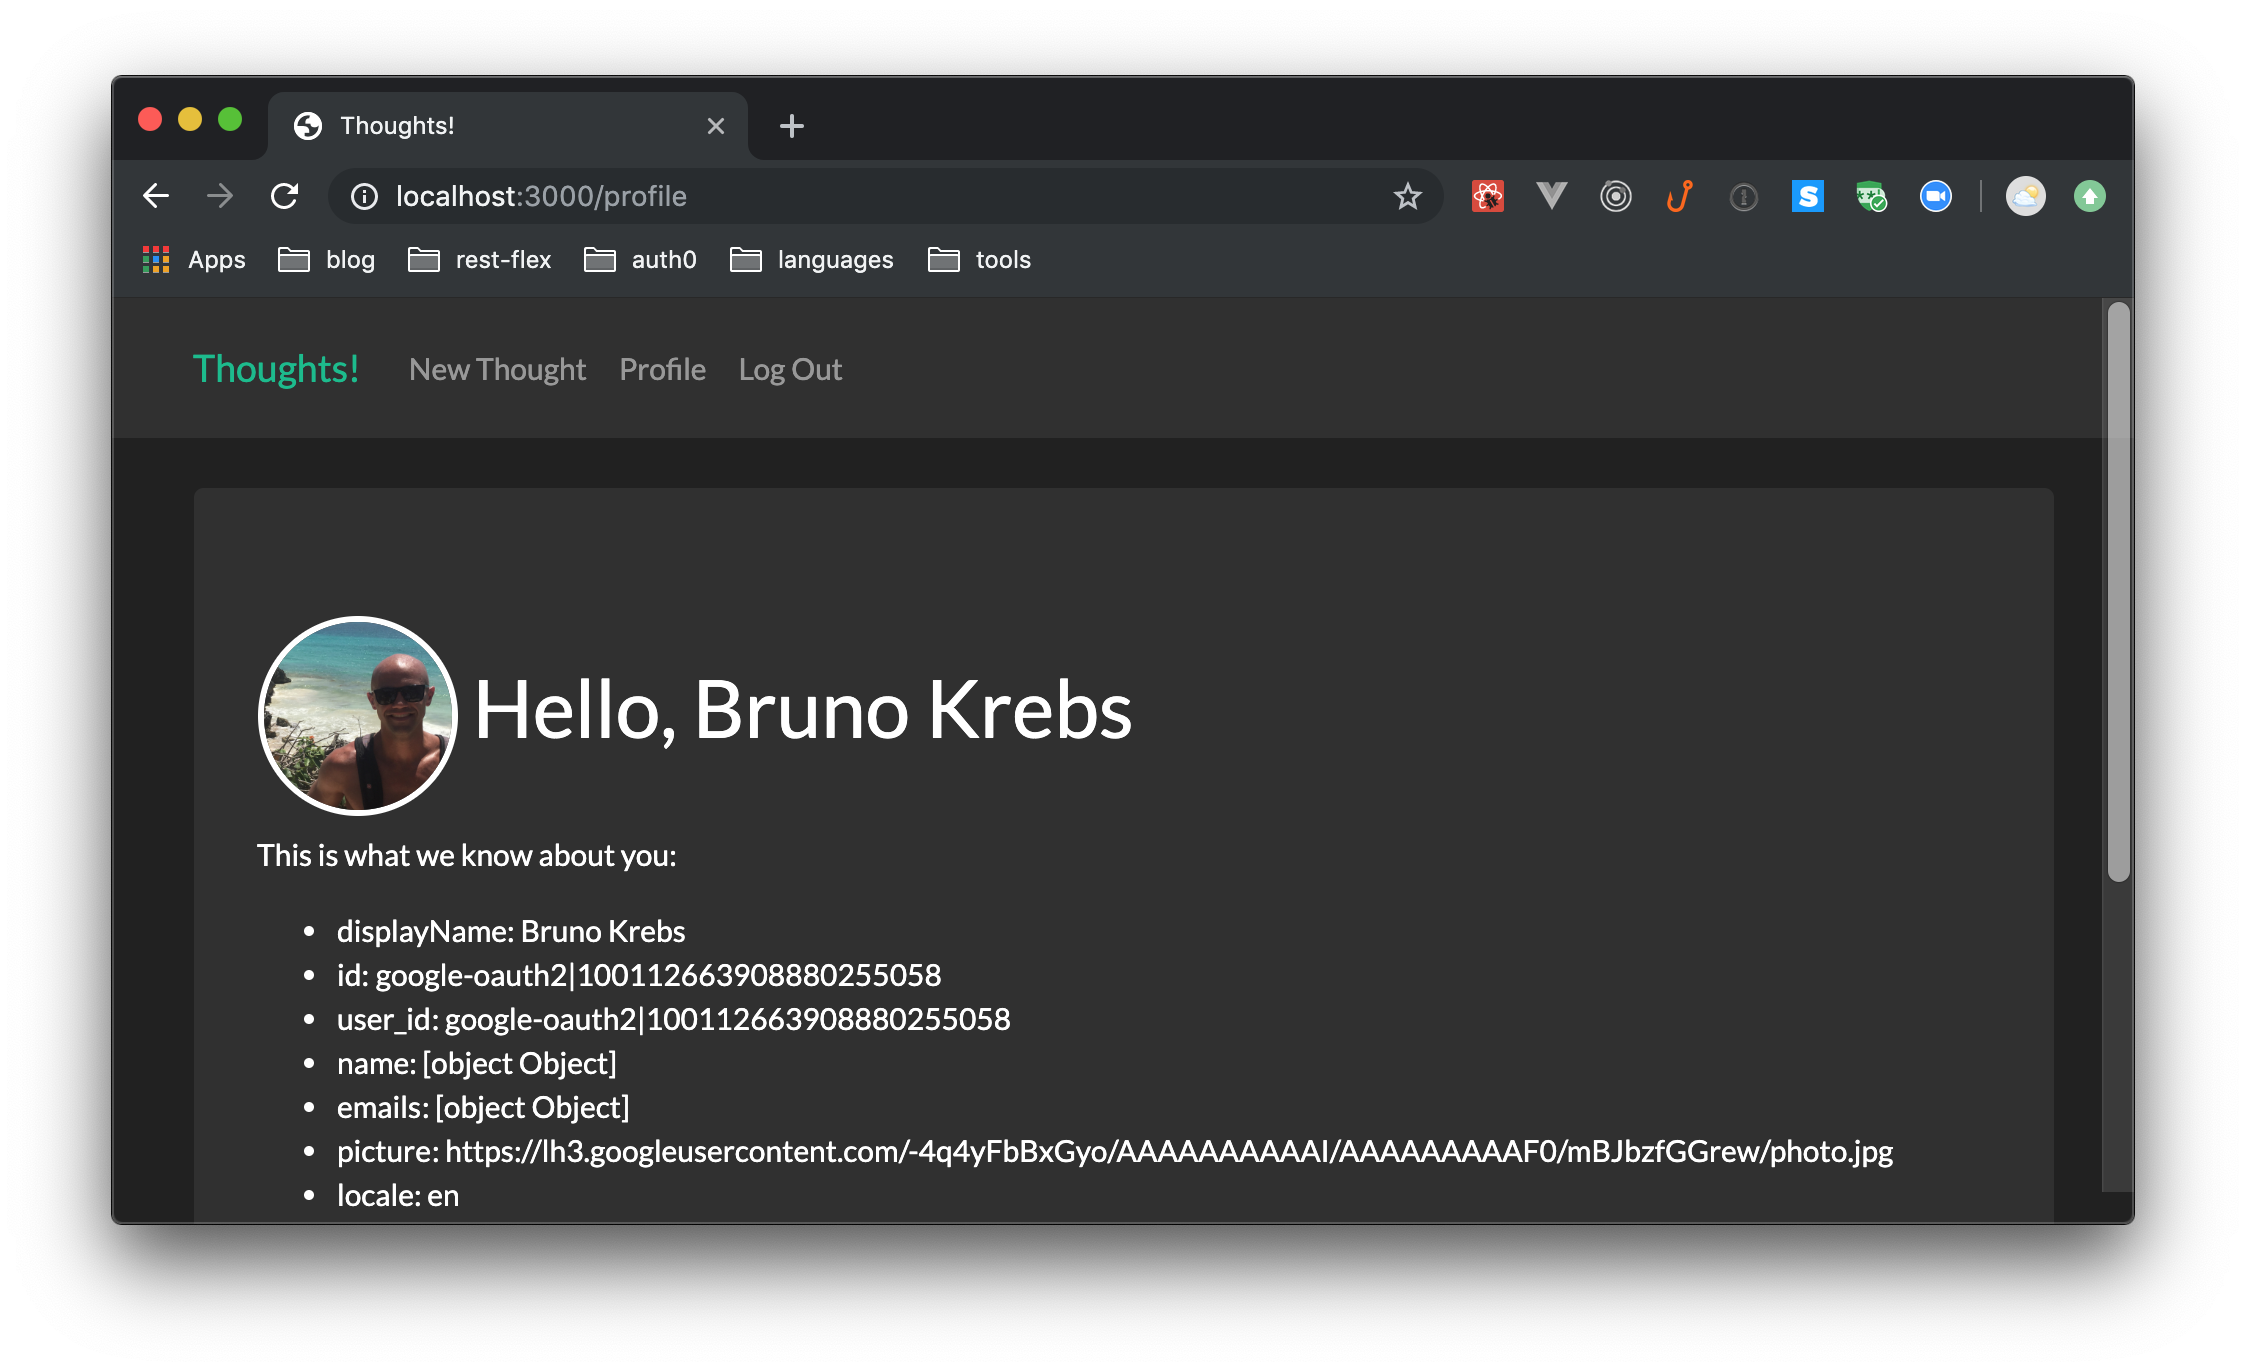
As you can see, this page will mainly show users’ displayName and picture. Then, it will iterate over the properties of the user object to create an unordered list (ul) with them and their values.
To complete this section, open the _app.js file and replace its contents with this:
// ./src/pages/_app.js

import React from "react";
import App, { Container as NextContainer } from "next/app";
import Head from "next/head";
import Container from "react-bootstrap/Container";
import Jumbotron from "react-bootstrap/Jumbotron";
import Navbar from "../components/Navbar";

class MyApp extends App {
  static async getInitialProps({ Component, ctx }) {
    let pageProps = {};
    if (Component.getInitialProps) {
      pageProps = await Component.getInitialProps(ctx);
    }
    if (ctx.req && ctx.req.session.passport) {
      pageProps.user = ctx.req.session.passport.user;
    }
    return { pageProps };
  }

  constructor(props) {
    super(props);
    this.state = {
      user: props.pageProps.user
    };
  }

  render() {
    const { Component, pageProps } = this.props;

    const props = {
      ...pageProps,
      user: this.state.user,
    };

    return (
      <NextContainer>
        <Head>
          <title>Thoughts!</title>
        </Head>
        <Navbar user={this.state.user} />
        <Container>
          <Jumbotron>
            <Component {...props} />
          </Jumbotron>
        </Container>
      </NextContainer>
    );
  }
}

export default MyApp;
One important change in this file is that you are redefining the static getInitialProps method of the MyApp class. You are doing this to add the user object (if available) to all pages’ props. That is, the Profile page you just defined will get this props. Also, ShareThought and Index will get this data too (the later will still get thoughts alongside the userobject).
Besides that, you are making the MyApp component hold the user that comes from the backend on its internal state. This will make any client-side navigation have access to the user profile.
With the changes that this section introduces, you are ready to take your secure app for a spin. So, in your terminal, run the npm run dev command. Then, head to <a href="http://localhost:3000" target="_blank">http://localhost:3000</a> and use the login button to test the authentication process.
If everything works as expected, after using the Auth0 login page to sign up (or sign in, in case you already have a user), you will be redirected back to your app. There, you will see the navigation bar showing three links: New Thought, Profile, and Log Out. Clicking on the second link will redirect you to the page where you will see your own information.
What is more interesting is that, at this moment, the view is rendered by the browser (i.e., without the help of the backend). And, if you use your browser to refresh this page, the same view appears, but now rendered with the help of the backend (i.e., the view travels through the wire with your profile data already structure in the HTML DOM).
Recap
In this article, you learned how to secure Next.js applications with Passport properly. You also learned how to use Auth0 as a strategy in your Passport configuration. This strategy speeds up the process because it prevents you from having to invest time in developing features like sign-in, sign-up, password reset, and similar.
As homework, you can try replacing Auth0 strategy with another one. But be aware, if you decide to handle user credentials by yourself, you will have to take care of important things like password hashing and multi-factor authentication manually. Or, if you end up deciding to support social strategies (like Facebook and Google), you will have to install each one separately (while with Auth0 you can add new social provider with a single click).
#javascript #reactjs #web-development