Create Weather Prediction on iOS Application using Flask API and Artificial Intelligence (AI)
How to predict temperatures on iOS using AI?
Imagine we want to predict the weather for a day based on historical data, or precipitation for that same date.
Weather forecasts consist of collecting as much data as possible—whether the current or historical state of the atmosphere in a given area (temperature, humidity, wind, and many more)—and using tools to measure atmospheric conditions and activity. Given this data, a meteorologist then determines the future evolution of the atmosphere.
So to predict the weather we need a huge amount of data—here’s where things get complicated. We need fresh and continuous data, which we don’t have if we want to predict the temperature of a day a year in advance.
Let’s say we only have six years of historical data, with only the maximum temperature of a given city. That’s all I have for my hometown Casablanca, Morocco, and you’ll see throughout the tutorial that it’s still possible.
Before we try to train any model, we need to understand the data and try to figure out if there are any trends in the data in order to choose the best algorithm.
Here’s the data I have:

Six years of daily maximum temperature (in Celsius) for Casablanca, Morocco
From the graph above, we can clearly see that it’s not linear, so a linear regression won’t be of any use in this case.
In order to have a clear view of what model can be used, let’s define our problem:
- The data is non-linear
- It’s continuous
- Periodical
- Supervised
At this point, we need to know if it’s a classification or a regression problem.
Regression and classification are categorized as supervised machine learning problems.

Classification problems consist of predicting the classes or labels of a set of data from a pre-labeled learning base.
For regression, there is no ambiguity—it’s mission is to predict continuous numerical values for a set of data from a learning base. Classification can be seen as a special case of regression where the values to be predicted are discrete.
Train a model
Decision Tree Regression
Decision tree regression (sometimes also referred to as segmentation) is a method that provides models that are both explanatory and predictive. Among its advantages include its simplicity (due to the visualization in the form of trees), and the possibility of obtaining rules in natural language.
Regression trees are used to explain and/or predict the values taken by a quantitative dependent variable, based on quantitative and/or qualitative explanatory variables.
To solve our problem, we need to predict the temperature (that’s our output value or prediction) based on the date (that’s our input variable). This is why a decision tree regression method makes the most sense.
But before we can start, we need to make sure that all the feature columns (in this case, DATE) are numbers.
I had to change the date from 22-08-2019 to 22082019 .
Training
Here are the libraries we need for training:
pandas: read the .csv file and parse it to a dataframe type
sklearn: a huge library with a lot of data science algorithms—we’re only going to use decision tree regression
import pandas as pd from sklearn.model_selection import train_test_split from sklearn.externals import joblib from sklearn.tree import DecisionTreeRegressorcolumn_names = [‘DATE’, ‘MAX_TEMPERATURE_C’]
def train():
data_set = ‘./export-casablanca-3.csv’
data = pd.read_csv(data_set, sep=‘,’, names=column_names)
x = data[‘DATE’]
y = data[‘MAX_TEMPERATURE_C’]x_train, x_test, y_train, y_test = train_test_split(x, y, test_size=0.5, random_state=123)
x_train = x_train.values.reshape(-1, 1)tree_model = DecisionTreeRegressor()
tree_model.fit(x_train, y_train)
joblib.dump(tree_model, ‘weather_prediction.pkl’)
print(“Done training”)if name == “main”:
train()
Here are the steps:
- Read the data from the
.csvfile usingpandas. - Split the train and test data—I chose a 50/50 split, but you can change it depending on the dataset size you have.
- Instantiate a
DecisionTreeRegressor()variable usingsklearn. - Train the model with the
sklearnfit()method that finds the coefficients for the equation specified via the algorithm. - Export a .pkl file, which is a file created by pickle that enables objects to be serialized to files on disk.
You have to be careful with the column names. In my case, I have two: DATE and MAXTEMPERATUREC. You can obviously change the script with the corresponding column names.

.csv file containing the data
Here’s an example of a small portion of the decision tree:

Small portion of the Tree generated by the algorithm
Prediction
import numpy as np
from sklearn.externals import joblibdef predict_weather(option):
tree_model = joblib.load(‘weather_prediction.pkl’)
date = [float(option)]
date = np.asarray(date, dtype=np.float32)
date = date.reshape(-1, 1)
print(date)
temp = tree_model.predict(date)[0]
print(“-” * 48)
print(“\nThe temperature is estimated to be: " + str(temp) + “\n”)
print(”-" * 48)
return str(temp)
In the above code snippet, I’ve created a simple function that takes the date as an argument and returns a temperature.
Here are the steps:
- Load the pickle file that contains our serialized model.
- Make sure that the date (option) is a float.
- Create a numpy array type from our date so that it can be used to predict the temperature.
- Make the prediction.
- Return the temperature.
Flask API
Flask is a Python web application micro-framework built on the WSGI library of Werkzeug. Flask can be “micro”, but it’s ready for use in production on a variety of needs.
The “micro” in the micro-frame means that Flask aims to keep the kernel simple but expandable. Flask won’t make many decisions for you, like the database to use, and the decisions made are easy to change. Everything is yours, so Flask can be everything you need and nothing else.
The community also supports a rich ecosystem of extensions to make your application more powerful and easier to develop.
I chose a library called Flask-RESTful made by Twilio that encourages best practices when it comes to APIs.
Here’s the full code
from flask import Flask
from flask_restful import Resource, Api
from predict import predict_weatherapp = Flask(name)
api = Api(app)class WeatherPrediction(Resource):
def get(self, date: str):
print(date)
prediction = predict_weather(date)
print(prediction)
return {‘prediction’: prediction}api.add_resource(WeatherPrediction, ‘/<string:date>’)
if name == ‘main’:
app.run(debug=True)
Here are the steps:
- Create an instance of
Flask. - Feed the Flask app instance to the
Apiinstance from Flask-RESTful. - Create a class
WeatherPredictionthat will be used as an entry point for our API. - Add a
GETmethod to the class. - Add the class as a resource to the API and define the routing.
Run the API and use this URL to check: http://127.0.0.1:5000/24082019
It should look like this:

API call result
iOS Application
Create a new project
To begin, we need to create an iOS project with a single view app:

Create a Single View Application
Now we have our project ready to go. I don’t like using storyboards myself, so the app in this tutorial is built programmatically, which means no buttons or switches to toggle
To follow this method, you’ll have to delete the main.storyboard and set your AppDelegate.swift file like so:
func application(_ application: UIApplication, didFinishLaunchingWithOptions launchOptions: [UIApplication.LaunchOptionsKey: Any]?) -> Bool {

    window = UIWindow(frame: UIScreen.main.bounds)

    let controller = ViewController()

    window?.makeKeyAndVisible()

    window?.rootViewController = controller

    return true

  }
Setup the layout
- Date picker:
Instantiate a UIDatePicker.
Setup the layout.
Add a target to update the prediction every time the user changes the date.
lazy var datePicker = UIDatePicker()///////////////////////////////////////
// MARK: - Setup the date picker layout
///////////////////////////////////////
private func setupPicker() {
datePicker.translatesAutoresizingMaskIntoConstraints = false
datePicker.datePickerMode = .date
datePicker.backgroundColor = #colorLiteral(red: 0.8380756974, green: 0.7628322244, blue: 0, alpha: 1)
datePicker.addTarget(self, action: #selector(datePickerChanged(picker:)), for: .valueChanged)
view.addSubview(datePicker)
datePicker.centerXAnchor.constraint(equalTo: view.centerXAnchor).isActive = true
datePicker.bottomAnchor.constraint(equalTo: view.bottomAnchor).isActive = true
datePicker.heightAnchor.constraint(equalToConstant: view.bounds.height/2).isActive = true
datePicker.widthAnchor.constraint(equalToConstant: view.bounds.width).isActive = true
}
//////////////////////////////
// MARK: - The picker’s target
//////////////////////////////
@objc private func datePickerChanged(picker: UIDatePicker) {
let dateFormatter = DateFormatter()
dateFormatter.dateFormat = “yyyy”
let year: String = dateFormatter.string(from: picker.date)
dateFormatter.dateFormat = “MM”
let month: String = dateFormatter.string(from: picker.date)
dateFormatter.dateFormat = “dd”
let day: String = dateFormatter.string(from: picker.date)
let date = “(day)(month)(year)”
getPrediction(date: date)
}
2. Label
Instantiate a UILabel.
Setup the layout and add it to the subview.
lazy var label = UILabel()///////////////////////////////////////////////////////////
// MARK: - Setup the label layout and add it to the subview
///////////////////////////////////////////////////////////
private func setupLabel() {
label.translatesAutoresizingMaskIntoConstraints = false
label.font = UIFont(name: “Avenir-Heavy”, size: 100)
view.addSubview(label)
label.centerXAnchor.constraint(equalTo: view.centerXAnchor).isActive = true
label.topAnchor.constraint(equalTo: view.topAnchor, constant: 120).isActive = true
}
API calls
URLRequestencapsulates two essential properties of a load request: the URL to load and the policies used to load it. In addition, for HTTP and HTTPS requests,URLRequestincludes the HTTP method (GET,POST, and so on) and the HTTP headers.
That’s exactly what we need to do to GET a prediction from our API.
Here’s the full code for the prediction method:
 /////////////////////////////////////////////////////////////////////////

  // MARK: - Get the prediction from the API, parse it and change the label

  /////////////////////////////////////////////////////////////////////////

  func getPrediction(date: String) {


        var request = URLRequest(url: URL(string: “http://127.0.0.1:5000/(date)”)!)

    request.httpMethod = “GET”

    request.addValue(“application/json”, forHTTPHeaderField: “Content-Type”)


    let session = URLSession.shared

    let task = session.dataTask(with: request, completionHandler: { data, response, error -> Void in

      do {

        let json = try JSONSerialization.jsonObject(with: data!) as! Dictionary<String, AnyObject>

        if let respond = json.values.first {

          DispatchQueue.main.async {

            let temp = respond as! String

            let tempFloat = Float(temp)

            self.label.text = String(format: “%.2f”, tempFloat!)

          }

        }


      } catch {

        print(“error”)

      }

    })


    task.resume()

  }
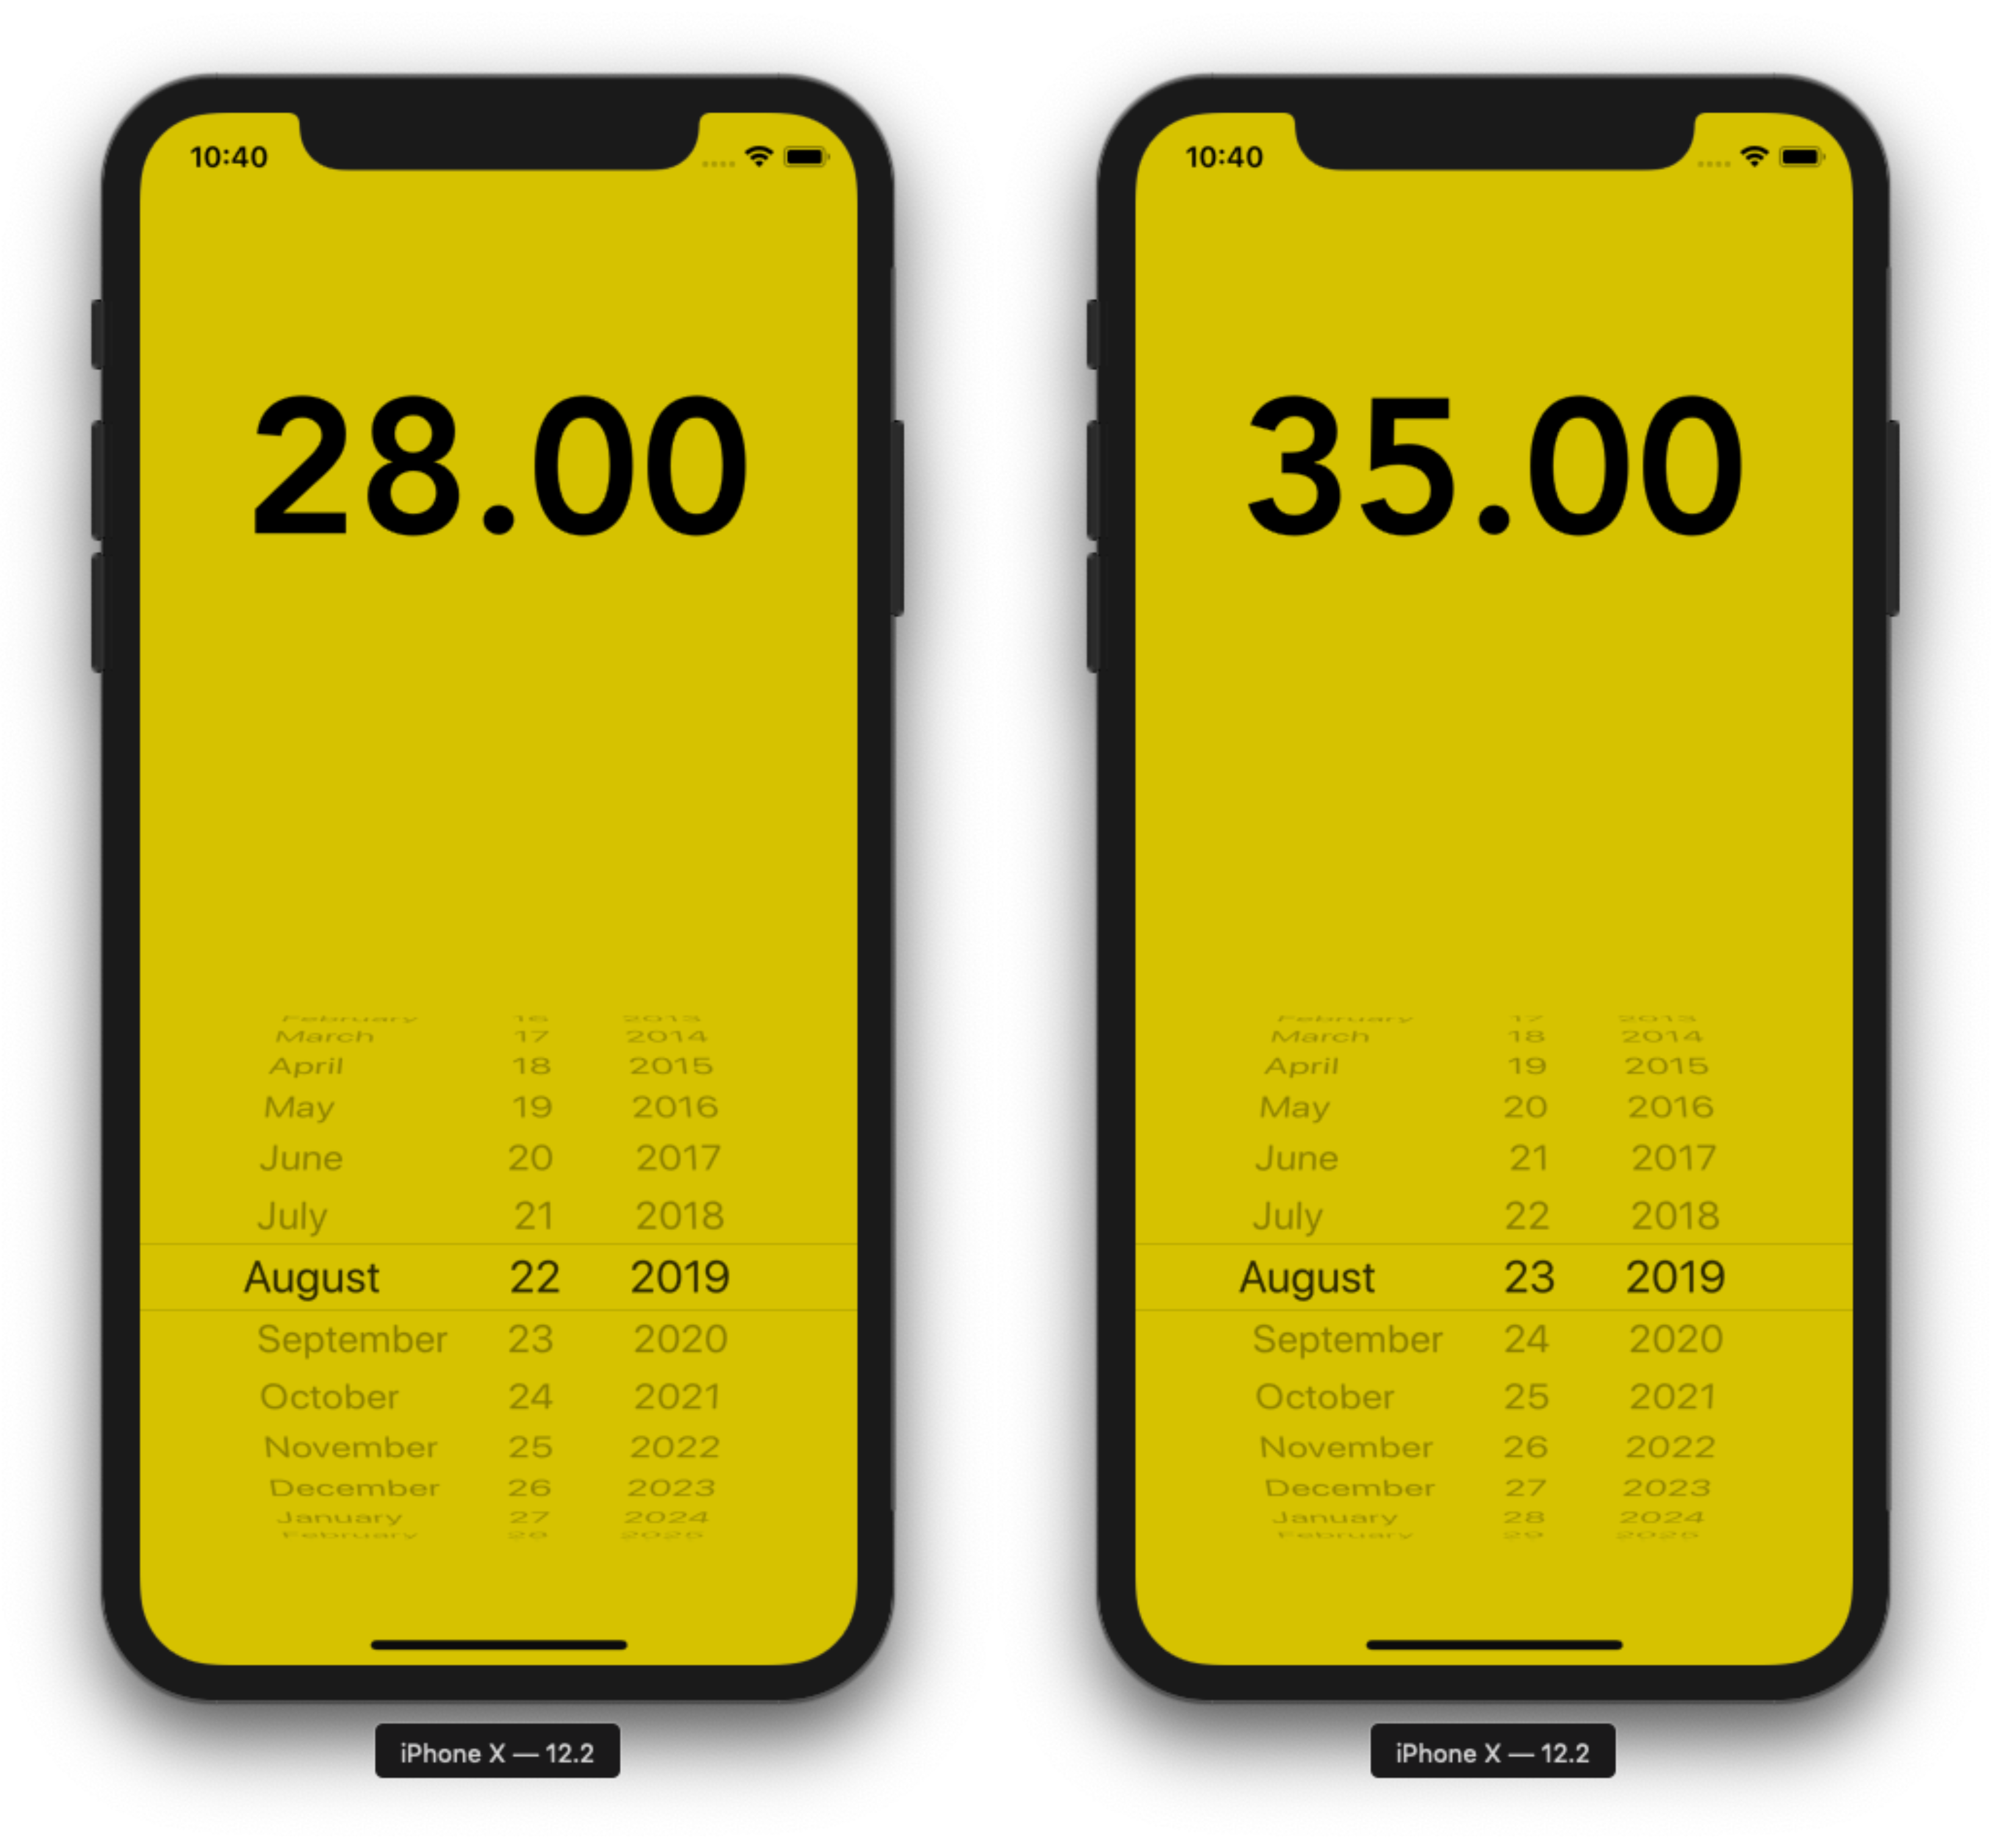
Final result
The results could be improved by increasing the dataset size. Using only six years of data isn’t enough, but I couldn’t find more for Casablanca. I’m sure if you live in the US or in Europe, you can find at least 30 years of data.
This model could also be used for wind, humidity, and even pollution as well. Take advantage of the data you find for your city.
Let’s take a look how the model’s accuracy looks:

Max Temperature From August 16, 2019 to August 22, 2019 in Casablanca, Morocco
Considering that the actual training data only contains 1202 entries, it’s not bad at all, but I’d recommend way more data to really improve the predictions.
That’s it! Now you have a working prototype of an iOS application that can predict the max temperature of a given city on a given day.

Input
We need the day, month and year as our input value, and we calculate the output which is our prediction (temperature).

Temperature is in degree Celsius
I also hosted the API on Heroku. You can check out the docs on my GitHub repository.
Thanks for reading.
Originally published on heartbeat.fritz.ai
#artificial-intelligence #data-science #ios #api #python
