If you want to fast-forward, the accompanying code repository will get you serving a image classification model within minutes.
Overview
There are a number of great “wrap your machine learning model with Flask” tutorials out there. However, when I saw this awesome series of posts by Adrian Rosebrock, I thought that his approach was a little more production-ready and lent itself well to dockerization. Dockerizing this setup not only makes it a lot easier to get everything up and running with Docker Compose, it also becomes more readily scalable for production.
By the end of the tutorial, you will be able to:
1. Build a web server using FastAPI (with Uvicorn) to serve our machine learning REST endpoints.
2. Build a machine learning model server that serves a Keras image classification model (ResNet50 trained on ImageNet).
3. Use Redis as a message queue to pass queries and responses between the web server and model server.
4. Use Docker Compose to spin them all up!
Follow
Architecture
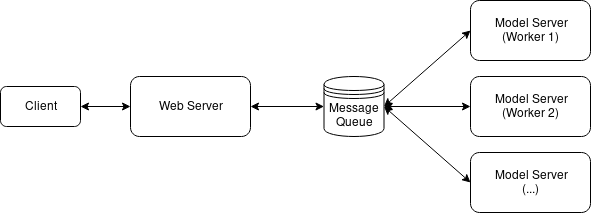
We will use the same architecture from the aforementioned posts by Adrian Rosebrock but substitute the web server frameworks (FastAPI + Uvicorn for Flask + Apache) and, more importantly, containerize the whole setup for ease of use. We will also be using most parts of Adrian’s code as he has done a splendid job with the processing, serialization, and wrangling with a few NumPy gotchas.

The main function of the web server is to serve a /predict REST endpoint through which other applications will call our machine learning model. When the endpoint is called, the web server routes the request to the Redis, which acts as an in-memory message queue for many concurrent requests. The model server simply polls the Redis message queue for a batch of images, classifies the batch of images, then returns the results to Redis. The web server picks up the results and returns that.
Code Repository
You can find all the code used in this tutorial here:
Building the web server
I chose to use the tiangolo/uvicorn-gunicorn-fastapi for the web server. This Docker image provides a neat ASGI stack (Uvicorn managed by Gunicorn with FastAPI framework) which promises significant performance improvements over the more common WSGI-based flask-uwsgi-nginx.
This decision was largely driven by wanting to try out an ASGI stack and high-quality docker images like tiangolo’s have made experimentation a lot easier. Also, as you’ll see in the code later, writing simple HTTP endpoints in FastAPI isn’t too different from how we’d do it in Flask.
The webserver/Dockerfile is quite simple. It takes the above-mentioned image and installs the necessary Python requirements and copies the code into the container:
FROM tiangolo/uvicorn-gunicorn-fastapi:python3.7

COPY requirements.txt /app/

RUN pip install -r /app/requirements.txt

COPY . /app
The webserver/main.py file runs the FastAPI server, exposing the/predict endpoint which takes the uploaded image, serializes it, pushes it to Redis and polls for the resulting predictions.
"""
Web server script that exposes REST endpoint and pushes images to Redis for classification by model server. Polls
Redis for response from model server.

Adapted from https://www.pyimagesearch.com/2018/02/05/deep-learning-production-keras-redis-flask-apache/
"""
import base64
import io
import json
import os
import time
import uuid

from keras.preprocessing.image import img_to_array
from keras.applications import imagenet_utils
import numpy as np
from PIL import Image
import redis

from fastapi import FastAPI, File, HTTPException
from starlette.requests import Request

app = FastAPI()
db = redis.StrictRedis(host=os.environ.get("REDIS_HOST"))

CLIENT_MAX_TRIES = int(os.environ.get("CLIENT_MAX_TRIES"))


def prepare_image(image, target):
    # If the image mode is not RGB, convert it
    if image.mode != "RGB":
        image = image.convert("RGB")

    # Resize the input image and preprocess it
    image = image.resize(target)
    image = img_to_array(image)
    image = np.expand_dims(image, axis=0)
    image = imagenet_utils.preprocess_input(image)

    # Return the processed image
    return image


@app.get("/")
def index():
    return "Hello World!"


@app.post("/predict")
def predict(request: Request, img_file: bytes=File(...)):
    data = {"success": False}

    if request.method == "POST":
        image = Image.open(io.BytesIO(img_file))
        image = prepare_image(image,
                              (int(os.environ.get("IMAGE_WIDTH")),
                               int(os.environ.get("IMAGE_HEIGHT")))
                              )

        # Ensure our NumPy array is C-contiguous as well, otherwise we won't be able to serialize it
        image = image.copy(order="C")

        # Generate an ID for the classification then add the classification ID + image to the queue
        k = str(uuid.uuid4())
        image = base64.b64encode(image).decode("utf-8")
        d = {"id": k, "image": image}
        db.rpush(os.environ.get("IMAGE_QUEUE"), json.dumps(d))

        # Keep looping for CLIENT_MAX_TRIES times
        num_tries = 0
        while num_tries < CLIENT_MAX_TRIES:
            num_tries += 1

            # Attempt to grab the output predictions
            output = db.get(k)

            # Check to see if our model has classified the input image
            if output is not None:
                # Add the output predictions to our data dictionary so we can return it to the client
                output = output.decode("utf-8")
                data["predictions"] = json.loads(output)

                # Delete the result from the database and break from the polling loop
                db.delete(k)
                break

            # Sleep for a small amount to give the model a chance to classify the input image
            time.sleep(float(os.environ.get("CLIENT_SLEEP")))

            # Indicate that the request was a success
            data["success"] = True
        else:
            raise HTTPException(status_code=400, detail="Request failed after {} tries".format(CLIENT_MAX_TRIES))

    # Return the data dictionary as a JSON response
    return data
webserver/main.py
The code is mostly kept as-is with some housekeeping for a Dockerized environment, namely separating helper functions and parameters for the web and model server. Also, the parameters are passed into the Docker container via environment variables (more on that later).
Building the model server
The modelserver/Dockerfile is also quite simple:
FROM python:3.7-slim-buster

COPY requirements.txt /app/

RUN pip install -r /app/requirements.txt
# Download ResNet50 model and cache in image                       RUN python -c "from keras.applications import ResNet50; ResNet50(weights='imagenet')"
COPY . /app

CMD ["python", "/app/main.py"]
Here I used the python:3.7-slim-buster image. The slim variant reduces the overall image size by about 700mb. The alpine variant does not work with tensorflow so I’ve chosen not to use it.
I also chose to downloaded the machine learning model in the Dockerfile so it’ll be cached in the Docker image. Otherwise the model will be downloaded at the point of running the model server. This is not an issue aside from adding a few minutes delay to the replication process (as each worker that starts up needs to first download the model).
Once again, the Dockerfile installs the requirements and then runs the main.py file.
"""
Model server script that polls Redis for images to classify

Adapted from https://www.pyimagesearch.com/2018/02/05/deep-learning-production-keras-redis-flask-apache/
"""
import base64
import json
import os
import sys
import time

from keras.applications import ResNet50
from keras.applications import imagenet_utils
import numpy as np
import redis

# Connect to Redis server
db = redis.StrictRedis(host=os.environ.get("REDIS_HOST"))

# Load the pre-trained Keras model (here we are using a model
# pre-trained on ImageNet and provided by Keras, but you can
# substitute in your own networks just as easily)
model = ResNet50(weights="imagenet")


def base64_decode_image(a, dtype, shape):
    # If this is Python 3, we need the extra step of encoding the
    # serialized NumPy string as a byte object
    if sys.version_info.major == 3:
        a = bytes(a, encoding="utf-8")

    # Convert the string to a NumPy array using the supplied data
    # type and target shape
    a = np.frombuffer(base64.decodestring(a), dtype=dtype)
    a = a.reshape(shape)

    # Return the decoded image
    return a


def classify_process():
    # Continually poll for new images to classify
    while True:
        # Pop off multiple images from Redis queue atomically
        with db.pipeline() as pipe:
            pipe.lrange(os.environ.get("IMAGE_QUEUE"), 0, int(os.environ.get("BATCH_SIZE")) - 1)
            pipe.ltrim(os.environ.get("IMAGE_QUEUE"), int(os.environ.get("BATCH_SIZE")), -1)
            queue, _ = pipe.execute()

        imageIDs = []
        batch = None
        for q in queue:
            # Deserialize the object and obtain the input image
            q = json.loads(q.decode("utf-8"))
            image = base64_decode_image(q["image"],
                                        os.environ.get("IMAGE_DTYPE"),
                                        (1, int(os.environ.get("IMAGE_HEIGHT")),
                                         int(os.environ.get("IMAGE_WIDTH")),
                                         int(os.environ.get("IMAGE_CHANS")))
                                        )

            # Check to see if the batch list is None
            if batch is None:
                batch = image

            # Otherwise, stack the data
            else:
                batch = np.vstack([batch, image])

            # Update the list of image IDs
            imageIDs.append(q["id"])

        # Check to see if we need to process the batch
        if len(imageIDs) > 0:
            # Classify the batch
            print("* Batch size: {}".format(batch.shape))
            preds = model.predict(batch)
            results = imagenet_utils.decode_predictions(preds)

            # Loop over the image IDs and their corresponding set of results from our model
            for (imageID, resultSet) in zip(imageIDs, results):
                # Initialize the list of output predictions
                output = []

                # Loop over the results and add them to the list of output predictions
                for (imagenetID, label, prob) in resultSet:
                    r = {"label": label, "probability": float(prob)}
                    output.append(r)

                # Store the output predictions in the database, using image ID as the key so we can fetch the results
                db.set(imageID, json.dumps(output))

        # Sleep for a small amount
        time.sleep(float(os.environ.get("SERVER_SLEEP")))

if __name__ == "__main__":
    classify_process()
The model server polls Redis for a batch of images to predict on. Batch inference is particularly efficient for deep learning models, especially when running on GPU. The BATCH_SIZE parameter can be tuned to offer the lowest latency.
We also have to use redis-py’s pipeline (which is a misnomer as it is by default transactional in redis-py) to implement an atomic left-popping of multiple element (see lines 45–48). This becomes important in preventing race conditions when we replicate the model servers.
Putting it all together with Docker Compose
version: '3'

services:
  redis:
    image: redis
    networks:
    - deployml_network

  modelserver:
    image: shanesoh/modelserver
    build: ./modelserver
    depends_on:
    - redis
    networks:
    - deployml_network
    env_file:
    - app.env
    environment:
    - SERVER_SLEEP=0.25  # Time in ms between each poll by model server against Redis
    - BATCH_SIZE=32
    deploy:
      replicas: 1
      restart_policy:
        condition: on-failure
      placement:
        constraints:
        - node.role == worker

  webserver:
    image: shanesoh/webserver
    build: ./webserver
    ports:
    - "80:80"
    networks:
    - deployml_network
    depends_on:
    - redis
    env_file:
    - app.env
    environment:
    - CLIENT_SLEEP=0.25  # Time in ms between each poll by web server against Redis
    - CLIENT_MAX_TRIES=100  # Num tries by web server to retrieve results from Redis before giving up
    deploy:
      placement:
        constraints:
        - node.role == manager

networks:
    deployml_network:
We create 3 services — Redis, model server and web server — that are all on the same Docker network.
The “global” parameters are in the app.env file while the service-specific parameters (such as SERVER_SLEEP and BATCH_SIZE) are passed in as environment variables to the containers.
The deploy parameters are used only for Docker Swarm (more on that in the following post) and will be safely ignored by Docker Compose.
We can spin everything up with docker-compose up which will build the images and start the various services. That’s it!
Testing the endpoints
Now test the service by curling the endpoints:
$ curl http://localhost
"Hello World!"
$ curl -X POST -F img_file=@doge.jpg http://localhost/predict
{"success":true,"predictions":[{"label":"dingo","probability":0.6836559772491455},{"label":"Pembroke","probability":0.17909787595272064},{"label":"basenji","probability":0.07694739103317261},{"label":"Eskimo_dog","probability":0.01792934536933899},{"label":"Chihuahua","probability":0.005690475460141897}]}
Success! There’s probably no “shiba inu” class in ImageNet so “dingo” will have to do for now. Close enough.
Load testing with Locust
Locust is a load testing tool designed for load-testing websites. It is intended for load testing websites but also works great for simple HTTP endpoints like ours.
It’s easy to get it up and running. First install it with pip install locustio then start it up by running within the project directory:
locust --host=http://localhost
This uses the provided locustfile to test the /predict endpoint. Note that we’re pointing the host to localhost — we’re testing the response time of our machine learning service without any real network latency.
Now point your browser to http://localhost:8089 to access the locust web ui.

We’ll simulate 50 users (who are all hatched at the start).

A p95 response time of around 5000ms means that 95% of requests should complete within 5 seconds. Depending on your use case and expected load, this could be far too slow.
Conclusion
We saw in this post how to build a Dockerized machine learning service using Keras, FastAPI and Redis. We also did a load test and saw how performance may be less than adequate.
Originally published by Shane Soh at medium.com
#docker #redis #machine-learning
