Building a simple app using NodeJS, MongoDB, and ExpressJS
In this tutorial, we will build a simple app with Node.Js using ExpressJs framework and MongoDB.
So, first of all, this one is my first blog. I am currently working as a full stack developer but mostly I stuck with front-end today we are going to learn basic operation using Nodejs and MongoDB and also use nodemonI remember when I eventually picked up the courage to try, I had such a hard time understanding the documentation for Express, MongoDB, and Node.js that I gave up.
One month later, I finally understood how to work with these tools. Then, I decided to write a comprehensive blog so you won’t have to go through the same headache I went through.
one thing you need to install node …. I know you can do this…. nodejs
To check if you have Node installed, open up your command line and run the following code: $node -v You should get a version number if you have Node installed. If you don’t, you can install Node either
Start by creating a folder for this project. Feel free to call it anything you want. Once you navigate into it, run the npm init command. This command creates a package.json file which helps you manage dependencies that we install later in the blog.
The simplest way to use node is to run the node command and specify a path to a file. Let’s create a file called server.js to run node with
$ touch server.js
When the execute the server.js file, we want to make sure it’s running properly. To do so, simply write a console.log statement in server.js
console.log('pdp pdp pdp pdp')
Now, run node server.js in your command line and you should see the statement you logged — — pdp pdp pdp pdp
We first have to install Express before we can use it in our application. Installing Express is pretty easy. All we have to do is run an install command with Node package manager (npm), which comes bundled with Node. Run the npm install express --save command in your command line
$ npm install express --save
Once you’re done, you should see that npm has saved Express as a dependency in package.json
Next, we use express in server.js by requiring it.
const express = require('express');
const app = express();
The first thing we want to do is to create a server where browsers can connect. We can do so with the help of a listen method provided by Express:
app.listen(3000, function() {
  console.log('listening on 3000')
})
Now, run node server.js and navigate to localhost:3000 on your browser. You should see a message that says “cannot get /”. nice great news just kidding…… this is just beginning. The READ operation is performed by browsers whenever you visit a webpage. Under the hood, browsers send a GET request to the server to perform a READ operation. The reason we see the “cannot get /” error is because we have yet to send anything back to the browser from our server.
In Expressjs, we handle a GET request with the get method:
app.get(path, callback)
The first argument, path, is the path of the GET request. It’s anything that comes after your domain name.
When we’re visiting localhost:3000, our browsers are actually looking for localhost:3000/. The path argument in this case is /.The second argument is a callback function that tells the server what to do when the path is matched. It takes two arguments, a request object and a response object:
app.get('/', function (request, response) {
   // work here
})
For now, let’s write “PDP” back to the browser. We do so by using a sendmethod that comes with the response object:
app.get('/', function(req, res) {
   res.send('PDP')
})
I’m going to start writing in ES6 code and show you how to convert to ES6 along the way as well. First off, I’m replacing function() with an ES6 arrow function. The below code is the same as the above code:
app.get('/', (req, res) => {
   res.send('PDP')
})
Now, restart your server by doing the following:
- Stop the current server by hitting
CTRL + Cin the command line. - Run
node server.jsagain.
Then, navigate to localhost:3000 on your browser. You should be able to see a string that says “PDP”.
Great. Let’s change our app so we serve an index.html page back to the browser instead. To do so, we use the sendFile method that’s provided by the res object.
res.sendFile(__dirname + '/index.html')
In the sendFile method above, we told Express to serve an index.html file that can be found in the root of your project folder. We don’t have that file yet. Let’s make it now.
touch index.html
Let’s put some text in our index.html file as well:
   MY APP


   May Node and Express be with you.
Restart your server and refresh your browser. You should be able to see the results of your HTML file now.
This is how Express handles a GET request (READ operation) in a nutshell.
At this point, you probably have realized that you need to restart your server whenever you make a change to server.js. This is process is incredibly tedious, so let’s take a quick detour and streamline it by using a package called nodemon.
Nodemon restarts the server automatically whenever you save a file that the server uses. We can install Nodemon by using the following command:
$ npm install nodemon --save-dev
Note: The reason we’re using a --save-dev flag here is because we’re only using Nodemon when we’re developing. This flag would save Nodemon as a devDependency in your package.json file.
Moving on, Nodemon behaves exactly the same as node, which means we can run our server by calling nodemon server.js. However, we can’t do it in the command line right now because Nodemon isn’t installed with a -g flag.
There’s one other way to run Nodemon — we can execute Nodemon from the node_modules folder. The code looks like this:
$ ./node_modules/.bin/nodemon server.js
That’s a handful to type. One way to make it simpler is to create a script key in package.json.
"scripts": {
  "dev": "nodemon server.js"
}
Now, you can run npm run dev to trigger nodemon server.js.
Back to the main topic. We’re going to cover the CREATE operation next.
The CREATE operation is only performed by the browser if a POSTrequest is sent to the server. This POST request can be triggered either with JavaScript or through a `` element.
Let’s find out how to use a `` element to create new entries for our Star Wars quote app for this part of the tutorial.
To do so, you first have to create a `` element and add it to your index.html file. You need to have three things on this form element:
- An
actionattribute, - a
methodattribute, - and
nameattributes on all ` elements within the form.
Submit
The action attribute tells the browser where to navigate to in our Express app. In this case, we’re navigating to /quotes. The methodattribute tells the browser what request to send. In this case, it’s a POST request.
On our server, we can handle this POST request with a post method that Express provides. It takes the same arguments as the GET method:
app.post('/quotes', (req, res) => {
  console.log('Hellooooooooooooooooo!')
})
Restart your server (hopefully you’ve set up Nodemon so it restarts automatically) and refresh your browser. Then, enter something into your form element. You should be able to see Hellooooooooooooooooo!in your command line.

Great, we know that Express is handling the form for us right now. The next question is, how do we get the input values with Express?
Turns out, Express doesn’t handle reading data from the ``element on it’s own. We have to add another package called body-parserto gain this functionality.
$ npm install body-parser --save
Express allows us to add middleware like body-parser to our application with the use method. You’ll hear the term middleware a lot when dealing with Express. These things are basically plugins that change the request or response object before they get handled by our application. Make sure you place body-parser before your CRUD handlers!
const express = require('express')
const bodyParser= require('body-parser')
const app = express()
app.use(bodyParser.urlencoded({extended: true}))
The urlencoded method within body-parser tells body-parser to extract data from the `` element and add them to the body property in the requestobject.
Now, you should be able to see everything in the form field within the req.body object. Try doing a console.log and see what it is!
app.post('/quotes', (req, res) => {
 console.log(req.body)
})
You should be able to get an object similar to the following in your command line:
{
name: 'pdp',
quotes: 'pdp psr pdp'
}
Enter the Database, MongoDB
We first have to install MongoDB through npm if we want to use it as our database.
$ npm install mongodb --save
Once installed, we can connect to MongoDB through the MongoClient’s connect method as shown in the code below:
const MongoClient = require('mongodb').MongoClient  MongoClient.connect('link-to-mongodb', (err, database) => {
   // ... start the server
})
The next part is to get the correct link to our database. Most people store their databases on cloud services like mLab (formerly MongoLab). We’re going to do same as well.
So, go ahead and create an account with mLab. (It’s free.) Once you’re done, create a new MongoDB Deployment
Once you’re done creating the deployment, head into it and create a database user and database password. Remember the database user and database password because you’re going to use it to connect the database you’ve just created.
Finally, grab the MongoDB url and add it to your MongoClient.connectmethod. Make sure you use your database user and password!
Next, we want to start our servers only when the database is connected. Hence, let’s move app.listen into the connect method. We’re also going to create a db variable to allow us to use the database when we handle requests from the browser.
const client = new MongoClient(url, { useNewUrlParser: true });
client.connect((err, database) => {
 db = database.db("test")
 app.listen(3000, function () {
 })
})
We’re done setting up MongoDB. Now, let’s create a quotes collection to store quotes for our application.
By the way, a collection is a named location to store stuff. You can create as many collections as you want. It can be things like “products”, “quotes”, “groceries”, or any other labels you choose.
We can create the quotes collection by using the string quotes while calling MongoDB’s db.collection() method. While creating the quotes collection, we can also save our first entry into MongoDB with the savemethod simultaneously.
Once we’re done saving, we have to redirect the user somewhere (or they’ll be stuck waiting forever for our server to move). In this case, we’re going to redirect them back to /, which causes their browsers to
app.post('/quotes', (req, res) => {   db.collection('quotes').save(req.body, (err, result) => {
     if (err) return console.log(err)
     console.log('saved to database')
     res.redirect('/')
   })
 })
Now, if you enter something into the `` element, you’ll be able to see an entry in your MongoDB collection.
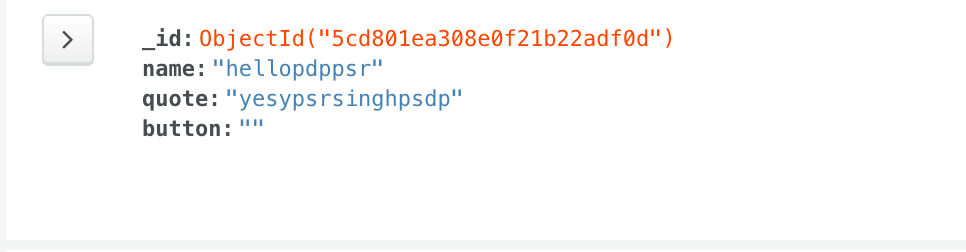
oh, sorry button is also there maybe I made mistake but leave it now…
Whoohoo! Since we already have some quotes in the collection, why not try showing them to our user when they land on our page?
We have to do two things to show the quotes stored in mLab to our users.
- Get quotes from mLab.
- Use a template engine to display the quotes.
Let’s go one step at a time.
We can get the quotes from mLab by using the find method that’s available in the collection method.
app.get('/', (req, res) => {
   var cursor = db.collection('quotes').find()
})
The find method returns a cursor (a Mongo object) that probably doesn’t make sense if you console.log it out. this cursor object contains all quotes from our database. It also contains a bunch of other properties and methods that allow us to work with data easily. One such method is the toArraymethod.The toArray method takes in a callback function that allows us to do stuff with quotes we retrieved from mLab. Let’s try doing a console.log() for the results and see what we get!
var cursor = db.collection('quotes').find().toArray(function(err, result){
    console.log('kya baat bhai mast')
    if (err) { return console.log(err) }
    console.log('haanbhai', result)
    res.render('index.ejs', {quotes: result})
  })
We can’t serve our index.html file and expect quotes to magically appear because there’s no way to add dynamic content to a HTML file. What we can do instead, is to use template engines to help us out. Some popular template engines include Jade, Embedded JavaScript and Nunjucks.
I’ve written extensively about the how and why of template engines in a separate post. You might want to check it out if you have no idea what template engines are. I personally use (and recommend) Nunjucks as my template engine of choice. Feel free to check out the post to find out why.
For this tutorial, we’re going to use Embedded JavaScript (ejs) as our template engine because it’s the easiest to start with. You’ll find it familiar from the get-go since you already know HTML and JavaScript.
We can use EJS by first installing it, then setting the view engine in Express to ejs.
$ npm install ejs --save
code in server.js
app.set('view engine', 'ejs')
Once the view engine is set, we can begin generating the HTML with our quotes. This process is also called rendering. We can use the render object built into the response object render to do so. It has the following syntax:
res.render(view, locals)
The first parameter, view, is the name of the file we’re rendering. This file must be placed within a views folder.
The second parameter, locals, is an object that passes data into the view.
Let’s first create an index.ejs file within the views folder so we can start populating data.
$ mkdir views
$ touch views/index.ejs
Now, place the following code within index.ejs.
See what I mean when I say you’ll find it familiar? In EJS, you can write JavaScript within tags. You can also output JavaScript as strings if you use the tags.
Here, you can see that we’re basically looping through the quotes array and creating strings with quotes[i].name and quotes[i].quote.
One more thing to do before we move on from the index.ejs file. Remember to copy the `` element from the index.html file into this file as well. The complete index.ejs file so far should be:
  MY APP


  May Node and Express be with you. and pdp ki blessing


    Submit
Finally, we have to render this index.ejs file when handling the GETrequest. Here, we’re setting the results (an array) as the quotes array we used in index.ejs above.
app.get('/', (req, res) => {
  // res.sendFile(__dirname + '/index.html');
  var cursor = db.collection('quotes').find().toArray(function(err, result){
    console.log('kya baat bhai mast')
    if (err) { return console.log(err) }
    console.log('haanbhai', result)
    res.render('index.ejs', {quotes: result})
  })
})
Now, refresh your browser and you should be able to see quotes.
#node-js #mongodb #express #javascript