Background
In last year’s KubeCon Shanghai and KubeCon Seattle, some keynotes delivered the message that Kubernetes is becoming “boring,” but I would actually say that Kubernetes is becoming “mature.”
A “mature” Kubernetes was triggered by the growing ecosystem of Kubernetes, like developers who are now trying to move upward by running more services on top of Kubernetes. This means that Kubernetes is now becoming the integration engine and innovation platform, and some new services like Kubeflow for Machine Learning, Knative for Serverless, Istio for Service Mesh, and more are now emerging in the Kubernetes ecosystem. Not to mention, developers are also trying to extend their applications to a variety of environments: hybrid cloud, Federation V2 for multi cloud, multi-cloud environments, Edge Cloud, and Rancher K3S – just to name a few.
The growing ecosystem of Kubernetes also means that developers are increasingly using a Kative methodology to resolve new requirements that are based on some CRDs and Controllers (like cluster-registry, Federation V2, Kubernetes Operators). This Kubernetes-native way also enables developers to catch up with the new services and functions that are built on Kubernetes with more ease.
The Cluster Management API, or Cluster API for short, was born under such conditions. For hybrid cloud and multi-cloud environments, we needed a Kubernetes-native way to help users manage (create/delete/add-node/delete-node) their Kubernetes clusters for their different cloud providers, like AWS, Azure, GCE, OpenStack, and IBM Cloud™.
Introduction to the Cluster API
The Cluster API is a Kubernetes project, which uses the Kuberentes native way for cluster creation, configuration, and management. It provides optional, additive functionality on top of the Kubernetes core.
The Cluster API can be treated as a common framework for Kubernetes cluster management, though you might want to implement your own cloud provider that’s based on Cluster API. There are now many different kinds of cloud providers that are based on Cluster API, like AWS, Azure, GCE, OpenStack, and IBM Cloud. You can get a full list of cloud providers from here.
You can also refer to the what-and-why-of-cluster-api for a more detailed explanation for why a developer would need Cluster API.
Playing With cluster-api-provider-openstack
The cluster-api-provider-openstack is a cloud provider implementation of cluster-api for OpenStack. I’ll show you some steps on how to work with it.
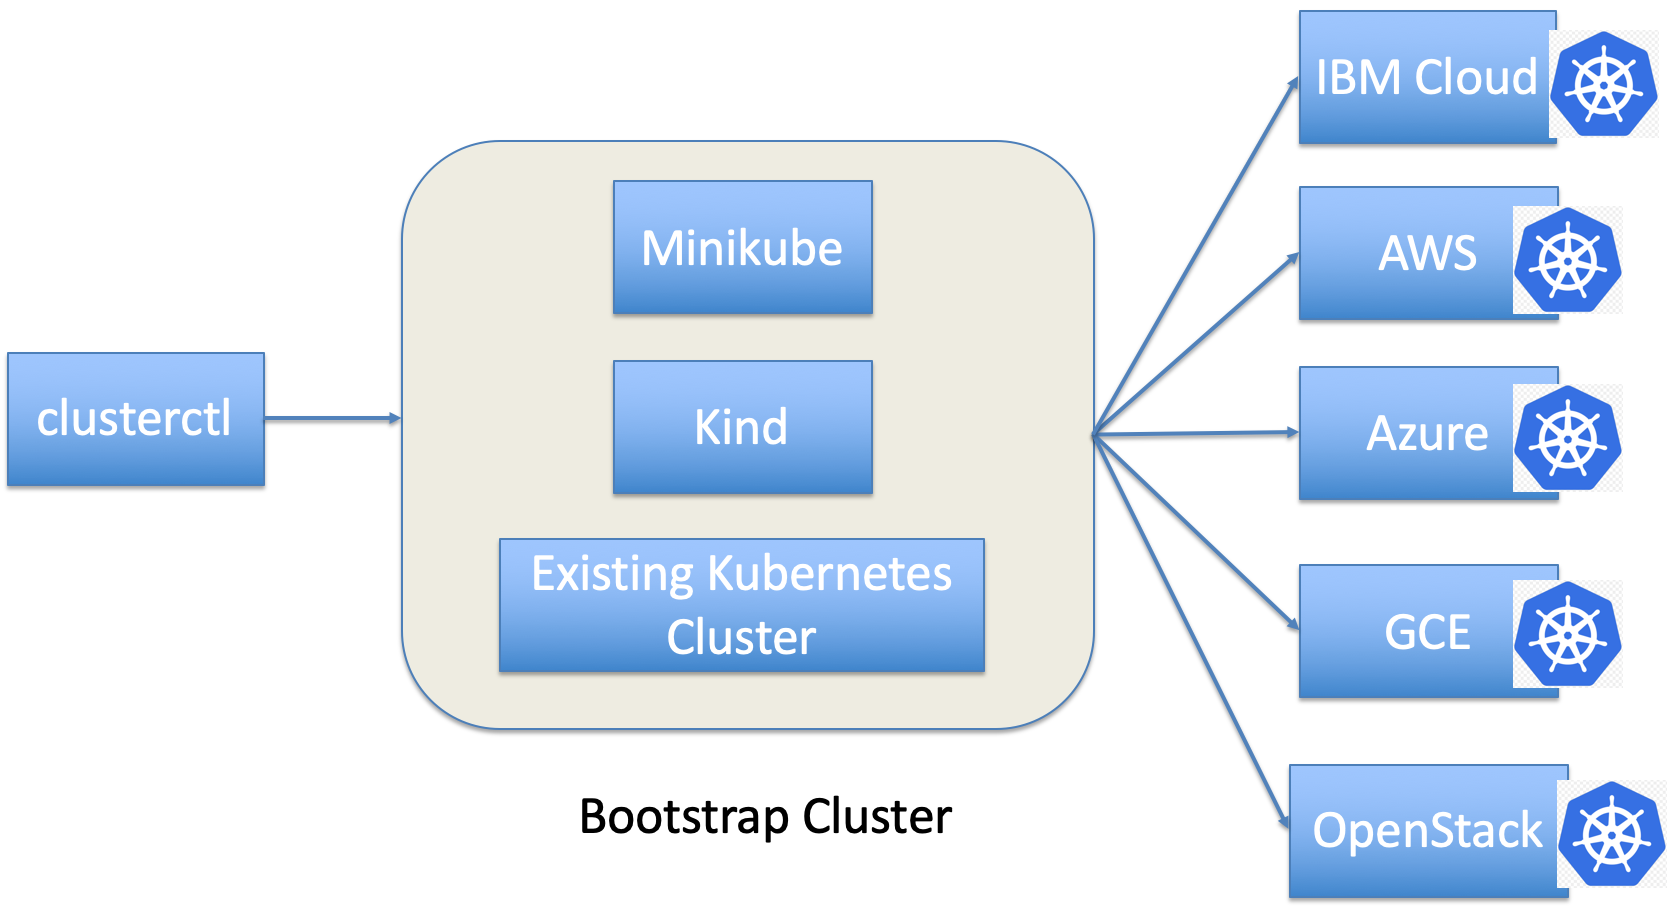
Currently, there are three ways to provision your Kubernetes cluster via Cluster API – you can use Minikube, Kind, or your existing Kubernetes cluster. We encourage you use either Kind or your existing Kubernetes cluster, as they are faster. Here, I’ll show you the steps for how to use Kind or an existing Kubernetes cluster to provision your Kubernetes Clusters.
Prerequisites
- Install
kubectl - Install Kind. If you do not have an existing Kubernetes cluster, you can refer to the Kind installation doc for steps on how to install.
- Build
clusterctlcommand as follows:
  $ git clone https://github.com/kubernetes-sigs/cluster-api-provider-openstack $GOPATH/src/sigs.k8s.io/cluster-api-provider-openstack
  $ cd $GOPATH/src/sigs.k8s.io/cluster-api-provider-openstack/cmd/clusterctl
  $ go build
Prepare clouds.yaml
The clouds.yaml is a file that specifies your OpenStack configuration parameters, those parameters will specify where do you want to manage your Kubernetes clusters.
The following is an example for my environment. The project_id identifies which project you want to get resources from to provision to your Kubernetes cluster. You can refer to https://github.com/kubernetes-sigs/cluster-api-provider-openstack#quick-notes-on-cloudsyaml for more details on clouds.yaml.
clouds:
  openstack:
    auth:
      auth_url: "https://xxx.ibm.com:5000"
      username: "your user name"
      password: "your password"
      project_id: 07962130d7044e3c84e1825859d5bef9
      domain_name: "ibm"
      user_domain_name: "ibm"
    region_name: "RegionOne"
    interface: "public"
    identity_api_version: 3
    verify: false
    cacert: |
      -----BEGIN CERTIFICATE-----
      xxxxxxxx
      -----END CERTIFICATE-----
Generate Cluster Creation files
After your clouds.yaml is ready, you need to use it to generate your Kubernetes cluster creation files as follows:
cd examples/openstack
./generate-yaml.sh [options] <path/to/clouds.yaml> <openstack cloud> <provider os>
openstack cloud is the cloud you are going to use and you can get it from the clouds.yaml file. In my case, you will see my openstack cloud will be openstack as defined in clouds.yaml.
provider os specifies the operating system of the virtual machines Kubernetes will run on; currently, we only support Ubuntu and Centos.
In my case here, I use the following command to provision my Kubernetes cluster in OpenStack cloud with Ubuntu as my VM operating system.
./generate-yaml.sh ./clouds.yaml openstack ubuntu
After this command finishes, it will generate two objects: a folder named out in the current dir and a new SSH key pair, stored as $HOME/.ssh/openstack\_tmp and $HOME/.ssh/openstack\_tmp.pub.
The out folder will include three files:
./generate-yaml.sh ./clouds.yaml openstack ubuntu
The cluster.yaml mainly defines your Kubernetes cluster name, Kubernetes CIDR for Pods and Services, Kubernetes Service Domain, Cloud Provider, and more. The following is an example of the cluster.yaml in my environment.
root@gyliu-dev1:~/go/src/sigs.k8s.io/cluster-api-provider-openstack/cmd/clusterctl/examples/openstack# cat out/cluster.yaml
apiVersion: "cluster.k8s.io/v1alpha1"
kind: Cluster
metadata:
  name: test1
spec:
    clusterNetwork:
        services:
            cidrBlocks: ["10.96.0.0/12"]
        pods:
            cidrBlocks: ["192.168.0.0/16"]
        serviceDomain: "cluster.local"
    providerSpec:
      value:
        apiVersion: "openstackproviderconfig/v1alpha1"
        kind: "OpenstackProviderSpec"
The machines.yaml file defines the machine spec that you want to provision for your Kubernetes cluster, like your VM image, VM floating IP, Kubernetes version, OpenStack network UUID, and OpenStack security group. The following is an example machines.yaml file in my environment for Kubernetes master node.
items:
- apiVersion: "cluster.k8s.io/v1alpha1"
  kind: Machine
  metadata:
    generateName: liugya-master-
    labels:
      set: master
  spec:
    providerSpec:
      value:
        apiVersion: "openstackproviderconfig/v1alpha1"
        kind: "OpenstackProviderSpec"
        flavor: m1.xlarge
        image: KVM-Ubt18.04-Srv-x64
        sshUserName: cloudusr
        keyName: cluster-api-provider-openstack
        availabilityZone: nova
        networks:
        - uuid: e2d9ead6-759b-4592-873d-981d3db07c86
        floatingIP: 9.20.206.22
        securityGroups:
        - uuid: 97acf9d4-e5bf-4fff-a2c0-be0b04fbc44b
        userDataSecret:
          name: master-user-data
          namespace: openstack-provider-system
        trunk: false
    versions:
      kubelet: 1.14.0
      controlPlane: 1.14.0
The provider-components.yaml file defines some CRD resources and controllers for the OpenStack cloud provider. It mainly includes two controllers as follows:
root@liugya-master-cpr5j:/home/cloudusr# kubectl get deploy -n openstack-provider-system
NAME                     READY   UP-TO-DATE   AVAILABLE   AGE
clusterapi-controllers   1/1     1            1           3h8m
root@liugya-master-cpr5j:/home/cloudusr# kubectl get sts -n system
NAME                 READY   AGE
controller-manager   1/1     3h9m
The controller-manager manages some common resources for Cluster API, like MachineSet, MachineDeployment, and Nodes.
The clusterapi-controllers is implemented by the OpenStack cloud provider; it is mainly used to manage clusters and machines, like creating cluster resources and provisioning machines on OpenStack.
The SSH key pair enables the clusterctl to fetch the provisioned Kubernetes admin.conf from the master node and then migrates all of the controllers from bootstrap cluster to provisioned Kubernetes master node.
Create Cluster
After all of the files are generated, we can use the following command to create the Kubernetes cluster:
./clusterctl create cluster --v 4 --bootstrap-type kind --provider openstack -c examples/openstack/out/cluster.yaml -m examples/openstack/out/machines.yaml -p examples/openstack/out/provider-components.yaml
The above command will use kind to create a bootstrap cluster, which helps provision the master node for our Kubernetes cluster. After the master node is ready, the clusterctl command will migrate all of the controllers and Kubernetes resources to the new provisioned Kubernetes master node, and it will also delete the bootstrap cluster. Then the controllers running on the new master node will continue to provision other worker nodes.
If you have an existing Kubernetes cluster, you can use following command to create your Kubernetes clusters:
./clusterctl create cluster --bootstrap-cluster-kubeconfig /root/.kube/config --provider openstack -c examples/openstack/out/cluster.yaml -m examples/openstack/out/machines.yaml -p examples/openstack/out/provider-components.yaml
Please note that I am using an option for clusterctl named bootstrap-cluster-kubeconfig; this option specifies your existing Kubernetes cluster kubeconfig, and thus takes your existing Kubernetes cluster as the bootstrap cluster.
After the cluster is created, you can log on to your newly provisioned Kubernetes cluster and check your cluster info by using the following commands:
root@liugya-master-fx9nn:~# kubectl get clusters
NAME    AGE
test1   33h
root@liugya-master-fx9nn:~# kubectl get machines
NAME                  AGE
liugya-master-fx9nn   33h
liugya-node-qknd7     33h
root@liugya-master-cpr5j:~# kubectl get nodes
NAME                  STATUS   ROLES    AGE     VERSION
liugya-master-cpr5j   Ready    master   3h50m   v1.14.0
liugya-node-ngw58     Ready    <none>   3h47m   v1.14.0
Deleting the machine
As machine is also a Kubernetes resource, so you can use the command kubectl delete to delete the machine resource as follows,( here I was deleting my worker node).
root@liugya-master-cpr5j:~# kubectl delete machine liugya-node-ngw58
machine.cluster.k8s.io "liugya-node-ngw58" deleted
root@liugya-master-cpr5j:~# kubectl get machines
NAME                  AGE
liugya-master-cpr5j   4h38m
root@liugya-master-cpr5j:~# kubectl get nodes
NAME                  STATUS   ROLES    AGE     VERSION
liugya-master-cpr5j   Ready    master   4h40m   v1.14.0
You can see the worker node is now deleted and if you go to your OpenStack dashboard, you can also see the VM for your worker node was also deleted.
I0404 06:28:11.145721       1 controller.go:114] Running reconcile Machine for liugya-node-ngw58
I0404 06:28:12.129559       1 controller.go:173] Reconciling machine object liugya-node-ngw58 triggers idempotent update.
I0404 07:24:42.608702       1 controller.go:114] Running reconcile Machine for liugya-node-ngw58
I0404 07:24:42.608762       1 controller.go:147] reconciling machine object liugya-node-ngw58 triggers delete.
I0404 07:24:45.549715       1 controller.go:158] machine object liugya-node-ngw58 deletion successful, removing finalizer.
And if you check the log of the clusterapi controller for OpenStack, you will also see the following logs telling you that the machine is deleted.
Adding a machine
Here we can use and define a machine YAML template to add a new node. You can get the machine spec from your out/machines.yaml, but here I created a machine with the following command:
root@liugya-master-cpr5j:~# cat machine.yaml
apiVersion: "cluster.k8s.io/v1alpha1"
kind: Machine
metadata:
  name: liugya-node-1
  labels:
    set: node
spec:
  providerSpec:
    value:
      apiVersion: "openstackproviderconfig/v1alpha1"
      kind: "OpenstackProviderSpec"
      flavor: m1.medium
      image: KVM-Ubt18.04-Srv-x64
      sshUserName: cloudusr
      keyName: cluster-api-provider-openstack
      availabilityZone: nova
      networks:
      - uuid: e2d9ead6-759b-4592-873d-981d3db07c86
      floatingIP: 9.20.206.8
      securityGroups:
      - uuid: 97acf9d4-e5bf-4fff-a2c0-be0b04fbc44b
      userDataSecret:
        name: worker-user-data
        namespace: openstack-provider-system
      trunk: false
  versions:
    kubelet: 1.14.0
Then create the machine via kubectl apply, like the following:
root@liugya-master-cpr5j:~# kubectl apply -f node.yaml
machine.cluster.k8s.io/liugya-node-1 created
root@liugya-master-cpr5j:~# kubectl get machines
NAME                  AGE
liugya-master-cpr5j   5h24m
liugya-node-1         5s
You will see that the new machine was created. If you go back to your OpenStack dashboard, you will see a new VM was now being provisioned. And the clusterapi controller for OpenStack has the following logs telling you that a new machine is being created.
I0404 08:11:32.266191       1 controller.go:114] Running reconcile Machine for liugya-node-1
I0404 08:11:32.274115       1 controller.go:114] Running reconcile Machine for liugya-node-1
I0404 08:11:32.883271       1 controller.go:184] Reconciling machine object liugya-node-1 triggers idempotent create.
I0404 08:11:33.898700       1 actuator.go:132] Creating bootstrap token
W0404 08:12:21.943293       1 controller.go:186] unable to create machine liugya-node-1: Operation cannot be fulfilled on machines.cluster.k8s.io "liugya-node-1": the object has been modified; please apply your changes to the latest version and try again
I0404 08:12:22.944113       1 controller.go:114] Running reconcile Machine for liugya-node-1
I0404 08:12:23.969128       1 controller.go:173] Reconciling machine object liugya-node-1 triggers idempotent update.
I0404 08:12:24.639494       1 actuator.go:217] Populating current state for boostrap machine liugya-node-1
I0404 08:12:25.245633       1 controller.go:114] Running reconcile Machine for liugya-node-1
I0404 08:12:26.043068       1 controller.go:173] Reconciling machine object liugya-node-1 triggers idempotent update.
After the machine was provisioned by OpenStack, you’ll see the new machine was joined to your Kubernetes cluster as well.
root@liugya-master-cpr5j:~# kubectl get machines
kubec    NAME                  AGE
liugya-master-cpr5j   5h40m
liugya-node-1         16m
root@liugya-master-cpr5j:~# kubectl get nodes
NAME                  STATUS   ROLES    AGE     VERSION
liugya-master-cpr5j   Ready    master   5h40m   v1.14.0
liugya-node-1         Ready    <none>   14m     v1.14.0
Troubleshooting
When you run clusterctl create, you can always add the option --v 10 to run the command so as to get more logs from the clusterctl to help you check what might be wrong with the command.
You can also check the logs of pod clusterapi-controllers-xxx under the openstack-provider-system namespace to check some error details if your Kubernetes cluster management has some issues. We can use my cluster as an example to check how to debug.
root@liugya-master-fx9nn:/home/cloudusr# kubectl get pods -n openstack-provider-system
NAME                                     READY   STATUS    RESTARTS   AGE
clusterapi-controllers-cdf99445c-lfxhg   1/1     Running   0          32h
root@liugya-master-fx9nn:/home/cloudusr# kubectl logs -f clusterapi-controllers-cdf99445c-lfxhg -n openstack-provider-system
I0402 05:30:44.926979       1 main.go:73] Initializing Dependencies.
W0402 05:30:44.928905       1 controller.go:58] environment variable NODE_NAME is not set, this controller will not protect against deleting its own machine
2019/04/02 05:30:44 Starting the Cmd.
I0402 05:30:45.130286       1 controller.go:114] Running reconcile Machine for liugya-master-fx9nn
I0402 05:30:45.130359       1 controller.go:89] Running reconcile Cluster for test1
I0402 05:30:45.130376       1 controller.go:127] reconciling cluster object test1 triggers idempotent reconcile.
I0402 05:30:45.130384       1 actuator.go:34] Reconciling cluster test1.
I0402 05:30:46.034994       1 controller.go:173] Reconciling machine object liugya-master-fx9nn triggers idempotent update.
I0402 05:30:46.124564       1 networkservice.go:52] Reconciling network components for cluster default/test1
I0402 05:30:46.124608       1 secgroupservice.go:71] Reconciling security groups for cluster default/test1
I0402 05:30:46.126950       1 controller.go:114] Running reconcile Machine for liugya-node-qknd7
I0402 05:30:46.229409       1 controller.go:114] Running reconcile Machine for liugya-node-qknd7
I0402 05:30:46.325294       1 controller.go:89] Running reconcile Cluster for test1
I0402 05:30:46.325329       1 controller.go:127] reconciling cluster object test1 triggers idempotent reconcile.
I0402 05:30:46.325338       1 actuator.go:34] Reconciling cluster test1.
I0402 05:30:47.008618       1 controller.go:184] Reconciling machine object liugya-node-qknd7 triggers idempotent create.
I0402 05:30:47.080219       1 networkservice.go:52] Reconciling network components for cluster default/test1
I0402 05:30:47.080247       1 secgroupservice.go:71] Reconciling security groups for cluster default/test1
I0402 05:30:48.360307       1 actuator.go:132] Creating bootstrap token
E0402 05:31:21.794720       1 actuator.go:319] Machine error liugya-node-qknd7: Associate floatingIP err: Resource not found
W0402 05:31:21.795091       1 controller.go:186] unable to create machine liugya-node-qknd7: Associate floatingIP err: Resource not found
I0402 05:31:22.795322       1 controller.go:114] Running reconcile Machine for liugya-node-qknd7
I0402 05:31:23.290910       1 controller.go:173] Reconciling machine object liugya-node-qknd7 triggers idempotent update.
I0402 05:31:24.142941       1 actuator.go:217] Populating current state for boostrap machine liugya-node-qknd7
I0402 05:31:26.224401       1 controller.go:114] Running reconcile Machine for liugya-node-qknd7
I0402 05:31:27.652795       1 controller.go:173] Reconciling machine object liugya-node-qknd7 triggers idempotent update.
I0402 05:31:28.324527       1 actuator.go:217] Populating current state for boostrap machine liugya-node-qknd7
I0402 05:31:29.224497       1 controller.go:114] Running reconcile Machine for liugya-node-qknd7
Finally, you can check the /var/log/cloud-init-output.log file to get more details on the post-install process. OpenStack uses cloud-init to run user-data to do some post-install work for your provisioned VM, that will then do some installation work for Kubernetes, such as apt-get update or installing Docker. We can always check the cloud-init log to see the error logs for the VM post installationm, which will install Kubernetes via kubeadm.
Cluster API plans for the future
The Cluster API just released 0.1.0, and it is still in very early stages, but we are glad to see that it is now adopted by many cloud providers like AWS, Azure, GCE, and OpenStack. The Cluster API community is still working on defining the goals, requirements and use cases for Cluster API post-v1alpha. When that is complete, we’ll be diving more into the design changes required to meet those adjusted goals, requirements, and use cases.
If you have any comments or suggestions for Cluster API, please do not hesitate to post it to the Google docs.
#kubernetes #devops #docker