Learn Kubernetes: A Detailed Guide to Orchestrating Containers
Why are banks paying me big bucks for something as simple as Kubernetes? When anybody — anybody can learn in under three hours?
If you doubt me, I challenge you to give it a try! By the end of this article, you will be able to run a Microservice based application on a Kubernetes Cluster. And I guarantee this because it’s how I introduce our clients to Kubernetes.
What does this guide do differently from the other resources, Rinor?
Quite a lot! Most guides start with the simple stuff: Kubernetes concepts and and kubectl commands. These guides assume the reader knows about application development, Microservices, and Docker containers.
In this Article we will go from :
- Running a Microservice based application on your computer.
- Building container images for each service of the Microservice application.
- Introduction to Kubernetes. Deploying a Microservice based application into a Kubernetes Managed Cluster.
The gradual build up provides the depth required for a mere mortal being to grasp the simplicity of Kubernetes. Yes Kubernetes is simple when you know the context it is used in. Without further ado lets see what we will build.
Application Demo
The application has one functionality. It takes one sentence as input. Using Text Analysis, calculates the emotion of the sentence.
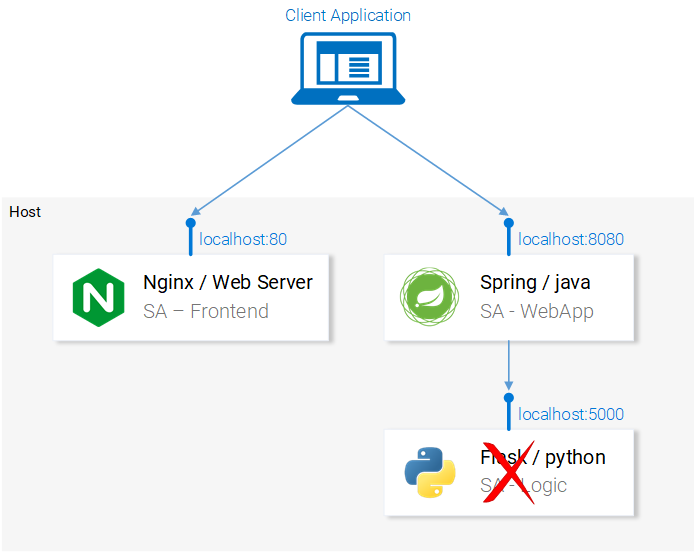
From the technical perspective, the application consists of three microservices. Each has one specific functionality:
- SA-Frontend: a Nginx web server that serves our ReactJS staticfiles.
- SA-WebApp: a Java Web Application that handles requests from the frontend.
- SA-Logic: a python application that performs Sentiment Analysis.
It’s important to know that Microservices don’t live in isolation, they enable “separation of concerns” but they still have to interact with each other.
This interaction is best illustrated by showing how the data flows between them:
- Running a Microservice based application on your computer.
- Building container images for each service of the Microservice application.
- Introduction to Kubernetes. Deploying a Microservice based application into a Kubernetes Managed Cluster.
The code for all of these applications can be found in this repository. I recommend cloning it immediately because we are going to build amazing things together.
1. Running a Microservice based application on your computer
We need to start up all three services. Let’s get started with the most attractive one, the front-end application.
Setting up React for Local Development
To start the React application you need to have NodeJS and NPM installed on your computer. After installing those navigate with your Terminal to the directory sa-frontend. Type the following command:
npm install
This downloads all the Javascript dependencies of the React application and places them in the folder node_modules. (Dependencies are defined in the package.json file). After all dependencies are resolved execute the next command:
npm start
That’s it! We started our react application and by default you can access it on localhost:3000. Feel free to modify the code and see the effects immediately on the browser. That is made possible using Hot Module Replacement. This makes front end development a breeze!
Making Our React App Production Ready
For production we need to build our application into static files and serve them using a web server.
To build the React application navigate in your terminal to the sa-frontend directory. Then execute the following command:
npm run build
This generates a folder named build in your project tree. This folder contains all the static files needed for our ReactJS application.
Serving static files with Nginx
Install and start the Nginx WebServer (how to). Then move the contents of the sa-frontend/build folder to [your_nginx_installation_dir]/html.
This way the generated index.html file will be accessible in [your_nginx_installation_dir]/html/index.html. This is the default file that Nginx serves.
By default the Nginx WebServer listens on port 80. You can specify a different port by updating server.listen property in the file [your_nginx_installation_dir]/conf/nginx.conf.
Open your browser and hit the endpoint localhost:80, see the ReactJS application appear.

Typing in the field: “Type your sentence.” and pressing the button Send will fail with a 404 error (You can check it in your browser console). But why that? Let’s inspect the code.
Inspecting the Code
In the file App.js we can see that pressing the Send button triggers the analyzeSentence method. The code for this method is shown below. (Each line that is commented with #Number will be explained below the script):
analyzeSentence() {
    fetch('http://localhost:8080/sentiment', {  // #1
        method: 'POST',
        headers: {
            'Content-Type': 'application/json'
        },
        body: JSON.stringify({
                       sentence: this.textField.getValue()})// #2
    })
        .then(response => response.json())
        .then(data => this.setState(data));  // #3
}
#1: URL at which a POST call is made. (An application should be listening for calls at that URL).
#2: The Request body sent to that application as displayed below:
{
    sentence: “I like yogobella!”
}
#3: The response updates the component state. This triggers a re-render of the component. If we received the data, (i.e. the JSON object containing the typed sentence and the polarity) we would display the component polarityComponent because the condition would be fulfilled and we would define the component:
const polarityComponent = this.state.polarity !== undefined ?
    <Polarity sentence={this.state.sentence}
              polarity={this.state.polarity}/> :
    null;
Everything seems correct. But what are we missing? If you guessed that we didn’t set up anything to listen on localhost:8080, then you are correct! We must start our Spring Web application to listen on that port!
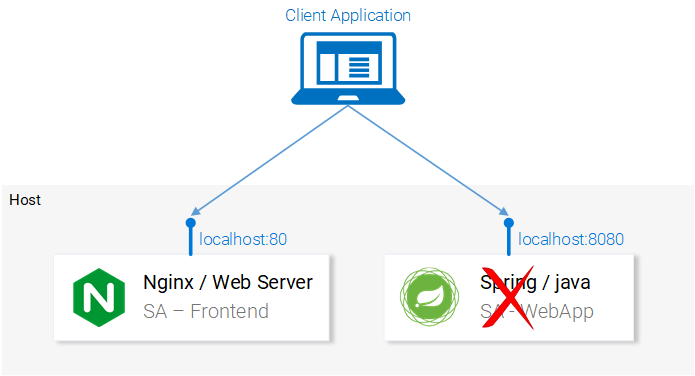
Setting up the Spring Web Application
To start up the Spring application you need to have JDK8 and Maven installed. (their environment variables need to be set up as well). After installing those you can continue to the next part.
Packaging the Application into a Jar
Navigate in your Terminal to the directory sa-webapp and type the following command:
mvn install
This will generate a folder named target, in the directory sa-webapp. In the folder target we have our Java application packaged as a jar: ‘sentiment-analysis-web-0.0.1-SNAPSHOT.jar’
Starting our Java Application
Navigate to the target directory and start the application with the command:
java -jar sentiment-analysis-web-0.0.1-SNAPSHOT.jar
Darn… We got an error. Our application fails on startup and our only lead is the exception in the stack trace:
Error creating bean with name 'sentimentController': Injection of autowired dependencies failed; nested exception is java.lang.IllegalArgumentException: Could not resolve placeholder 'sa.logic.api.url' in value "${sa.logic.api.url}"
The important information here is the placeholder sa.logic.api.url in the SentimentController. Let’s check that out!
Inspecting the Code
@CrossOrigin(origins = "*")
@RestController
public class SentimentController {

    @Value("${sa.logic.api.url}")    // #1
    private String saLogicApiUrl;

    @PostMapping("/sentiment")
    public SentimentDto sentimentAnalysis(
        @RequestBody SentenceDto sentenceDto)
    {
        RestTemplate restTemplate = new RestTemplate();

        return restTemplate.postForEntity(
                saLogicApiUrl + "/analyse/sentiment",    // #2
                sentenceDto, SentimentDto.class)
                .getBody();
    }
}
- Running a Microservice based application on your computer.
- Building container images for each service of the Microservice application.
- Introduction to Kubernetes. Deploying a Microservice based application into a Kubernetes Managed Cluster.
Defining the Property
In Spring the default property source is application.properties. (Located in sa-webapp/src/main/resources). But that’s not the only means to define a property, it can be done with the earlier command as well:
java -jar sentiment-analysis-web-0.0.1-SNAPSHOT.jar
     --sa.logic.api.url=WHAT.IS.THE.SA.LOGIC.API.URL
The property should be initialized with the value that defines where our Python application is running, this way we will let our Spring Web Application know where to forward messages on run time.
To make things simpler let’s decide that we will run the python application on localhost:5000. Lets just not forget it!
Run the below command and we are ready to move to the last service the python application.
java -jar sentiment-analysis-web-0.0.1-SNAPSHOT.jar
     --sa.logic.api.url=http://localhost:5000
Setting up the Python Application
To start the Python application, we need to have Python3 and Pip installed. (Their environment variables need to be set up as well).
Installing Dependencies
Navigate in the Terminal to the directory sa-logic/sa (repo)and type the following command:
python -m pip install -r requirements.txt
python -m textblob.download_corpora
Starting the app
After using Pip to install the dependencies we are ready to start the application by executing the following command:
python sentiment_analysis.py
* Running on http://0.0.0.0:5000/ (Press CTRL+C to quit)
This means that our application is running and listening for HTTP Requests on port 5000 on localhost.
Inspecting the Code
Let’s investigate the code to understand what is happening in the SA Logic python application.
from textblob import TextBlob
from flask import Flask, request, jsonify

app = Flask(__name__)                                   #1

@app.route("/analyse/sentiment", methods=['POST'])      #2
def analyse_sentiment():
    sentence = request.get_json()['sentence']           #3
    polarity = TextBlob(sentence).sentences[0].polarity #4
    return jsonify(                                     #5
        sentence=sentence,
        polarity=polarity
    )

if __name__ == '__main__':
    app.run(host='0.0.0.0', port=5000)                #6
- Running a Microservice based application on your computer.
- Building container images for each service of the Microservice application.
- Introduction to Kubernetes. Deploying a Microservice based application into a Kubernetes Managed Cluster.
The services are set up to communicate with each other. Re-open the frontend in localhost:80 and give them a try before continuing on!

In the next section, we will go over how to start the services in Docker Containers, as it is a prerequisite to being able to run them in a Kubernetes Cluster.
2. Building container images for each service
Kubernetes is a container orchestrator. Understandably we need containers to be able to orchestrate them. But what are containers? This is best answered from the Documentation at docker.
A container image is a lightweight, stand-alone, executable package of a piece of software that includes everything needed to run it: code, runtime, system tools, system libraries, settings. Available for both Linux and Windows based apps, containerized software will always run the same, regardless of the environment.
It means that containers can run on any computer — even in the production server — with no differences.
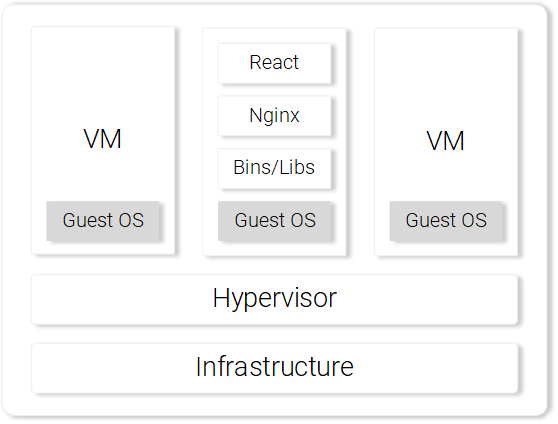
For illustration purposes let’s compare how our React Application would be served using a Virtual Machine vs. a Container.
Serving React static files from a VM
The cons of using a Virtual Machine:
- Running a Microservice based application on your computer.
- Building container images for each service of the Microservice application.
- Introduction to Kubernetes. Deploying a Microservice based application into a Kubernetes Managed Cluster.
Serving React static files from a Container
The pros of using a Container.
- Running a Microservice based application on your computer.
- Building container images for each service of the Microservice application.
- Introduction to Kubernetes. Deploying a Microservice based application into a Kubernetes Managed Cluster.

Those are the most prominent features and benefits of using containers. For more information continue reading on the Docker documentation.
Building the container image for the React App (Docker intro)
The basic building block for a Docker container is the .dockerfile. The Dockerfile starts with a base container image and follows up with a sequence of instructions on how to build a new container image that meets the needs of your application.
Before we get started defining the Dockerfile, let’s remember the steps we took to serve the react static files using nginx:
- Running a Microservice based application on your computer.
- Building container images for each service of the Microservice application.
- Introduction to Kubernetes. Deploying a Microservice based application into a Kubernetes Managed Cluster.
In the next section, you will notice parallels on how creating a Container is similar to what we did during local React setup.
Defining the Dockerfile for SA-Frontend
The instructions in the Dockerfile for the SA-Frontend is only a two-step task. That is because the Nginx Team provided us with a base image for Nginx, which we will use to build on top of. The two steps are:
- Running a Microservice based application on your computer.
- Building container images for each service of the Microservice application.
- Introduction to Kubernetes. Deploying a Microservice based application into a Kubernetes Managed Cluster.
Converted into a Dockerfile it looks like:
FROM nginx
COPY build /usr/share/nginx/html
Isn’t it amazing, it’s even humanly readable, let’s recapitulate:
Start from the nginx image. (Whatever the guys did over there). Copy the build directory to the nginx/html directory in the image. That’s it!
You may be wondering, how did I know where to copy the build files? i.e. /usr/share/nginx/html. Quite simple: It was documented in the nginx image in Docker Hub.
Building and Pushing the container
Before we can push our image, we need a Container Registry to host our images. Docker Hub is a free cloud container service that we will use for this demonstration. You have three tasks before continuing:
- Running a Microservice based application on your computer.
- Building container images for each service of the Microservice application.
- Introduction to Kubernetes. Deploying a Microservice based application into a Kubernetes Managed Cluster.
docker login -u="$DOCKER_USERNAME" -p="$DOCKER_PASSWORD"
After completing the above tasks navigate to the directory sa-frontend. Then execute the below command (replace $DOCKER_USER_ID with your docker hub username. For e.g. rinormaloku/sentiment-analysis-frontend)
docker build -f Dockerfile -t $DOCKER_USER_ID/sentiment-analysis-frontend .
We can drop -f Dockerfile because we are already in the directory containing the Dockerfile.
To push the image, use the docker push command:
docker push $DOCKER_USER_ID/sentiment-analysis-frontend
Verify in your docker hub repository that the image was pushed successfully.
Running the container
Now the image in $DOCKER_USER_ID/sentiment-analysis-frontend can be pulled and run by anyone:
docker pull $DOCKER_USER_ID/sentiment-analysis-frontend
docker run -d -p 80:80 $DOCKER_USER_ID/sentiment-analysis-frontend
Our Docker container is running!
Before we continue lets elaborate the 80:80 which I find confusing:
- SA-Frontend: a Nginx web server that serves our ReactJS staticfiles.
- SA-WebApp: a Java Web Application that handles requests from the frontend.
- SA-Logic: a python application that performs Sentiment Analysis.
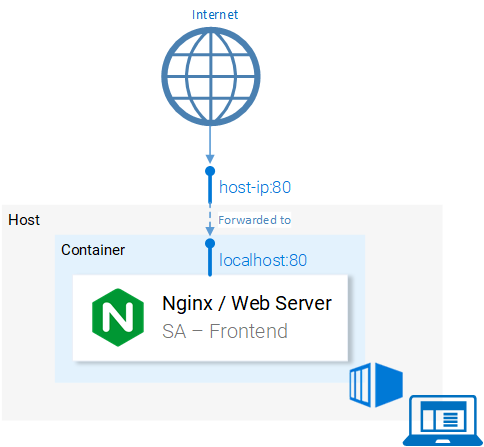
It maps from to . Meaning that calls to host port 80 should be mapped to the port 80 of the container, as shown in figure 9.
Because the port was run in the host (your computer) in port 80 it should be accessible on the localhost:80. If you do not have native docker support, you can open the application in :80. To find your docker-machine ip execute docker-machine ip
Give it a try! You should be able to access the react application in that endpoint.
The Dockerignore
We saw earlier that building the image for SA-Frontend was slow, pardon me, Extremely slow. That was the case because of the build context that had to be sent to the Docker Deamon. In more detail, the build context directory is defined by the last argument in the docker build command (the trailing dot), which specifies the build context. And in our case, it included the following folders:
sa-frontend:
|   .dockerignore
|   Dockerfile
|   package.json
|   README.md
+---build
+---node_modules
+---public
\---src
But the only data we need is in the build folder. Uploading anything else will be a waste of time. We can improve our build time by dropping the other directories. That’s where .dockerignore comes into play. For you it will be familiar because it’s like .gitignore, i.e. add all directories that you want to ignore in the .dockerignore file, as shown below:
node_modules
src
public
The .dockerignore file should be in the same folder as the Dockerfile. Now building the image takes only seconds.
Let’s continue with the Java Application.
Building the container image for the Java Application
Guess what! You learned almost everything about creating container images! That’s why this part is extremely short.
Open the Dockerfile in sa-webapp, and you will find only two new keywords:
ENV SA_LOGIC_API_URL http://localhost:5000
…
EXPOSE 8080
The keyword ENV declares an Environment Variable inside the docker container. This will enable us to provide the URL for the Sentiment Analysis API when starting the Container.
Additionally, the keyword EXPOSE exposes a port that we want to access later on. But hey!!! We didn’t do that in the Dockerfile in SA-Frontend, good catch! This is for documentation purposes only, in other words it will serve as information to the person reading the Dockerfile.
You should be familiar with building and pushing the container image. If any difficulties arise read the README.md file in sa-webapp directory.
Building the container image for the Python Application
In the Dockerfile in sa-logic there are no new keywords. Now you can call yourself a Docker-Master 😉.
For building and pushing the container image read the the README.md in sa-logic directory.
Testing the Container-ized Application
Can you trust something that you didn’t test? Neither can I. Let’s give these containers a test.
- Running a Microservice based application on your computer.
- Building container images for each service of the Microservice application.
- Introduction to Kubernetes. Deploying a Microservice based application into a Kubernetes Managed Cluster.
docker run -d -p 5050:5000 $DOCKER_USER_ID/sentiment-analysis-logic
- Run sa-webapp container and configure to listen on port 8080, and additionally we need to change the port in which the python app listens by overriding the environment variable SA_LOGIC_API_URL.
$ docker run -d -p 8080:8080 -e SA_LOGIC_API_URL='http://<container_ip or docker machine ip>:5000' $DOCKER_USER_ID/sentiment-analysis-web-app
Checkout the README on how to get the container ip or docker machine ip.
- Run sa-frontend container:
docker run -d -p 80:80 $DOCKER_USER_ID/sentiment-analysis-frontend
We are done. Open your browser on localhost:80.
Attention: If you changed the port for the sa-webapp, or if you are using docker-machine ip, you need to update App.js file in sa-frontend in the method analyzeSentence to fetch from the new IP or Port. Afterwards you need to build, and use the updated image.
Brain Teaser — Why Kubernetes?
In this section, we learned about the Dockerfile, how to use it to build an image, and the commands to push it to the Docker registry. Additionally, we investigated how to reduce the number of files sent to the build context by ignoring useless files. And in the end, we got the application running from containers. So why Kubernetes? We will investigate deeper into that in the next article, but I want to leave you a brainteaser.
- SA-Frontend: a Nginx web server that serves our ReactJS staticfiles.
- SA-WebApp: a Java Web Application that handles requests from the frontend.
- SA-Logic: a python application that performs Sentiment Analysis.
Introduction to Kubernetes
I promise and I am not exaggerating that by the end of the article you will ask yourself “Why don’t we call it Supernetes?”.
If you followed this article from the beginning we covered so much ground and so much knowledge. You might worry that this will be the hardest part, but, it is the simplest. The only reason why learning Kubernetes is daunting is because of the “everything else” and we covered that one so well.
What is Kubernetes
After we started our Microservices from containers we had one question, let’s elaborate it further in a Q&A format:
Q: How do we scale containers?
A: We spin up another one.
Q: How do we share the load between them? What if the Server is already used to the maximum and we need another server for our container? How do we calculate the best hardware utilization?
A: Ahm… Ermm… (Let me google).
Q: Rolling out updates without breaking anything? And if we do, how can we go back to the working version.
Kubernetes solves all these questions (and more!). My attempt to reduce Kubernetes in one sentence would be: “Kubernetes is a Container Orchestrator, that abstracts the underlying infrastructure. (Where the containers are run)”.
We have a faint idea about Container Orchestration. We will see it in practice in the continuation of this article, but it’s the first time that we are reading about “abstracts the underlying infrastructure”. So let’s take a close-up shot, at this one.
Abstracting the underlying infrastructure
Kubernetes abstracts the underlying infrastructure by providing us with a simple API to which we can send requests. Those requests prompt Kubernetes to meet them at its best of capabilities. For example, it is as simple as requesting “Kubernetes spin up 4 containers of the image x”. Then Kubernetes will find under-utilized nodes in which it will spin up the new containers (see Fig. 12.).
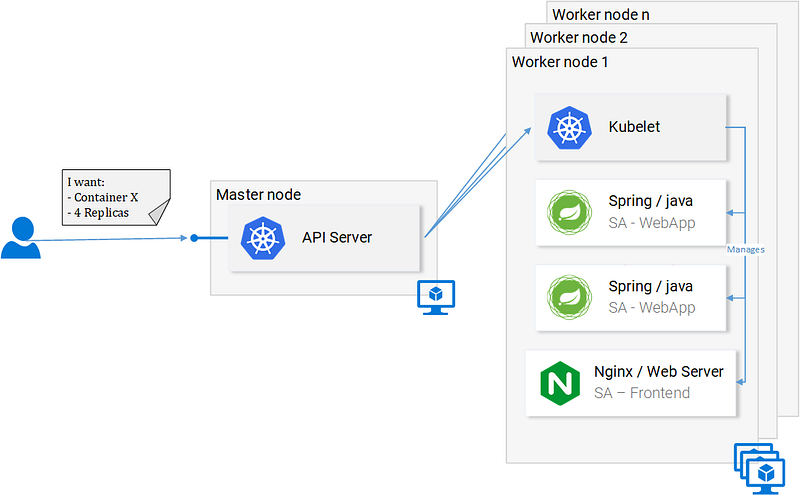
What does this mean for the developer? That he doesn’t have to care about the number of nodes, where containers are started and how they communicate. He doesn’t deal with hardware optimization or worry about nodes going down (and they will go down Murphy’s Law), because new nodes can be added to the Kubernetes cluster. In the meantime Kubernetes will spin up the containers in the other nodes that are still running. It does this at the best possible capabilities.
In figure 12 we can see a couple of new things:
- SA-Frontend: a Nginx web server that serves our ReactJS staticfiles.
- SA-WebApp: a Java Web Application that handles requests from the frontend.
- SA-Logic: a python application that performs Sentiment Analysis.
And we will stop here, as diving deeper will just loosen our focus and we can always do that later, there are useful resources to learn from, like the official documentation (the hard way) or reading the amazing book Kubernetes in Action, by Marko Lukša.
Standardizing the Cloud Service Providers
Another strong point that Kubernetes drives home, is that it standardizes the Cloud Service Providers (CSPs). This is a bold statement, but let’s elaborate with an example:
– An expert in Azure, Google Cloud Platform or some other CSP ends up working on a project in an entirely new CSP, and he has no experience working with it. This can have many consequences, to name a few: he can miss the deadline; the company might need to hire more resources, and so on.
In contrast, with Kubernetes this isn’t a problem at all. Because you would be executing the same commands to the API Server no matter what CSP. You on a declarative manner request from the API Server what you want. Kubernetes abstracts away and implements the how for the CSP in question.
Give it a second to sink in — this is extremely powerful feature. For the company it means that they are not tied up to a CSP. They calculate their expenses on another CSP, and they move on. They still will have the expertise, they still will have the resources, and they can do that for cheaper!
All that said, in the next section we will put Kubernetes in Practice.
Kubernetes in Practice — Pods
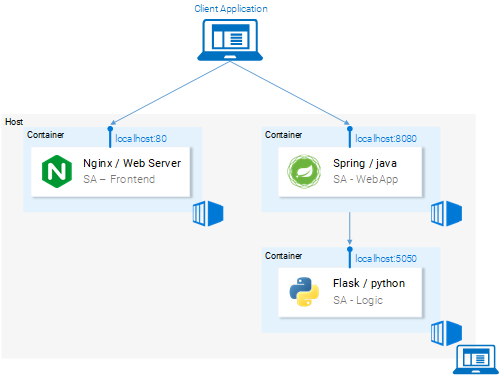
We set up the Microservices to run in containers and it was a cumbersome process, but it worked. We also mentioned that this solution is not scalable or resilient and that Kubernetes resolves these issues. In continuation of this article, we will migrate our services toward the end result as shown in figure 13, where the Containers are orchestrated by Kubernetes.
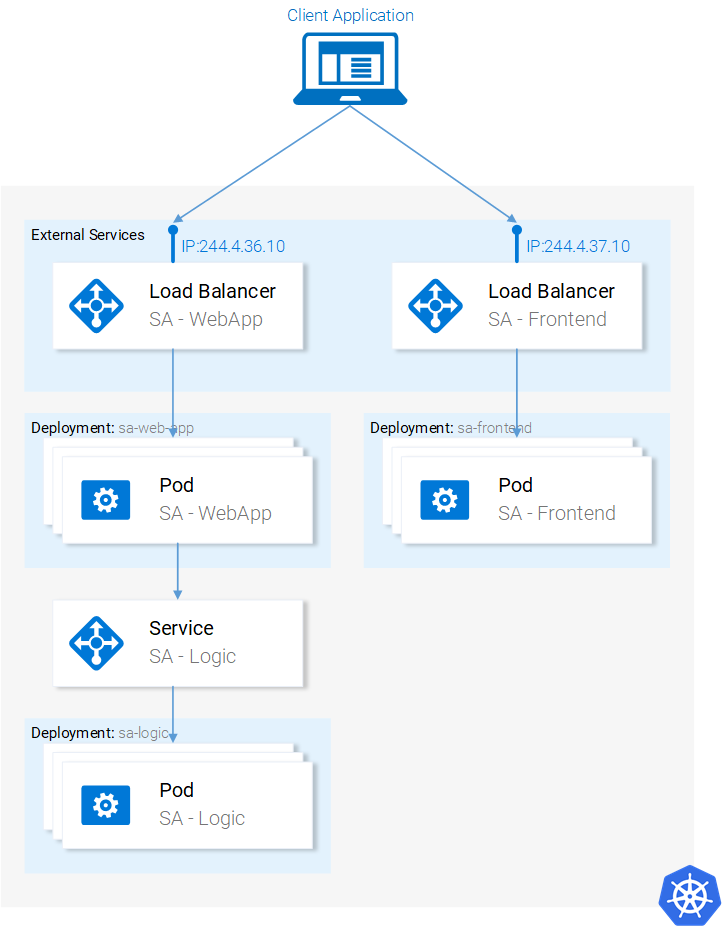
In this article, we will use Minikube for debugging locally, though everything that will be presented works as well in Azure and in Google Cloud Platform.
Installing and Starting Minikube
Follow official documentation for installing Minikube. During Minikube installation, you will also install Kubectl. This is a client to make requests to the Kubernetes API Server.
To start Minikube execute the command minikube start and after it is completed, execute kubectl get nodes and you should get the following output
kubectl get nodes
NAME       STATUS    ROLES     AGE       VERSION
minikube   Ready     <none>    11m       v1.9.0
Minikube provides us with a Kubernetes Cluster that has only one node, but remember we do not care how many Nodes there are, Kubernetes abstracts that away, and for us to learn Kubernetes that is of no importance. In the next section, we will start with our first Kubernetes resource [DRUM ROLLS] the Pod.
Pods
I love containers, and by now you love containers too. So why did Kubernetes decide to give us Pods as the smallest deployable compute unit? What does a pod do? Pods can be composed of one or even a group of containers that share the same execution environment.
But do we really need to run two containers in one pod? Erm… Usually, you run only one container and that’s what we will do in our examples. But for cases when for e.g. two containers need to share volumes, or they communicate with each other using inter-process communication or are otherwise tightly coupled, then that’s made possible using Pods. Another feature that Pods make possible is that we are not tied to Docker containers, if desired we can use other technologies for e.g. Rkt.
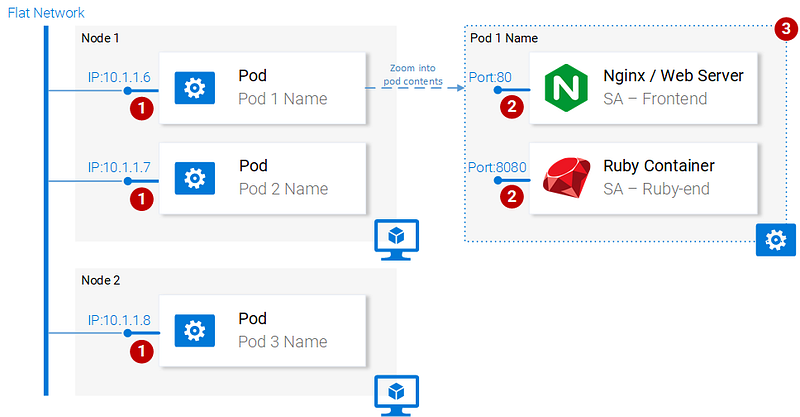
To summarize, the main properties of Pods are (also shown in figure 14):
- Running a Microservice based application on your computer.
- Building container images for each service of the Microservice application.
- Introduction to Kubernetes. Deploying a Microservice based application into a Kubernetes Managed Cluster.
*Containers have their own isolated filesystems, though they are able to share data using the Kubernetes resource Volumes.
This is more than enough information for us to continue, but to satisfy your curiosity check out the official documentation.
Pod definition
Below we have the manifest file for our first pod sa-frontend, and then below we explain all the points.
apiVersion: v1
kind: Pod                                            # 1
metadata:
  name: sa-frontend                                  # 2
spec:                                                # 3
  containers:
    - image: rinormaloku/sentiment-analysis-frontend # 4
      name: sa-frontend                              # 5
      ports:
        - containerPort: 80                          # 6
- Running a Microservice based application on your computer.
- Building container images for each service of the Microservice application.
- Introduction to Kubernetes. Deploying a Microservice based application into a Kubernetes Managed Cluster.
Creating the SA Frontend pod
You can find the file for the above pod definition in resource-manifests/**sa-frontend-pod.yaml.** You either navigate in your terminal to that folder or you would have to provide the full location in the command line. Then execute the command:
kubectl create -f sa-frontend-pod.yaml
pod "sa-frontend" created
To check if the Pod is running execute the following command:
kubectl get pods
NAME                          READY     STATUS    RESTARTS   AGE
sa-frontend                   1/1       Running   0          7s
If it is still in ContainerCreating you can execute the above command with the argument --watch to update the information when the Pod is in Running State.
Accessing the application externally
To access the application externally we create a Kubernetes resource of type Service, that will be our next article, which is the proper implementation, but for quick debugging we have another option, and that is port-forwarding:
kubectl port-forward sa-frontend 88:80
Forwarding from 127.0.0.1:88 -> 80
Open your browser in 127.0.0.1:88 and you will get to the react application.
The wrong way to scale up
We said that one of the Kubernetes main features was scalability, to prove this let’s get another pod running. To do so create another pod resource, with the following definition:
apiVersion: v1
kind: Pod
metadata:
  name: sa-frontend2      # The only change
spec:
  containers:
    - image: rinormaloku/sentiment-analysis-frontend
      name: sa-frontend
      ports:
        - containerPort: 80
Create the new pod by executing the following command:
kubectl create -f sa-frontend-pod2.yaml
pod "sa-frontend2" created
Verify that the second pod is running by executing:
kubectl get pods
NAME                          READY     STATUS    RESTARTS   AGE
sa-frontend                   1/1       Running   0          7s
sa-frontend2                  1/1       Running   0          7s
Now we have two pods running!
Attention: this is not the final solution, and it has many flaws. We will improve this in the section for another Kubernetes resource Deployments.
Pod Summary
The Nginx web server with the static files is running inside two different pods. Now we have two questions:
- SA-Frontend: a Nginx web server that serves our ReactJS staticfiles.
- SA-WebApp: a Java Web Application that handles requests from the frontend.
- SA-Logic: a python application that performs Sentiment Analysis.

Kubernetes provides us the Services resource. Let’s jump right into it, in the next section.
Kubernetes in Practice — Services
The Kubernetes Service resource acts as the entry point to a set of pods that provide the same functional service. This resource does the heavy lifting, of discovering services and load balancing between them as shown in figure 16.
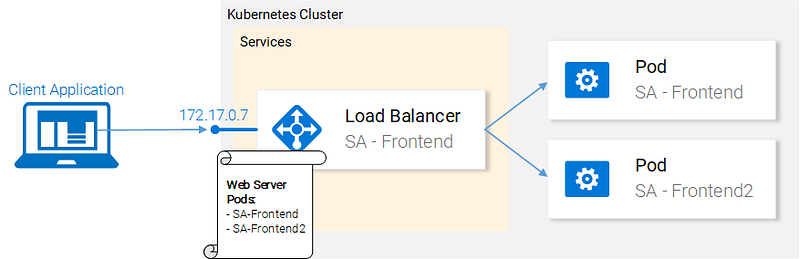
In our Kubernetes cluster, we will have pods with different functional services. (The frontend, the Spring WebApp and the Flask Python application). So the question arises how does a service know which pods to target? I.e. how does it generate the list of the endpoints for the pods?
This is done using Labels, and it is a two-step process:
- Running a Microservice based application on your computer.
- Building container images for each service of the Microservice application.
- Introduction to Kubernetes. Deploying a Microservice based application into a Kubernetes Managed Cluster.
This is much simpler visually:
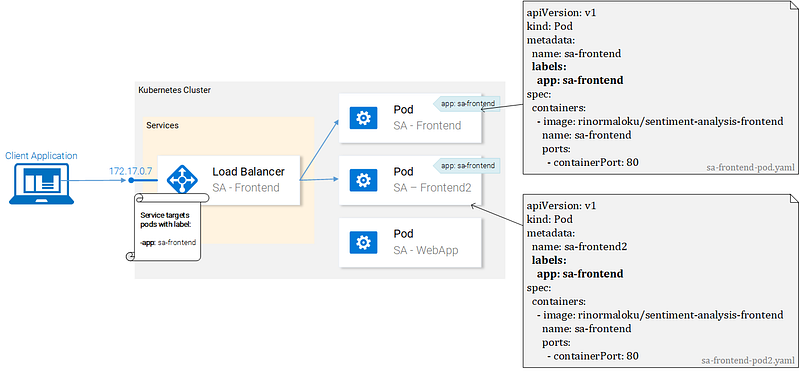
We can see that pods are labeled with “app: sa-frontend” and the service is targeting pods with that label.
Labels
Labels provide a simple method for organizing your Kubernetes Resources. They represent a key-value pair and can be applied to every resource. Modify the manifests for the pods to match the example shown earlier in figure 17.
Save the files after completing the changes, and apply them with the following command:
kubectl get pod -l app=sa-frontend
NAME           READY     STATUS    RESTARTS   AGE
sa-frontend    1/1       Running   0          2h
sa-frontend2   1/1       Running   0          2h
We got a warning (apply instead of create, roger that). In the second line, we see that the pods “sa-frontend” and “sa-frontend2” are configured. We can verify that the pods were labeled by filtering the pods that we want to display:
kubectl get pod -l app=sa-frontend
NAME           READY     STATUS    RESTARTS   AGE
sa-frontend    1/1       Running   0          2h
sa-frontend2   1/1       Running   0          2h
Another way to verify that our pods are labeled is by appending the flag --show-labels to the above command. This will display all the labels for each pod.
Great! Our pods are labeled and we are ready to target them with our Service. Lets get started defining the Service of type LoadBalancer shown in Fig. 18.
Service definition
The YAML definition of the Loadbalancer Service is shown below:
apiVersion: v1
kind: Service              # 1
metadata:
  name: sa-frontend-lb
spec:
  type: LoadBalancer       # 2
  ports:
  - port: 80               # 3
    protocol: TCP          # 4
    targetPort: 80         # 5
  selector:                # 6
    app: sa-frontend       # 7
- Running a Microservice based application on your computer.
- Building container images for each service of the Microservice application.
- Introduction to Kubernetes. Deploying a Microservice based application into a Kubernetes Managed Cluster.
To create the service execute the following command:
kubectl create -f service-sa-frontend-lb.yaml
service "sa-frontend-lb" created
You can check out the state of the service by executing the following command:
kubectl get svc
NAME             TYPE           CLUSTER-IP      EXTERNAL-IP   PORT(S)        AGE
sa-frontend-lb   LoadBalancer   10.101.244.40   <pending>     80:30708/TCP   7m
The External-IP is in pending state (and don’t wait, as it’s not going to change). This is only because we are using Minikube. If we would have executed this in a cloud provider like Azure or GCP, we would get a Public IP, which makes our services worldwide accessible.
Despite that, Minikube doesn’t let us hanging it provides a useful command for local debugging, execute the following command:
minikube service sa-frontend-lb
Opening kubernetes service default/sa-frontend-lb in default browser...
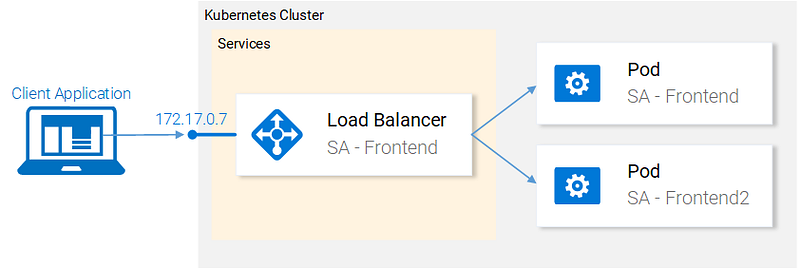
This opens your browser pointing to the services IP. After the Service receives the request, it will forward the call to one of the pods (which one doesn’t matter). This abstraction enables us to see and act with the numerous pods as one unit, using the Service as an entry point.
Service Summary
In this section, we covered labeling resources, using those as selectors in Services, and we defined and created a LoadBalancer service. This fulfills our requirements to scale the application (just add new labeled pods) and to Load balance between the pods, using the service as an entry point.
Kubernetes in Practice — Deployments
Kubernetes Deployments help us with one constant in the life of every application, and that is change. Moreover, the only applications that do not change are the ones that are already dead, and while not, new requirements will come in, more code will be shipped, it will be packaged, and deployed. And on each step of this process, mistakes can be made.
The Deployment resource automates the process of moving from one version of the application to the next, with zero downtime and in case of failures, it enables us to quickly roll back to the previous version.
Deployments in Practice
Currently, we have two pods and a service exposing them and load balancing between them (see Fig. 19.). We mentioned that deploying the pods separately is far from perfect. It requires separately managing each (create, update, delete and monitoring their health). Quick updates and fast rollbacks are out of the question! This is not acceptable and the Deployments Kubernetes resource solves each of these issues.
Before we continue let’s state what we want to achieve, as it will provide us with the overview that enables us to understand the manifest definition for the deployment resource. What we want is:
- Running a Microservice based application on your computer.
- Building container images for each service of the Microservice application.
- Introduction to Kubernetes. Deploying a Microservice based application into a Kubernetes Managed Cluster.
In the next section, we will translate the requirements into a Deployment definition.
Deployment definition
The YAML resource definition that achieves all the above-mentioned points:
apiVersion: extensions/v1beta1
kind: Deployment                                          # 1
metadata:
  name: sa-frontend
spec:
  replicas: 2                                             # 2
  minReadySeconds: 15
  strategy:
    type: RollingUpdate                                   # 3
    rollingUpdate:
      maxUnavailable: 1                                   # 4
      maxSurge: 1                                         # 5
  template:                                               # 6
    metadata:
      labels:
        app: sa-frontend                                  # 7
    spec:
      containers:
        - image: rinormaloku/sentiment-analysis-frontend
          imagePullPolicy: Always                         # 8
          name: sa-frontend
          ports:
            - containerPort: 80
- Running a Microservice based application on your computer.
- Building container images for each service of the Microservice application.
- Introduction to Kubernetes. Deploying a Microservice based application into a Kubernetes Managed Cluster.
Honestly, that wall of text got even me confused, let’s just get started with the example:
kubectl apply -f sa-frontend-deployment.yaml
deployment "sa-frontend" created
As always let’s verify that everything went as planned:
kubectl get pods
NAME                           READY     STATUS    RESTARTS   AGE
sa-frontend                    1/1       Running   0          2d
sa-frontend-5d5987746c-ml6m4   1/1       Running   0          1m
sa-frontend-5d5987746c-mzsgg   1/1       Running   0          1m
sa-frontend2                   1/1       Running   0          2d
We got 4 running pods, two pods created by the Deployment and the other two are the ones we created manually. Delete the ones we created manually using the command kubectl delete pod <pod-name>.
Exercise: Delete one of the pods of the deployment as well and see what happens. Think for the reason before reading the explanation below.
Explanation: Deleting one pod made the Deployment notice that the current state (1 pod running) is different from the desired state (2 pods running) so it started another pod.
So what was so good about Deployments, besides keeping the desired state? Let’s get started with the benefits.
Benefit #1: Rolling a Zero-Downtime deployment
Our Product manager came to us with a new requirement, our clients want to have a green button in the frontend. The developers shipped their code and provided us with the only thing we need, the container image rinormaloku/sentiment-analysis-frontend:green. Now it’s our turn, we the DevOps have to roll a Zero-Downtime deployment, Will the hard work pay off? Let’s see that!
Edit the file sa-frontend-deployment.yaml by changing the container image to refer to the new image: rinormaloku/sentiment-analysis-frontend:green. Save the changes as sa-frontend-deployment-green.yaml and execute the following command:
kubectl apply -f sa-frontend-deployment-green.yaml --record
deployment "sa-frontend" configured
We can check the status of the rollout using the following command:
kubectl rollout status deployment sa-frontend
Waiting for rollout to finish: 1 old replicas are pending termination...
Waiting for rollout to finish: 1 old replicas are pending termination...
Waiting for rollout to finish: 1 old replicas are pending termination...
Waiting for rollout to finish: 1 old replicas are pending termination...
Waiting for rollout to finish: 1 old replicas are pending termination...
Waiting for rollout to finish: 1 of 2 updated replicas are available...
deployment "sa-frontend" successfully rolled out
According to the output the deployment was rolled out. It was done in such a fashion that the replicas were replaced one by one. Meaning that our application was always on. Before we move on let’s verify that the update is live.
Verifying the deployment
Let’s see the update live on our browsers. Execute the same command that we used before minikube service sa-frontend-lb, which opens up the browser. We can see that the button was updated.

Behind the scenes of “The RollingUpdate”
After we applied the new deployment, Kubernetes compares the new state with the old one. In our case, the new state requests two pods with the image rinormaloku/sentiment-analysis-frontend:green. This is different from the current state running so it kicks in the RollingUpdate.
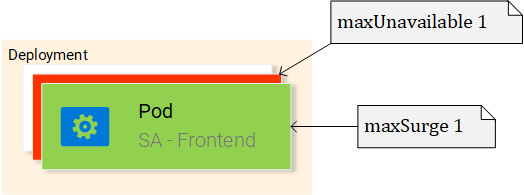
The RollingUpdate acts according to the rules we specified, those being “maxUnavailable: 1″ and “maxSurge: 1″. This means that the deployment can terminate only one pod, and can start only one new pod. This process is repeated until all pods are replaced (see Fig. 21).
Let’s continue with the benefit number 2.
Disclaimer: For entertainment purposes, the next part is written as a novella.
Benefit #2: Rolling back to a previous state
The Product Manager runs into your office and he is having a crisis!
“The application has a critical bug, in PRODUCTION!! Revert back to the previous version immediately” — yells the product manager.
He sees the coolness in you, not twitching one eye. You turn to your beloved terminal and type:
kubectl rollout history deployment sa-frontend
deployments "sa-frontend"
REVISION  CHANGE-CAUSE
1         <none>
2         kubectl.exe apply --filename=sa-frontend-deployment-green.yaml --record=true
You take a short look at the previous deployments. “The last version is buggy, meanwhile the previous version worked perfectly?” — you ask the Product Manager.
“Yes, are you even listening to me!” — screams the product manager.
You ignore him, you know what you have to do, you start typing:
kubectl rollout undo deployment sa-frontend --to-revision=1
deployment "sa-frontend" rolled back
You refresh the page and the change is undone!
The product managers jaw drops open.
You saved the day!
The end!
#kubernetes #docker