Getting Started With ASP.NET Core & Docker
This is a really short tutorial about how you may set up fast and easily a simple .NET applicaction with Docker
So, things you will get from this post will be:
- Having a clearer idea about what is .NET and one approach about how you should start or where you may start
- Learning the basics about Docker to deploy your application
Oh right! then let’s start from the beginning, what is .NET and what is Docker?
.NET
.NET is a free, cross-platform, open source developer platform for building many different types of applications.> .NET is a free, cross-platform, open source developer platform for building many different types of applications.
What about .NET Core? NET Core is the framework that support ASP.NET, is a cross platform, open source re-implementation of the .NET Framework. If you want to know more in depth, I recommend you this.NET Core.
And ASP .NET? makes easy to create MVC Applications. It provides a languange named razor to build views. Basically, allow to insert C# code inside HTML, reducing coding and increasing the productivity.
You can learn more about .NET on the official page: https://dotnet.microsoft.com/learn/dotnet/what-is-dotnet
Docker
.NET is a free, cross-platform, open source developer platform for building many different types of applications.
I really like this definition, you can read more about it on: https://opensource.com/resources/what-docker or you may want to go to the official where you can read about containers as well: https://www.docker.com/
Requirements:
In order to moving forward with this tutorial you will need to have some softwares already installed on your pc, on this links you will find an installation step by step guide for Windows / Linux / MAC Platforms:
If you are able to run these commands in your shell, then you are ready to go!

Ok, let’s put hands on the code:
Open a terminal and create some folders:
mkdir NetCore-Docker
cd NetCore-Docker
mkdir src
cd src
mkdir AspMVC
cd AspMVC
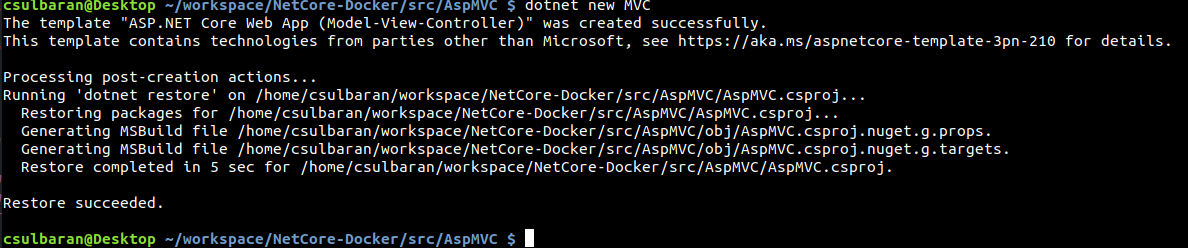
Once you have created this folder tree and have your shell on AspMVC folder we create or .Net Core project:
dotnet new MVC
You should get something like this:
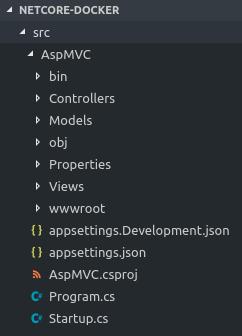
Now we open our project with our prefered text editor, and should have a folder tree similar to this:
At this moment we have already the basic files and structure to start creating an ASP .NET application but it isn’t dockerized, let’s do a few more steps before bring docker to the field.
Let’s run this command from command line:
dotnet publish -o ./publish
You should get something like this:

Now
cd publish
dotnet AspMVC.dll
You will get this:

You can also run this command from AspMVC folder:
dotnet run
And will get:

In your browser you will get a basic view like this either running dotnet run or dotnet AspMVC.dll, and if you have troubles with https just add the exception and it should open:

So basically we are running an ASP .NET app directly from our computer, this is what we want to achieve but without using our local dotnet software, instead, we want to use docker.
Dockerizing our app
In order to understand what we want to do, we have to understand this:
- Having a clearer idea about what is .NET and one approach about how you should start or where you may start
- Learning the basics about Docker to deploy your application
.NET is a free, cross-platform, open source developer platform for building many different types of applications.
- Docker containers
.NET is a free, cross-platform, open source developer platform for building many different types of applications.
So images is what we build and containers is an instance of that build that runs our code, what we want to do is create sucessfully an image that we can use to run an instance of that image, that means a container that will run our code
Let’s start for creating our Dockerfile, at this moment your shell should be located either NetCore-Docker/src/AspMVC/publish or NetCore-Docker/src/AspMVC, we need to go to our root folder, that would be NetCore-Docker
cd ../../../
# Make sure you are in the root directory! ---> NetCore-Docker
# Create new file with the name Dockerfile (extension is not required)
code Dockerfile
Now open a new file (or create) called Dockerfile on my root directory, since i use Visual Studio Code:

On this file we are going to copy this:
FROM microsoft/dotnet:sdk AS build-env
WORKDIR /app

# Copy csproj and restore as distinct layers
COPY ./src/AspMVC/*.csproj ./
RUN dotnet restore

# Copy everything else and build
COPY ./src/AspMVC ./
RUN dotnet publish -c Release -o out

# Build runtime image
FROM microsoft/dotnet:aspnetcore-runtime
WORKDIR /app
COPY --from=build-env /app/out .
ENTRYPOINT ["dotnet", "AspMVC.dll"]
I must say this is the way that actually propose microsoft to dockerize an app, you can check it here: https://docs.microsoft.com/en-us/dotnet/core/docker/build-docker-netcore-container
But there is another way, that could result a little bit easier to understand:
FROM microsoft/dotnet:latest

WORKDIR /app

COPY ./AspMVC/publish .

ENTRYPOINT ["dotnet", "AspMVC.dll"]
If you want to know what means every reserved word and how to use it, please check: https://docs.docker.com/engine/reference/builder/
So once we got our file ready we go back to our console. Here we create our image
docker build -t myapp .

You should be getting an input similar to that, once it has finished, we run these commands, this will create an instance of our image, that means, create our container that will run our code and the second command will list us what containers we got running in our computer:
docker run -d -p 8080:80 --name MyNetApp myapp
docker ps
If everything is ok, you should be getting something similar to this:

That means our app is already working and dockerized, and we can check it writing in our browser http://localhost:8080 and we should get the same Home Page, that we got earlier running our app directly from our dotnet installed directly in our pc

Please note that when we run
docker run -d -p 8080:80 --name MyNetApp myapp
It has a few parameters
When we run
docker ps
We are listing all our running containers.
If you want to list all your images, you can just type console
docker images
And you should see a list with all image that you have on your computer, like this:

That’s it, we did it! Now we can start coding our app and easily deploy it or run it from everywhere where we can run Docker. I strongly suggest you to read about docker compose. It’s a tool that let you run multiples containers and all of them connected between each other :O.
In real world this is really common since we need to run a DB Server, with a FrontEnd Server and a BackEnd Server to run a full application.
You can get the files from:
https://github.com/nostick/dot-net-core
You will find a file call Dockerfile and Dockerfile1 if you want to switch between how you build your images just rename the file Dockerfile1 to Dockerfile or viceversa and run the same commands
What’s next?
Here are some useful articles to continue learning Docker and .NET Core
#asp.net #docker