The series so far:
- Creating Your First SQL Server Docker Container in macOS
- Managing SQL Server Docker containers in macOS
- Connecting to a SQL Server Docker Container Running in macOS
In the second part of this article series, you learned about the container’s nature (ephemeral) and a few details about its life cycle. More importantly, I provided you with a detailed explanation on how to use the Docker client to list and delete container images, check the container’s state filtering by name, and specific status (started | stopped). To finally close, the article explained what happens inside a container when it is ended, started, and deleted.
In this third part, you will learn about the container’s network connectivity, starting from the creation of an interactive bash shell session to remotely connect within the container and ending with an understanding of how containers interact with your local network. And finally, connecting to your SQL Server instance running an in a Docker container by using your favorite database management tool.
Connecting within a container
Before providing examples on how to connect to SQL Server to execute queries and scripts, create database objects, or start any database development, I would like to show you how to connect within the actual (Linux) container through the macOS terminal.
Getting started with docker exec
The docker exec command allows you to execute any type of shell-based commands within a running container. This command is an excellent tool for debugging, monitoring, and also to perform administrative level tasks like the creation of directories, files, and more.
Here is the docker exec syntax:
docker exec [ options ] < command >
As you can see, this command is very straightforward. As the syntax above describes, you have to pass one or more options and then just provide the container name followed with the actual command to execute within the container.
You may wonder what options to use. That’s a very fair question, and let me tell you there a few of them. You can start by taking a look at the official definition from Docker docs here, in case you want to read further. However, I will make use of a couple of them in the next section.
Creating a Bash session
Based on the explanation from the previous section. You can leverage the docker exec command to perform any kind of Linux based command inside a container, like creating a remote terminal session.
In Ubuntu’s case, the default shell is bash. However, it won’t be just a matter of passing bash as the second parameter. Remember, you still have to provide one or more options for this command to work.
In the specific case to connect to your container using an interactive bash terminal, you have to use the -i with -t options before the bash command. I know this sounds a little bit complex, but trust me, this is the right way you want to do it.
The following table explains each one of the parameters I will use for this command:
Option
Description
-i
It means you want to connect using an interactive method
-t
It means tty as any devices that act like teletype in a terminal
bash
Starts a bash session inside the container
Putting all these options and parameters together, you will execute the following instruction. In this case, SimpleTalk is my SQL Server’s name:
docker exec -it SimpleTalk “bash”

The context of your macOS terminal will switch immediately, from your localhost to the container’s interactive bash session you just created. You can also confirm, you are within the container executing the hostname command as follows:

As you can see, SimpleTalk is the string value I defined as the container hostname at the time of its creation. In case you get an alpha-numeric combination returned, do not worry; that is fine. That happens to be the actual container ID (As described in the docker ps section in the second part of this article series).
Now that you confirmed the connection works within the container, it’s time to perform more interesting like exploring all SQL Server binaries and data files.
Exploring your SQL Server container
As it occurs on any Windows installation, SQL Server on Linux uses a default location to store all its binaries, libraries, dumps, and another for the actual database files (MDF, NDF, and LDF) and error logs. There are no changes in this regard when running SQL Server on Docker. In the end, SQL Server will use the same binaries and libraries when running in a Docker container on Linux.
You can find the SQL Server binaries, libraries, and configuration files all in the /opt/mssql location, as any other regular SQL Server on Linux installation. Take a look at the folder structure for a moment:
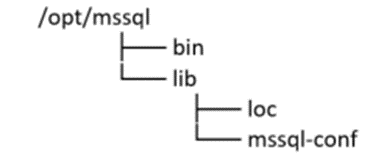
All these directories and files within are pretty much the heart and soul of SQL Server on Linux. I recommend not making any changes to the existing files in this location as any mistake there can compromise your SQL Server instance availability and operationality.
Now it is the time to get familiar with the datafile and logs location. First, get familiar with the folder structure:
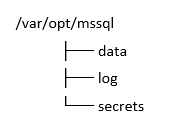
As you can see, there is a folder called data. That is the location where you will find all the system and user database files (MDF, NDF, and LDF); of course, you can change this location to a customized path as you are used to doing in Windows. However, modifying the SQL Server default data path for a container is outside the scope of this article.
Do not get confused by the log folder; this is where the error log and dump files are stored. As described before, the _data _folder holds both MDF (data) and LDF (transaction log) files.
It is time to put what you have learned into practice, starting from listing the existing database files in your container. The first thing you want to do is to navigate towards /var/opt/mssql/data as follows:
cd / var / opt / mssql / data

Now that you are positioned in the data file directory, it will be easy to list all files under this folder to identify which databases exist in this container. You can use the ls -ll command for that purpose; it will return the complete list of existing files under the current directory using the “long list format”.
Here you have the example, starting from the docker exec command:
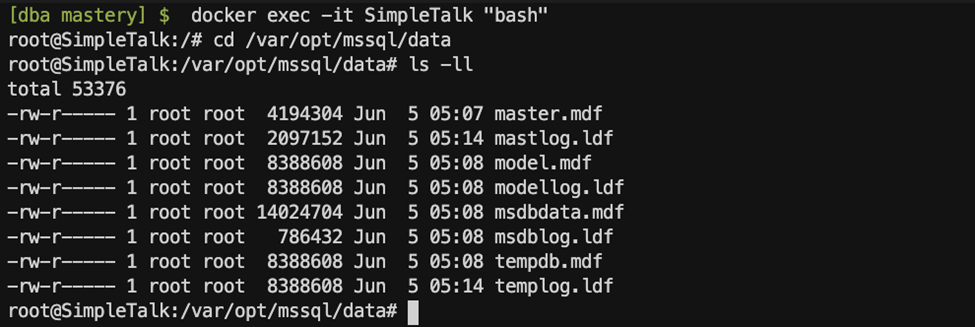
As you can see above, the long list format that includes the file type (simple file | directory), owner, group, file size, creation date, and file name. This information is pretty good; moreover, it helps you to understand better who, when, and what kind of files was created under a specific directory.
#containerization #homepage #sql tools #automation #sql