Getting the Authorization Code. Need help implementing Spring Boot and OAuth2? In this tutorial, we look at getting the authorization code grant for Spring Boot and OAuth2, implementing the Client Application and Resource
To do this, we will be implementing the Client Application and Resource Server. The flow we will be implemented as follows:
- The Resource Owner will ask the Client Application to get data from the Resource Server.
- The Resource Server asks the Resource Owner to authenticate itself and for the authorization to share data.
- After successful authentication, the Resource Server shares an authorization code with the client application
Let’s begin, shall we?
Resource Server Application
In another previous tutorial, we implemented an application with a Simple Login Page using Spring Boot Security. We will quickly create a similar project, which will authenticate and return JSON data.
We will be configuring the authorization server. The Maven project will be as follows:
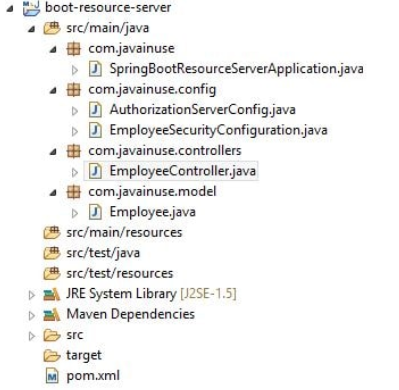
The pom.xml will add the spring-security-oauth2 dependency:
<project xmlns="http://maven.apache.org/POM/4.0.0" xmlns:xsi="http://www.w3.org/2001/XMLSchema-instance"
    xsi:schemaLocation="http://maven.apache.org/POM/4.0.0 http://maven.apache.org/xsd/maven-4.0.0.xsd">
    <modelVersion>4.0.0</modelVersion>
    <groupId>com.oauth</groupId>
    <artifactId>boot-sec</artifactId>
    <version>0.0.1-SNAPSHOT</version>
    <packaging>jar</packaging>

    <name>boot-resource-server</name>
    <description>Demo project for Spring Boot OAuth</description>

    <parent>
        <groupId>org.springframework.boot</groupId>
        <artifactId>spring-boot-starter-parent</artifactId>
        <version>1.5.2.RELEASE</version>
        <relativePath /> <!-- lookup parent from repository -->
    </parent>

    <properties>
        <project.build.sourceEncoding>UTF-8</project.build.sourceEncoding>
        <project.reporting.outputEncoding>UTF-8</project.reporting.outputEncoding>
        <java.version>1.8</java.version>
    </properties>

    <dependencies>

        <dependency>
            <groupId>org.springframework.security.oauth</groupId>
            <artifactId>spring-security-oauth2</artifactId>
        </dependency>

        <dependency>
            <groupId>org.springframework.boot</groupId>
            <artifactId>spring-boot-starter-web</artifactId>
        </dependency>

        <dependency>
            <groupId>org.springframework.boot</groupId>
            <artifactId>spring-boot-starter-security</artifactId>
        </dependency>

    </dependencies>

    <build>
        <plugins>
            <plugin>
                <groupId>org.springframework.boot</groupId>
                <artifactId>spring-boot-maven-plugin</artifactId>
            </plugin>
        </plugins>
    </build>

</project>
Next, we need to define the Spring Boot bootstrap class with the SpringBootApplication annotation.
package com.javainuse;

import org.springframework.boot.SpringApplication;
import org.springframework.boot.autoconfigure.SpringBootApplication;

@SpringBootApplication
public class SpringBootResourceServerApplication {

    public static void main(String[] args) {
        SpringApplication.run(SpringBootResourceServerApplication.class, args);
    }
}
Define the model class Employee. We will also be returning the model class as a JSON response.
package com.javainuse.model;

public class Employee {

    private String empId;
    private String empName;

    public String getEmpId() {
        return empId;
    }

    public void setEmpId(String empId) {
        this.empId = empId;
    }

    public String getEmpName() {
        return empName;
    }

    public void setEmpName(String empName) {
        this.empName = empName;
    }

    @Override
    public String toString() {
        return "Employee [empId=" + empId + ", empName=" + empName + "]";
    }

}
Define the controller that exposes a GET REST endpoint to return JSON as:
package com.javainuse.controllers;

import java.util.ArrayList;
import java.util.List;
import org.springframework.stereotype.Controller;
import org.springframework.web.bind.annotation.RequestMapping;
import org.springframework.web.bind.annotation.ResponseBody;
import com.javainuse.model.Employee;

@Controller
public class EmployeeController {

    @RequestMapping(value = "/user/getEmployeesList", produces = "application/json")
    @ResponseBody
    public List<Employee> getEmployeesList() {
        List<Employee> employees = new ArrayList<>();
        Employee emp = new Employee();
        emp.setEmpId("emp1");
        emp.setEmpName("emp1");
        employees.add(emp);
        return employees;

    }

}
Finally, we will be configuring security. In this configuration, we specify which URLs are to be intercepted and which URLs can be accessed by which users having which roles.
package com.javainuse.config;

import org.springframework.context.annotation.Configuration;
import org.springframework.security.config.annotation.authentication.builders.AuthenticationManagerBuilder;
import org.springframework.security.config.annotation.web.builders.HttpSecurity;
import org.springframework.security.config.annotation.web.builders.WebSecurity;
import org.springframework.security.config.annotation.web.configuration.EnableWebSecurity;
import org.springframework.security.config.annotation.web.configuration.WebSecurityConfigurerAdapter;

@Configuration
@EnableWebSecurity
public class EmployeeSecurityConfiguration extends WebSecurityConfigurerAdapter {

    @Override
    public void configure(WebSecurity web) throws Exception {
        web.ignoring().antMatchers("/resources/**");
    }

    @Override
    protected void configure(HttpSecurity http) throws Exception {
        http.authorizeRequests().antMatchers("/").permitAll().antMatchers("/user/getEmployeesList")
            .hasAnyRole("ADMIN").anyRequest().authenticated().and().formLogin()
            .permitAll().and().logout().permitAll();

        http.csrf().disable();
    }

    @Override
    public void configure(AuthenticationManagerBuilder authenticationMgr) throws Exception {
        authenticationMgr.inMemoryAuthentication().withUser("admin").password("admin")
            .authorities("ROLE_ADMIN");
    }
}
Next, we will configure an authorization server using the EnableAuthorizationServer annotation.
The server is customized by extending the class AuthorizationServerConfigurerAdapter, which provides empty method implementations for the interface AuthorizationServerConfigurer.
The authorization server does not secure the authorization endpoint, i.e. /oauth/authorize. The configure method here injects the Spring Security authentication manager.
Using the in-memory client service, we set up the clients that can access the server.
package com.javainuse.config;

import org.springframework.context.annotation.Configuration;
import org.springframework.security.oauth2.config.annotation.configurers.ClientDetailsServiceConfigurer;
import org.springframework.security.oauth2.config.annotation.web.configuration.AuthorizationServerConfigurerAdapter;
import org.springframework.security.oauth2.config.annotation.web.configuration.EnableAuthorizationServer;

@Configuration
@EnableAuthorizationServer
public class AuthorizationServerConfig extends AuthorizationServerConfigurerAdapter {

    @Override
    public void configure(ClientDetailsServiceConfigurer clients) throws Exception {
        clients.inMemory().withClient("javainuse").secret("secret").authorizedGrantTypes("authorization_code")
            .scopes("read").authorities("CLIENT");
    }
}
Client Application
We will create the client application. This application will ask the Resource Server we created above for JSON data.
As explained previously, we have assumed that this Client Application is already registered to the Resource Server and has received the client id as ‘javainuse’ and secret key as ‘secret.’
According to the OAuth spec, it should ask for authorization at the default URI /authorize.
We can change this default URI, according to the requirement, but we will be using the default one in this example.
Along with the default URI, we should also send the following parameters:
- The Resource Owner will ask the Client Application to get data from the Resource Server.
- The Resource Server asks the Resource Owner to authenticate itself and for the authorization to share data.
- After successful authentication, the Resource Server shares an authorization code with the client application
The above parameters should be in the “application/x-www-form-urlencoded” format. So, let’s begin the implementation.
The Maven project is as follows:

The pom.xml is as follows:
<?xml version="1.0" encoding="UTF-8"?>
<project xmlns="http://maven.apache.org/POM/4.0.0" xmlns:xsi="http://www.w3.org/2001/XMLSchema-instance"
xsi:schemaLocation="http://maven.apache.org/POM/4.0.0 http://maven.apache.org/xsd/maven-4.0.0.xsd">
<modelVersion>4.0.0</modelVersion>

<groupId>com.oauth</groupId>
<artifactId>boot-client-application</artifactId>
<version>0.0.1-SNAPSHOT</version>
<packaging>jar</packaging>

<name>boot-client-application</name>
<description>Demo project for Spring Boot</description>

<parent>
<groupId>org.springframework.boot</groupId>
<artifactId>spring-boot-starter-parent</artifactId>
<version>1.5.2.RELEASE</version>
<relativePath /> <!-- lookup parent from repository -->
</parent>

<properties>
<project.build.sourceEncoding>UTF-8</project.build.sourceEncoding>
<project.reporting.outputEncoding>UTF-8</project.reporting.outputEncoding>
<java.version>1.8</java.version>
</properties>

<dependencies>

<dependency>
<groupId>org.springframework.boot</groupId>
<artifactId>spring-boot-starter-web</artifactId>
</dependency>

<dependency>
<groupId>org.apache.tomcat.embed</groupId>
<artifactId>tomcat-embed-jasper</artifactId>
</dependency>

<dependency>
<groupId>javax.servlet</groupId>
<artifactId>jstl</artifactId>
</dependency>

</dependencies>

<build>
<plugins>
<plugin>
<groupId>org.springframework.boot</groupId>
<artifactId>spring-boot-maven-plugin</artifactId>
</plugin>
</plugins>
</build>

</project>
Now, we need to create the Controller class with the getEmployeeInfo method, which returns a page.
package com.javainuse.controllers;

import org.springframework.stereotype.Controller;
import org.springframework.web.bind.annotation.RequestMapping;
import org.springframework.web.bind.annotation.RequestMethod;
import org.springframework.web.servlet.ModelAndView;

@Controller
public class EmployeeController {

    @RequestMapping(value = "/getEmployees", method = RequestMethod.GET)
    public ModelAndView getEmployeeInfo() {
        return new ModelAndView("getEmployees");
    }
}
Next, define the following properties:
spring.mvc.view.prefix:/WEB-INF/jsp/
spring.mvc.view.suffix:.jsp

server.port:8090
Then, create the Spring Boot bootstrap class with the SpringBootApplication annotation.
package com.javainuse;

import org.springframework.boot.SpringApplication;
import org.springframework.boot.autoconfigure.SpringBootApplication;

@SpringBootApplication
public class SpringBootFormHandingApplication {

    public static void main(String[] args) {
        SpringApplication.run(SpringBootFormHandingApplication.class, args);
    }
}
Next, create the getEmployees.jsp, which we will POST a request to /authorize the form of the encoded URL format.
<%@taglib uri="http://www.springframework.org/tags/form" prefix="form"%>
<html>
<head>
<meta http-equiv="Content-Type" content="text/html; charset=ISO-8859-1">
<title>Get Employees</title>
</head>
<body>
    <h3 >Get Employee Info</h3>

    <div id="getEmployees">
        <form:form action="http://localhost:8080/oauth/authorize"
            method="post" modelAttribute="emp">
            <p>
                <label>Enter Employee Id</label>
                 <input type="text" name="response_type" value="code" />
                 <input type="text" name="client_id" value="javainuse" />
                 <input type="text" name="redirect_uri" value="http://localhost:8090/showEmployees" />
                 <input type="text" name="scope" value="read" />
                 <input type="SUBMIT" value="Get Employee info" />
        </form:form>
    </div>
</body>
</html>
Next, start the boot-resource-server and the boot-client-application. Go to localhost:8090/getEmployees. Then, click on the Get Employee Info button:

Enter the credentials as ‘admin’ and ‘admin.’

Then, authorize the Resource Owner to share the data.
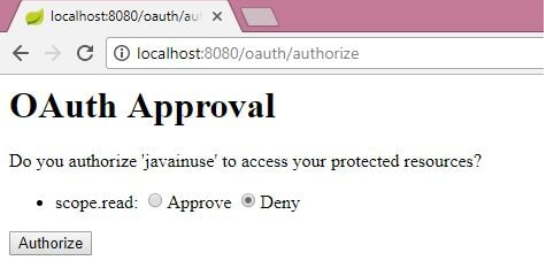
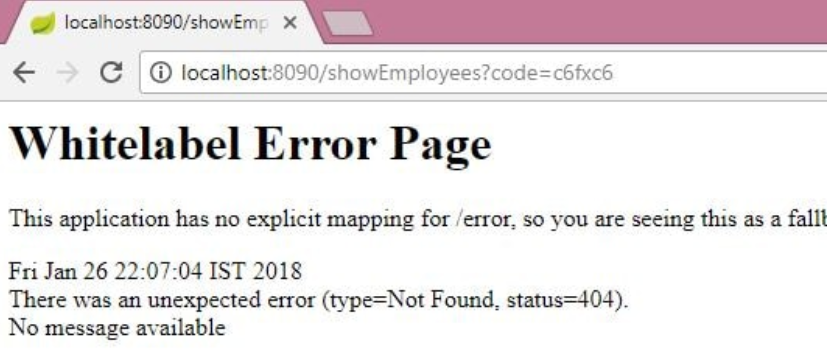
We can see that the Resource Owner shares the authorization code with the Client Application.
You can download the source code here:
- The Resource Owner will ask the Client Application to get data from the Resource Server.
- The Resource Server asks the Resource Owner to authenticate itself and for the authorization to share data.
- After successful authentication, the Resource Server shares an authorization code with the client application
#java #spring